Potaka
-
Posts
45 -
Joined
-
Last visited
Recent Profile Visitors
434 profile views


Potaka's Achievements
MCM Regular (3/6)
-
So beautiful !!!
-
You should pad on 'em. That's cool.
-
You did a great job.
-
Looks great!
-
The video is so well shot and the model is painted perfectly
-
I have to say this base is pretty nice, is it a license plate?
-
I appreciate you like it.
-
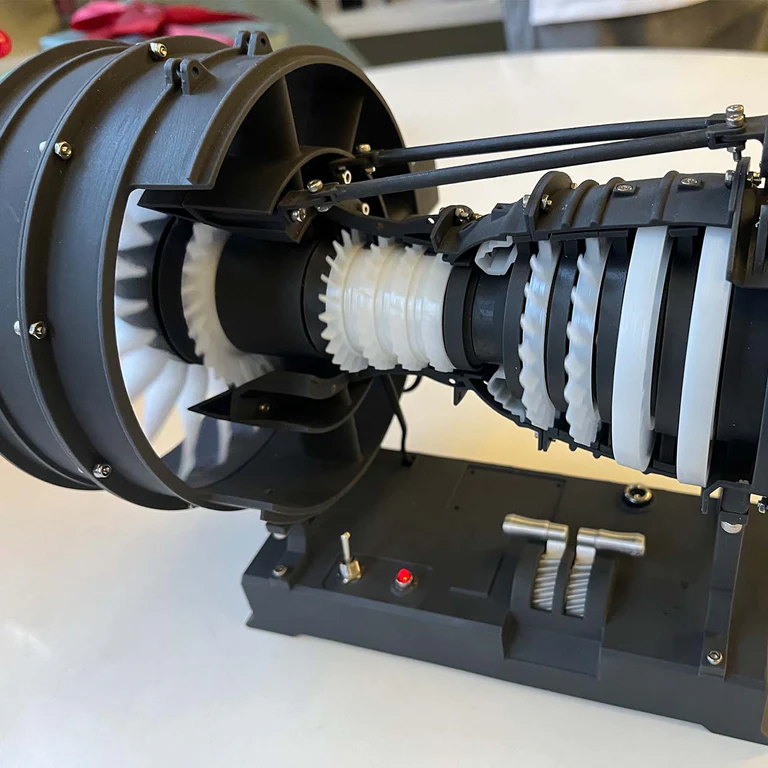
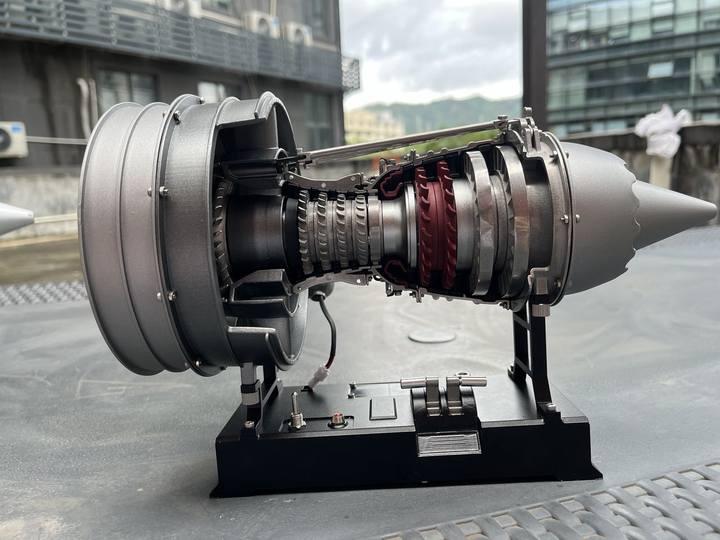
Hey everyone, I recently got my hands on two versions of the TECHING DM121 1:12 cutaway turbofan engine – one 3D printed, and one full metal. I’ve built both, played around with them a bit, and also took some photos and short clips to compare. Thought I’d share my experience and hear what you guys think – if it were you, which one would you pick? (3D printed Version) (Metal Version) The 3D printed version is really light and easy to carry around, which makes it perfect if you want to take it to a club or classroom demo. It’s also more forgiving during assembly – small misalignments are easy to fix with some sanding. It runs quietly, too, which is nice if you’re showing it off to people without scaring them with mechanical noise. There’s also lots of potential for painting or customizing it afterward, so it’s fun to experiment with. stirlingkit-dm121 plastic video-2-metal-vs-3d-printed-which-one-s-right-for-model-enthusiasts.mp4 The metal version, on the other hand, feels super solid in hand. Once it’s fully assembled, it really looks like a proper engine on your shelf. The edges are sharp, the shine under the light is beautiful, and the mechanical sound when it runs is far more immersive. Honestly, for what you get, the metal version isn’t even that expensive – I was pleasantly surprised it doesn’t cost a lot more than the 3D printed one, considering how premium it feels. It’s definitely the type of kit you’d want to keep in a collection or display long term. 启动展示.mp4 For maintenance, the printed version benefits from some sanding, primer, and paint to get a nice finish, while the metal one mostly just needs occasional wiping and a bit of lubricant on the gears or shafts. In terms of budget and purpose, the 3D printed kit is more affordable and great if you want to tinker with it or bring it to a demo, while the metal version feels like the “final form” you’d proudly put on display. Now I’m torn between the two. The metal one looks amazing on a shelf, but the 3D printed one is fun to play with and much easier to carry around. If you could only keep one, which would you go for? Do you care more about the weight and realism, or the lighter, more customizable nature of the printed kit? Also, if anyone has tips for sanding or painting the 3D printed parts, or tricks for maintaining the metal version, I’d love to hear them. And if you have any ideas on the DM121, like adding lights, custom paint jobs, or stands, please don‘t hesitate to tell me.

-
- 1
-

-
- metal parts
- plastic models
- (and 1 more)
-
Thanks. This is the first time I spent so much time assembling a model.
-
Thanks. It must be cool, it took me ten hours to assemble.
-
This is the video I took. You can hear that the sound effect is very realistic, and the overall texture is also good. ytdl.canehill.info - 【TECHING Turbofan Engine Model DM119 – Unlocking the Secrets of Aviation Engineering 】 (1080p50).mp4
-
Hey folks, I finally got my hands on the TECHING DM119 Twin-Spool Turbofan Engine model kit and spent the last few days putting it together. This thing is a real engineering marvel – over 1000+ metal parts, working fan blades, gearbox, and you can actually see the spools spin when powered up. The assembly was challenging but super satisfying, almost like working on the real thing in miniature. What impressed me most is the detail of the core engine. You can really learn how air goes through the fan, compressor, combustion, and turbine stages. For anyone into aviation models or just mechanical builds, this is one of the coolest kits I’ve ever tried. Here is the picture: Curious – has anyone here built other engine models (jet or piston)? Would love to see your projects too!
-
Well said! I think both approaches are valid — whether it’s the thrill of building or the satisfaction of curating a collection, the passion really shows. I personally enjoy the building process, but I also admire collectors who assemble a beautiful display of rare models. Do you ever find yourself tempted to build a model you initially bought just to collect? I’ve caught myself doing that more than once — a rare find that ends up on my workbench instead of the shelf!
-
Thanks for the detailed breakdown! I totally agree — building plastic kits is a very different experience from collecting diecast cars, even if both involve miniatures. I’ve always admired those Master Craftsman pieces — the level of detail and patience required is just incredible.
-
Wow, that’s quite a story! 😲 It’s amazing how some of these vintage toys like Buddy L have appreciated so much over the years. $6,500 for a 4-piece train set is insane! I love that you and your wife go antiquing together — it must be fun stumbling across hidden gems. Since you build models too, do you ever try to blend that with vintage finds, or do you keep them completely separate? I could imagine a metal Buddy L truck sitting alongside a finely detailed scale model — the contrast would be incredible.