Chuck Most
-
Posts
12,888 -
Joined
-
Last visited
Content Type
Profiles
Forums
Events
Gallery
Everything posted by Chuck Most
-
I seem to remember being told it was 1962 or 63.
-
Started this thing about 150 years ago, but finally got it done this weekend. Amazing what you can accomplish on a project when you stop letting it do little more than sit around in a box, right? Normally, I resist using Small Block Chevy engines, but I figured in this case the rest of the car made up for any lack of imagination using such a generic engine would normally carry with it. That, and I had an old Accu-Pro B&M supercharger for a 1:24 Chevy V8, and I had to use it on something, right? The Tamiya body sits on a partial NASCAR T-Bird chassis, and much of the interior was made from plastic sheet. The car is meant to be laid out on air suspension, and I added a pressure gauge and switches for that on the console. '37 Ford artillery wheels are used, with the hubcaps from an Austin FX4 taxi kit. The front bumper is from a Fujimi Rover Mini, which includes an earlier style set of bumpers and grille on the chrome sprue. Other than the plug wires touching on the scratchbuilt headers (which were a last-minute addition) I'm about as pleased as I possibly could be about the finished product. There's no room to route the wires under the headers (which I think is how it was done on stock Chevy V8's?), so maybe I'll just use some comically long plug boots.
-
This is the Revell of Germany kit, done up as a rat rod. I retained the factory engine and front-drive setup, but added a turbo charger and intercooler. The car is chopped, channeled, and severely distressed, and the interior uses a suitcase and cooler from a Johan '59 Rambler, along with a skateboard and roller blades casually tossed behind the seat. Those came from a Fujimi accessories set. The surf boards came from the Rambler as well.
-
Unusual wheel painting , old school ?
Chuck Most replied to Greg Myers's topic in General Automotive Talk (Trucks and Cars)
It's done on demolition derby cars as well- in that case it's for safety reasons. If a car flips over or or gets wedged in with another car, the first responders can easily tell if a wheel is still spinning. -
Not yet, but it's going into a car that was originally intended to be rotary powered. That's all I've got for now.
-
1955 Daihatsu CM10T
Chuck Most posted a topic in Model Trucks: Pickups, Vans, SUVs, Light Commercial
Just a box-stock buildup of the Arii 1:32 scale "Owner's Club" kit. -
1966 Suburban...
Chuck Most replied to chadrob30's topic in Model Trucks: Pickups, Vans, SUVs, Light Commercial
Nice. -
I actually finished this months ago, but I don't think I ever put up any pics of it. I bought the kit for the 13B rotary engine for another project. I decided to build the remainder of the kit as a curbside. I used wheels and tires from a third-gen RX-7 and added some larger tailpipes from an Aohsima hop-up set, but aside from that it's box stock. Well, aside from that and the lack of drivetrain detail, I guess.
-
1966 Chevrolet Suburban
Chuck Most replied to Chuck Most's topic in Model Trucks: Pickups, Vans, SUVs, Light Commercial
Like this? 1966 Chevrolet C10 by Chuck Most, on Flickr -
Resin Freightliner Coronado Available Again
Chuck Most replied to vincen47's topic in Truck Aftermarket / Resin / 3D Printed
"Modern American Conventional Truck". Choke on that, Daimler copyright lawyers. Or fitted with a dump body. A guy in my area has one of these as a dump with a lift axle and more running lights than Manhattan at Christmastime. -
This is the new Revell kit- if you're familiar with the '64, '65, and/or '66 C10 pickups, let's just say you'll be in familiar territory. I only encountered two problems with the project, and both were entirely my fault... you'll see the first but not the second. The first was, while I found and fixed the mold seams on the body at the cowl, I missed the ones on the rear pillars until after I'd painted the body... I saw the driver's side one as I was applying the dry transfer lettering. I'll know better next time. Maybe. The second was that I misplaced some of the engine parts during detailing. So, I'll be raiding some replacements from a '65 kit I have laying around, or possibly transplant the straight six from an AMT '60 Chevy pickup. My only real gripe is that low-hanging spare, but I think if you cut out the crossmember it attaches to and modified things a bit so it would tuck up just a little higher into the chassis, that wouldn't be a problem. And yes, the wheel for the spare is still a five-lug piece. Other than some dechroming, blacking out the whitewall inserts, and adding the dry transfer lettering, it's box stock. A 9-passenger Suburban would have been better suited for a mini school bus, but add a third seat and simulate the "slider" posts on the rearmost quarter windows and it would be a fairly easy conversion.
-
Thanks guys. I'd have about 20 more of these kits if they weren't so hard to find.
-
This started with a glue-bomb AMT annual back in 2014 or so. A chassis from an AMT Pro Street Nova had the front suspension and rear axle from an AMT '67 Mustang added, and was set up on wheels and tires from a Revell Willys street rod. The engine is a 351 Windsor fitted with twin McCullough superchargers from the Barris Surf Woody kit, I think I used Testors Star Spangled blue for the body color. Rear 1/4 windows were cut from clear plastic sheet.
-
I haven't built a full-blown, cartoony rat rod in quite a while, and I've always wanted to do an "updated" version of the '53 I built in 2010, so... once again, I rounded up some incomplete parts-donor kits, some scratchbuilding materials, and some mind-altering substances, and came up with this...

-
I would say "This is going to be good", but it already is pretty good. Loadstars are badly needed in scale!
-
This started out with the Moebius '72 Sport Custom F100. I used the front axle, springs, and swing arms from the AMT '78 F350, along with that kit's divorced transfer case. I used the wheels and tires from Revell's Build and Play Jeep Wrangler, in hindsight I wish I'd at least upgraded the wheels. The engine is the big block (backed by the C6 auto) from the '71 kit... in fact, I just switched engines with this and the '71 I posted earlier. The engine uses old machined aluminum valve covers from Arrowhead. It was also adorned with a prewired distributor from MAD. I upgraded the truck from a Sport Custom to a Ranger XLT using side spears (cut down for the bed sides obviously), tailgate, and decals from the '71. I also pirated some bed rails from the Revell '77 GMC. But, other than that? Totally box stock. I may lift it just a tad more, and foil the bead locks... or maybe try out one of those Molotov chrome pens on them. Other than that, I'm actually pretty happy with how this one came out. That's a pretty rare outcome for my projects anymore.
-
This is a crusty build up of the F100 by Moebius. I used some wide whitewalls from one of the Hornet kits, sagged the rear suspension, and added a tube grille and roll pan with '65-'66 Mustang taillights. The small block from the '72 kit was used, and treated to an EFI swap... I think the intake is from the Revell Deuce 5-window. The home-built camper top was made from various scraps of plastic.
-
This is a '69 F100 kit I bought for parts, set up on a spare AMT '78 frame. It's built to resemble a weird old wrecker I remember seeing as a kid- a regular cab short bed pickup set up on a crew cab chassis, with a semi sleeper stuck between the cab and bed. I used a Mercury from one of the AMT White/DR kits. The wrecker boom is from the MPC Datsun monster truck, built mostly box stock. The rear bumper was made from diamond-plate pattern plastic, and I used a rear step bumper on the front after seeing an old pickup in a junkyard with a similar setup. I think the hitch on it came from the '84 GMC kit.
-
I never did, I'd just recommend watching one of Dr. Cranky's tutorials on YouTube. He explains it better than I can, and what I'm doing pretty much isn't any different from what he does. He just does it better.
-
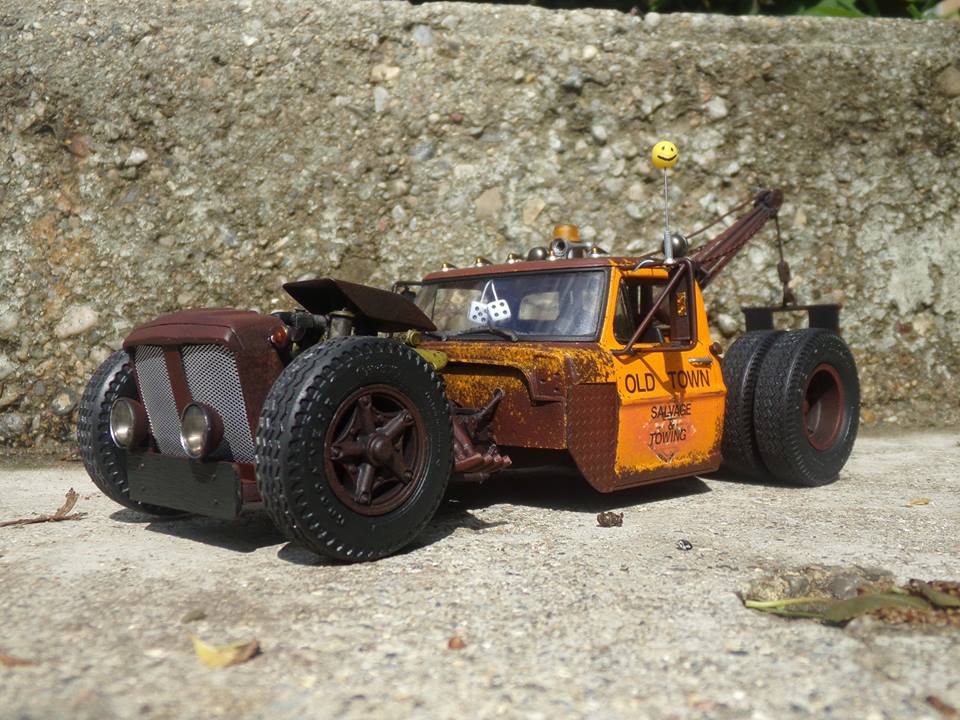
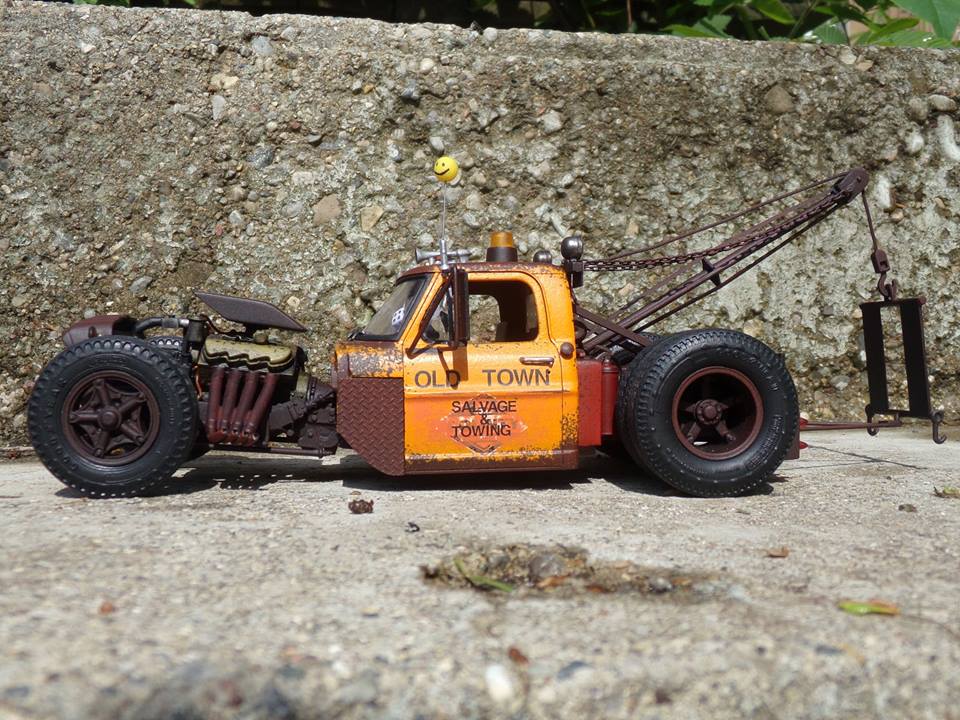
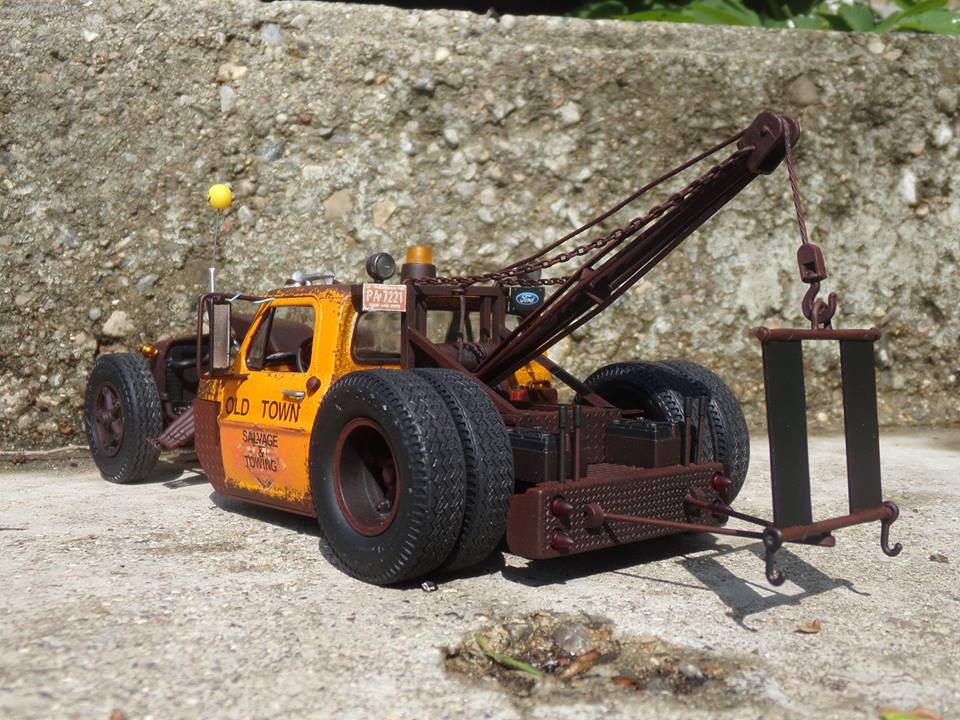
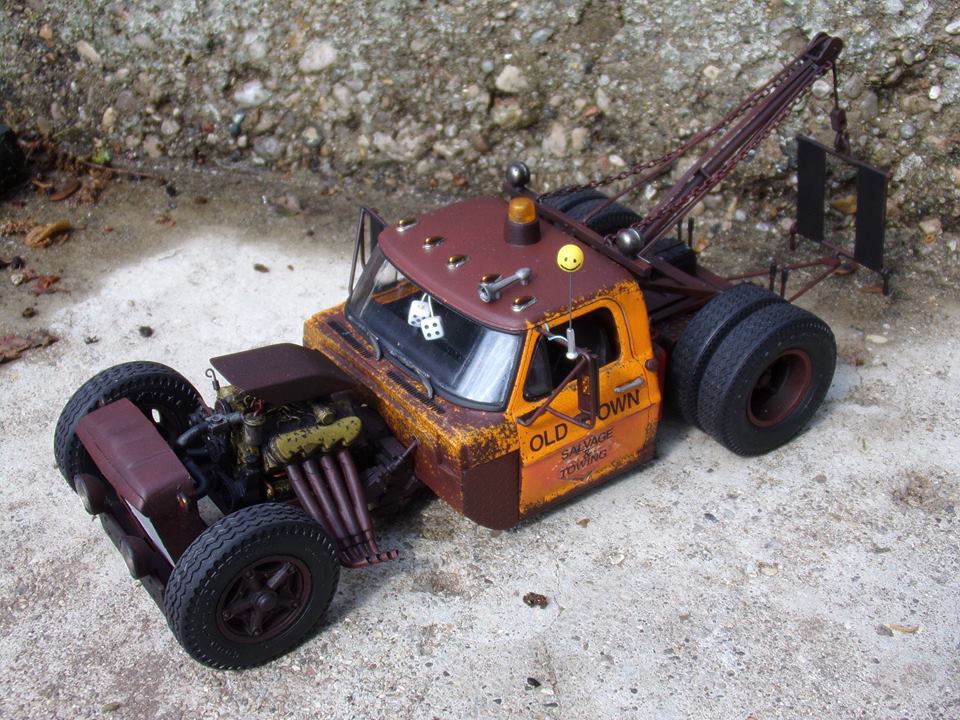
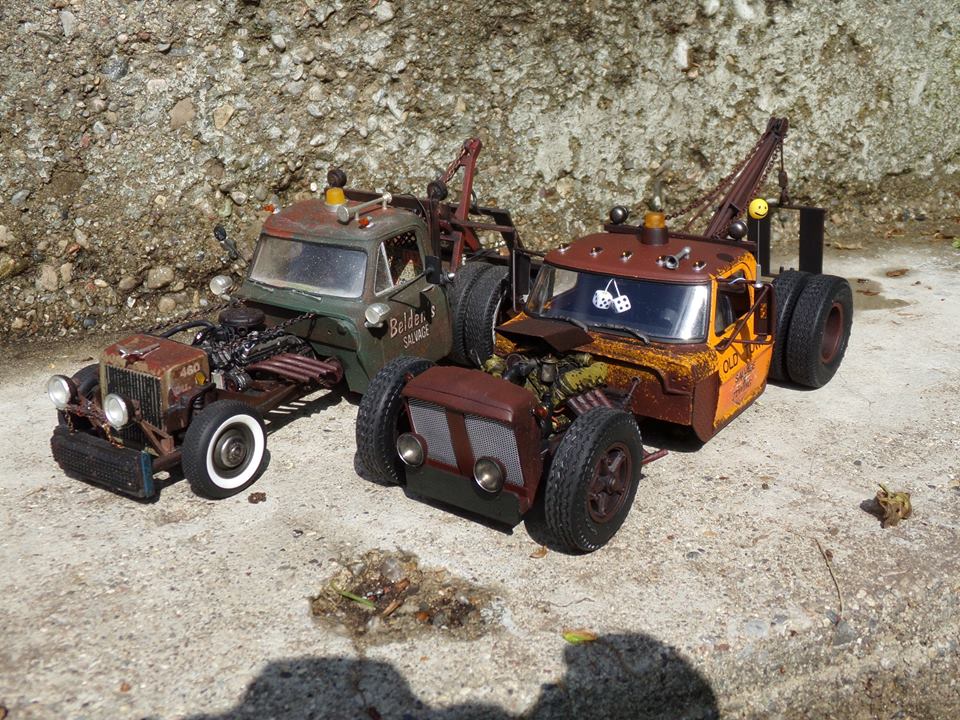
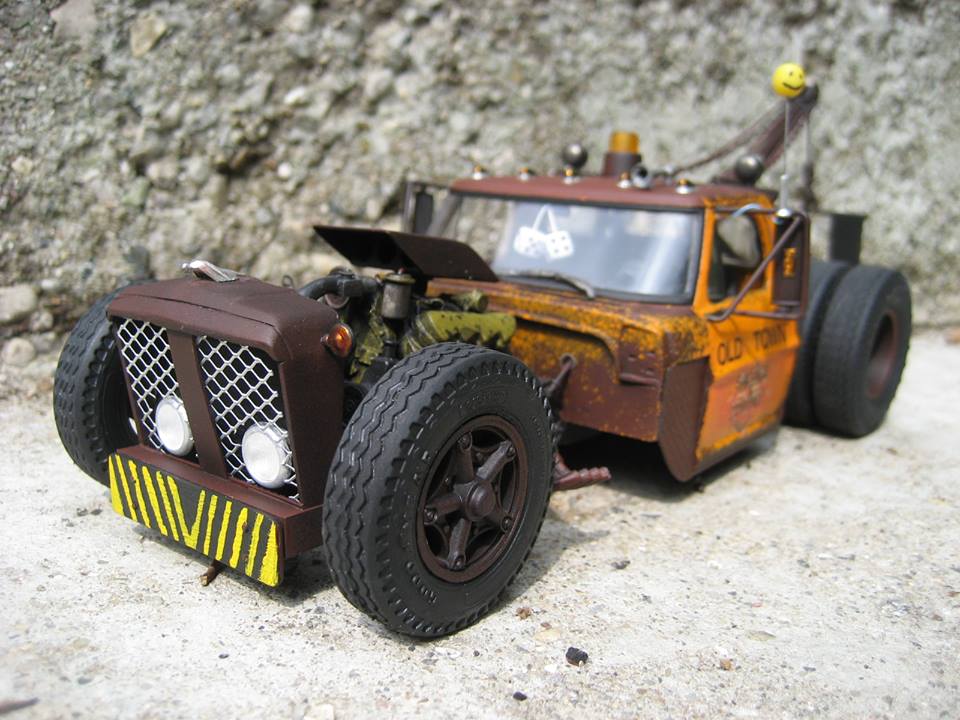
I know some of you have seen the first two versions of this, but I built this seven long years ago, so I'll post the original pics too because we've gotten quite few new people during that time, and it might be a refresher for people who liked the model the first time around. Please, don't ask me where I got these parts, I don't remember at this point. The model was basically just a fun way of getting rid of cast-off spare parts. Here's the completed model, as it appeared in the summer of 2010... About a year later, after a little "transport damage" had happened, and after I'd gotten a little bored, I did this... I replaced the front wheels and tires, as well as the air cleaner. I also made up a sling for the wrecker boom. After all of that, some wide whites were spray-bombed onto the rear tires, so that they'd kinda/sorta match the new fronts. And that's where the model stood until last weekend, when it underwent a few other changes, and a general cleanup. This time around, I added some cab clearance lights, as well as some front turn signals from an AMT Ford L-Series. I replaced the air cleaner yet again... I think I nabbed it from the Moebius Comet. Finally, I swapped the headers side-for-side so they'd face down instead of up. And after seven years of faithful service, the rag gas cap was replaced with an actual gas cap. A fresh coat of Testors dull clear was then slathered over the entire mess. I guess some projects are never really done.
-
This is the American Industrial Truck Models conversion kit, installed on a frame that's a hodge-podge of leftover Transtar and Fleetstar parts.
-
Looks great! I'd definitely be interested in the set once it's ready.
-
Is it the green twin turbo one? But, to answer your question- I don't think anyone is casting one anymore. Tom Coolidge of Promolite 2000 did a couple of them- a four door and a Fury Hardtop. I think Modelhaus did one as well. Neither one is in production currently, Tom is having health issues and Modelhaus is closed, but there are '61 Plymouth kits out there.
-
Jeep J10 Gladiator
Chuck Most replied to landman's topic in General Automotive Talk (Trucks and Cars)
Would be cool if Revell did a Gladiator-era J-Truck as a new tool kit. You could have the old Jeep pickup and *maybe* not as many "proportional eccentricities" going on with the body, like the 1980-vintage kit. -
Really nice! Was Shirley just a common woman's name back then, or did destiny itself dictate that two of the best known early female drag racers were both named Shirley?