

Ryan S.
-
Posts
922 -
Joined
-
Last visited
Content Type
Profiles
Forums
Events
Gallery
Everything posted by Ryan S.
-
real from me as well
-
Nice job on the conversion. I don't know that I've seen many of the shoebox Pontiac's but I did an image search and I've gotta say that I almost like them better than their better known Chevy cousins. Yours looks spot on. Sweet!
-
Yup, that came out very nice. Great color combo.
-
This is just sweet. I love everything about it but those surf boards are fantastic. Excellent work. I'd take up surfing just to cruise this thing to the beach.
-
Thanks for all the nice replies everyone. Unfortunately the weather has been pretty cold and wet here and is going to continue as so, so I can't spray the rest of the interior or anything else for that matter. So no update for now, but hopefully I'll get some time in this weekend. Thanks again for following along!
-
Just a little weekend update. Got some more painting done and the chassis assembly has begun. If it wasn't raining and super windy here today I would wrap up the interior and try and get this one close to finished. Looks like I'm going to have to wait a little longer... Thanks everyone for the kind comments. This one has been a lot of fun so far. Thanks for looking
-
This is coming along nicely. I'm really liking that color. This is a fantastic kit for sure. Lot's of extra parts. I've got one I've just barely started on myself.
-
Great project you've got going. I'll be watching for sure. I like the idea of the hubless wheels too. They go with the futuristic concept much better.
-
Yeah, mine to. Let's see some more! It's looking good so far!
-
Cool truck. I dig how low it is. Where are the rims from? I really like 'em.
-
This is just so sweet. I can't really add anything more than what's been said, just WOW.
-
That's one great looking Merc. I like the original 49 grill over the Desoto grill; it really matched the ribs in the bumpers.
-
Holy man that thing is gorgeous. The paint is amazing and I can only say you did your inspiration justice. Perfect, just perfect.
-
I'm loving where both of these are headed. Keep 'em up!
-
Thanks for the kind words guys, here's a little more for ya Got the dash done: Worked with some aluminum tube to make the over-engine bracing. 3 bars, 2 spaces...32 and another side shot, mock up for good measure.
-
So here's what I did to make some new coil-over shocks for the rear. I just measured out some different lengths of aluminum tubing and then assembled them as so: I took some blue wire and wrapped it around a length of tube for a while to allow it to retain its shape. Then cut it to length and slipped it between the two ends of the shocks. All I've got to do now is make some attachments for the ends, and install when ready.
-
Just thinking out loud here, but if it's going to be a single seater, why not pick a seat that you'll use, then base the narrowing around that? If you go for full detail, an inline 6 or 4-banger could work, being narrow enough. A motor and a seat choice could dictate the rest of the dimensions. How about taking the stovebolt-6 from the Revell 41 Chevy pickup and attaching a Potvin style, front mounted blower? Just a thought...
-
Custom Model T idea
Ryan S. replied to sjordan2's topic in General Automotive Talk (Trucks and Cars)
Looks like it belongs in Willy Wonka's factory...the 70's version. -
Here's a couple of more shots of where I'm at now. Done some more to the motor, got the two tone done on the grill, but not cleared. Up next, I'm going to scratch up some coil over shocks for the rear end. Thanks for looking and following along!
-
Here's where I started to get creative and do some scratch building. I didn't like the look of the air bag looking things on the rear axle so I decided to fab up some more realistic looking air bags. Here's how I did it. First I went looking around for something that had the general shape of airbags that I was going for. I had a bag of old beads from a necklace that I had that had broken. Looking through them I found some silver metal beads with the right shape. I cut off the unwanted part of the rear axl and sanded down the mounting points. I found 2 wheel retainer pins from another kit and grabbed some heat-shrink tubing. The beads fit perfectly on the pins. Then I cut some of the shrink to a length about twice as long as the pins. I slid the shrink over the beads on the pin and lined up the end of the tube with the top of the pin. After heating carefully with a lighter, the shrink snugged up over the beads and right around the top of the pin. I then cut off the excess shrink tubing, drilled a hole in the rear end to fit the pin down into, counter sunk the top of the mount to fit the contours of the round bead then attached with a drop of superglue and voila, air bag suspension on the cheap! Here's what it looks like under the car, sorry it's not the best picture.
-
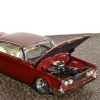
So I've wanted to build a 32 for quite some time, and I finally got around to working on one. This is Revell's 32 5 window. Here's where I started with the mock up. I'm using the "Hella" big and littles from Pegasus for wheels/tires and I grabbed one of the 390's out of the 60 Starliner kit for motor-vation. After getting some work done on the motor and the first coat of paint on the grill shell. Going with a Diamond dust and Silver Blue two tone paint scheme. More to come. Thanks for taking a look.
-
Went with real.
-
Gorgeous. I love the 62's with the bubble top. You knocked this one out of the park.
-
I can't really add anything as it's all been said, but for your second model you did a heck of a job. Looks real good. Nice and clean. Keep it up. Each one is a learning experience. Cheers.
-
I don't know what it is, but you've got is sitting backwards in there... Looks like a cool start!