David G.
-
Posts
11,310 -
Joined
-
Last visited
Content Type
Profiles
Forums
Events
Gallery
Everything posted by David G.
-
Specific answer to the random question: The body, chassis and "chrome" trim were masked and sprayed with rattle cans, as was the bright red on the interior. The darker "cloth" insets on the seats were brush painted along with the flat white on the headliner. Cheers, David G.
-
You can absolutely build something cool. This hobby is a balance of what we want to accomplish and what we can accomplish. Just plan out what you want to do and take your time working through it, and you'll come up with something cool. Also, realize that each kit you build is really only practice for the next one. Don't be afraid to admit there's something you don't know how to do yet. Most of the folks in this community are very happy to help with any tips or information, and love to share their knowledge. Most of us (at least I) have more respect for someone who can admit a weakness and ask for help, than someone who pretends to know everything! Keep up the good work, we need more young folks like you in this hobby! David G.
-
Wow! Is that over the top, or what? Looks great!
-

Where's my mailbox??????????
David G. replied to impcon's topic in Model Building Questions and Answers
No wonder you can't find it, you're looking in the wrong place! -
Harry, Thanks, I appreciate your optimism. I've tried foil before, that's why I tried to make the paint work. I have some Model Master foil that I'm told may be a major contributor to my difficulties. I looked into ordering some BMF online, at about $6.00, the price isn't bad but the shipping is a killer. It was like $7.50 through the BMF site! I mean jeez just put the stuff in an envelope with a piece of card stock! Consequently, I've been trying to assemble a list of tools and such for an order with Micro Mark, so hopefully, soon. Thanks again, David G.
-
Thanks Bill. I have a lot or respect for you skills and your compliment means a lot to me! David G.
-
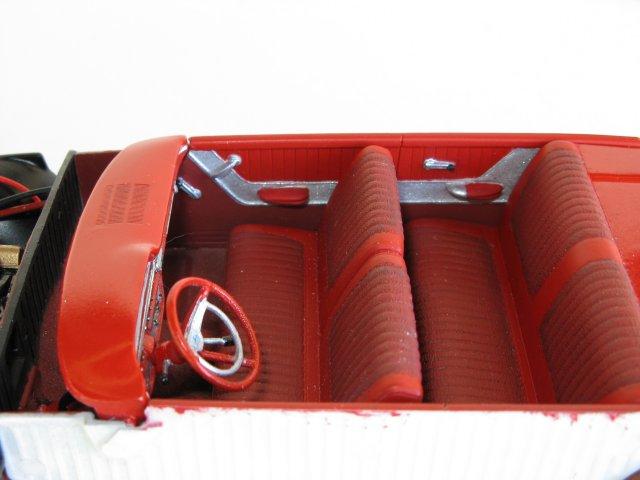
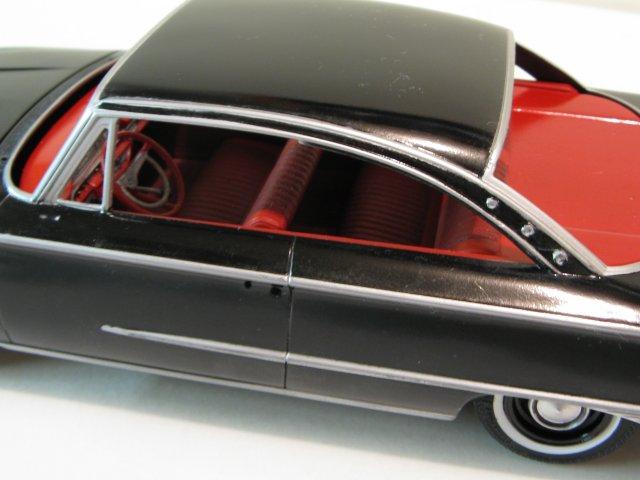
Thanks, it's one of my favorites too. After masking the seats "cloth" inset areas I sprayed everything with Tamiya TS-49 Bright Red. After removing the masks, I painted the cloth areas with Poly Scale Acrylic Soo Line Red, darkened with about 25% Poly Scale Acrylic Engine Black. After it all dried, I sprayed the seats with dull coat then used a thin black wash on the cloth insets, another dull coat then I very lightly dry brushed some flat white on the cloth bits to highlight the texture. Thanks Again, David G.
-
I love the hood on this one! I don't recall having seen one like it before.
-
It looks like you picked a fun build to bring you back into the hobby. What you've got done to this point looks great. Also, I think many of spend time and effort on details that won't be seen or appreciated once the kit is built, but we know they're there!
-
Smooooth and deadly! I noticed it's on a contest table. Did you get any recognition for your efforts?
-
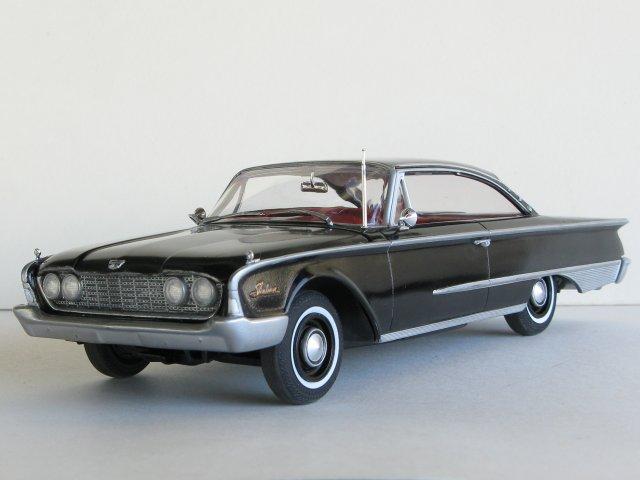
Thanks for the compliment. The paint is Tamiya TS-14 gloss black, two coats- color sanded, buffed out, clear coated with Tamiya TS-13 clear, then polished with Meguiar's Cleaner Wax. -D-
-
Thanks for the tip, that'll save me some time and aggravation. I guess I'll just have to break down and get better with the foil. -D-
-
Yep, right above the last photo... "Next time, Alclad." I've done a bit of foil work with some other cars that have less chrome trim, and I still need more practice. I'm not going to try to practice on a car with this much trim, I'll go postal and never finish it. Thanks for the input, I really do appreciate honest evaluations. David G.
-
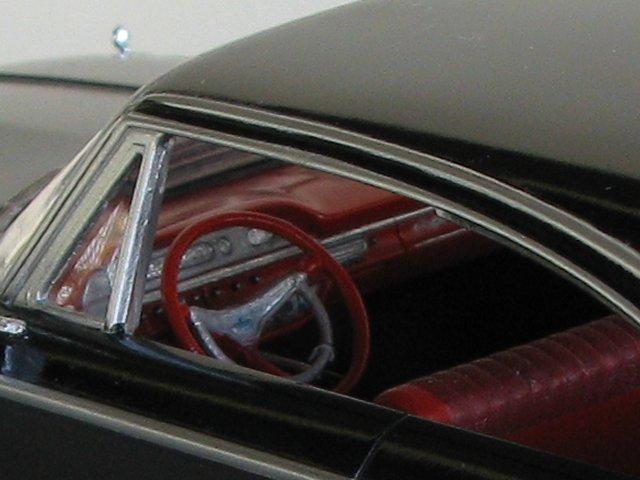
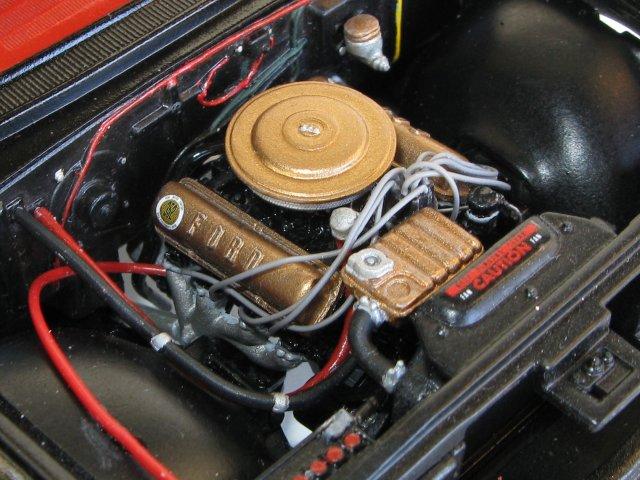
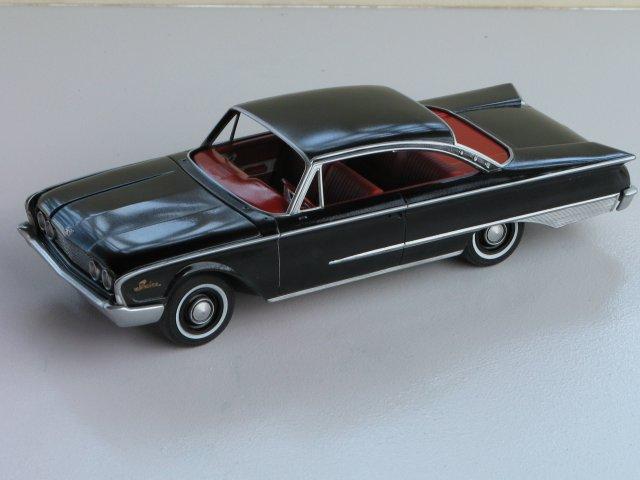
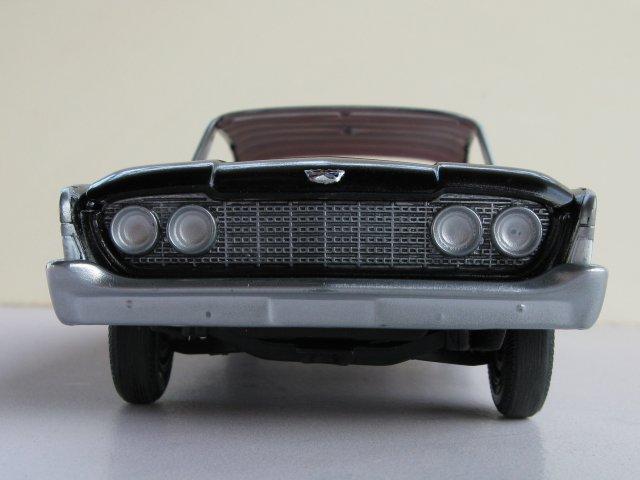
This weekend I finished the AMT Starliner I've been working on for the past couple of months. A quick shot engine showing the plug wires and fuel line that I added. The red interior. The floor is flocked, though it can't be seen here, or in the assembled model! Finished engine with battery cables... another first for me! Batmobile Fins! Also my first successful black paint job. Interior detail also showing the chrome trim that I decided to mask and spray on with Testors Aluminum Metalizer paint. I still have difficulty getting foil to work to my satisfaction. The Metalizer looked good until I clear coated it. I never did get that buffed-up sheen back. Next time, Alclad! As always, please feel free to offer any tips, comments or critiques. I do value honest opinions, it's the best way to improve my skills. Thanks for taking the time to look. David G.

-
Unique vechicle?
David G. replied to Greg Cullinan's topic in General Automotive Talk (Trucks and Cars)
That's cool! All we need now, is somebody to start molding fiberglass bodies for golf carts based on those old pedal cars! -
What an excellent idea. I had that game on Dreamcast and not only was it better that the Nintendo port, I think it looked better than the arcade version that inspired it. I have an old glue bomb '59 Caddy convertable that I've been trying to figure out what to do with. I'll have to put this idea in as one of the possibilities. From what I've seen so far, you've got a good start on the project. I'm interested to see what you do with it.
-
Thanks for the photos, they're cool. I don't have a particular use for them at the moment, but images like this tend to get filed away in my mental archive for later use. They usually end up in the "I seem to recall..." file. With the new frame and other patching and re-fab, it doesn't look like there is much of the original vehicle left.
-
AMT's 1960 Ford Starliner. (Photos Restored)
David G. replied to David G.'s topic in WIP: Model Cars
Thanks for the tips. I think I just might tap some silver Testors on the grille surround and hood trim, the foil would be too bright compared to the rest of the "chrome." Besides, that foil drives me nuts! After seeing the pics pre-edit, I've found some other areas that need some attention too. I just have to adjust the resolution on my camera. It shows me too many errors that my eyes don't catch until it's too late. I need to set the resolution so it macthes what my eyes see! Thanks again for the input, David G. -
AMT's 1960 Ford Starliner. (Photos Restored)
David G. replied to David G.'s topic in WIP: Model Cars
Welcome to the next update. I managed to get the paint work mostly finished. I found the thought of applying all that foil rather intimidating, so I bought some Testors Aluminum Metalizer paint and started masking and spraying. The results are shown below. These cars had a lot of chrome trim. The whole car is pretty much outlined in chrome. Using Testors Metalizer Aluminum from a spray can, I had to mask and shoot this in three stages. I think it was a bit easier than using foil, but the results are somewhat less than impressive. As a paint job, it came out well enough, but it looks more like a good paint job than chrome trim. I think If I try to go this route again, I'll try Alclad chrome paint. The grille and bumpers buffed up nicely and looked great until I put clear coat on them. Hopefully, I can buff them back up to the sheen they had before. It's just about ready for final assembly. I hope to finish it up this weekend. As always, honest critiques and comments are welcome! Thanks for hanging in there with me David G.
-
Excellent replica! Some of the photos almost look like a Photoshop trick!
-
Drive your Chevrolet to the levee...
David G. replied to sjordan2's topic in General Automotive Talk (Trucks and Cars)
Well, I'm glad the company's not trying to charge us each time we say "Chevrolet" or "Chevy". Though, if there was some reasonable way to do it, they would. -
Very impressive build!
-
Aussie Aussie Aussie....
David G. replied to Fuel Injected's topic in General Automotive Talk (Trucks and Cars)
I think currently, kits are difficult to find anywhere. Here in the States, Toys R Us no longer stocks model car kits at all. The only place I can find a kit is at the old LHS and their selection is a bit limited. When I was a child back in the '70s, car kits were everywhere, even local drug stores carried them. But that's the way it goes, thak a few decades off to raise a family, and whammo! the whole world changes. But that makes finding that desired kit that much more rewarding. -
I won't be building models for a while
David G. replied to tuffone20's topic in General Automotive Talk (Trucks and Cars)
Congratulations! Exciting times ahead for you with your new house. Good luck on the job search. -
Awsome! It's hard to believe there's a Caddy in there somewhere.