Cato
-
Posts
2,674 -
Joined
-
Last visited
Content Type
Profiles
Forums
Events
Gallery
Everything posted by Cato
-
See my reply in your thread.
-
You don't have to Bo. Get another even coat of primer on it. Then spray a 'barrier' coat of Future acrylic on and let dry thoroughly. Then another even coat of primer, sanded lightly. You don't need heavy coats of primer.
-
 Epoxy.
 -
POCHER F70 FIAT UPDATE 1/14 ALMOST Done
Cato replied to crb1024's topic in WIP: Other Racing: Road Racing, Land Speed Racers
Great idea and tip. Read the whole thread. Hate to nitpic a perfect model and glad it's just the way it photographs. Yes, I know from mine that photos bring out surprising and somewhat untrue finishes. Bet yours looks a treat in person. Get a nice case for it... -
POCHER F70 FIAT UPDATE 1/14 ALMOST Done
Cato replied to crb1024's topic in WIP: Other Racing: Road Racing, Land Speed Racers
Beautiful details, meticulous assembly Randy. The Alclad brass is outstanding. Did you buff the finish when dry or is that right out of the gun? Amazing reflective quality. A tiny nit; I might tone-down the VERY bright white spring wraps. They might be a light tan or khaki from the grease within. Unless your building a concours restored car. -
You guys are absolutely the best medicine. Sincere thanks for your encouragement and support. My Rolls is also good medicine because having to plan and concentrate on it takes mind off the bad stuff. Unfortunately the bad stuff will continue a while longer. More doc and hospital visits in the cards. I've learned that this is not a one-shot fix situation. So I have to lay off the more complex stuff, like the inner door supports for the windows and latch bolt system. To be covered by the pretty stuff, assembled nearly a year ago. The door outer skins are covered with soft foam so as not to scuff the prepared surfaces. I was just up to that after much planning, but med stuff caused a speed bump yesterday. Hope to work on less taxing stuff like seats, carpets and building up of the cabin floor. I'm amazed so many of you continue to follow at this snails pace I'm working. Harry would have had it idling in the driveway by now. He is good AND fast - something I haven't mastered.
-
Resolving problems / making better progress... Seen here in an earlier view, the door is hung and alignment of all the elements is very good. Harder to see is that the front upper edge (where the latch will engage the cowl, has the door slightly ajar. This is due to the fact that the Sedanca cowl pinches inward quite a bit from the rear main body: After considerable hot water bending the door now meets the cowl perfectly at this area and will latch with no tension. The other door is seen with a clip to hold it closed - needs the heat treatment too. The door handles are fragile and would not last long otherwise. Note that the heat treatment has not loosened or damaged the beltline or sweep cladding: The cowl and windshield frame are now perfected and sanded to 600. The rocker panel will come shortly: If anyone doubts the effectiveness of the previously shown guide coating process, here is the proof. The main cabin area has been finished with the final prime coat after the low spots were filled by the process. It is flat and sanded to 600. Continuing work on the body will be done using thin soft foam as protection for the skin. A lot of work - yes - but for me the only way to concours paint using lacquer on large areas: Moving ahead, attention to the doors is next. Here, their edges have been shimmed with strip stock and blended to fit the openings. Paint clearance will further slim the gaps for a smooth look. The window frames and latch are next to be mounted and fiddled with: The near finished door skins. These will also get guide coats for priming but are smaller and stiffer than the main body area was so are mostly already very flat. These are sanded to 400 right now; they will be primed in gray upper (under the dark red) and white lower as discussed below: An important and exciting (for me) test of the color for the body sweep. Three spoons are tested. One has the regular gray primer, the second has no primer (the raw spoon is white plastic) and the third has white primer. All are shot with two coats of color (called Krylon Sweet Cream) and two coats of clear. Note that the first is a weak, diluted color because of the gray base, The second is a truer color but note that it's a dull finish. This is because the lacquer is too hot for the raw plastic and etches the surface. The last is the solution; white primer / color / clear. A hard high gloss. Final polishing will improve it further. All are shown resting on the unpolished but cleared trunk lid. Take the time to test your ideas to avoid disappointments. The two colors are just what I hoped they'd be.
-
Careful Bo. Looks like a fracture in the plastic where the rear fender meets body at the corner of the door.
-
Small progress... Bondo and primer for a smooth area under the 'screen and on the cowl sides which meet the side cladding: No gaps and a light press fit: The third application of primer and guide on the rear quarters drying tonight for sanding tomorrow. Should be as good as I can get it then.
-
Here's why... Here's my method to get really flat paint. It's a messy, time-consuming process. But to me, worth it. The primer (Duplicolor Perfect Match) and guide coat (any flat black) seen above is now being wet sanded to reveal the low spots. I set up near a sink filled with dish soap (a couple drops) and warm water. I soak 400 grit in that with a foam sanding block. I make these blocks from dense garage foam floor tiles, cut to the shapes I need to get into all tight places. This one is is narrow to fit into the space at the rear just above the wheel arch. I spray water onto the body surface and sand, frequently resoaking the paper to clean it. Working carefully with medium pressure, you can see the black remains in the low spots. These spots are too shallow for putty so they require the build up of primer. Blow off any water in nooks and crannies with shop air and wipe the dry area of work with isopropyl before re-priming. When the black stops coming off, that's where you've cut enough primer to flatten quite a bit of the surface. The next step is a repeat of this process with 2 fairly good coats of prime (to fill those low spots as much as possible) and a spritz of flat black to find the remaining shallow areas. When all is well a final light coat of prime will be shot overall and sanded with 600 for the first color coats. So if you want concours paint on large surfaces this method works well for me. Just don't expect overnight results...
-
Thanks guys. I hope a little sanding today.
-
POCHER F70 FIAT UPDATE 1/14 ALMOST Done
Cato replied to crb1024's topic in WIP: Other Racing: Road Racing, Land Speed Racers
Beautiful work Randy. Great work on the chain, hood and all the great details that make these mechanical contraptions. I use 00-90 countersunks on my door hinges and they save the day. -
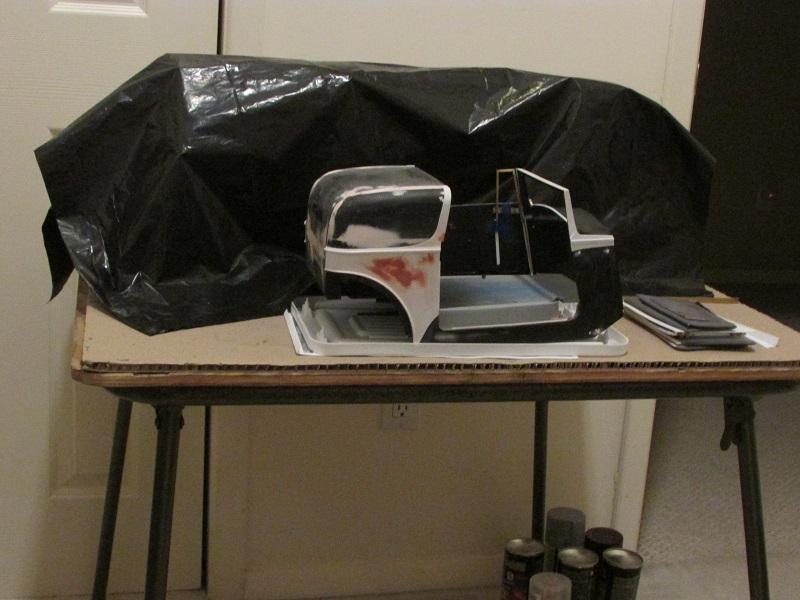
A little rehab... Slowly over the last couple of days I got back to doing small things. Boy it feels great when working but I pay a price after... I started slowly with a masking project on the rear body work. No rush, so I took a day for that. As the temps warmed to the 50F, I shot two build primer coats and one mist guide coat in black then an overnight dry. This in an effort to perfect the sweep panels and get them flat. The roof will remain masked so that the fabric covering bonds to raw plastic and not paint. That's quite a way off. Sanding tomorrow to get flat and find any low spots. Getting crazy, I tackled a nit pick job of perfecting the windshield opening to match the brass frame. I cut thin strips of .030, .020 and .005 styrene to build the curvature at the bottom center. A little sanding and back and forth fittings blends them into a gradual curve. The frame is a now a press fit snug but when painted, I will relieve the paint build-up and make it a light press fit. A smear of Bondo may be needed across the front edge - will see when I get some primer on that area. Sure feels good to get back to the bench...
-
1:12 Tamiya WR1
Cato replied to Belugawrx's topic in WIP: Other Racing: Road Racing, Land Speed Racers
You are nailing this thing Bruce. Could not be better. -
1:12 Tamiya WR1
Cato replied to Belugawrx's topic in WIP: Other Racing: Road Racing, Land Speed Racers
I'm trying to battle my way back to the bench but recovery is slow and I've a bit more 'bodywork' to be done on myself before I can do meaningful things on the Roller. But planning never stops... -
1:12 Tamiya WR1
Cato replied to Belugawrx's topic in WIP: Other Racing: Road Racing, Land Speed Racers
Yikes! You could have a pretty nice Pocher for that outlay! Bruce, your reference is ironclad. It's obvious the '70's pattern was changed when my vintage rain tires were molded. The color is perfect as I knew it also. Surprised 'your' pattern has no overspray. They look hand painted. Goodyear G-7 slicks were also heavily oversprayed. Carry on your great build. -
1:12 Tamiya WR1
Cato replied to Belugawrx's topic in WIP: Other Racing: Road Racing, Land Speed Racers
Bruce, too long between updates on this great build! Looking back, I saw a tiny missing detail if you care to add it. It's easy. You have a perfect track finish on the tires. However, the letters were sprayed on by Goodyear and never very neatly. There are vertical breaks in the O's, D,A and R where the stencils are affixed for spraying. Here are mine, direct from the distributor. Scuffs and all, that's how they leave the factory. They also turn tan color with a few heat cycles: Here after a bit of clean-up by me: And finally how I did my Trumpeter track rat GT: Please continue to update us. -
POCHER F70 FIAT UPDATE 1/14 ALMOST Done
Cato replied to crb1024's topic in WIP: Other Racing: Road Racing, Land Speed Racers
Either Scale Hardware or Walthers has what you need Ron. I use both. Randy your Fiat is very well done and welcomed here. There's a small band of we Pocher Crazies and a wealth of experience. Love the subdued paint - perfect for the old timey look. The chain, detailing and patience are excellent. In all a great start and looking forward to a great build. -
SHELBY COBRA restomod >real alu dash>high gloss paint
Cato replied to crazyrichard's topic in WIP: Model Cars
Sadly no Richard, quite a while ago. But try the gallery at the Kirkham Motorsports site because the car was a Kirkham. -
Looks lovely and scale-like. Use small dots of gel CA on the mating areas at the perimeter. . DO NOT glue solid all the way around - just get the edges flush. These panels should be removable because the latch linkage can always fail. You can pry between dots of gel to reopen and repair.
-
SHELBY COBRA restomod >real alu dash>high gloss paint
Cato replied to crazyrichard's topic in WIP: Model Cars
In all, an excellent solution for your custom design. A friend had built his with a Lexan shield, half the height of the regular 'screen. It had no framed edges and curved slightly at the ends to meet the doors. It was more of a clear wind deflector. Makes the car look even lower and wider. -
SHELBY COBRA restomod >real alu dash>high gloss paint
Cato replied to crazyrichard's topic in WIP: Model Cars
Richard, I have followed your build with interest because you have excellent skills and workmanship. You've made wonderful details to enhance your build ideas. I know that traditional Cobra accuracy was not your plan so your custom version is very creative. However, you are battling some inherent flaws in every small scale Cobra kit on the market. The flaws are basic and affect everything else. Your windscreen work is wonderful scratch building. But not like a real car's 'screen. The reason is the molding of the body in the cowl area; the cowl at the center of the dash is raised above the fender planes at the doors more than the kit makers get them. This makes the glass and frame too flat at top and bottom. Your side legs (brackets) are very well done. But the 'screen has more bow (curvature) from side to side. It's not straight across. The black rubber water shield is in a channel in the bottom of the cross piece and overlaps the body about 1/2". You've got the frame commendably thin but it really needs to be PE in 1/25 scale with .010 acetate for glass. Here is mine and you can clearly see the curvatures and raised cowl area. I know, even if you wanted to, you can't add fill to this finished car to correct the body. Maybe if you try another. But that raised area tapers forward and down the hood center making 'valleys' where they meet the raised fenders. Meaning a new or built-up hood too. This is never right on plastic models and most full sized replicas. The rear deck also has the pronounced curvature. It's what makes Cobras beautiful shapes. A word on roll bars; mine, being level with the w'screen top, is too low and I was not permitted on certain tracks. The correct ones are about 1 1/2" higher. Your helmet must be below the plane of the 'screen and bar. Here is mine; I hope these are helpful to you should you have further Cobra building interest. -
Thanks to all for the well-wishes and support. Much appreciated and good medicine - thanks. C
-
Forlorn... Here sits 1616 hours of work, hibernating for a while longer. But the 'better' news today (as opposed to 'GOOD' news) is that improvements in its maker are on the way within a month or so. So the quest will go on. Hope you still have interest, C.

-
The good wishes are much appreciated guys.