Cato
-
Posts
2,674 -
Joined
-
Last visited
Content Type
Profiles
Forums
Events
Gallery
Everything posted by Cato
-
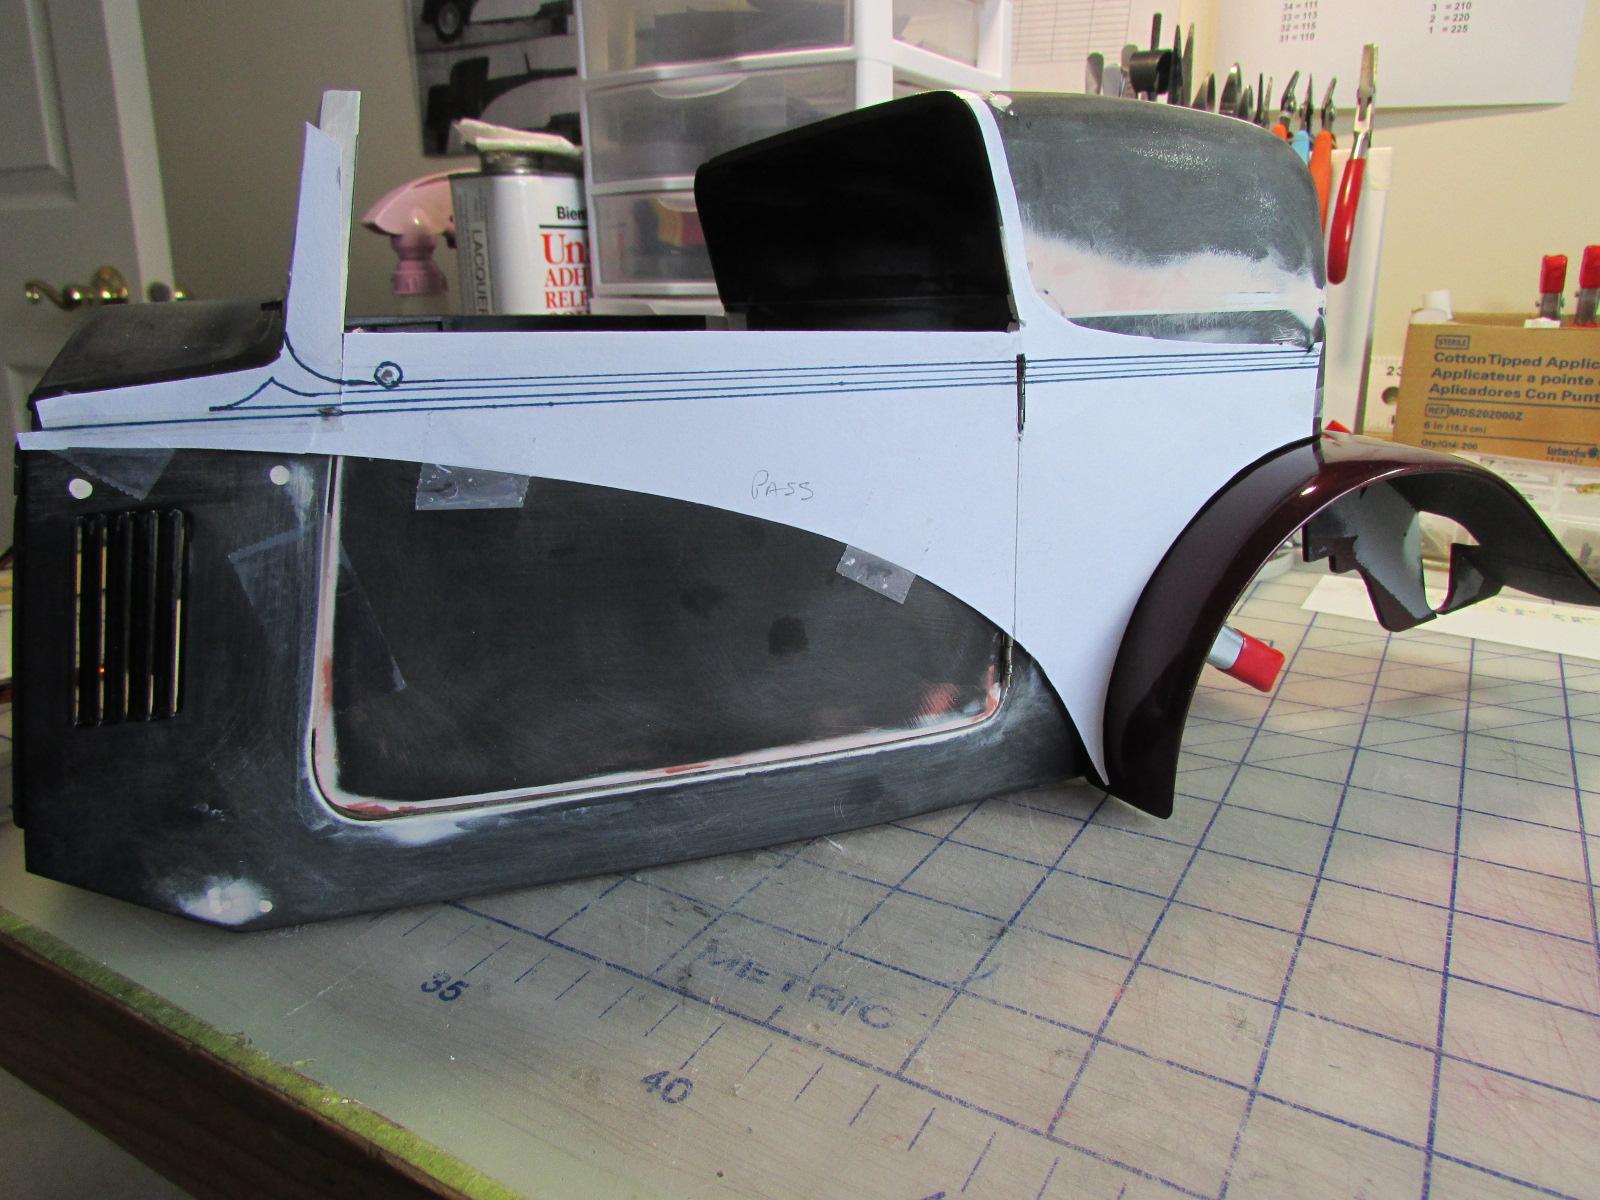
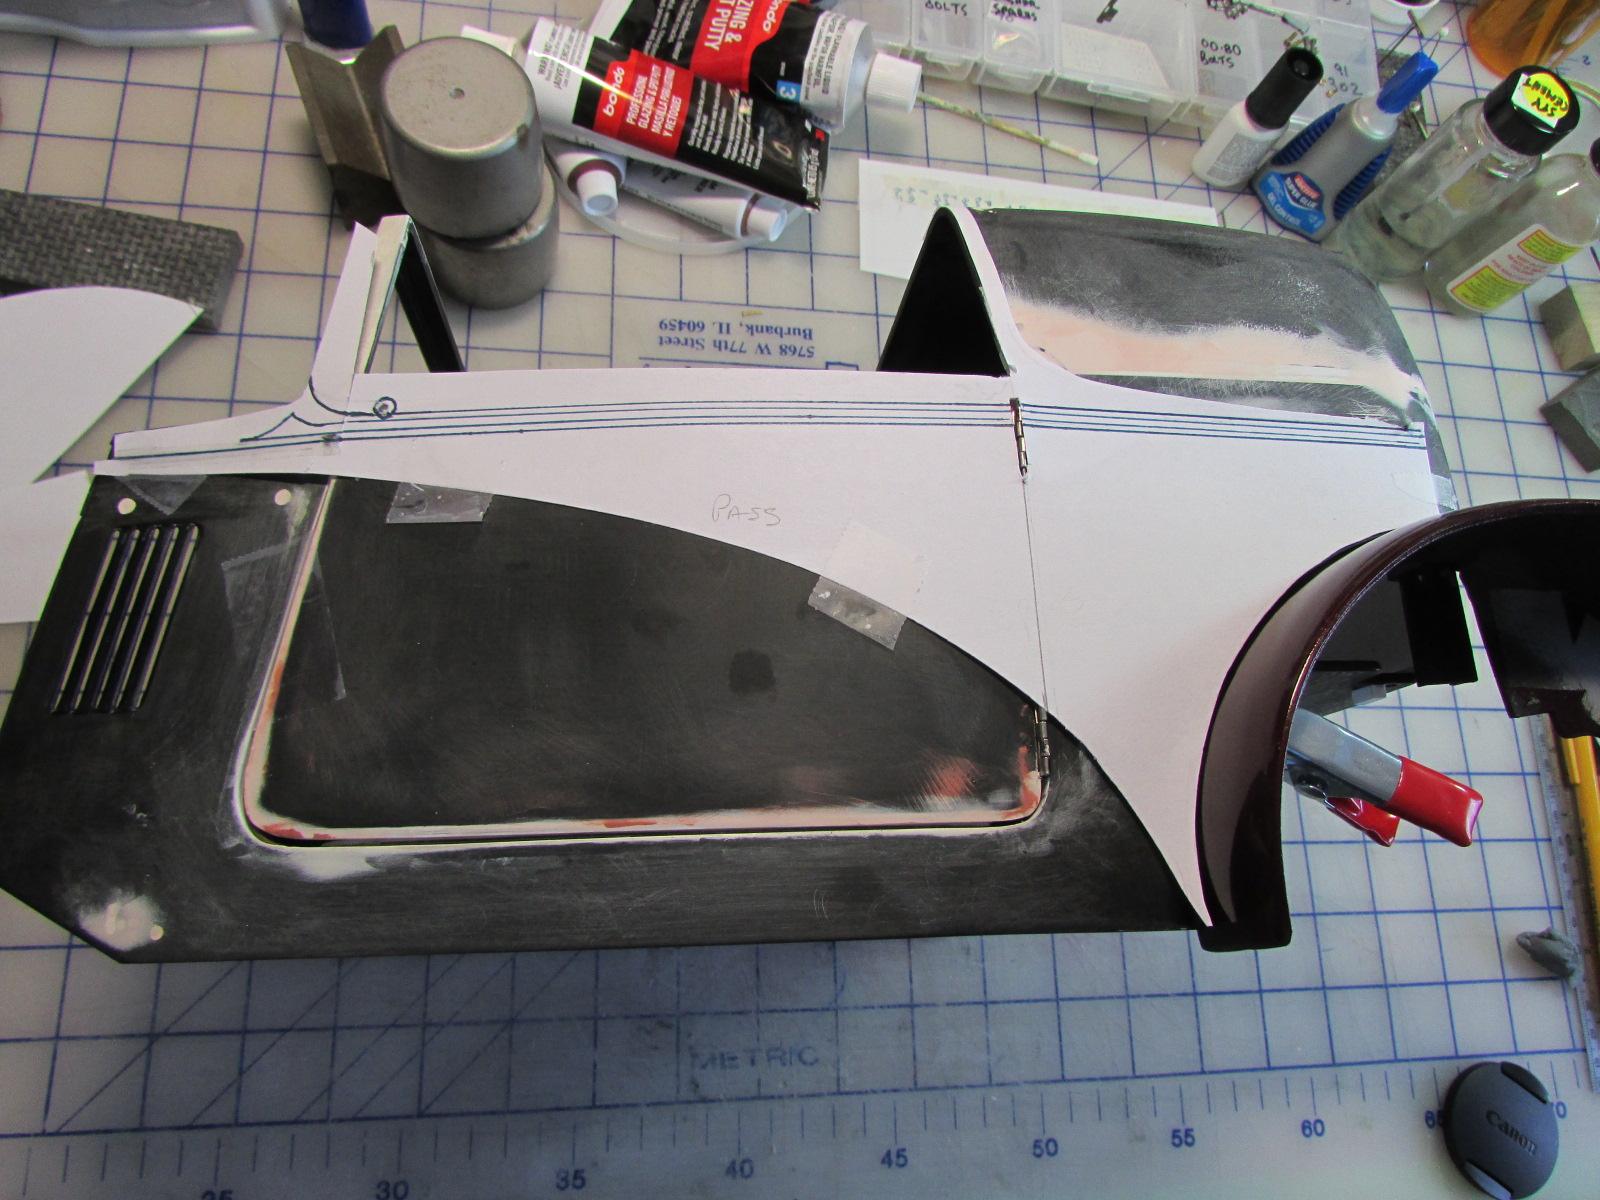
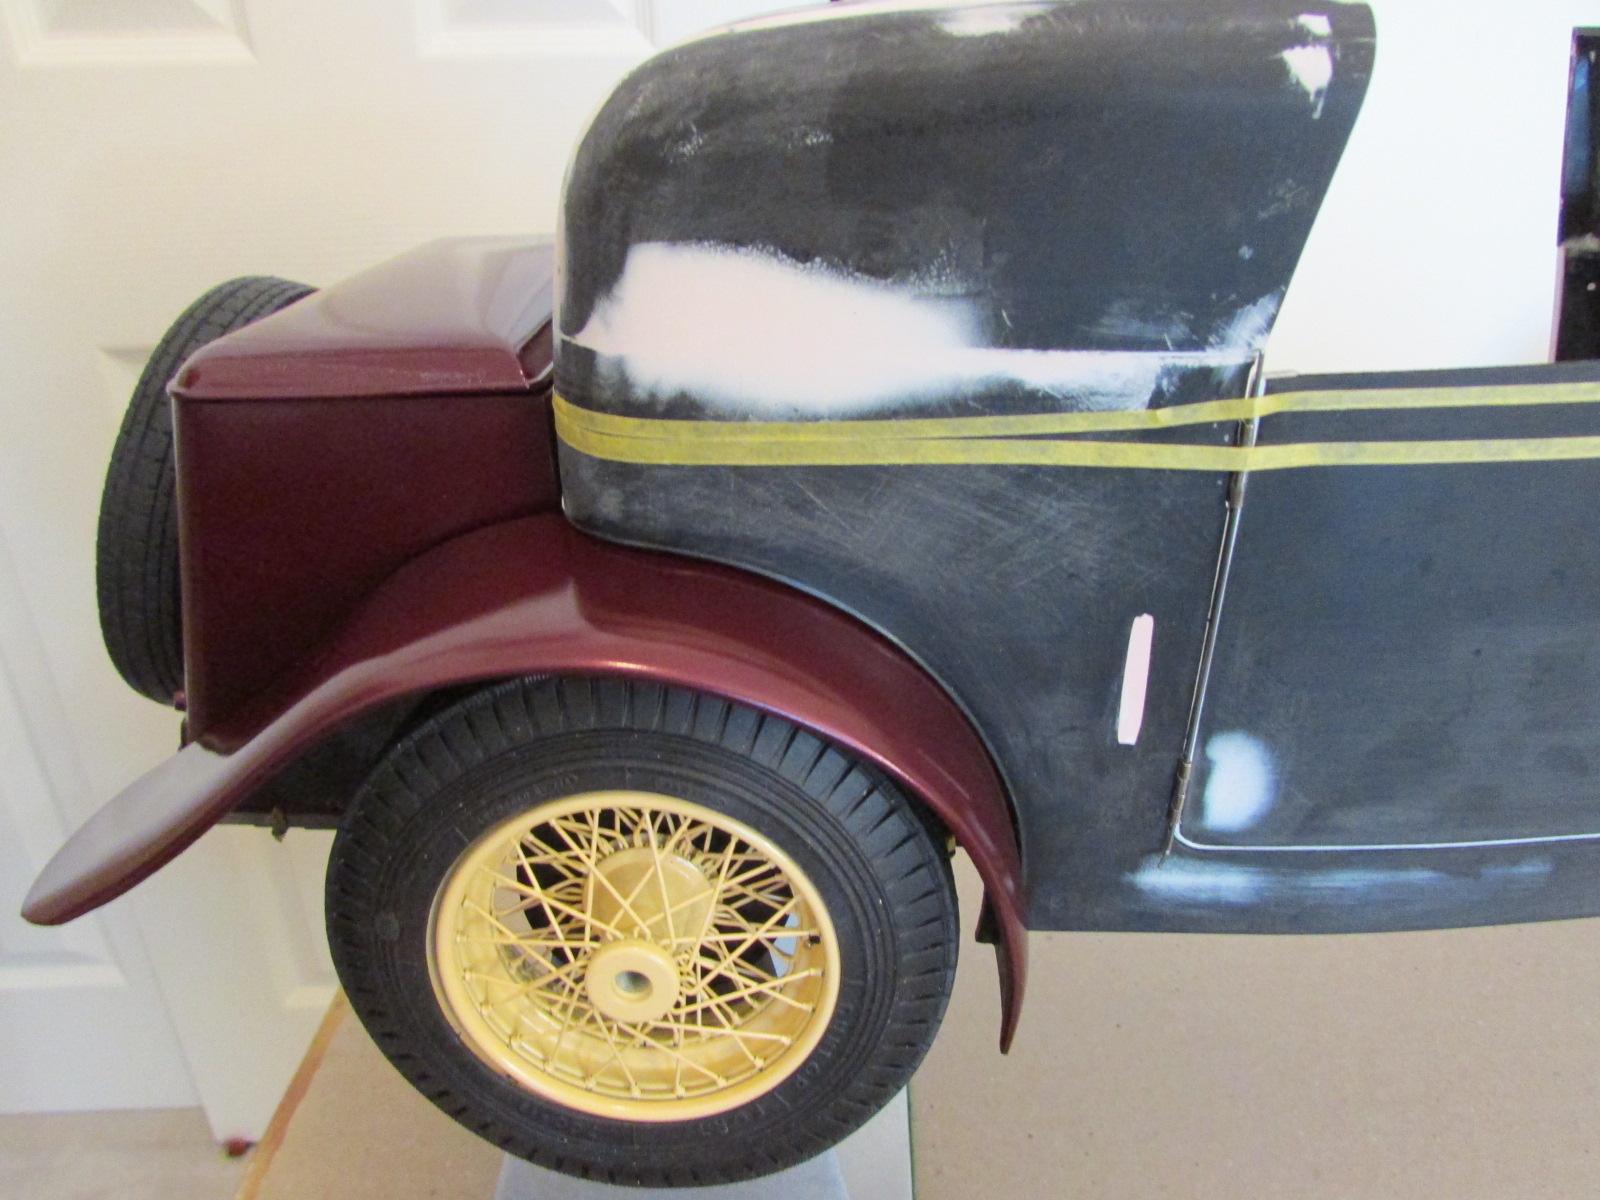
Turning a corner... I'm sorry I can't put text between shots to better explain; I just dunno how so I get the electronic dunce cap. Continuous work has finally got the doors sized and mounted. easier written than done. Numerous sessions with hinge placement (doors on and off) and heating the warps was tedious. There are so many compounds to the body curvature that the door must conform to it you want a smooth paint reflection. I got it better than OOB but probably not as perfect as I want it. With doors in their final place, I finalized a paper template of the maroon portion of the sweep with a beltline. The idea is a smooth flow of lines front to rear and blend into the trunk lines. So the trunk does not look like an afterthought. From this I will make a .010 styrene template with sharp edges and from that the actual cladding that will get fastened to the body. The cladding will be .020 thick, the raised beltline will be .030 atop that and the center line seen here will be .080 wide half-round. I may tweek or remove the arrow point on the front and possibly slightly adjust the bottom edge of the roof line. I'm relieved the design is finalized but anxious about getting a perfect, flat fit to the body. Stay tuned...

-

Big Bugatti in the house!
Cato replied to Harry P.'s topic in General Automotive Talk (Trucks and Cars)
Well, you could swap engines between the two and have a blown Shooting Brake. Now THAT'S unique. Did you have the shaft play in the diff? -
Big Bugatti in the house!
Cato replied to Harry P.'s topic in General Automotive Talk (Trucks and Cars)
From Marvin's site, here is a model by Roger Antrobus. The rear glass is clearly smaller by Pocher. Would you correct that on yours?
-
Big Bugatti in the house!
Cato replied to Harry P.'s topic in General Automotive Talk (Trucks and Cars)
Uhhh, He told me he had that problem. I suggested that fix. It worked. I think these forums are to help and be helped. I try... -
Big Bugatti in the house!
Cato replied to Harry P.'s topic in General Automotive Talk (Trucks and Cars)
I know a guy who bought a pristine early kit and when I gave him that tip it fixed his problem. Thought it might be helpful for you too. -
Big Bugatti in the house!
Cato replied to Harry P.'s topic in General Automotive Talk (Trucks and Cars)
The shafts carrying the diff gears will have slop in the plastic journal saddles. Wrapping the shafts with a bit of teflon tape or BMF will remove the slop but allow them to turn easily. For when you're zooming it across the rug... -
Cool - flames instead will look bitchin' Boy, with out masking and no wire wheels to build, this one will be done in a week.
-
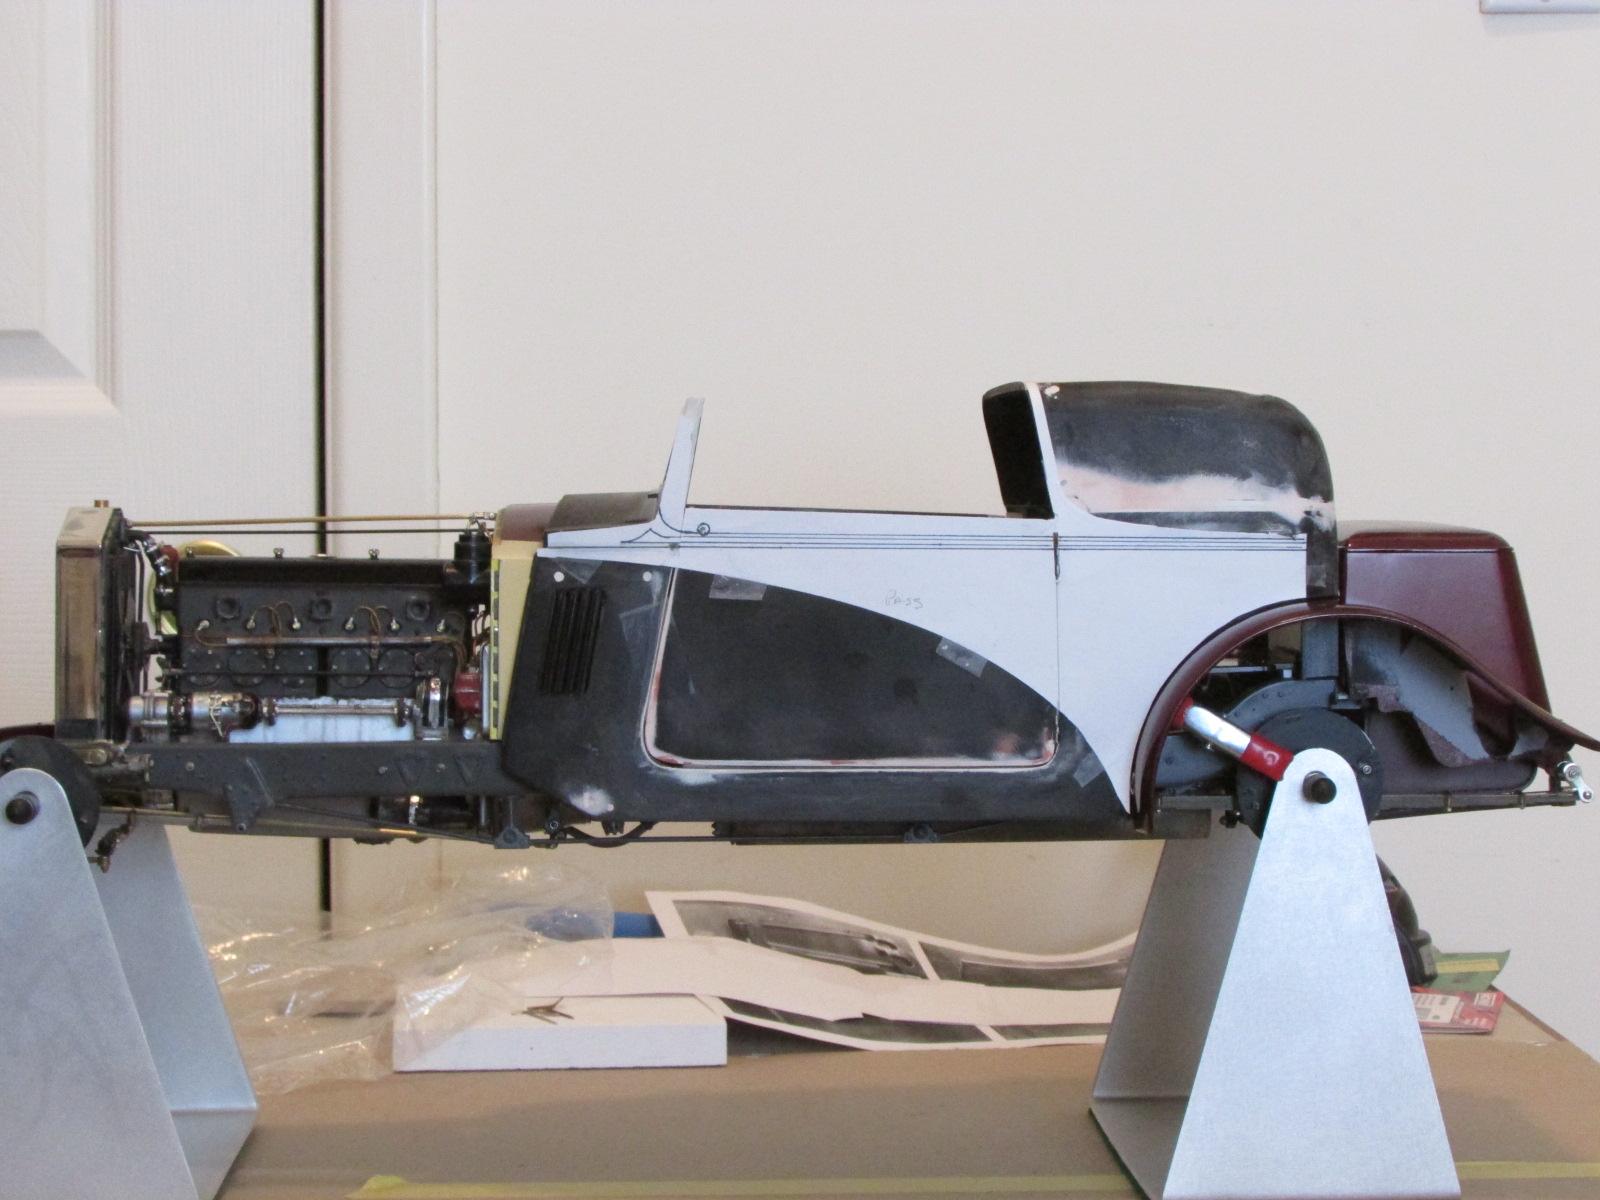
Thanks guys for taking time to register comment on my latest (and last) madness. On the point about the the 'curl' at the bottom of the sweep, I have anguished over that for quite some time. My feeling is that it works best for the Bugatti T-50; precisely for the reason that the Bug fenders / running boards are one piece. And they have a beautiful flow from one to the other front to back. That curl should be there (IMO) on the Bug because the rear fenders begin to sweep upward right at that junction. (Snob Bug owners may not agree - Scott...) My car has 'slashes', where the fronts end, the boards begin and end and the rear fenders start abruptly. So it seemed logical to me to terminate in a pronounced 'vee' at the rear fender leading edge. A joint that may be echoed by the roof / trunk lids intersection. Resembling the downward curve of the front fender was primary to my eye. Here are some shots of the sweep in the actual cream color (painted, 2 thin coats) and with the running board (not yet painted) attached. Hopefully that will make more sense.
-
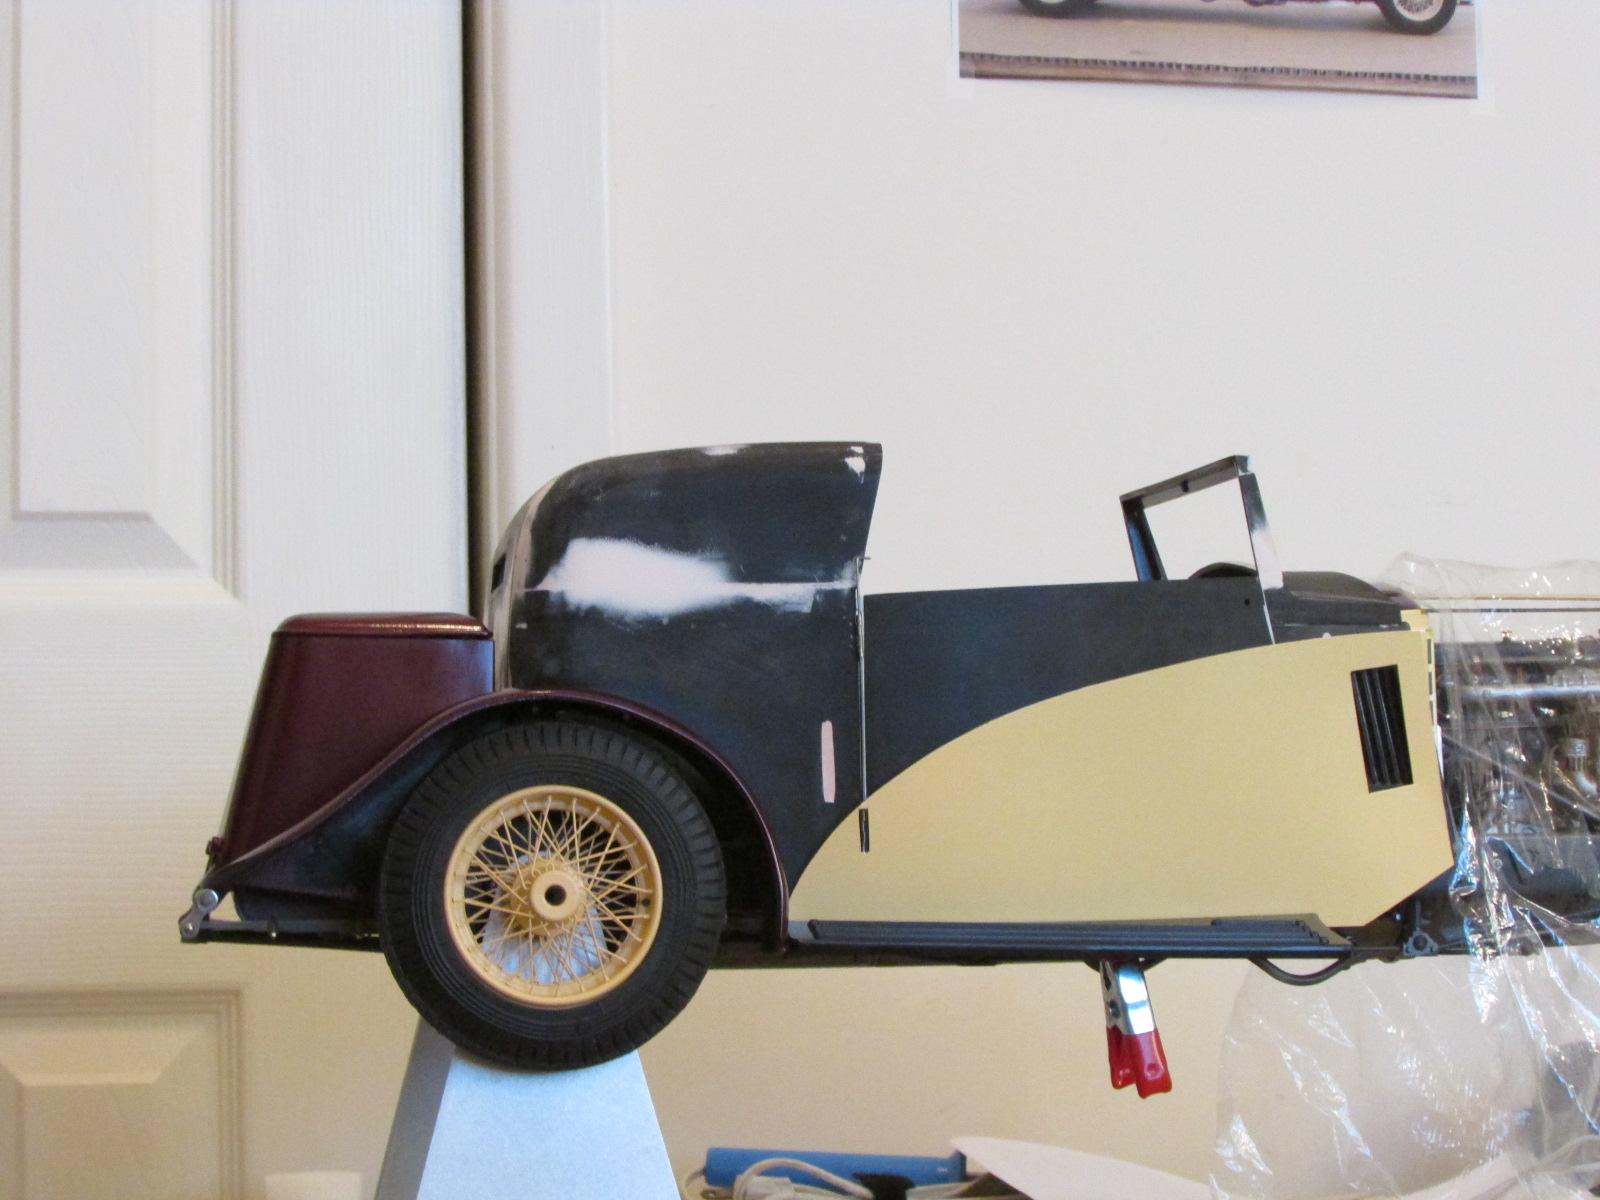
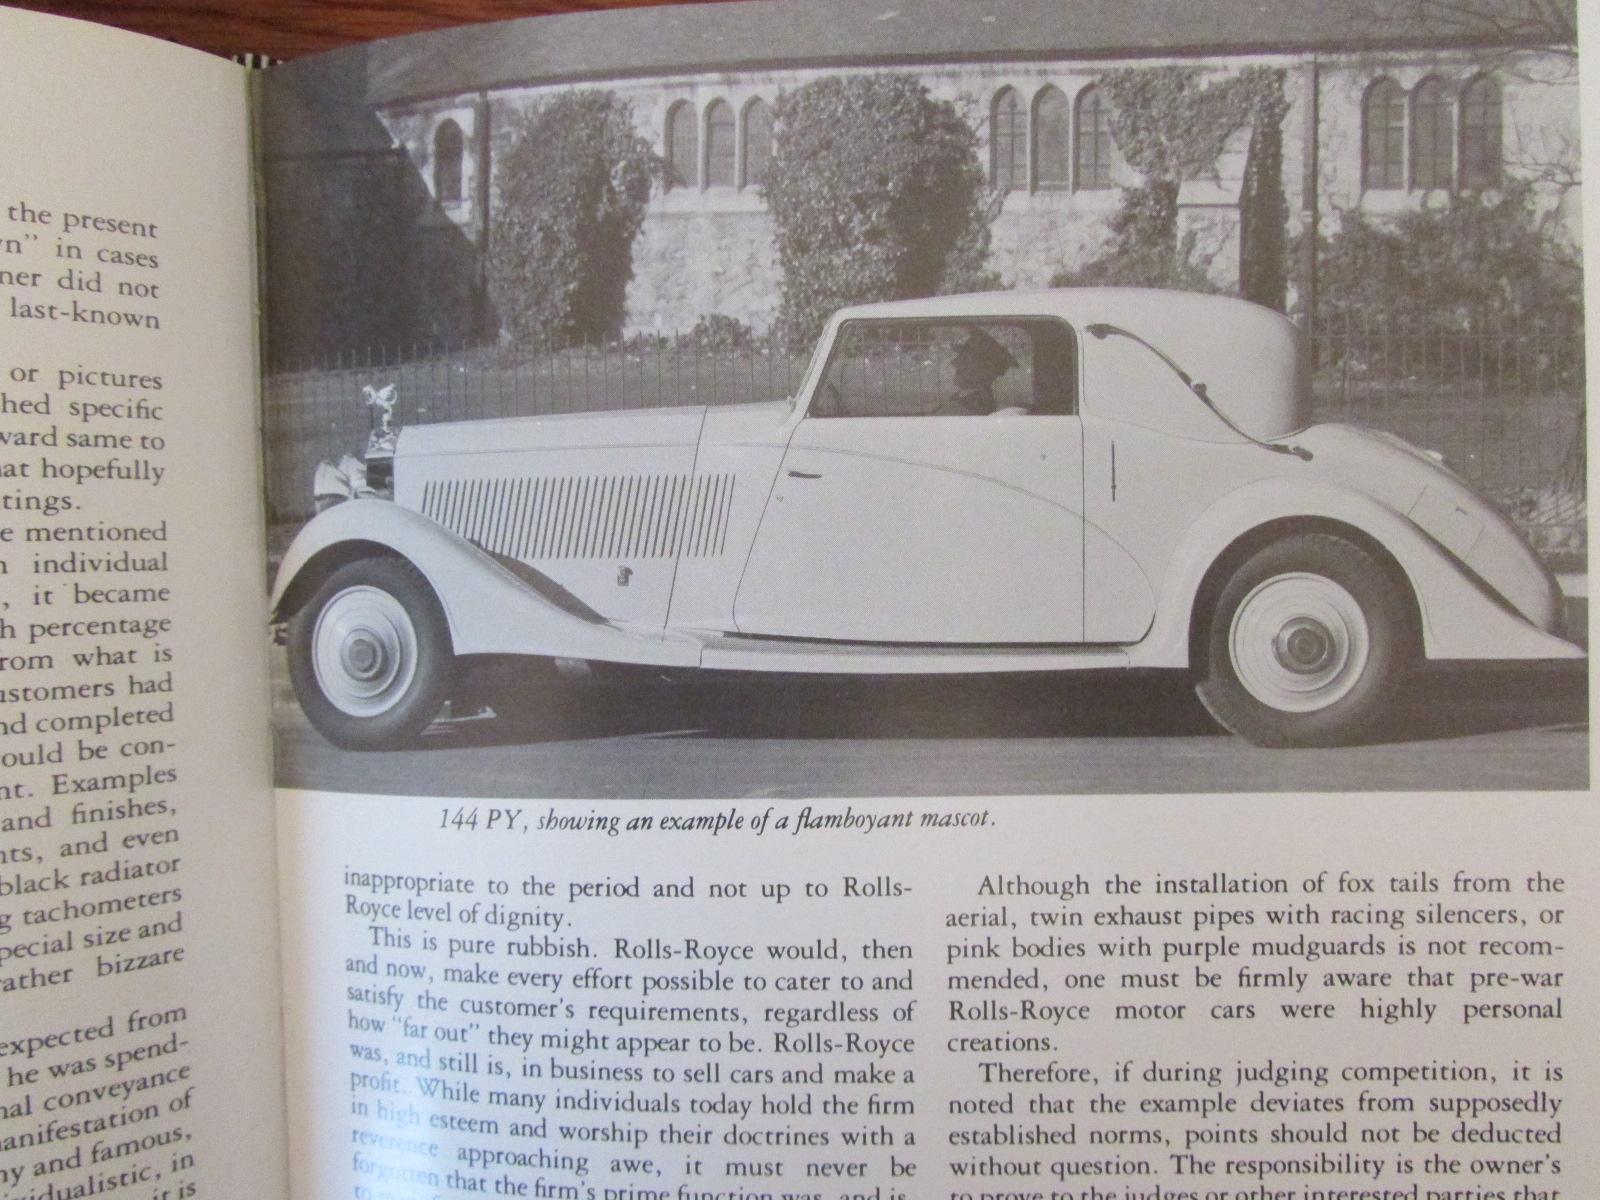
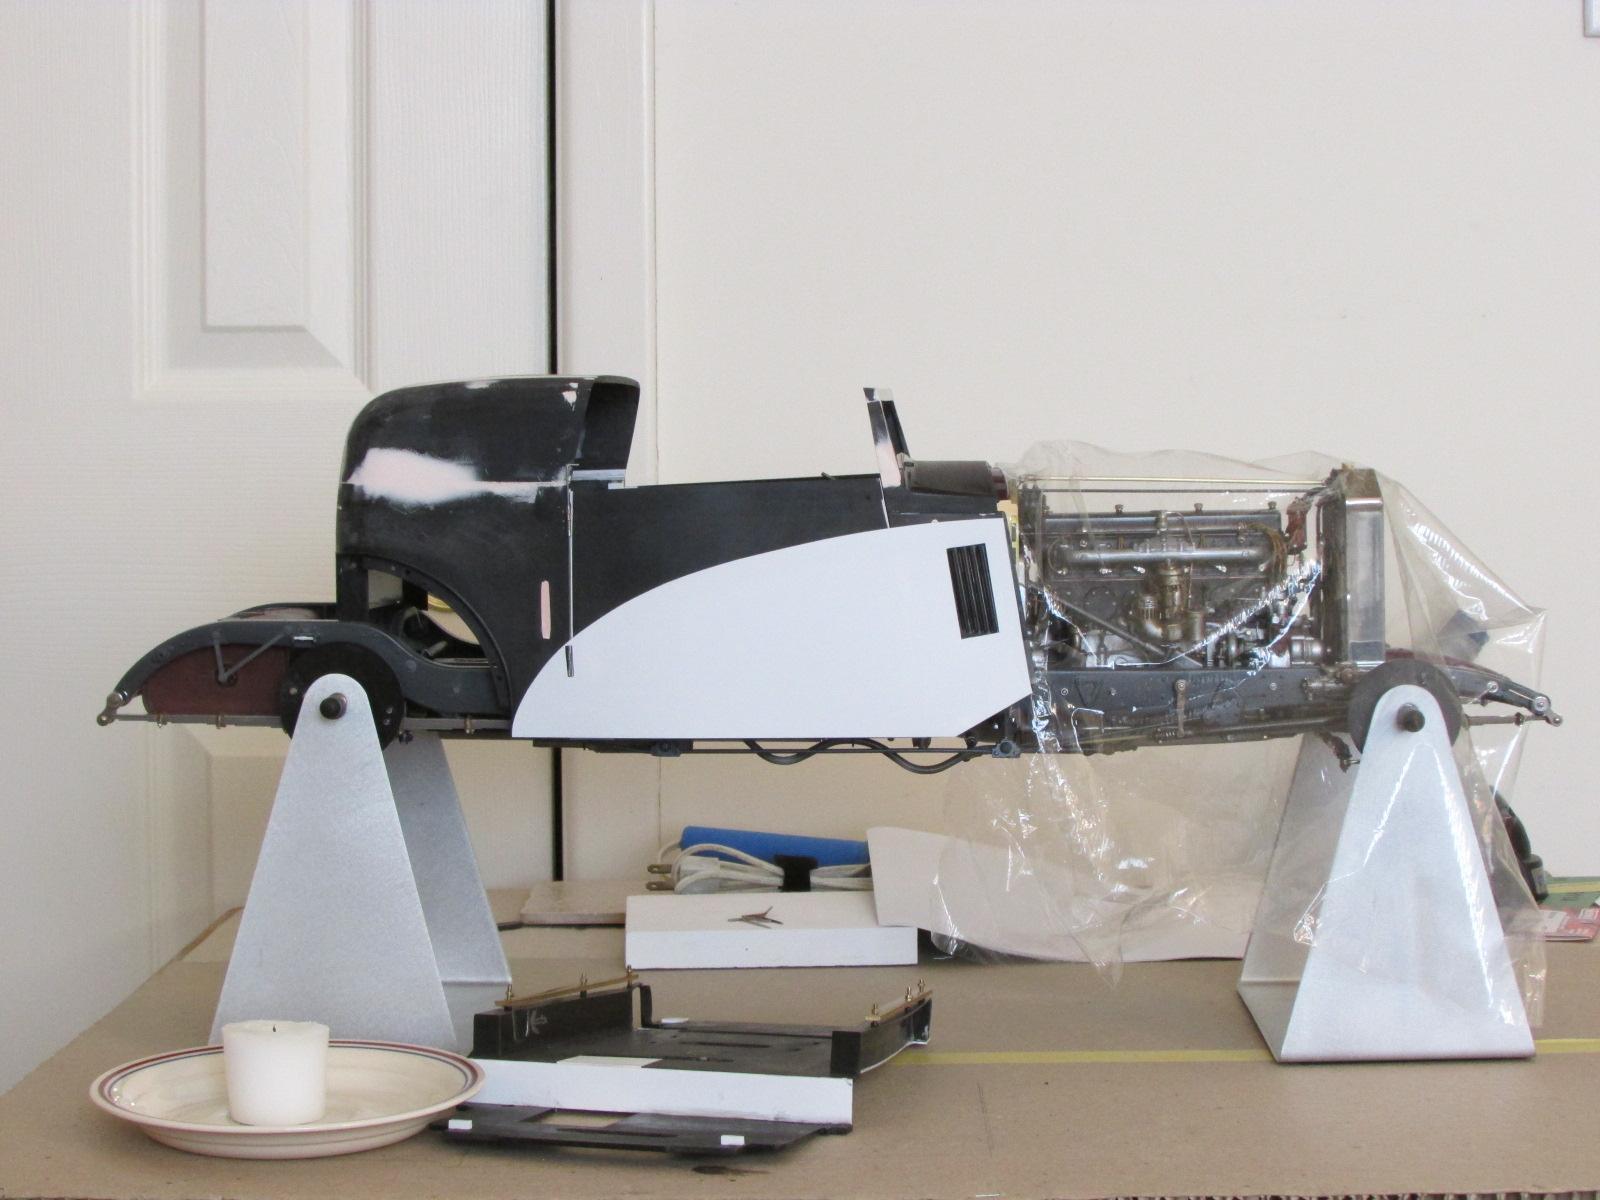
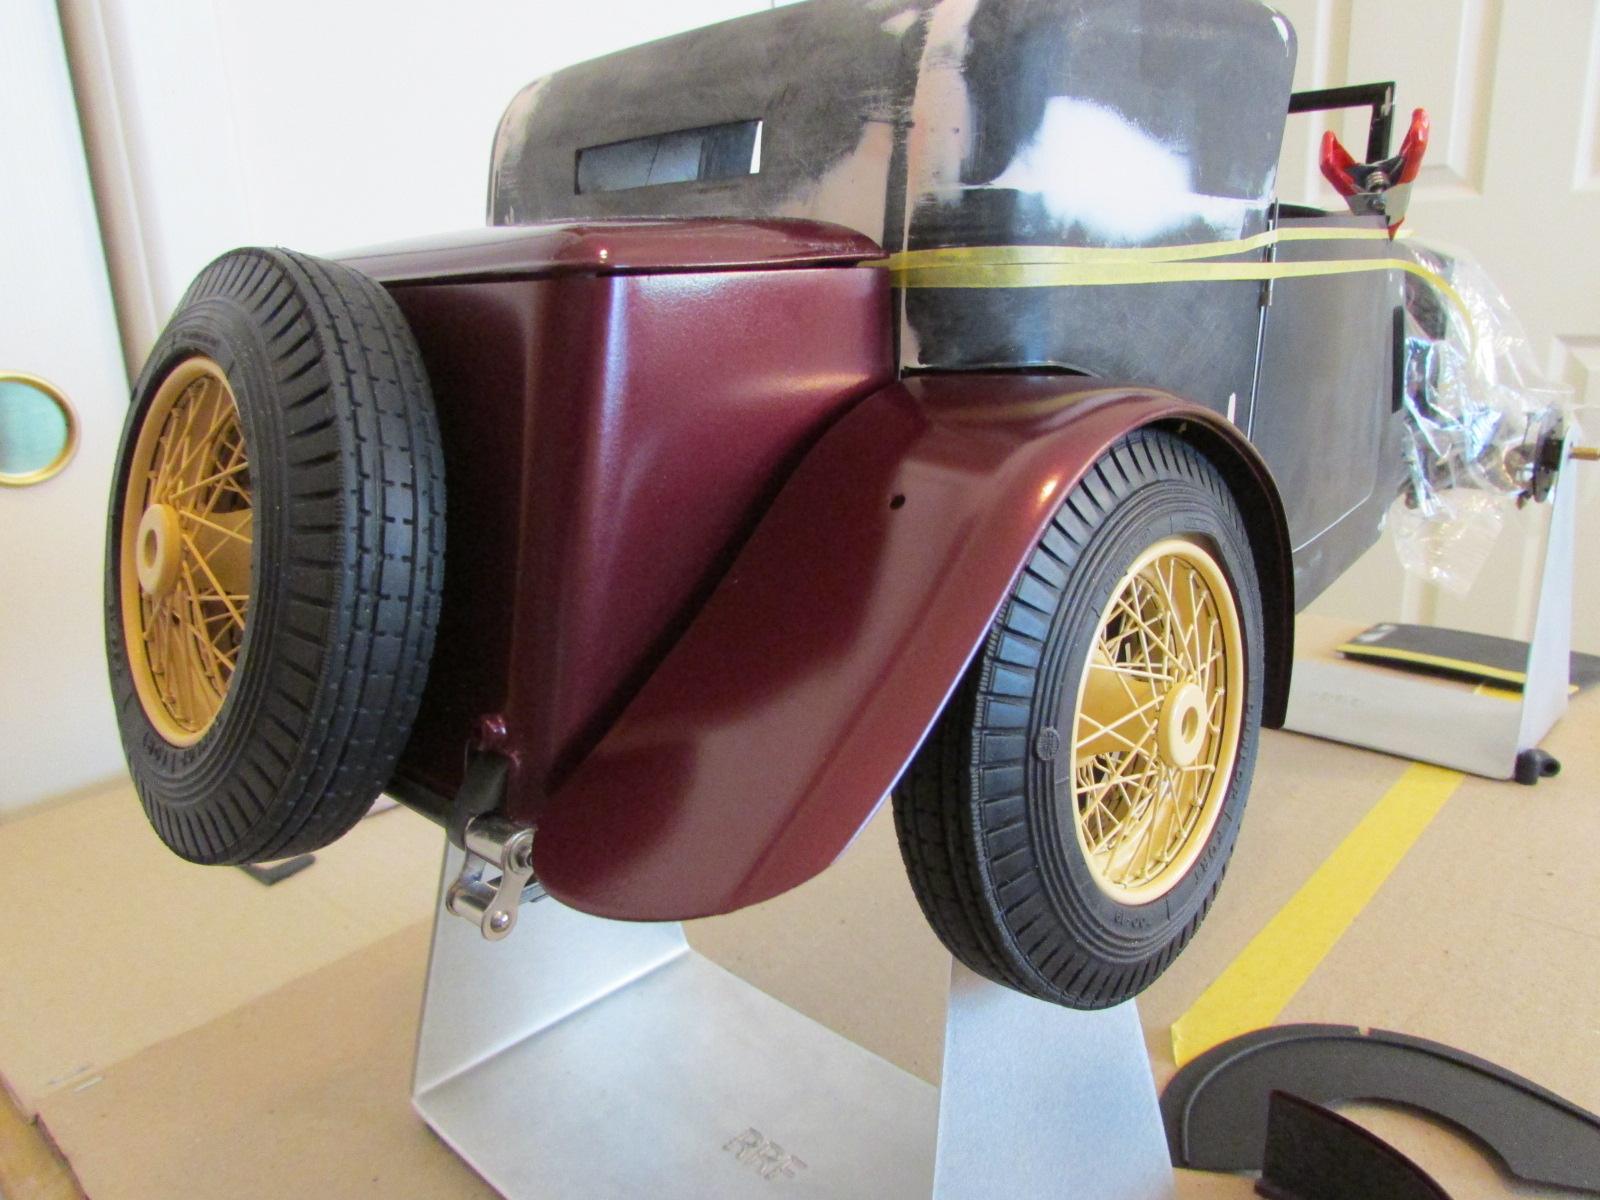
Love / hate relationship... Here's where I polarize the few of you I haven't already alienated with my tampering of a Pocher classic. With one door mounted and the second nearly so, I will reveal a styling change long in the planning stage and soon to be constructed. My goal for so long has been a low, long, elegant and jaunty sporting coupe in the Gurney Nutting coach style. All the modifications have been aimed that way. A hint was tendered a few posts back with the addition of Bugatti Type-50 tail lamps. Having rotated the rear fenders a bit to make them 'fly' and add to the streamline, I felt the lamps were the perfect addition to highlight that as they do on the Bug. They are also period correct. The concept came a year ago; the parts just a month or so ago. After looking at so many T-50 models back then an idea came to me; the color sweep. A two-tone demarcation which could add visual excitement and increase horizontal elements. I searched all my Rolls reference and found but one example of a P II that had been treated this way by its owner. Seen here in Gentile's book is 144 PY, a somewhat in-elegant combination of lines but the sweep is there. EDIIT; I'm sorry for the poor presentation as I don't know how to integrate the text between each photo. Color sweeps were not uncommon in the era especially good examples being Gable's Duesenberg Roadsters. Many custom coach builders used the device. So on firmer ground, I set to work integrating the device into the Sedanca design in a graceful way. Many paper templates followed along with many 'paint program' alterations of model Rolls photos. I found it's not as easy as it sounds. The 'speed' of the arc and its fit on the body work took much work to reconcile. Finally a pleasing to my eye design evolved. (You may now understand why this build has been taking so long; the prior modifications and this bright idea has caused many of you to yawn off into oblivion. I can't blame you; even I think I'm nuts going this deep off the gang plank). Anyway, this color illustration makes it very clear and fairly accurate. It's an actual photo of my model on its wheels, then colorized in a facsimile of the final colors. The modified trunk, cut top etc. is all actually the model with fenders attached and wheels. Only thing forgotten was the spare hanging off the back.The sweep design finalized from this and transferred to styrene. The influence can be seen in this superb T-50 built by David Cox. The sweep differs from mine because both bodies have different proportions but that was my task; to integrate that look onto the Sedanca 'canvas'. I tried to mimic the fender curves and integrate the roof lower edge in a harmonious way. You will judge if I succeeded or not. Lastly, here is the body side with door and sweep attached. This is a sheet of .010 styrene (purely to get the curvature right for the upper cladding) which will be used as a template to make the upper body cladding. That's right, the upper portion will be .020 thick styrene so there is a demarcation line just like the Bug - not just a masked paint line. The edge will create a subtle shadow at the color break. The coachline will run from the grille to the trunk, further 'lengthening' the lines. Another involved project to get just right. Not seen on the illustration but present in the last shots are the hinge and louver details which will be in the yellow lower portion. I may have a completely unique Pocher Rolls at the conclusion or chicken soup. I'm pressing on so I think I'm gonna like it. I welcome the few of you patient ones to continue on with me but truly understand if you feel I've gone to far and you've had enough. EDIT; I'm sorry for the poor presentation as I don't know how to integrate text between the photos. WYSIWYG in not a good editing tool and I HATE it. BRING BACK THE PREVIEW BUTTON!
-
Harry Pristovnik - NOT just a pretty face.
-
Hey Harry; as the number 2 man here, you got any pull to stop this stacking of responses in one post?? Geeze it's annoying and I know you hate it too.
-
Then when will you be posting your builds here Ron??
-
You will also need separate living quarters and arrangements to have visitation with those two lovely kids who used to keep you awake. Destroy your credit card............
-
I stand corrected Harry. The Pochers are all on what would be a scale 145.5" chassis. The prototypes however were either 144" or 150" wb chassis; not what Pocher's depict. . Another Pocher compromise.
-
For sure; that plus the 'Pocher Factor'. Left and right sides seldom have the same dimensions or thicknesses. Everything has to be checked to avoid tilted, crooked assemblies. Later kits like the Torp and Ambassador had better molds and improved parts, like the metal springs. My very early, first gen Sedanca came with vee-shaped bottom edges on the hood sides! Body halves and doors were each different. Lot of time spent checking and correcting before modifying. I will lay off pointing out pitfalls for you because you've obviously solved them all and have a different, less deficient platform.
-
Au contraire, mon frere. (that's French for "no way, José".... I lowered the cowl and the hood sides by the same amount, so the louvers still line up. If I took 3/16 off the bottom of the cowl and 3/16 off the bottom of the hood side panels, how could they not line up? Well done and you're lucky it was that simple. I realize you may not have set the body aft as much as I did (~7mm) to get the wheels centered. That changes a lot; you're working with the longer wheelbase model - a different platform. Plus we may have different fender apron thicknesses as you have the full fenders. Anyway, I'm glad you're getting a good result. Fine about the hood hinge. But when painted, I will round the hex off the 00-90's and they will be in position like the prototype's chrome buttons which act as rests when the hood half is peeled open. So as not to scratch paint.
-
I raised these points in a previous post but it's obviously too late now. You've lowered the firewall and cowl nearly as much as I did. This will cause serious misalignment with the cowl louvers and hood side louvers. They were completely level on all the prototypes. The answer is to adjust the hood sides by end angles and and material cutting. Mine will need strip wedges ADDED above the hood louvers to lower them in relation to the cowl louvers, as well as angle cuts. The other point is the hood center hinge. Instead of CA (which means they'll get masked or painted), You can drill for 00-90 bolts and put 4 in place through the hood and hinge. Now you can do all the mock-up with joined panels and then simply unbolt the hinge for painting. If you want, I'll take a shot of mine for explanation. But I think you've already got past this step.
-
Yeah I feel bad for you guys getting older..................
-
And to have even less stuff, sell that 'instruction book' on eBay for $10. It's virtually useless.
-
Thanks for throwing us under the bus. We encourage building, not hoarding!
-
Absolutely. It's next up on my "to do" list... probably will be my winter project. And I'm happy to have snagged one of the early issues with the geared rear end. More parts = more fun! OK I'm just telling you Harry, When you finish a Shooting Brake AND freakin Bugatti before I finish my lump, my blood will be on your hands. In the immortal words of Popeye 'Dat's all I can stands, I can't stands no more!!'
-
Hurry up and get that workbench built........................................!
-
Thank you my friend. I hope that happens before I am 'Under Earth',,,
-
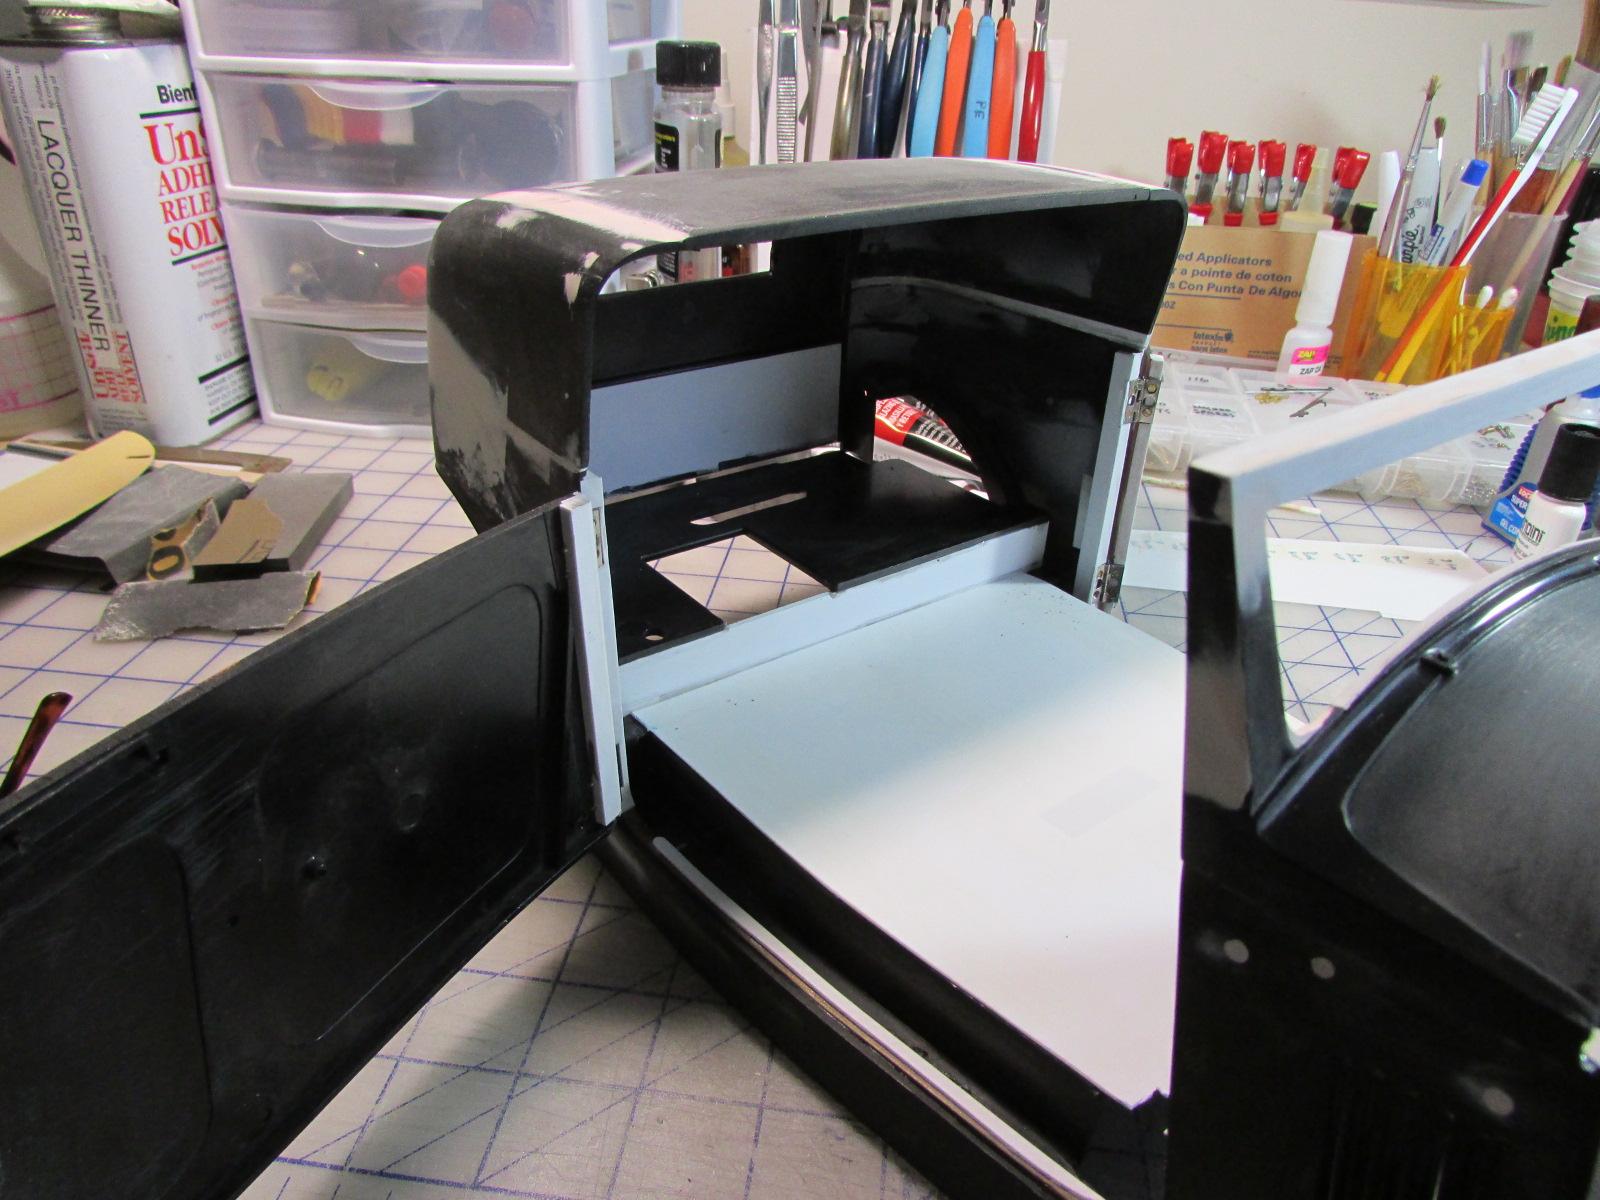
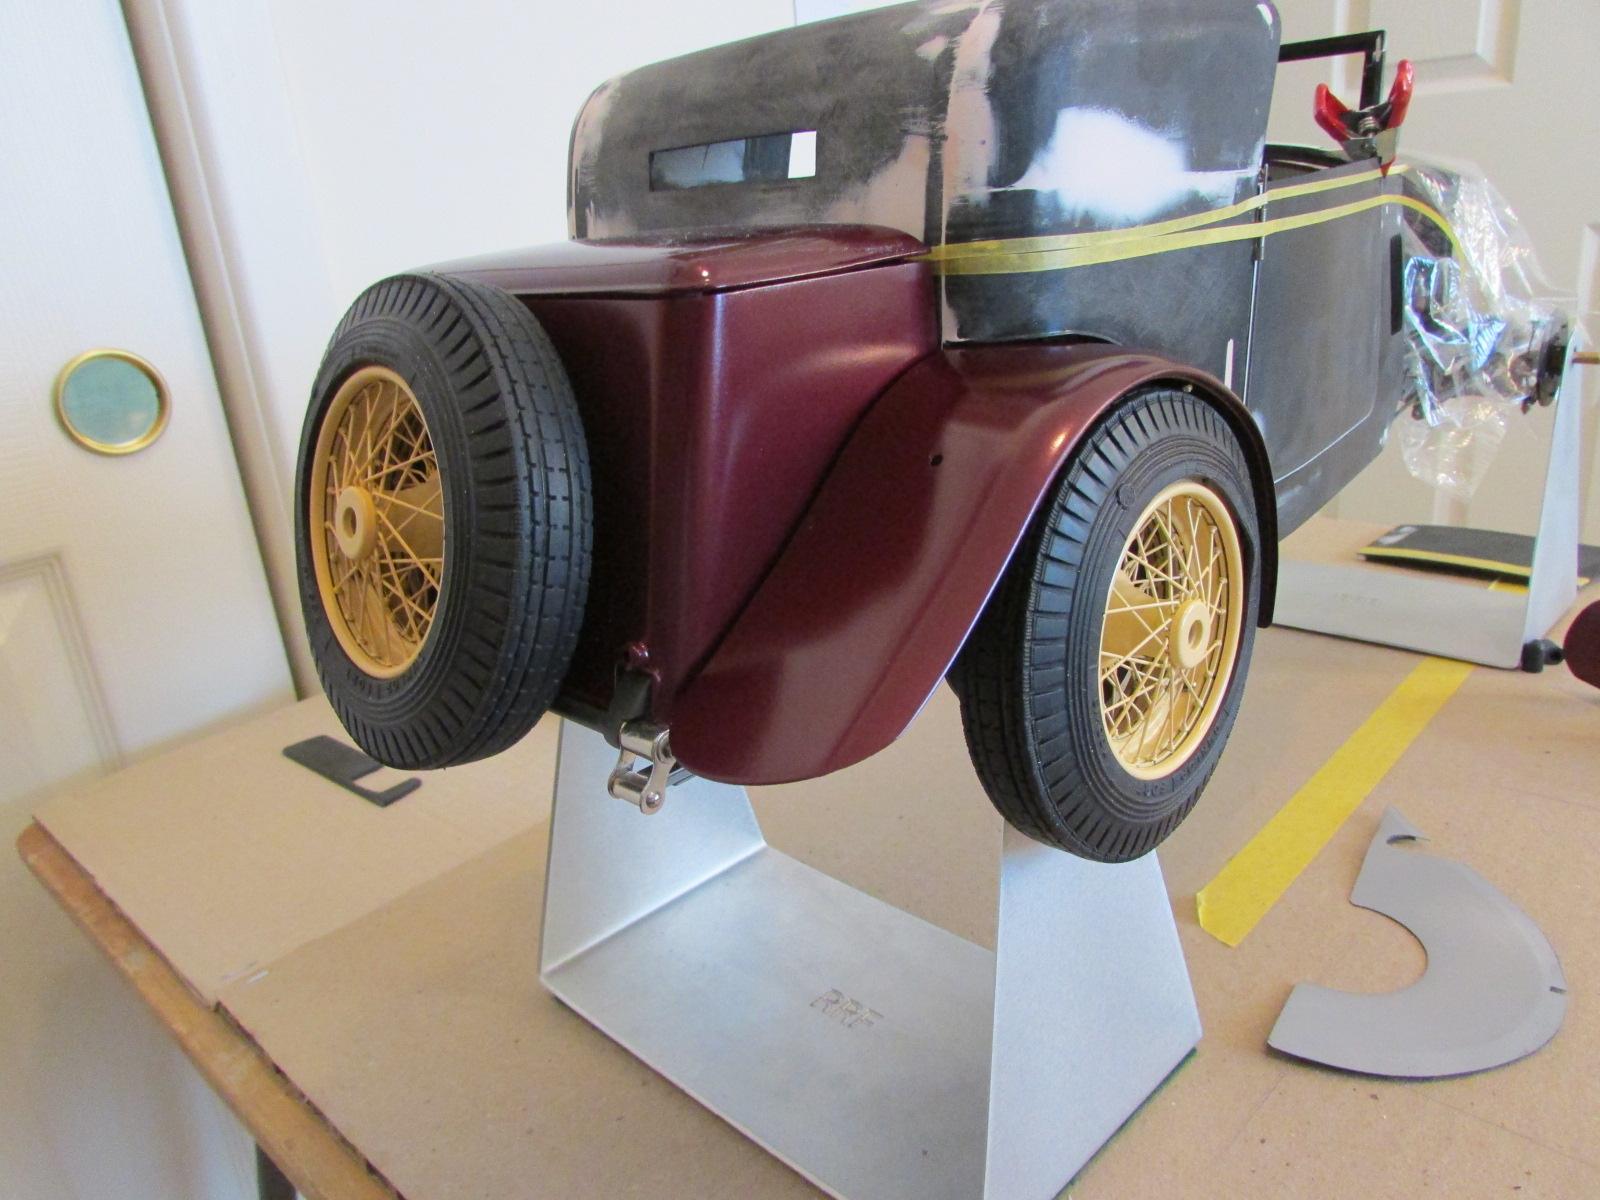
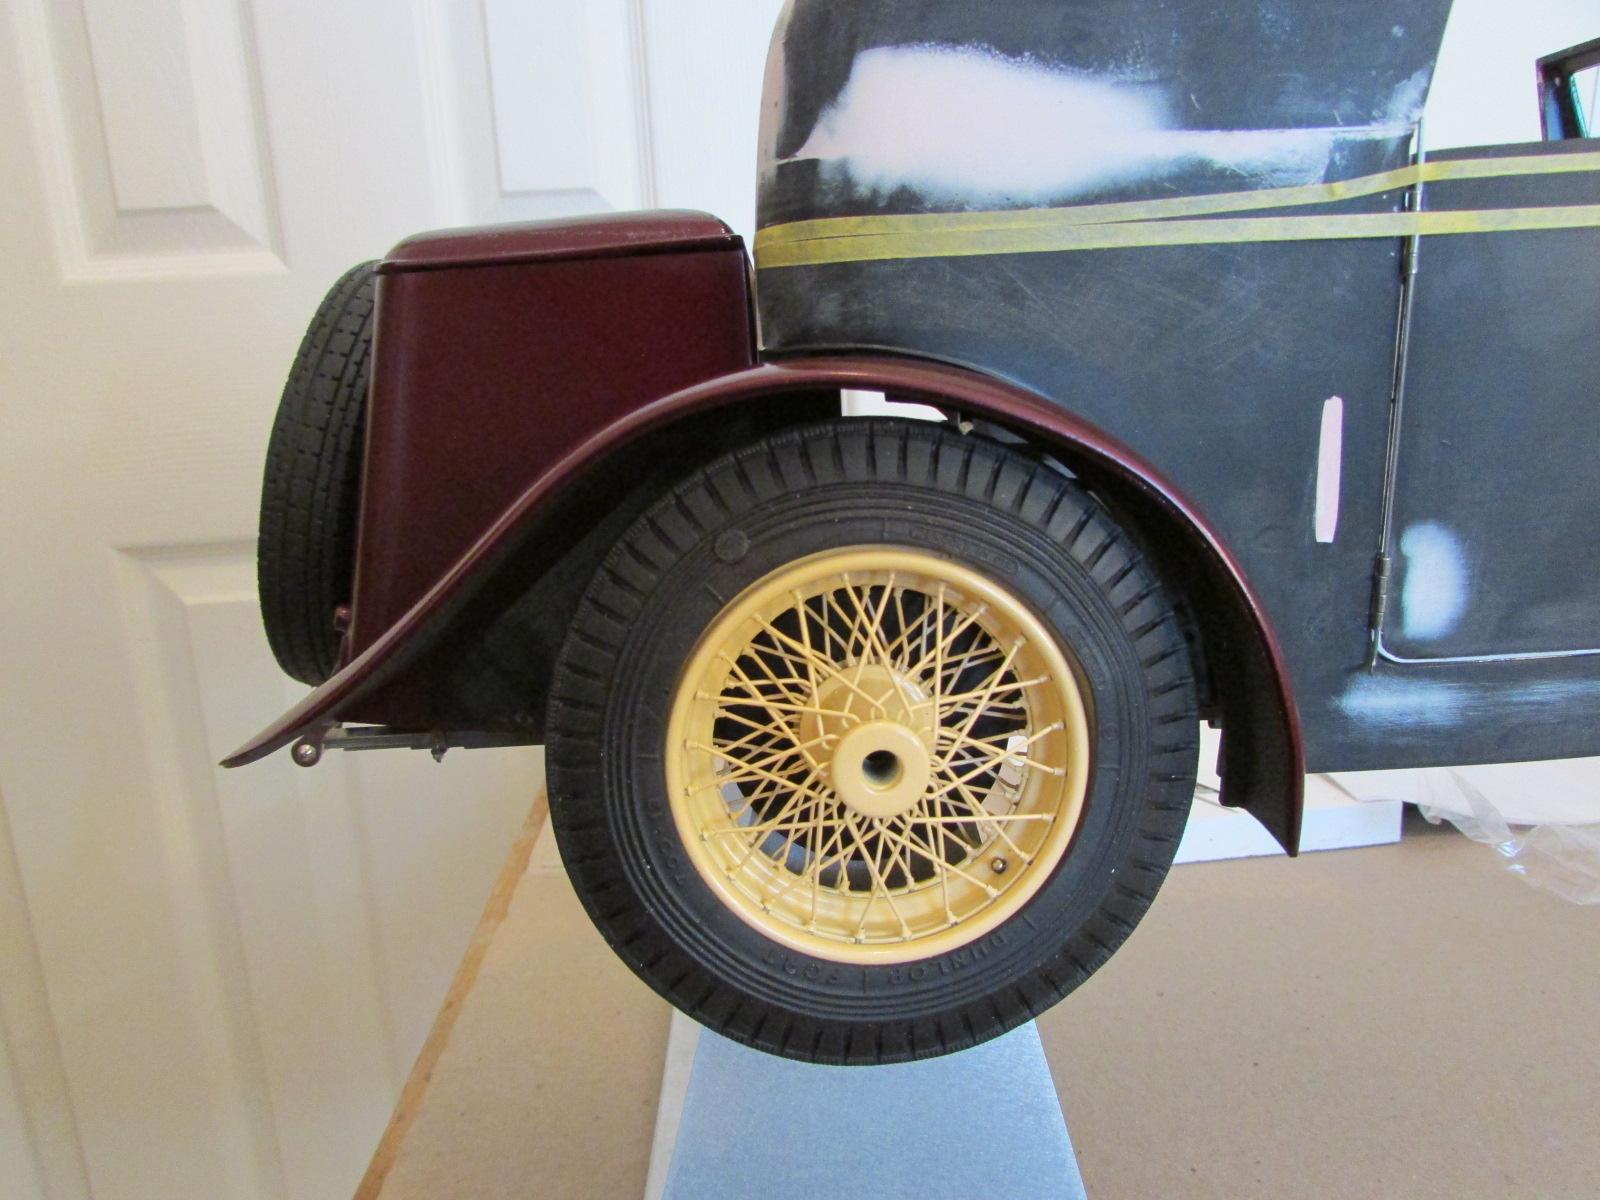
A sort of update... I have been heavily involved in hanging the doors (1 actually) since the last posting but today I stepped out of my sequence due to favorable weather; very low humidity and no wind, Perfect for paint. December is not so... I prepped and shot the rear fenders. This is to color only, sanded between coats but not final sanded and cleared yet. That happens when ALL the fabricating and fitting gets done - probably the spring. Anyway here's the result, just hung in place with a tooth pic bit pinning it to the body and the wheel dangling off the axle. I do this because I need the incentive to see some sparkly bits during the tedious processes - like the doors. Yes the eagle-eyed will see the door neatly in place. How it got there is coming in another posting. And it's far from finished so as to start the other side door. Sigh... The yellow tape is an early sketch for the coachline to come later. It defines where the bottom of the fabric roof might be. I just look at these things every day and it starts to tell me if I've got it right or not. This will probably get tweeked in various ways before I start cutting plastic.
-
Countersinks for Plastic?
Cato replied to John Clutch's topic in Model Building Questions and Answers
For real tiny screws, I agree, a bit in a pin vise should be adequate. But not for metal hinges.