Jurva
-
Posts
235 -
Joined
-
Last visited
Content Type
Profiles
Forums
Events
Gallery
Everything posted by Jurva
-
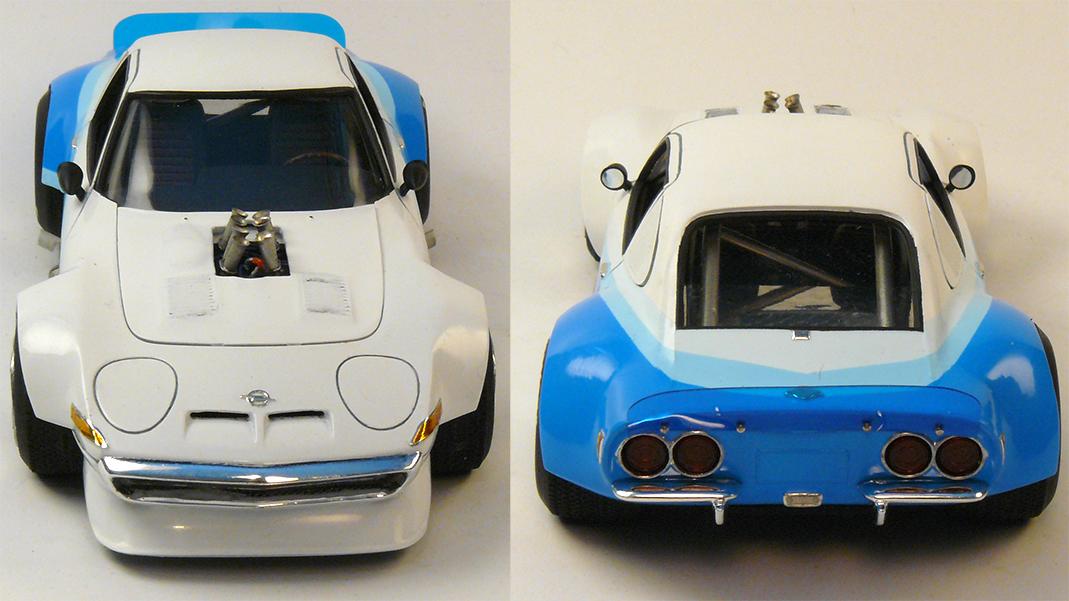
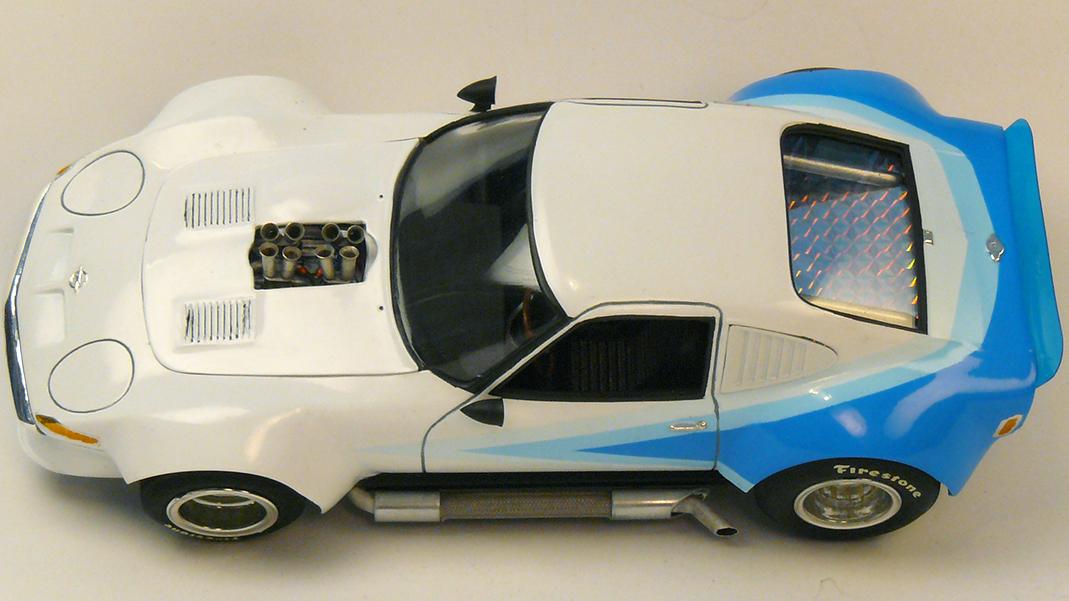
In a way this has been built before. Inspiration came from Roadkill's Super Camaro. I copied it's paintjob.
-
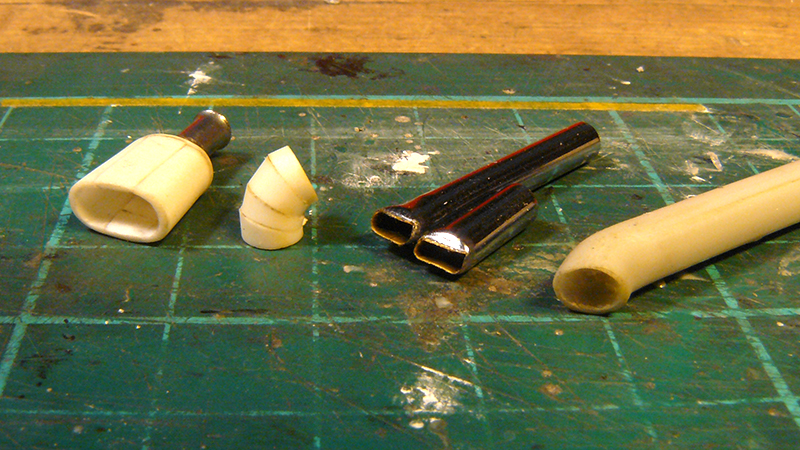
Tips were made from radio antenna tube. Then heated with torch. Remember to clean them before heating. Fingerprints leave ugly surface when heated.
-

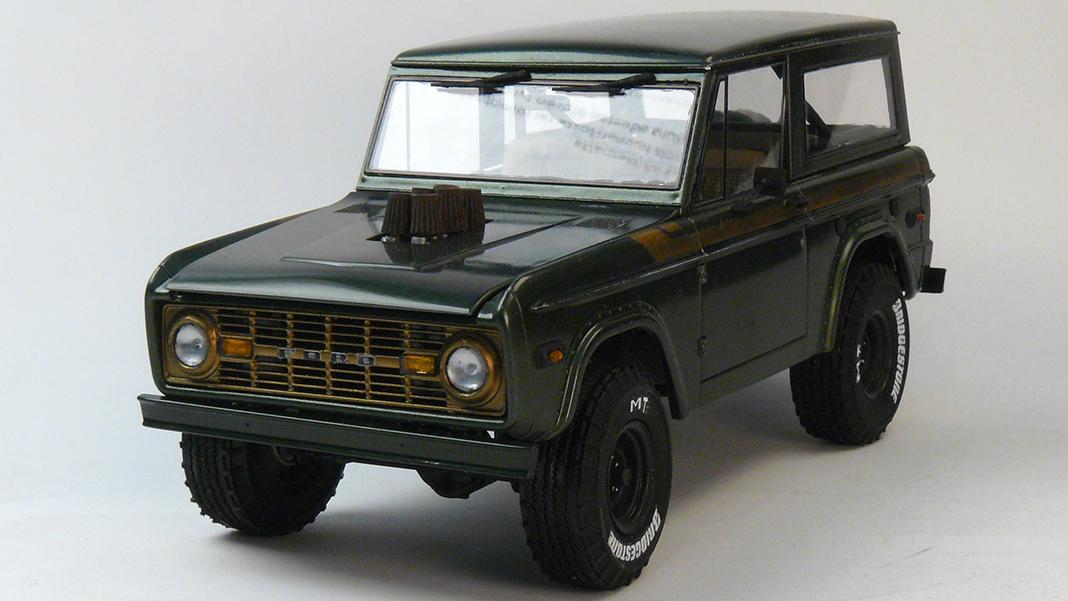
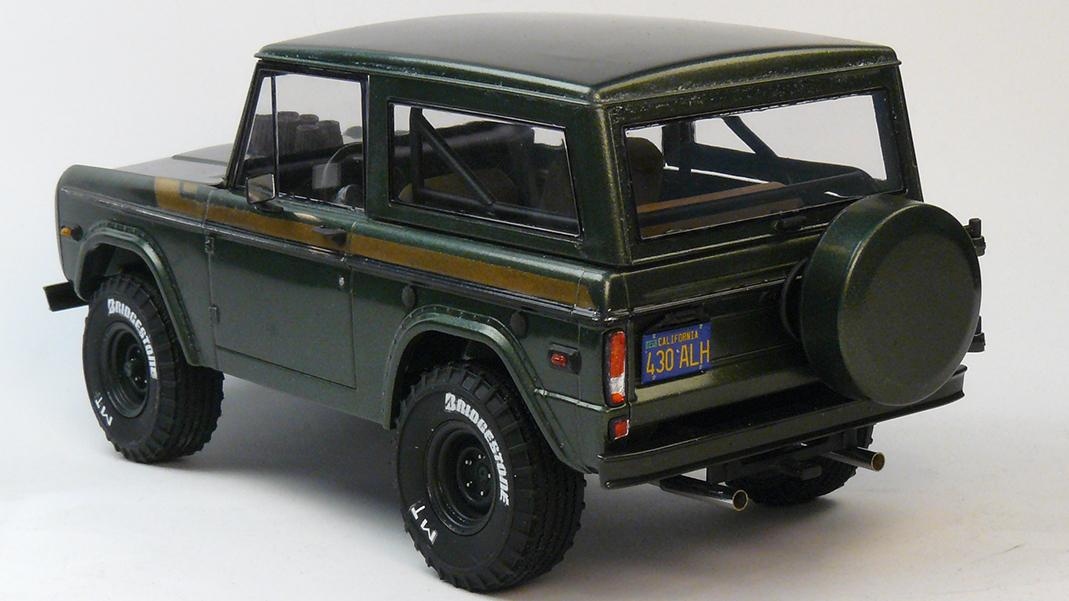
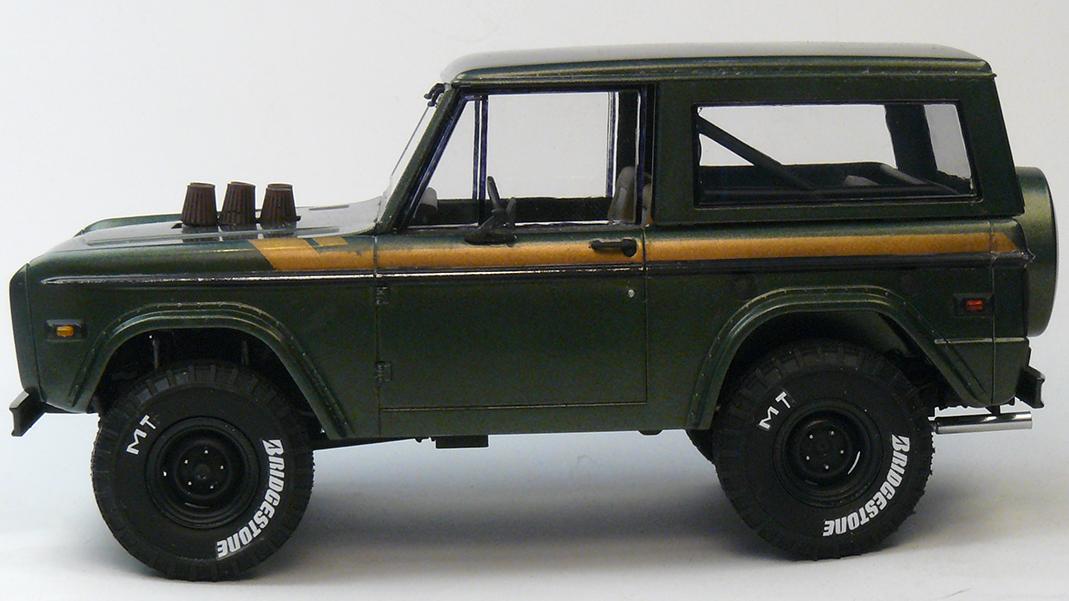
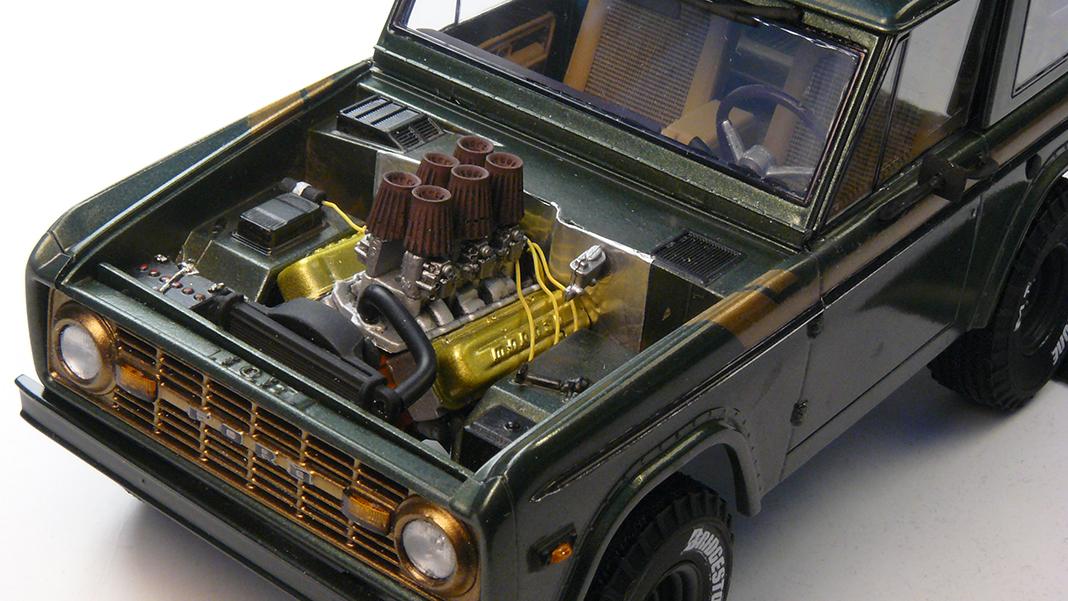
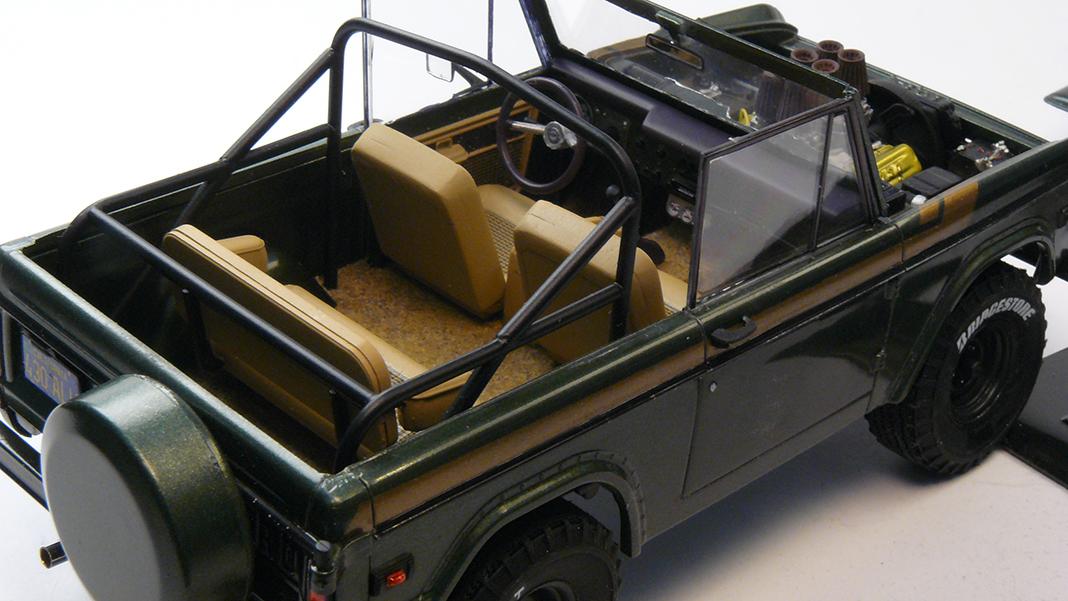
Revell Baja Ford Bronco
Jurva replied to Jurva's topic in Model Trucks: Pickups, Vans, SUVs, Light Commercial
If I remember correctly, they were from Aoshima Nissan Silvia S13 kit, which has an engine. -
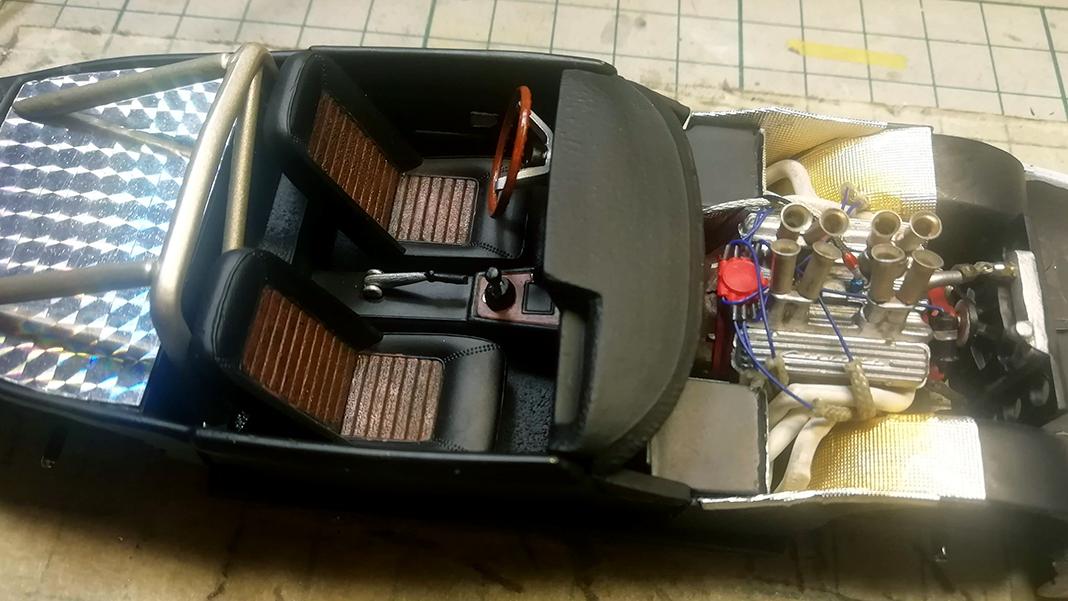
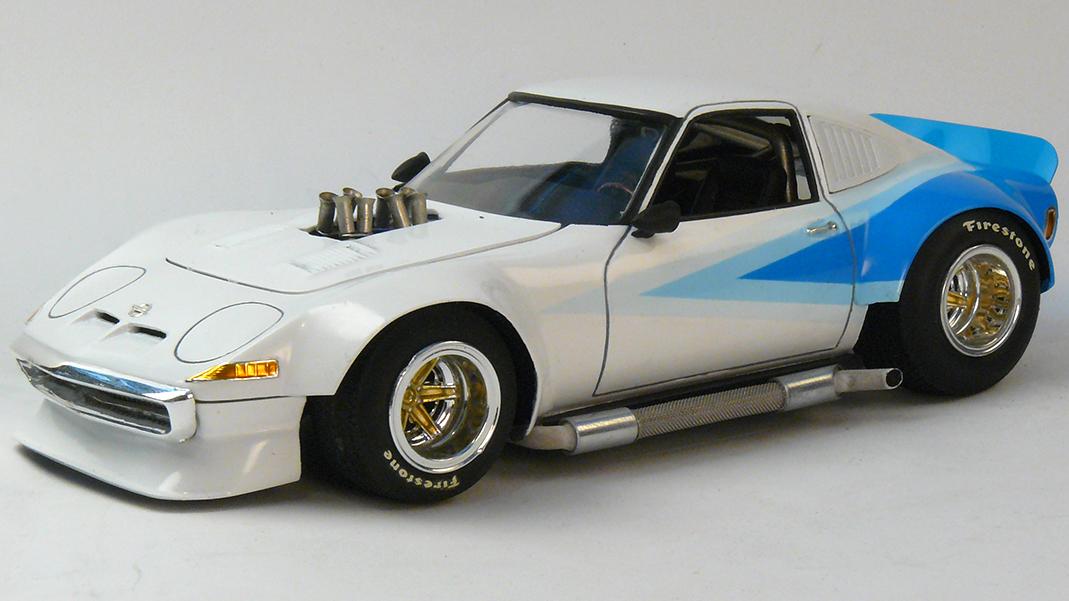
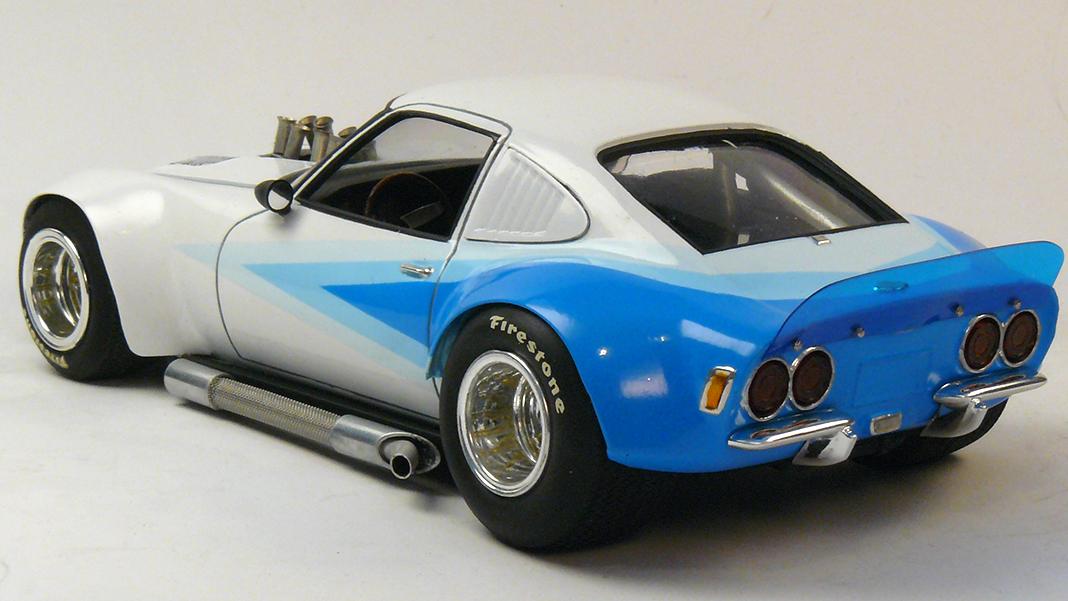
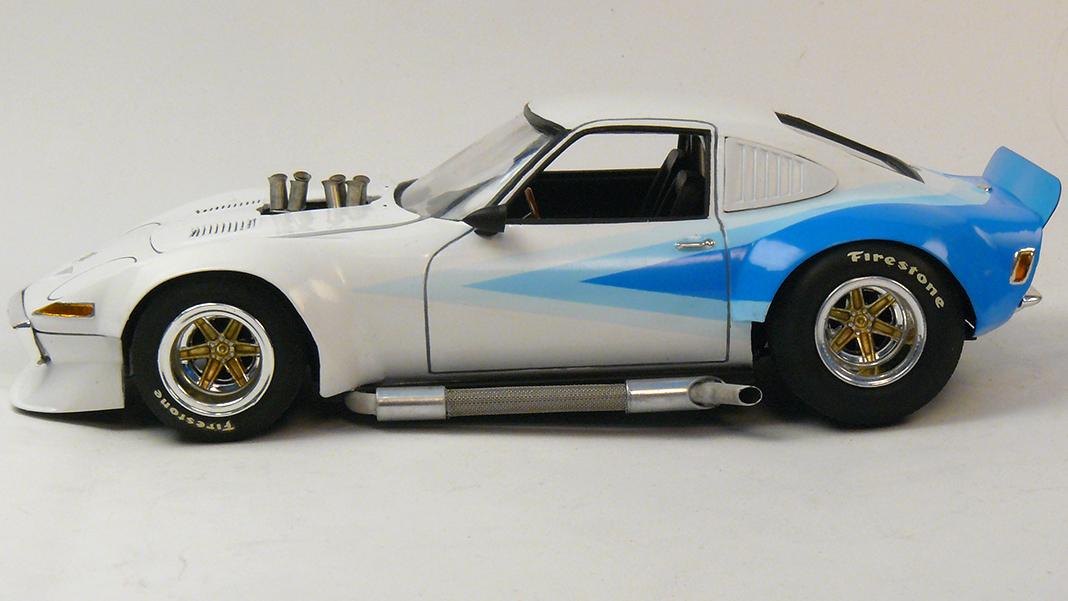
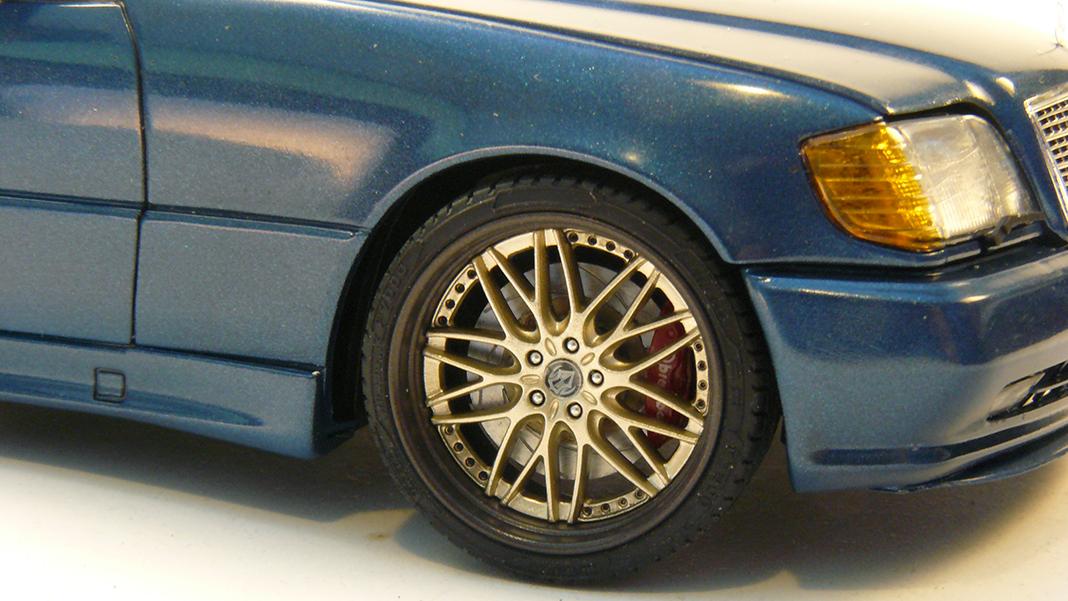
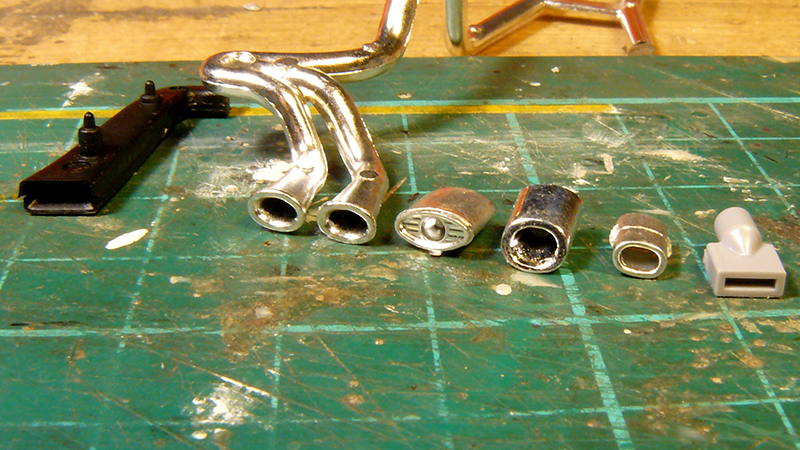
Changes: - Fender flares from Fujimi set - Engine is Corvette V8. Changed the intake manifold and carbs. Scratchbuild distributor and exhaust headers - Sidepipes made from brass tubes - Model Factory Hiro's 70' prototype tyres with widened kit rims - Front spoiler out of Peugeot 206 WRC rear spoiler. Rear spoiler is styrene sheet

-
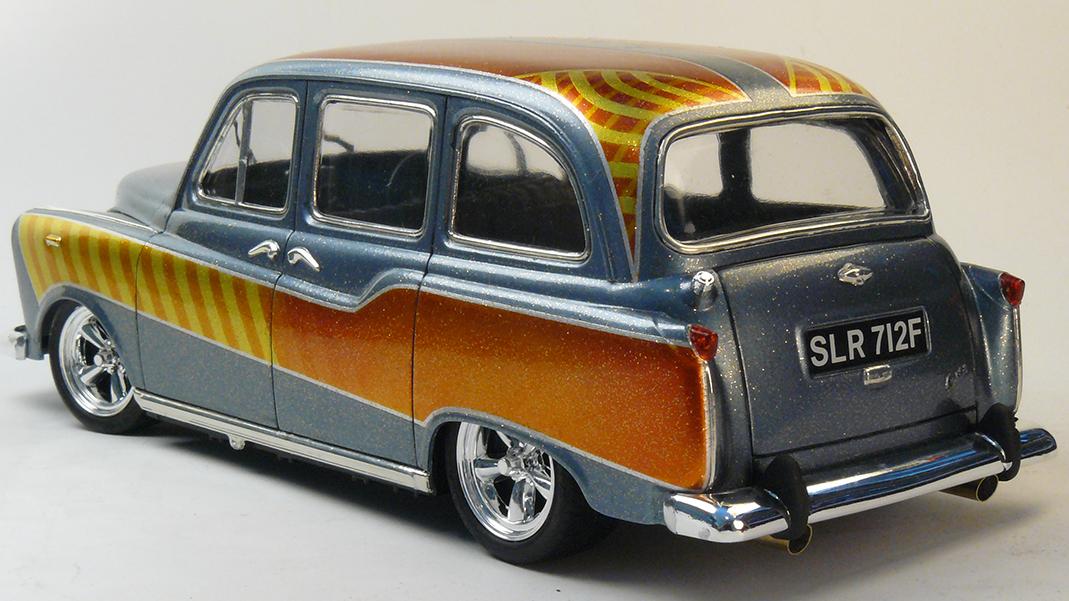
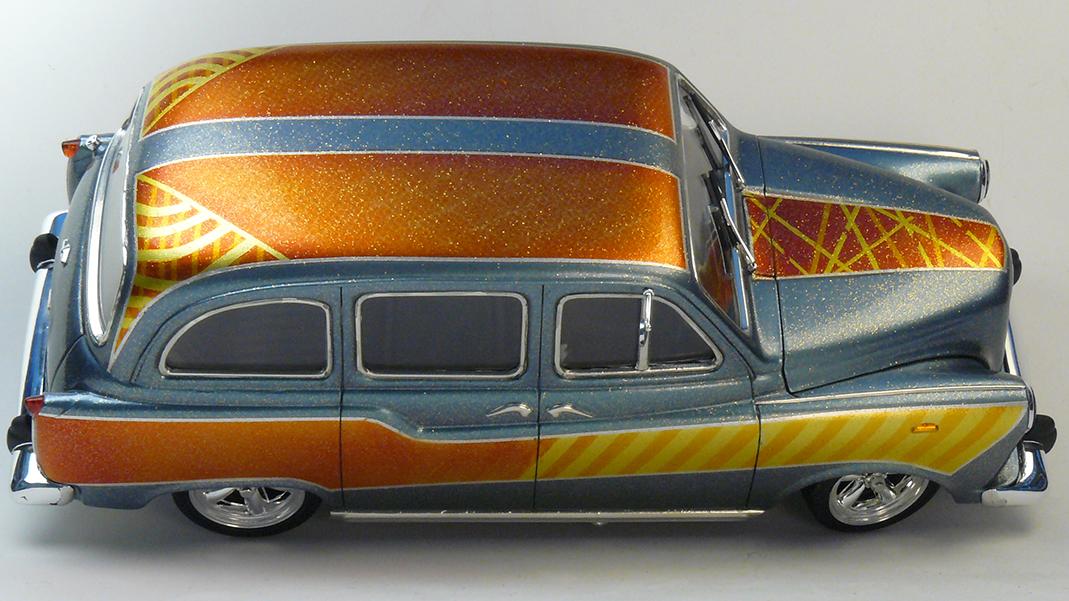
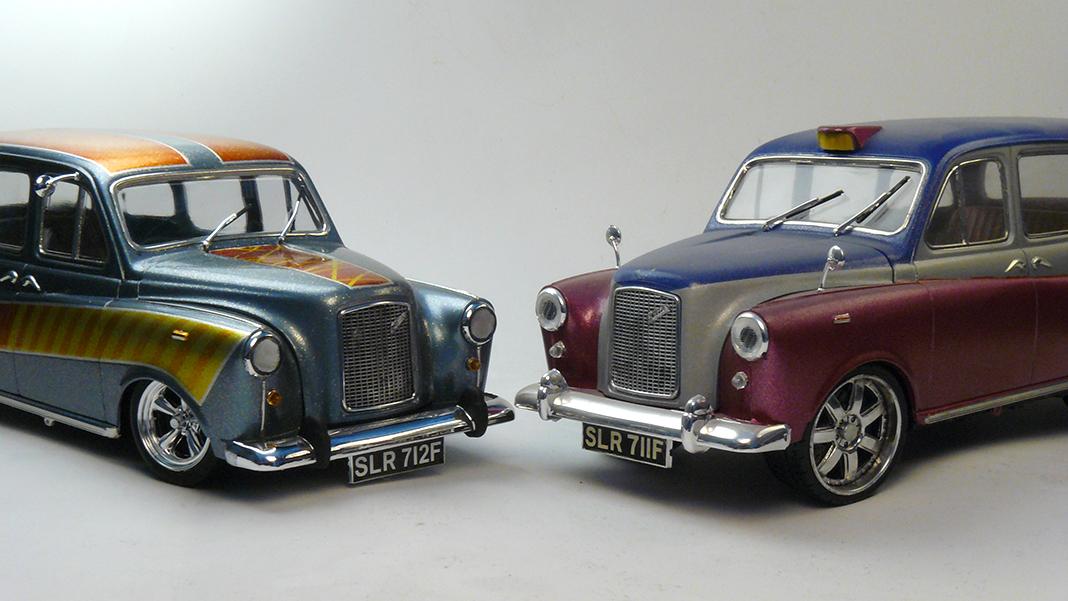
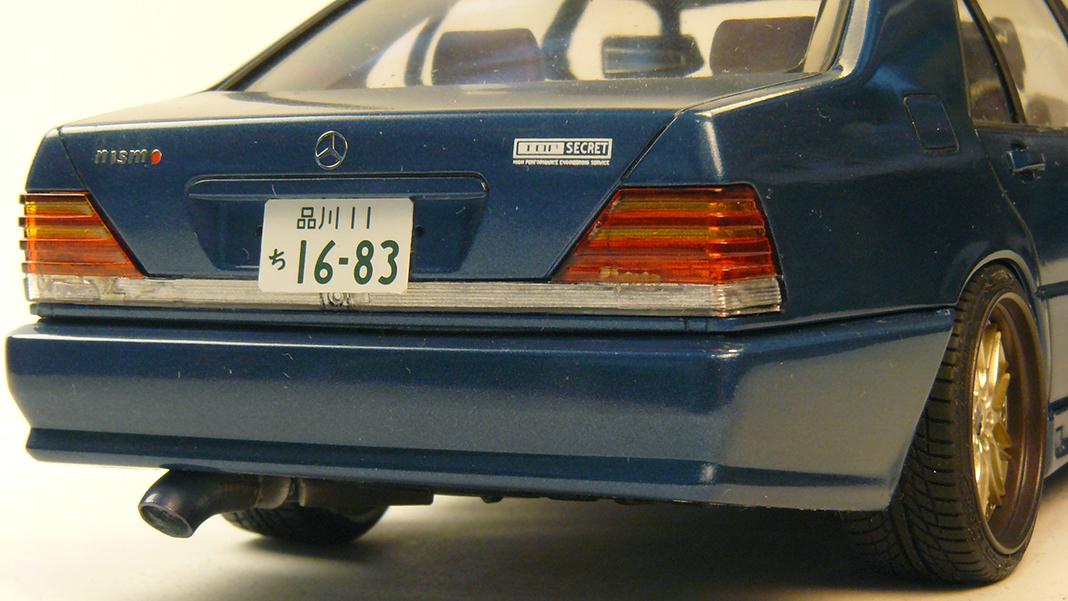
Changes: - Lowering - Wheels and tyres - Double exhaust - Sideview mirror place switched - Custom paintjob Lowest picture is the same kit, built by me in early 2000's. Notice the kit's updated licence plate.
-
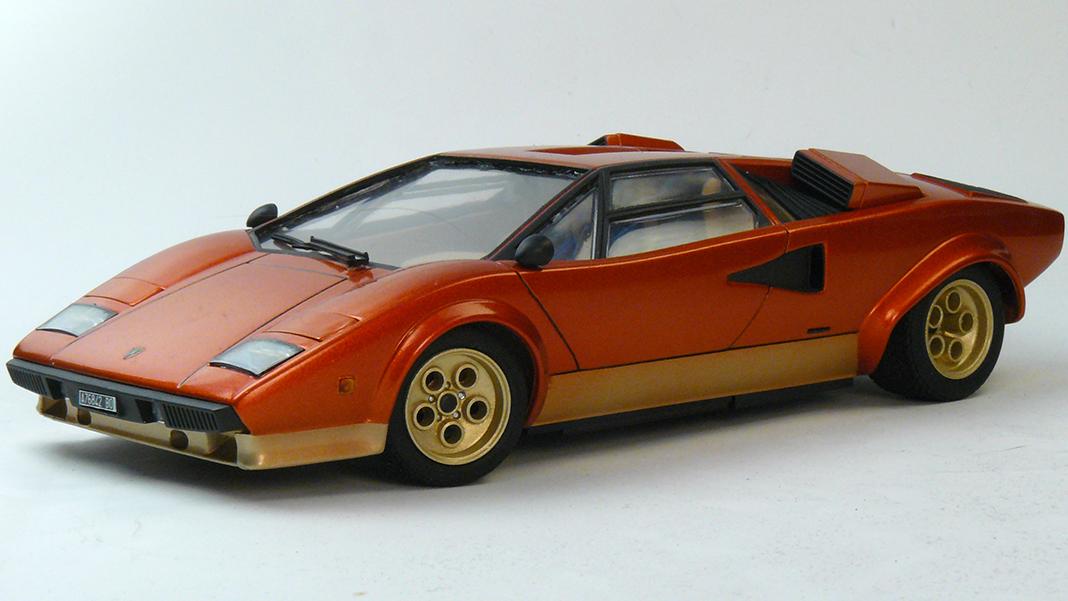
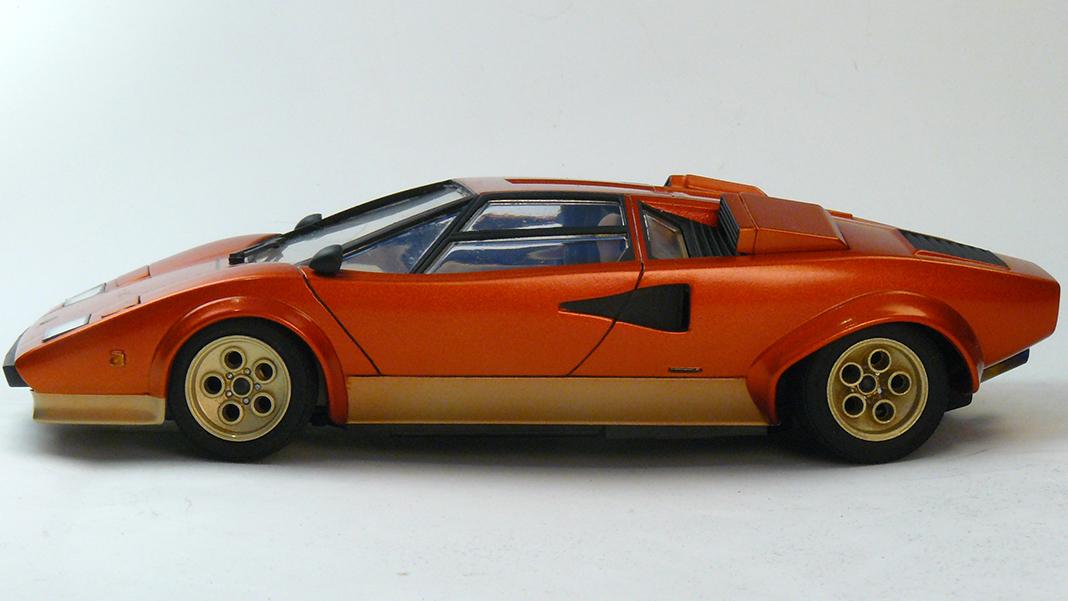
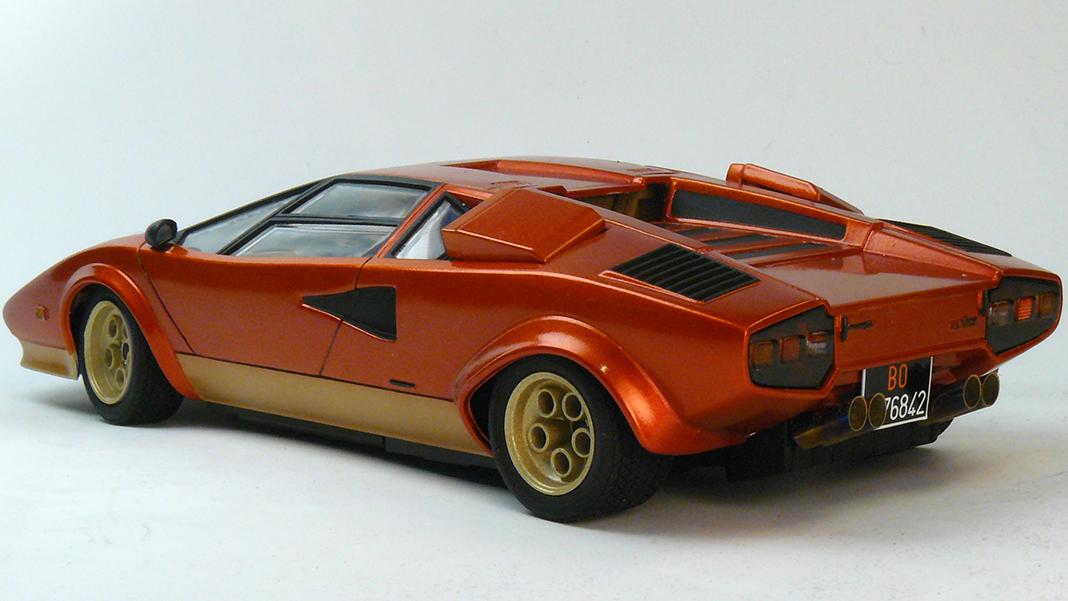
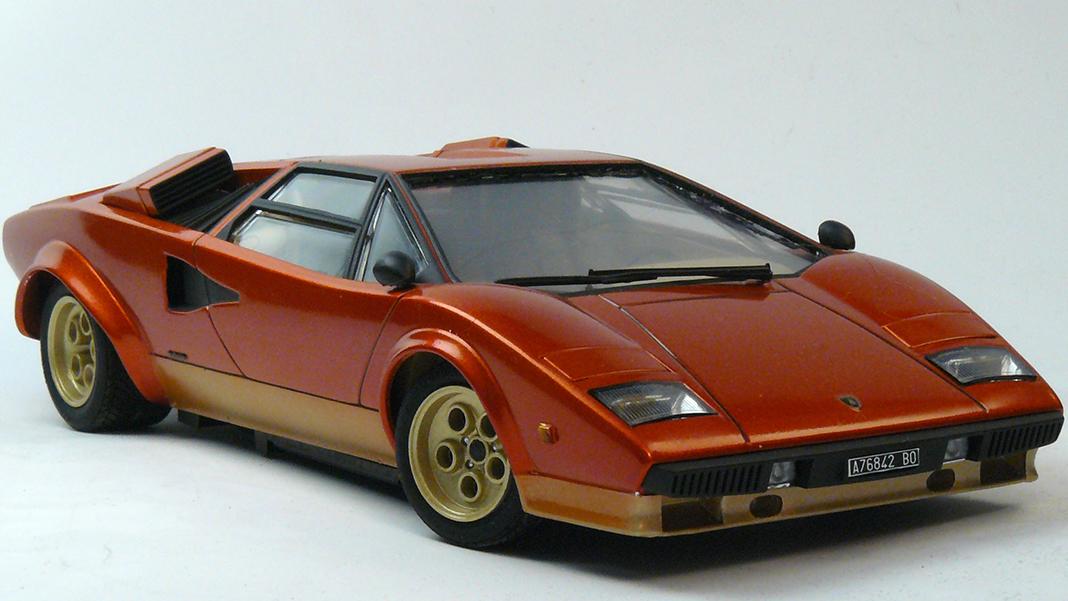
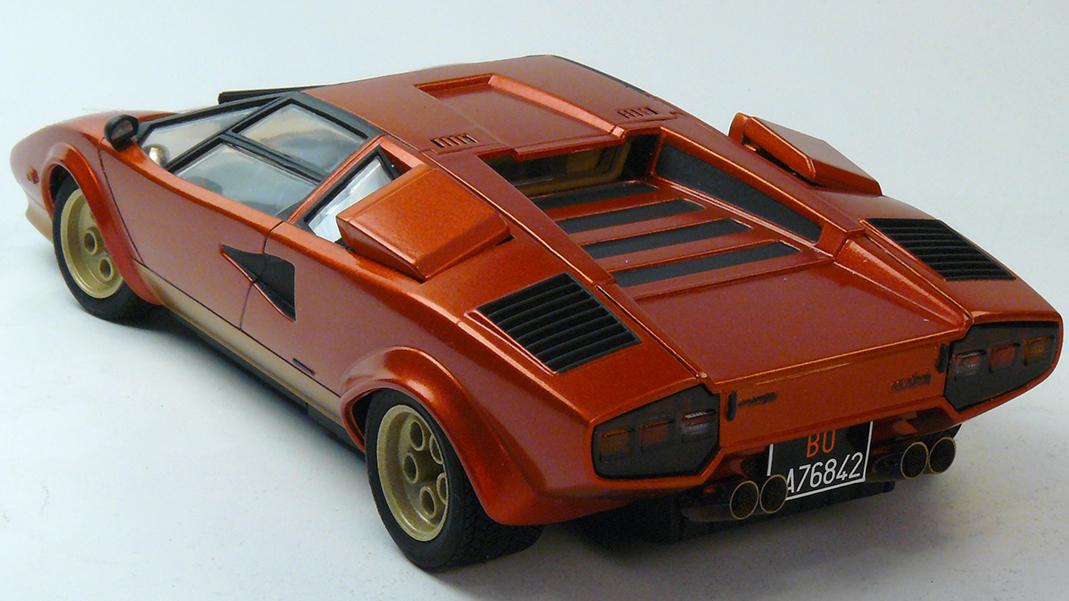
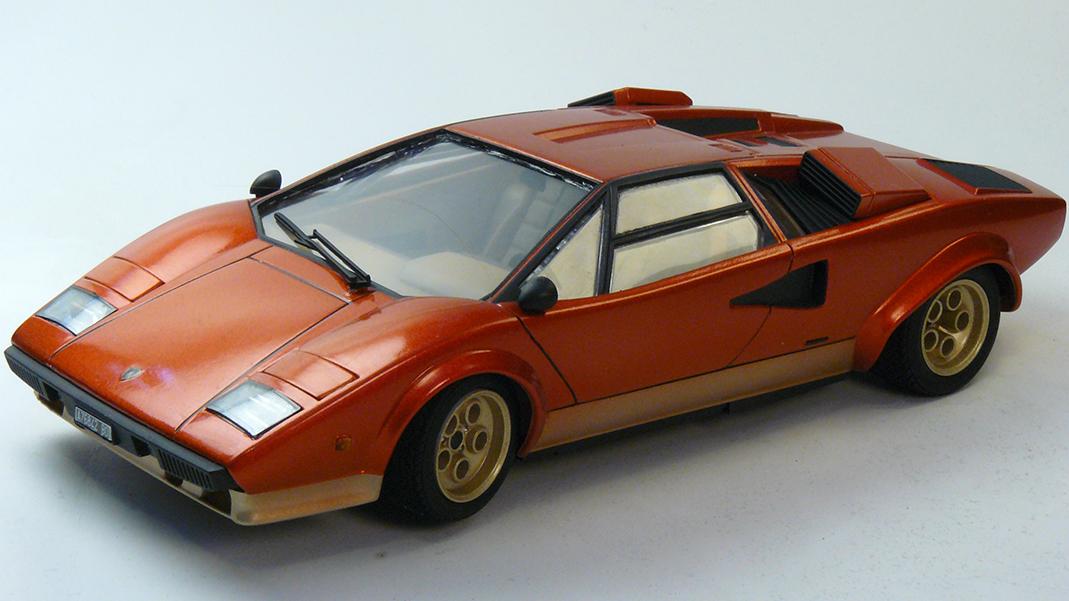
Paint idea came from early Lamborghini Miuras. Changed exhaust tips to metallic ones and removed rear wing.
-
Changes: - Self casted air filters, carbs and valve covers - Learned that you can't fix canned spraypaints with airbrush. Metallic chips will align differently mainly because pressure differences. - Don't touch black bare metal foil after applied. Will rub off.
-
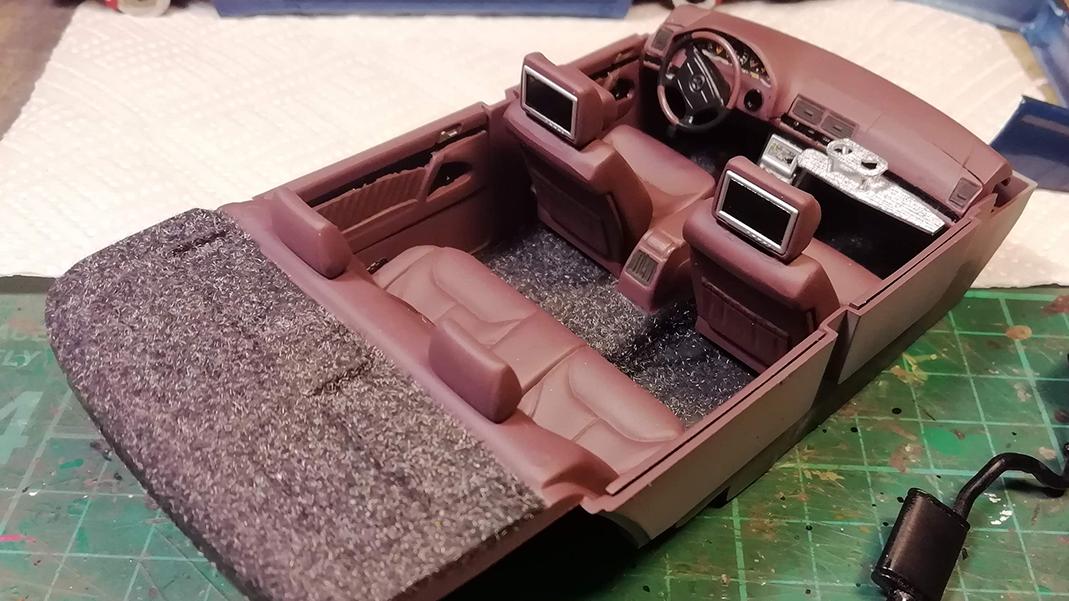
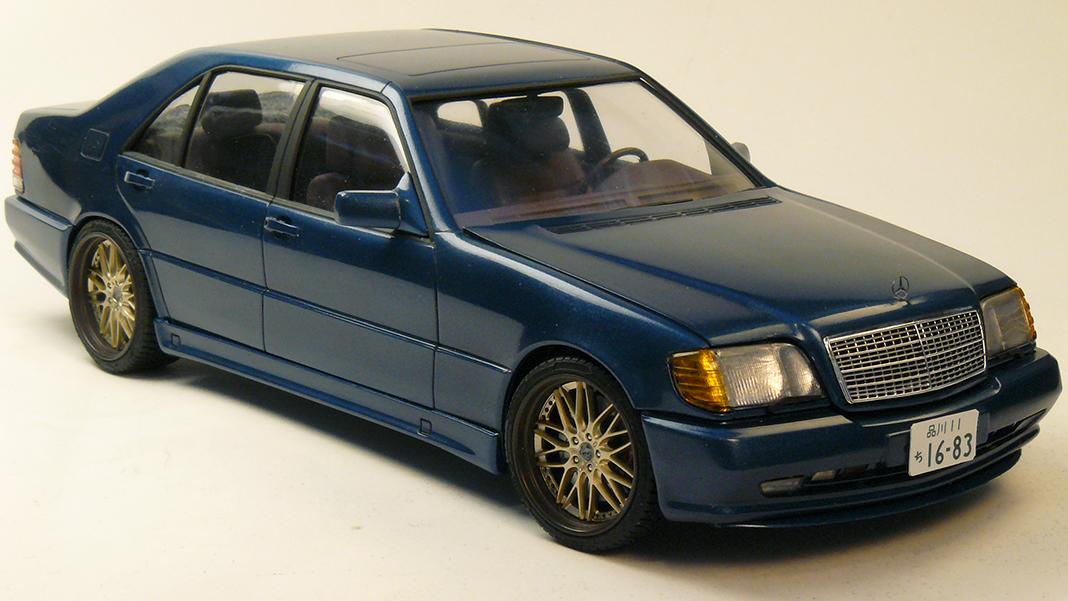
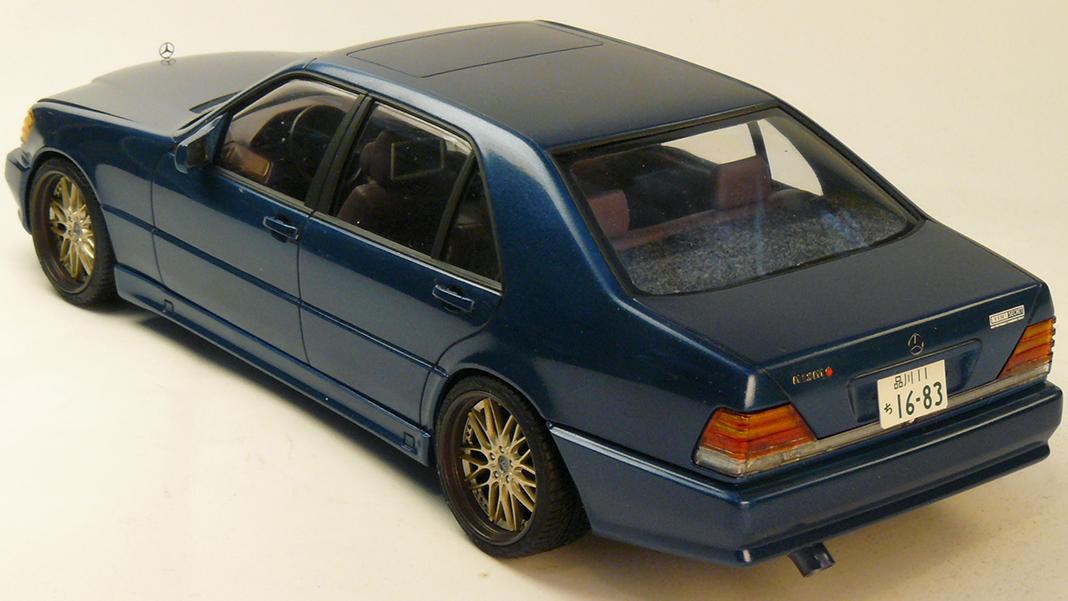
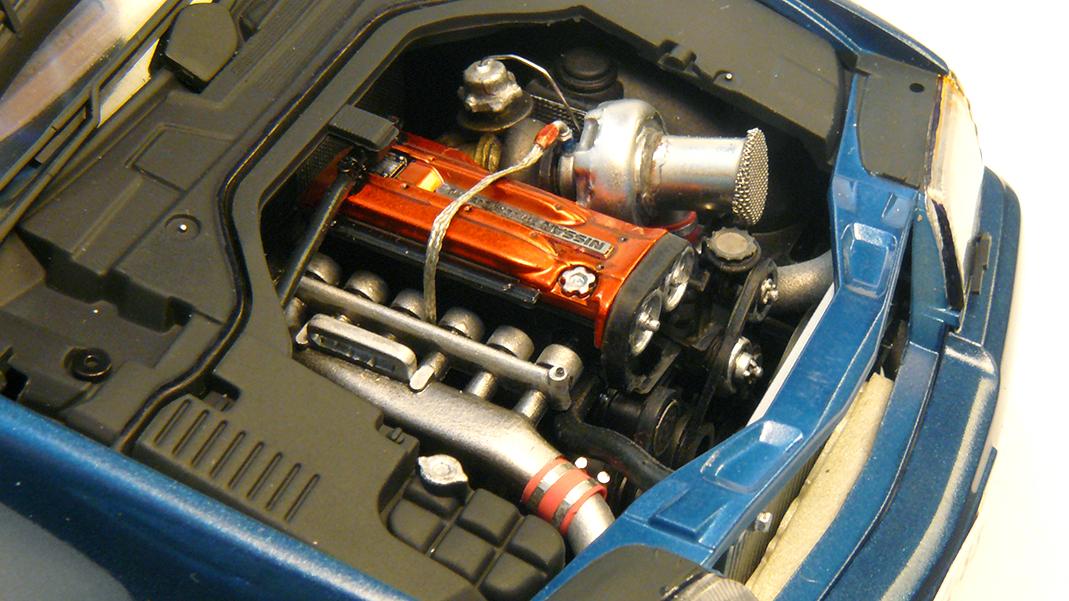
Changes: - Bigger wheels and tyres from Aoshima - Photoetch brake discs - Engine changed to Nissan RB26 with resin turbo - New front seat headrests with screens - Scratchbuild "japanese" table for the passenger
-
This method might work. There's two things that I can think would be issue. First, you have have something to protect the pipe in the vice. Otherwise you could have nasty marks in your pipe. Secondly, some kind of spacer or stopped would be required to make two identical oval tubes. Thirdly, what if you like a bend in your fresh oval tube. How do you make that? Also how to attach oval tube to reqular round exhaust pipe? I'm in for all kind of advices and tips. I like making custom exhausts to my models and I like to make them "realistic". At least the tips need to be hollow.
-
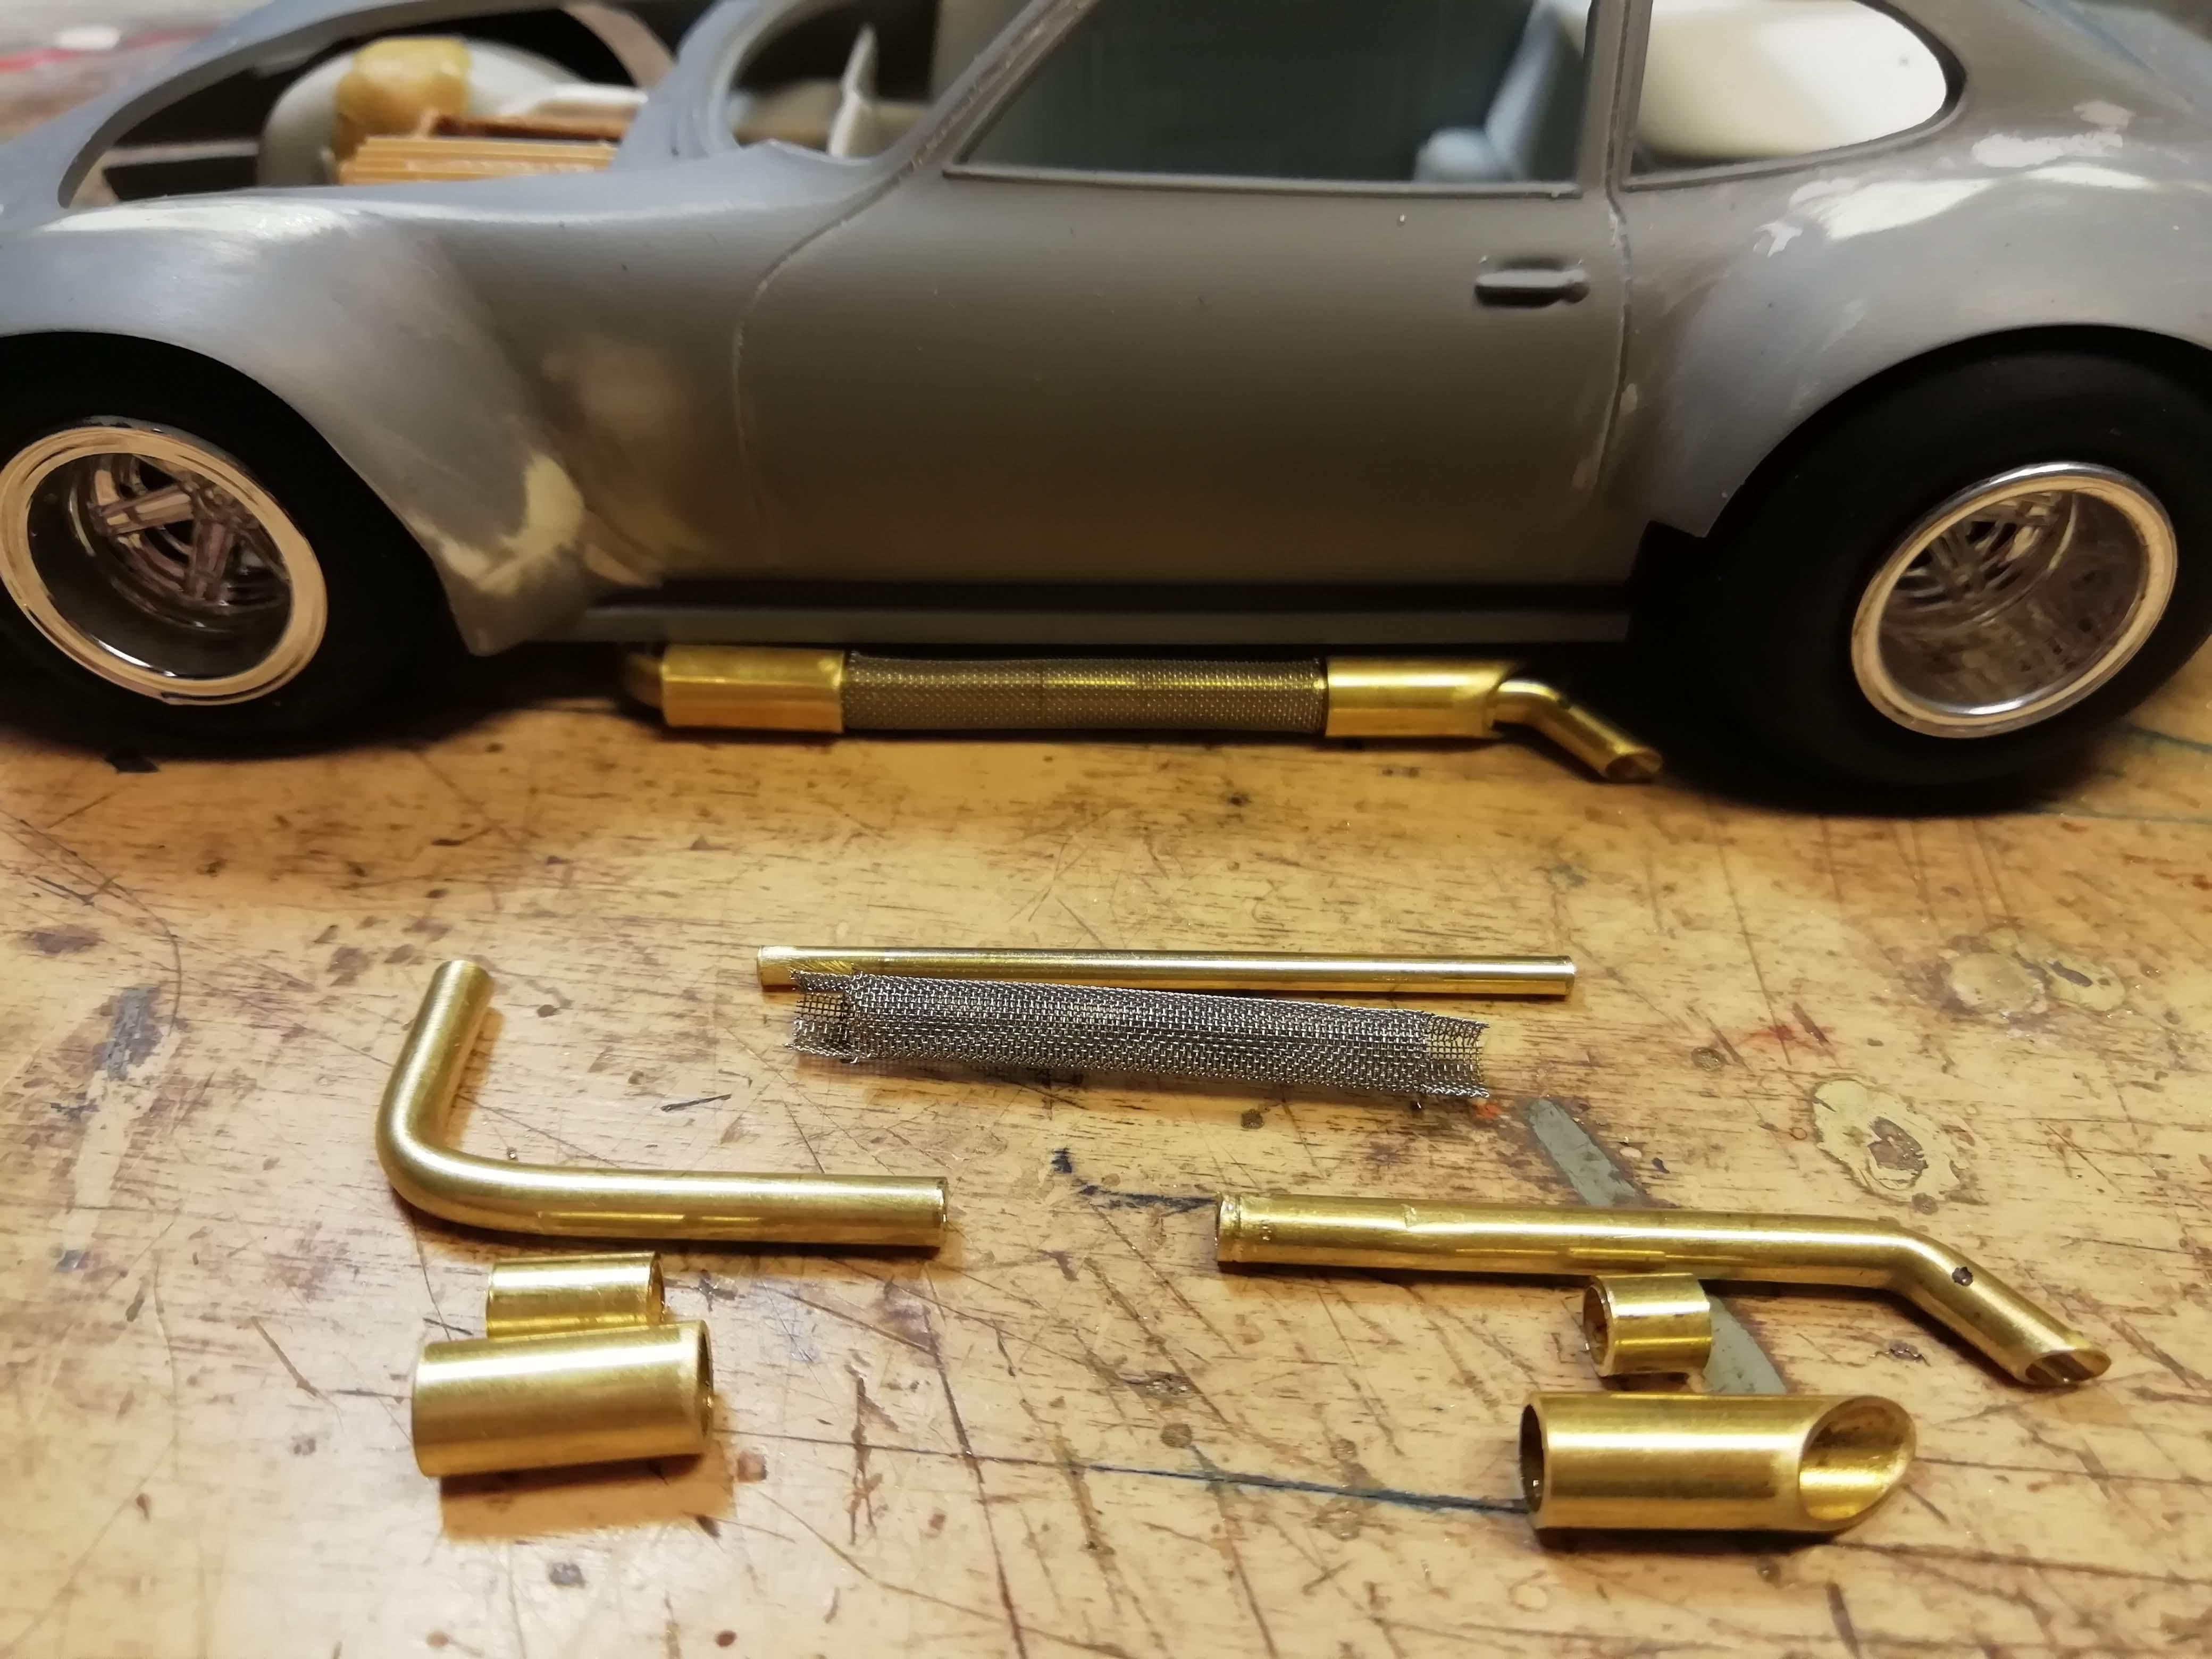
I used Albion Alloys brass tubing for these side pipes. Mainly because I can bend it, without it crushing. Although, I had to use smaller tube inside bigger, to get 90 degree angle. Secondly, they fit inside each other. I also had to drill the tips, so the pipe wouldn't have too thick walls.
-
After alot of thinking, I lowered it this way. In front, I didn't use kit brakes. Glued styrene piece to the lower suspension arm. Then drilled hole to it, allowing new stud(white part) to be mounted up(thus lowering car). For the rear, I left out springs and the triangle structure. I drilled the center axle hole little bit bigger, allowing rear axle to be pushed closer to the chassis. I would have liked to have the suspension little bit lower in the rear, but axle interfered with stock exhaust. So that needs to modified too, if you want lower rear even more.
-
Thanks. Chrome moldings were very tricky to get right.
-
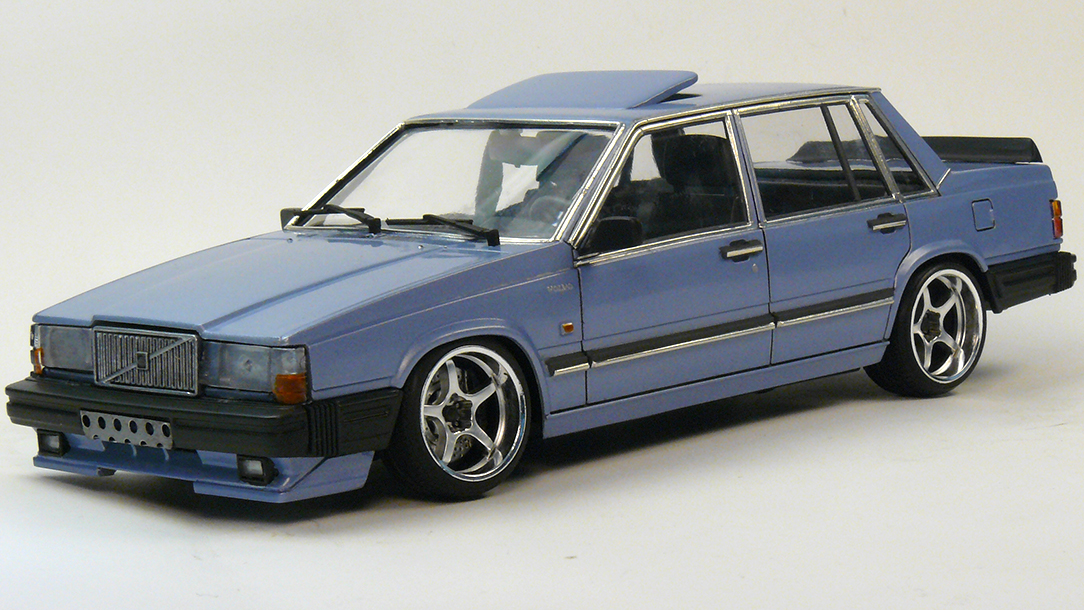
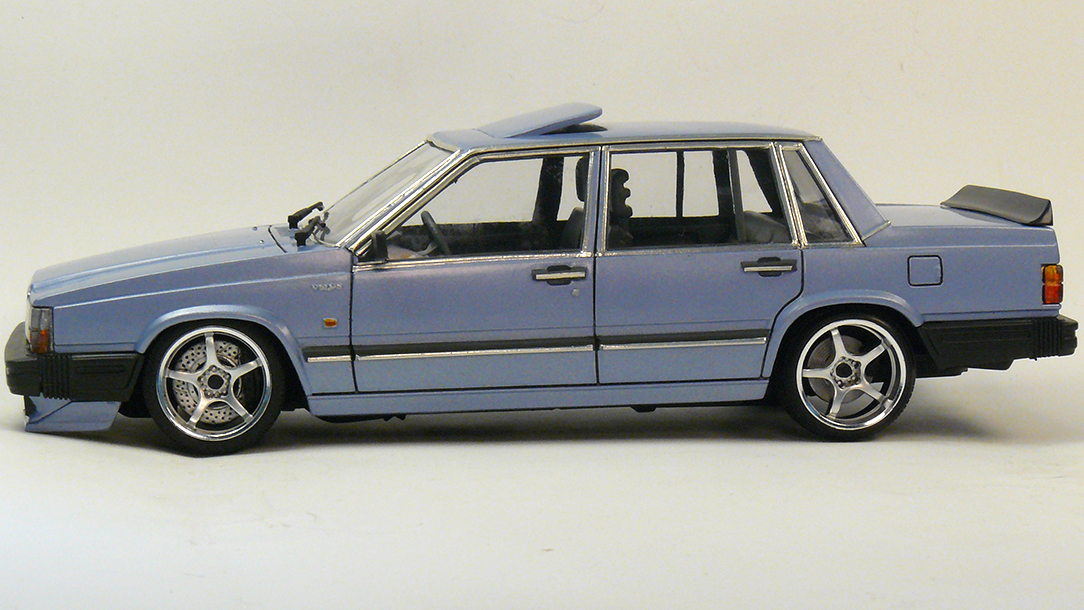
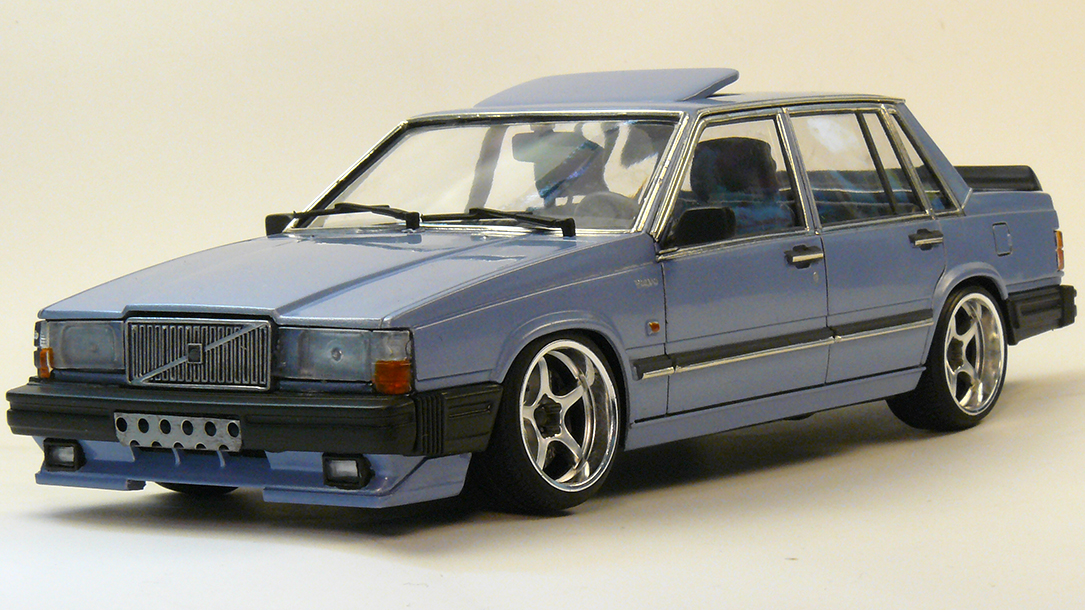
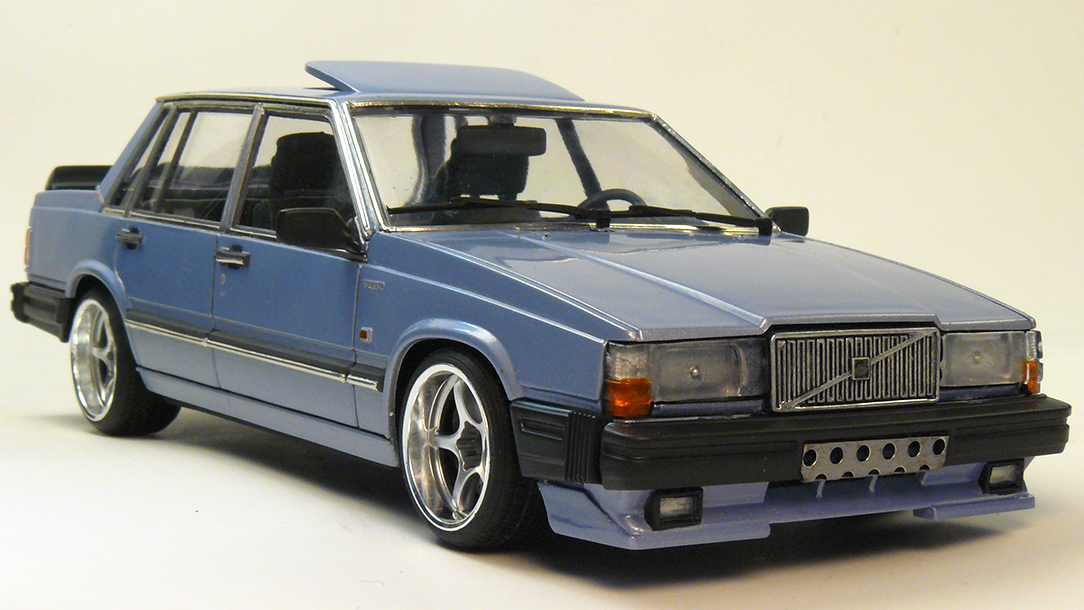
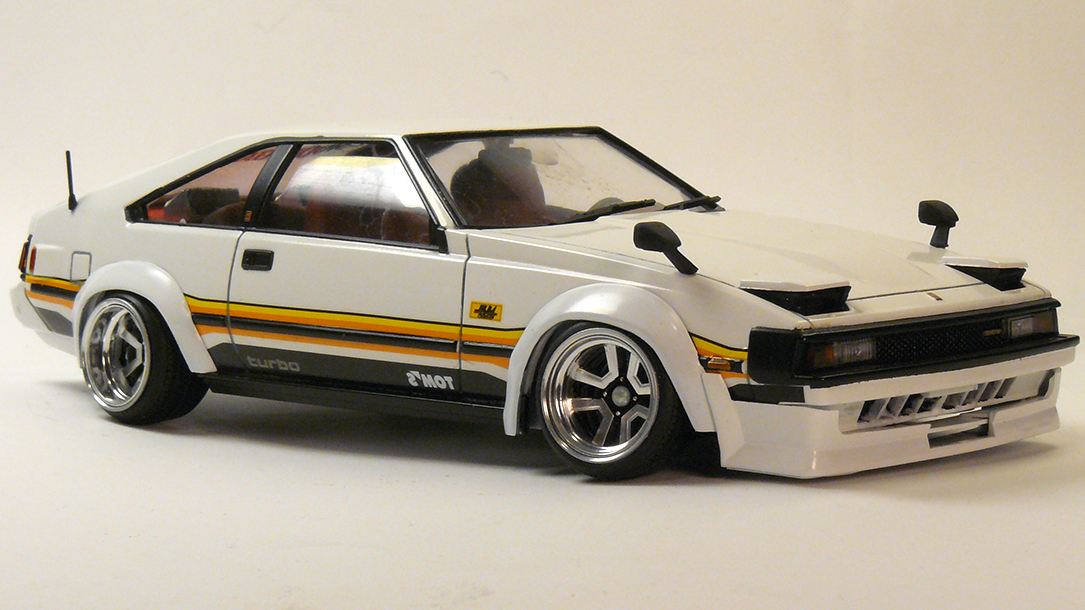
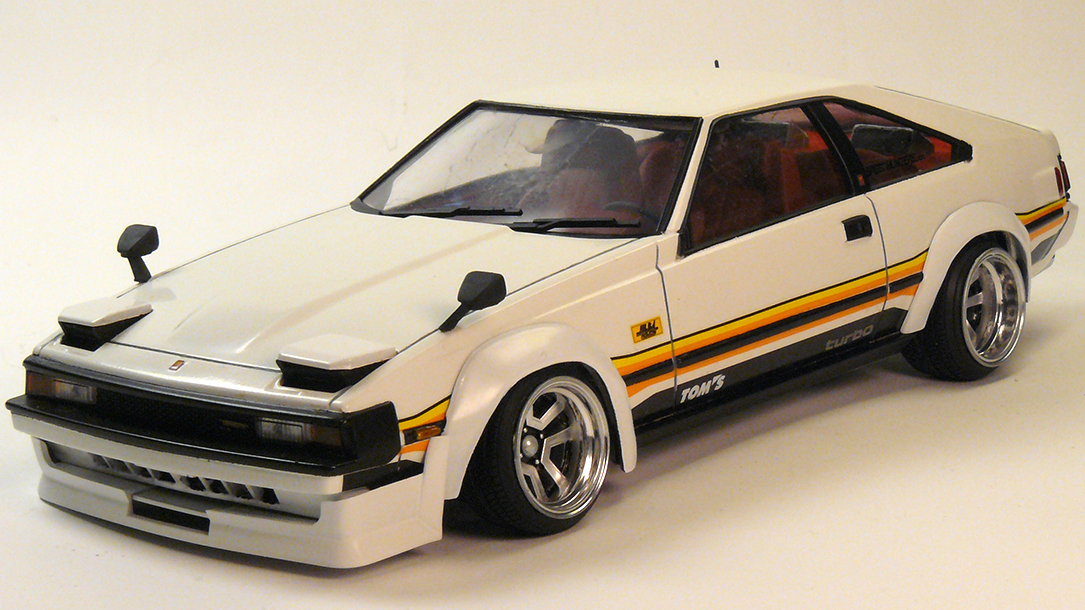
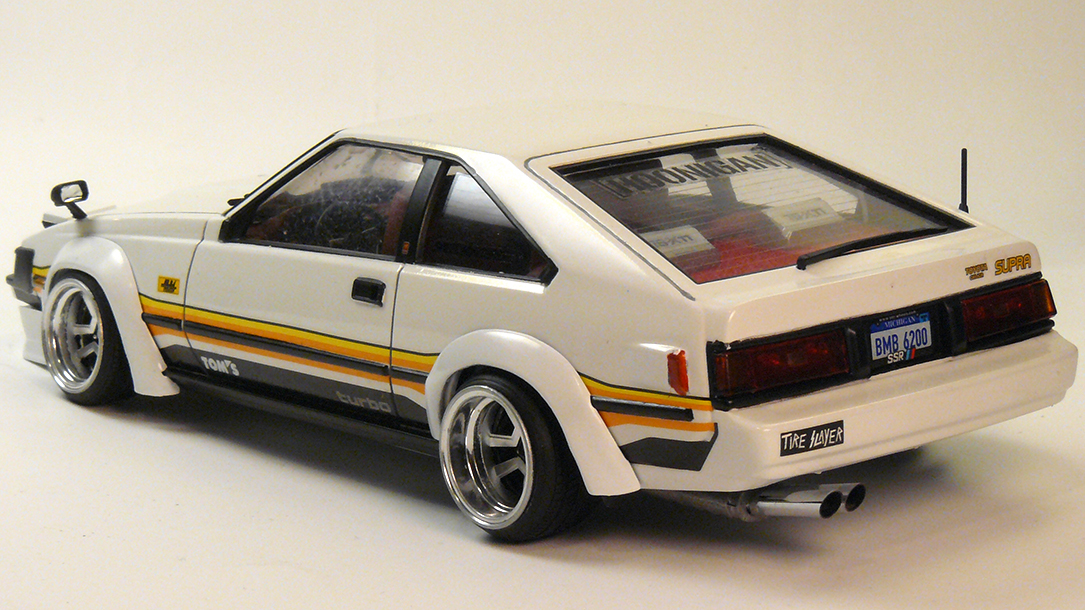
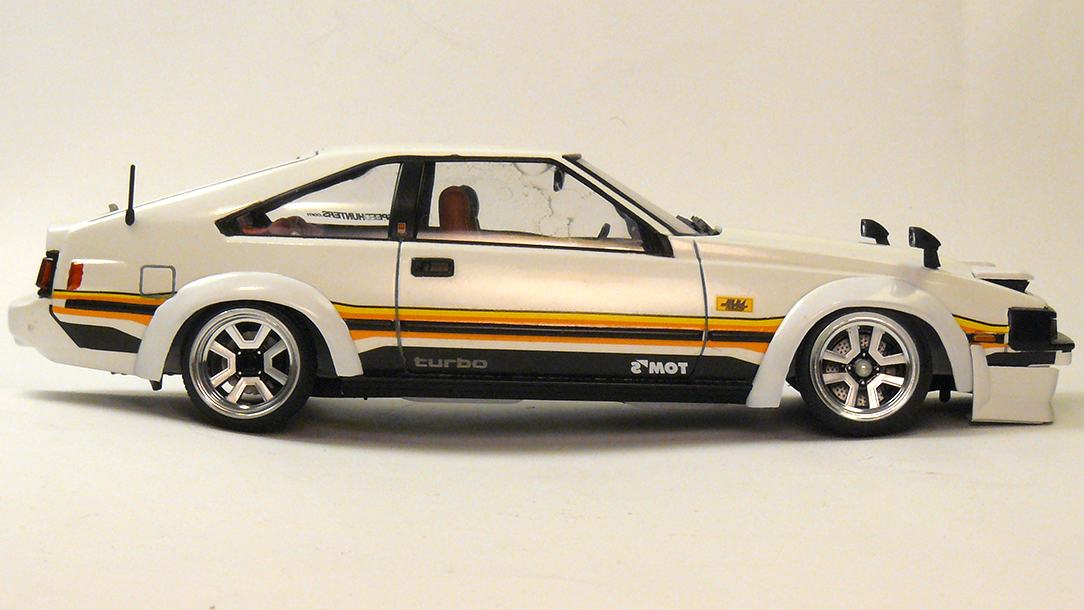
Modifications: -Painted with Tamiya TS-58 Pearl Light Blue -Lowered suspension -New brakes -Fujimi rims + added chrome lips -Stretched tyres -Exhaust tip -Rear spoiler -Modified front lip -Opened sunroof
-
Yes i have some Albion Alloys tubing. They're great. It's the shaping part that's hard. Could some kind of buck work? Has anybody tried? And has anybody tried some methods of filling the tube?
-
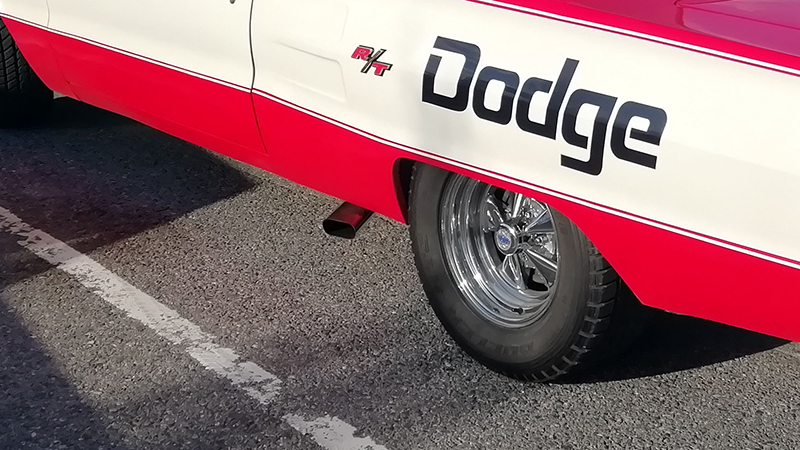
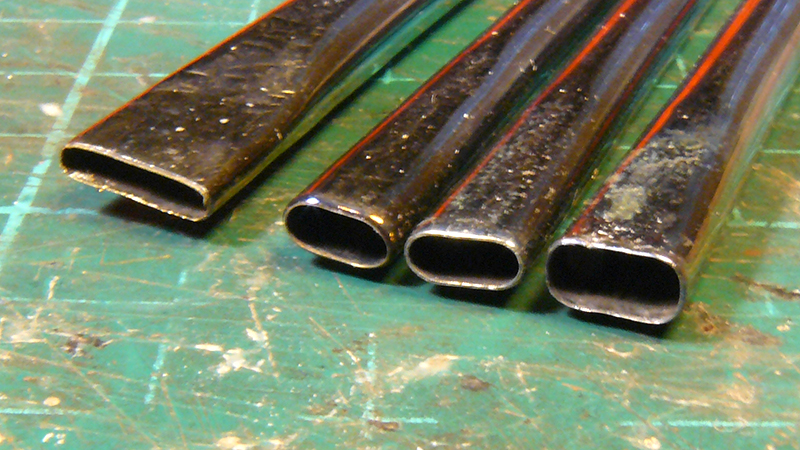
Couple of weeks ago, I saw this Dodge sporting nice oval shaped exhaust pipes. It got me thinkering, how can I make similar and realistic ones to scale models. Since I wanted pipes to be pipes, I tried heating radio antenna, and making it oval shaped. Kinda easy process, but hard to make two similar ones. Also hard to make longer section. Also you have to make the transition to normal exhaust pipe size. Of course, if you only need piping section to underneath the car, you can shape some round rod to oval rod. Then I remembered, that I had made some experiments of exhaust tips before. -Cutting round tube to half and widening it. Hard to make super smooth. I think this is the way Nascar boom tubes are made. Could be wrong. -Pie cutting tube and making it pointing down. -Using radio antenna with pipe bender. It has too small wall thickness, so it wants to crumble. If stopped at the right moment, it could be snapped into two pieces. I can create two identical ovalish shapes. -Heated and drilled exhaust tip from parts sprue. Hard to make wall thickness realistic, and you could see the inside being not hollow. There is also sometimes oval exhaust tips in kits. I like to use real pipe on my exhausts, because it adds realism. It is also one of my favourite parts when modifying cars. I hate some of the kits, when exhaust is molded shut. You could drill those ends open, but I find it difficult. Centering the hole, getting wall thickness right. Those things. When the tips are not round, it gets even harder. Carving an oval hole. Not going to be clean. Almost every time I change at least the round tips, to hollow ones. I like using radio antennas and electric wire crimps. You could even use crimps with the plastic things on, to have some interestign shapes. Crimps could also be used as intake funnels. -What kind of methods have you used when building interesting exhaust pipes/tips/heatshieds? -Have you tried to make Nascar boom tubes?
-
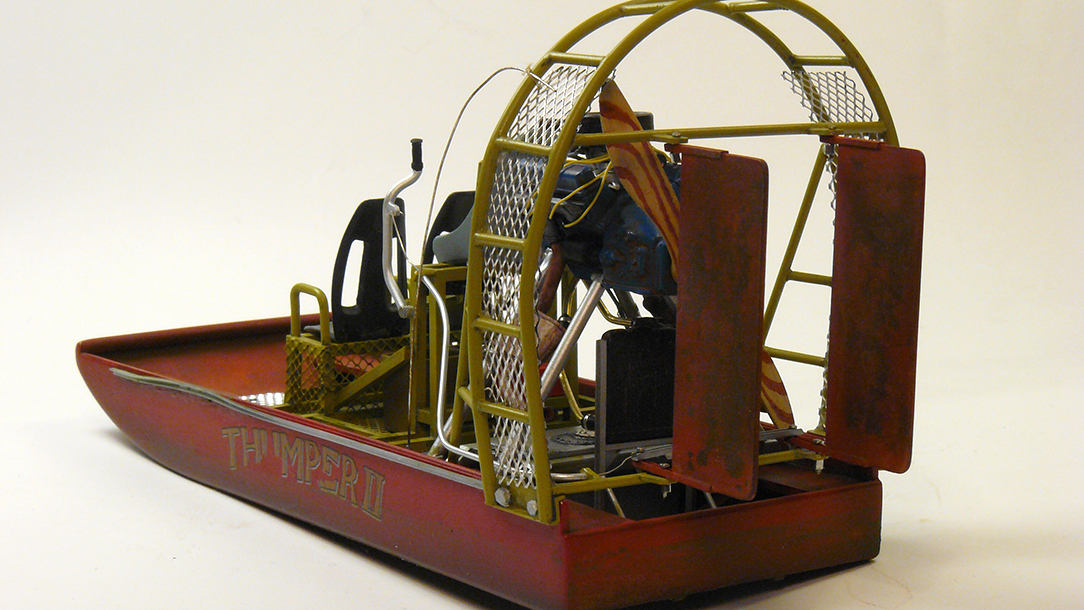
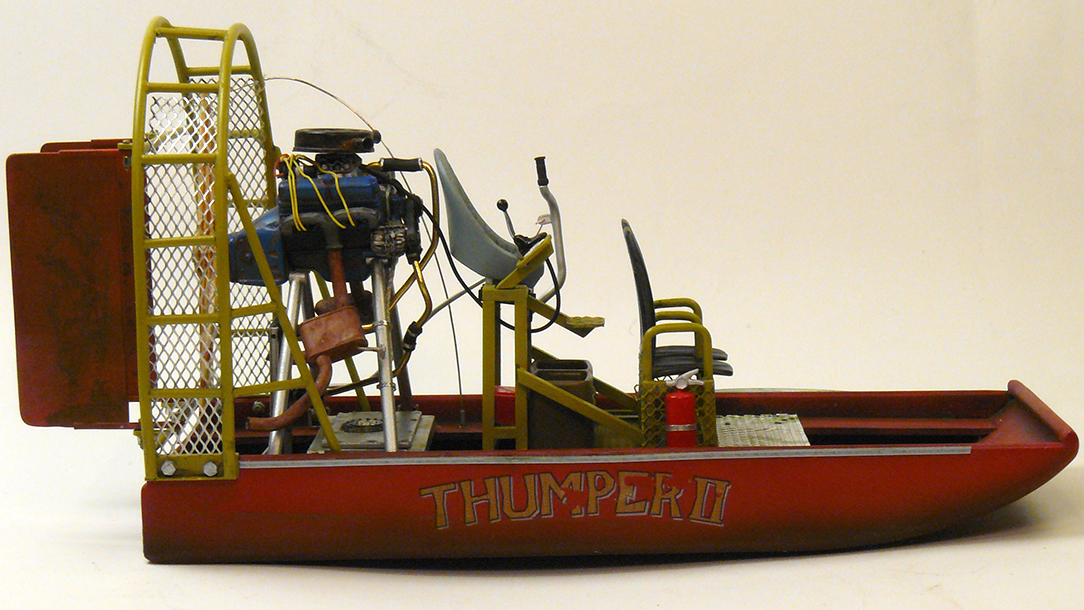
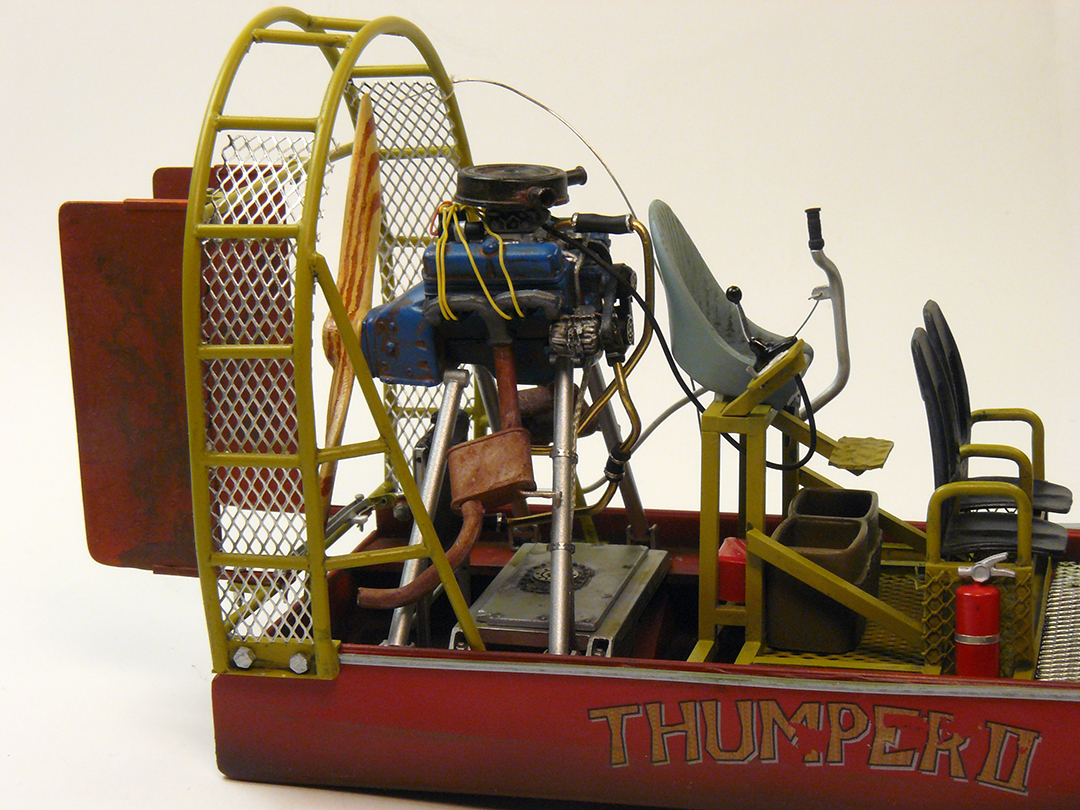
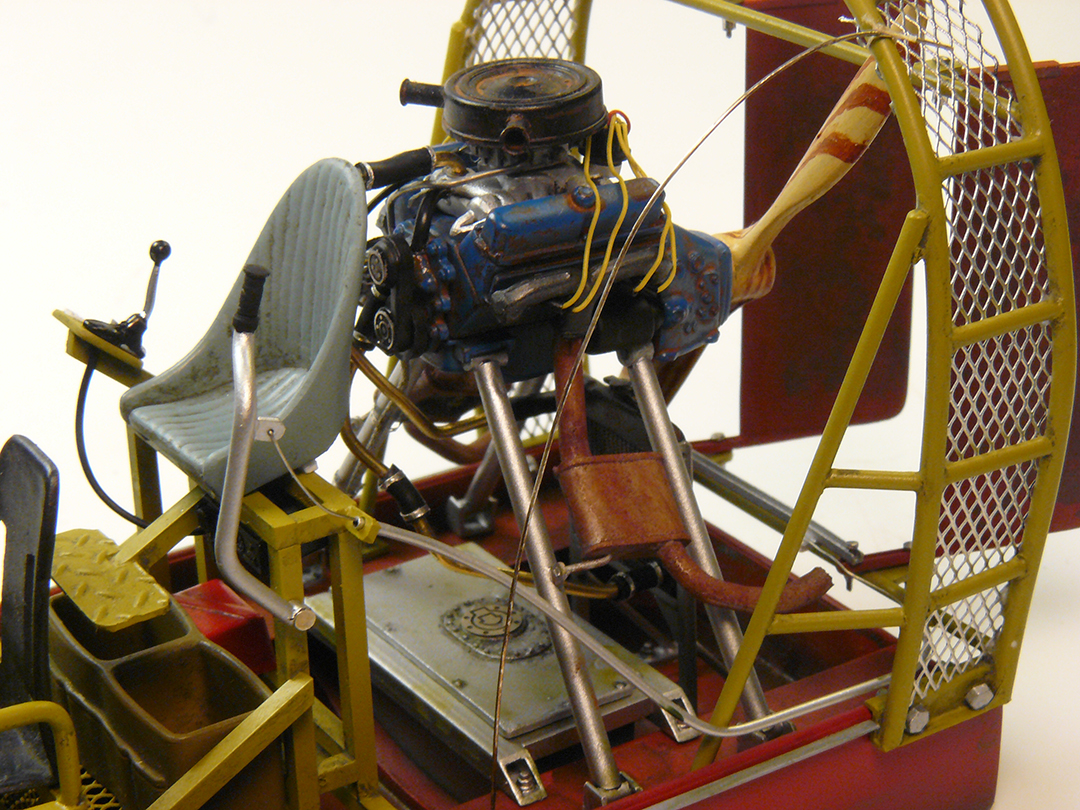
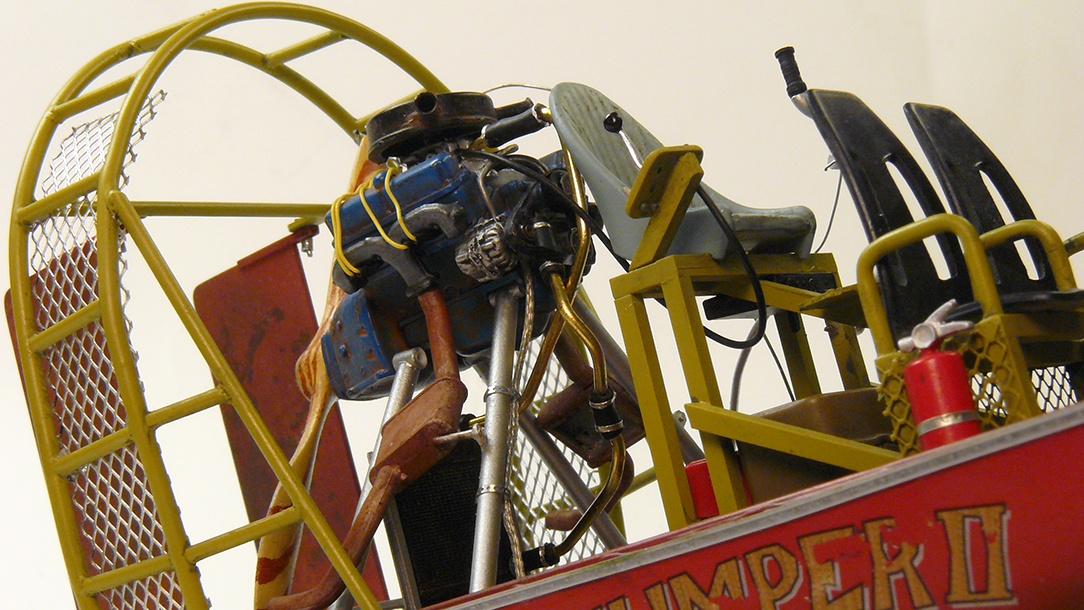
Scratchbuild V8 swamp boat
Jurva replied to Jurva's topic in All The Rest: Motorcycles, Aviation, Military, Sci-Fi, Figures
Thanks for the feedback. -
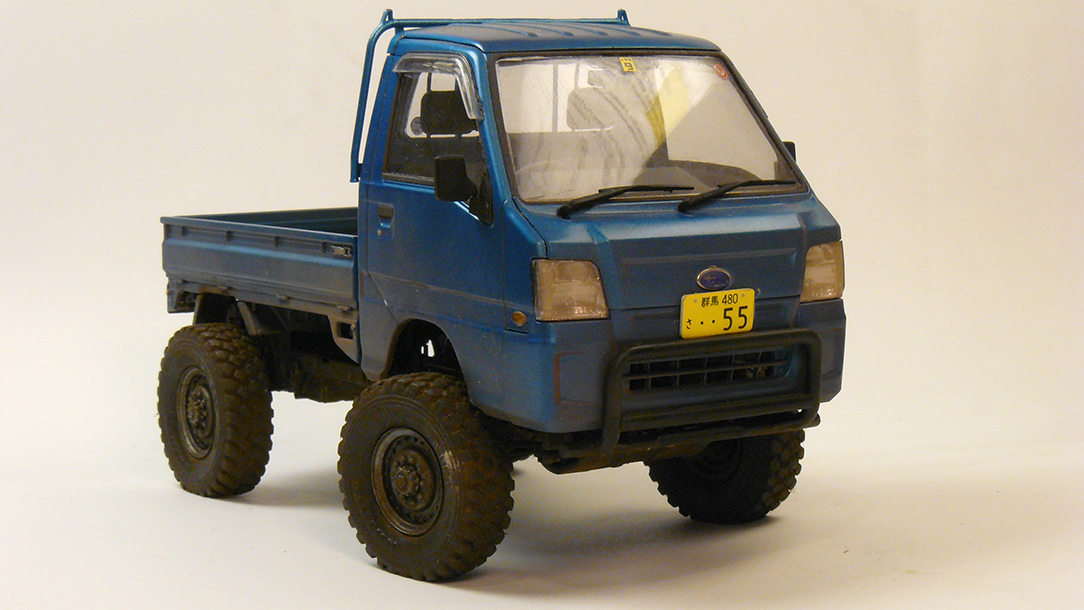
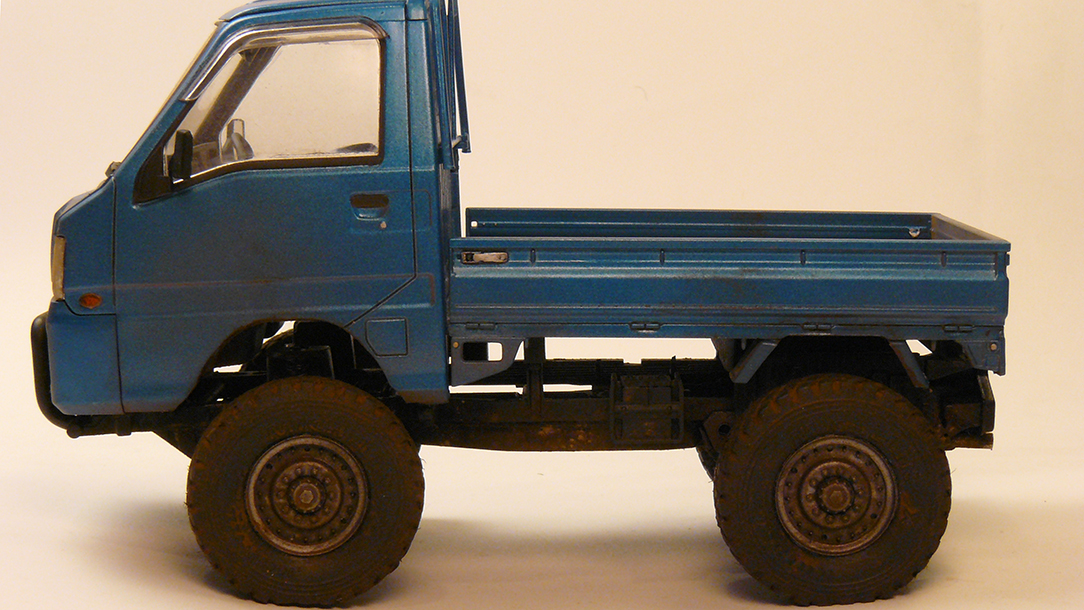
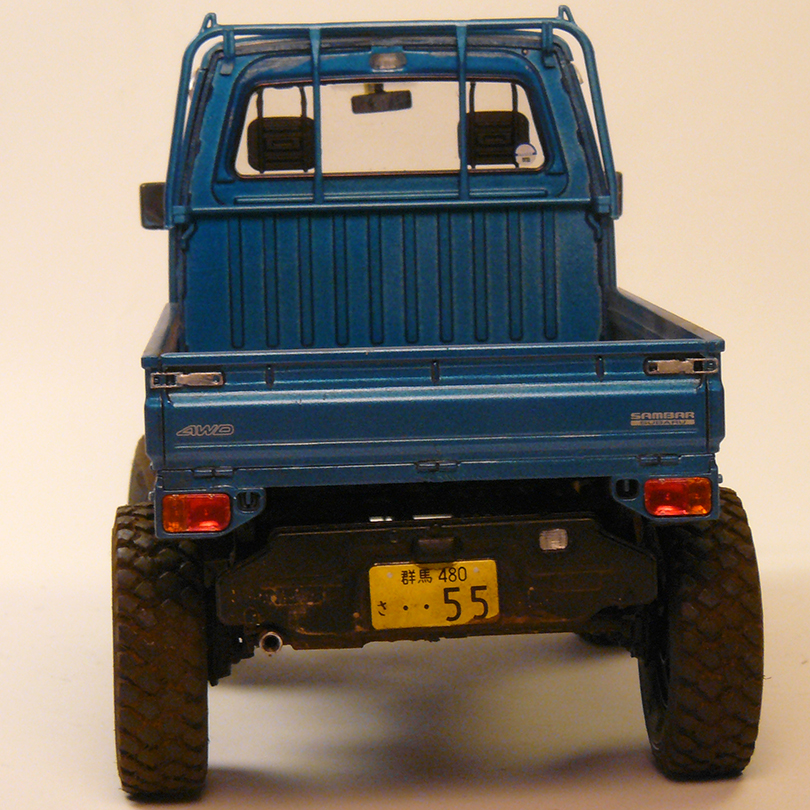
Lifted Subaru Sambar
Jurva replied to Jurva's topic in Model Trucks: Pickups, Vans, SUVs, Light Commercial
Thanks for the feedback. -
Thanks for the feedback.
-
I got it from some random decal sheet. I don't know makes it. And thanks for the feedback.
-
Scratchbuild almost 100%. Only kit parts were engine, seats, propeller, fuel tank + some details. Steering works too.
-
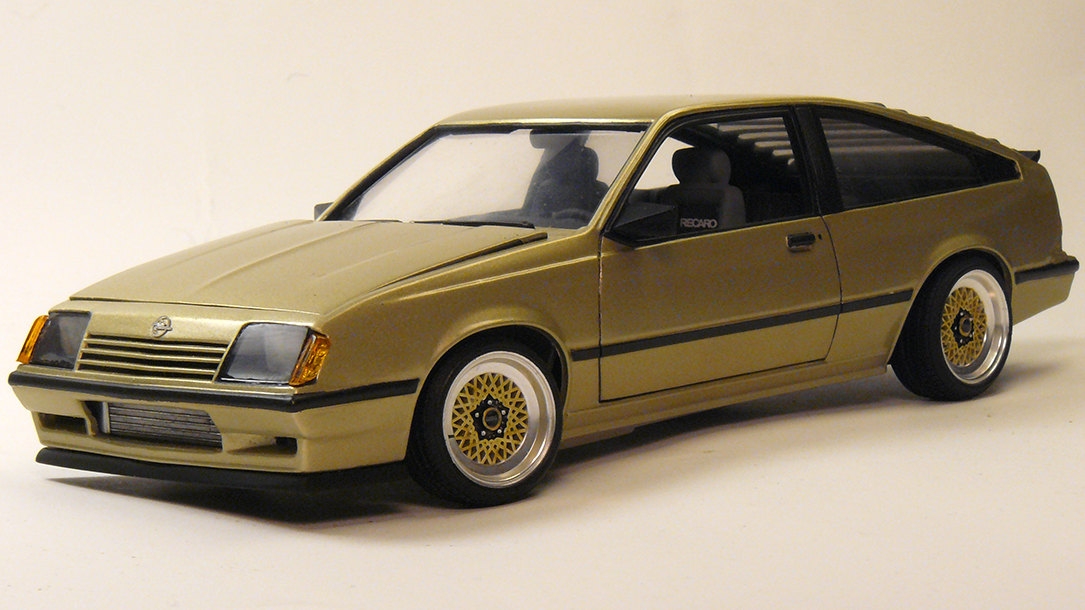
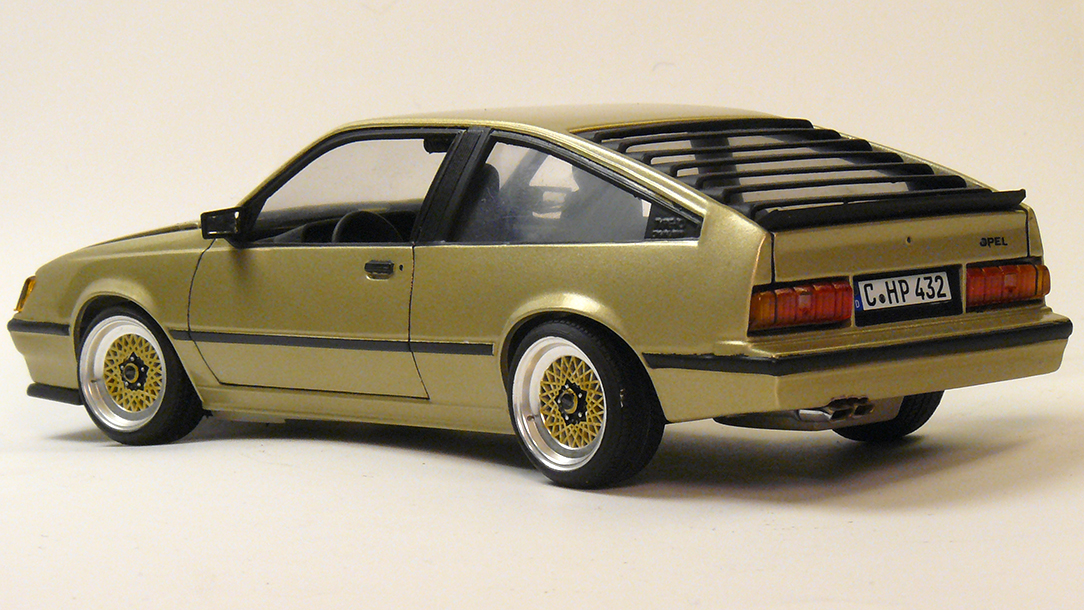
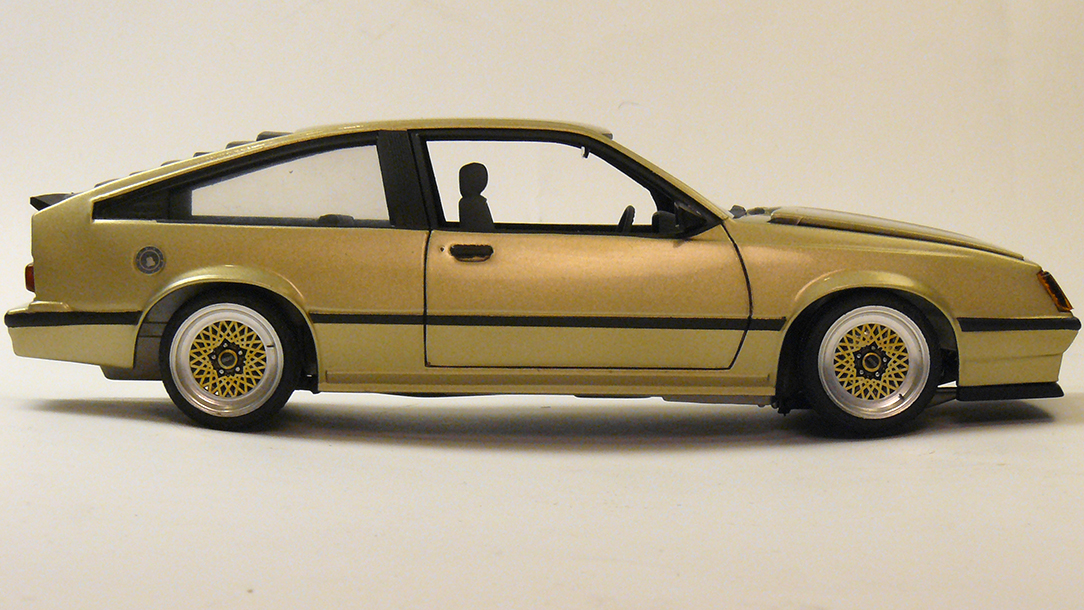
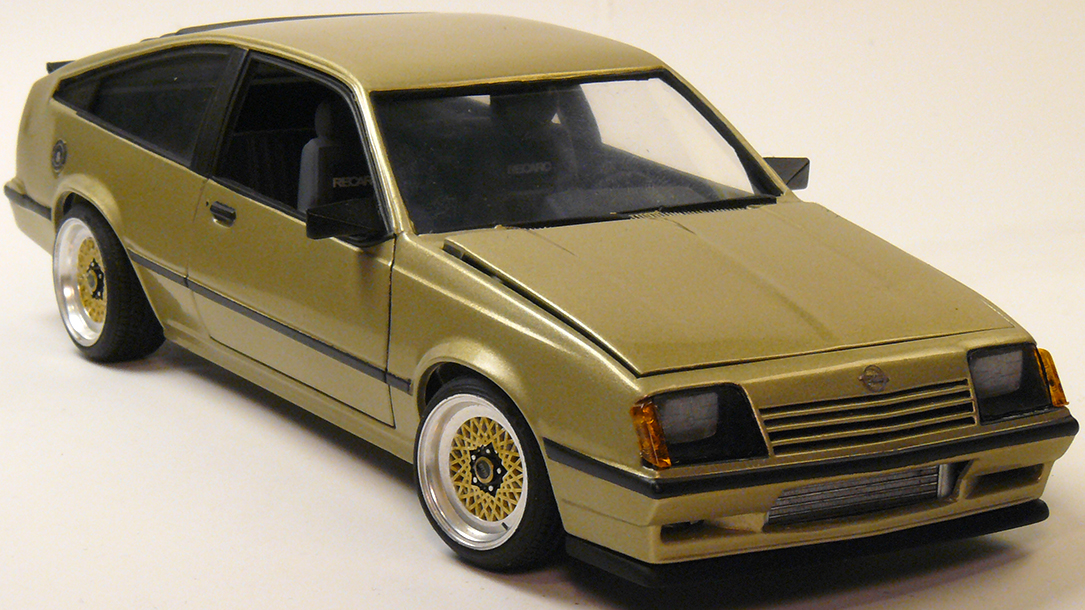
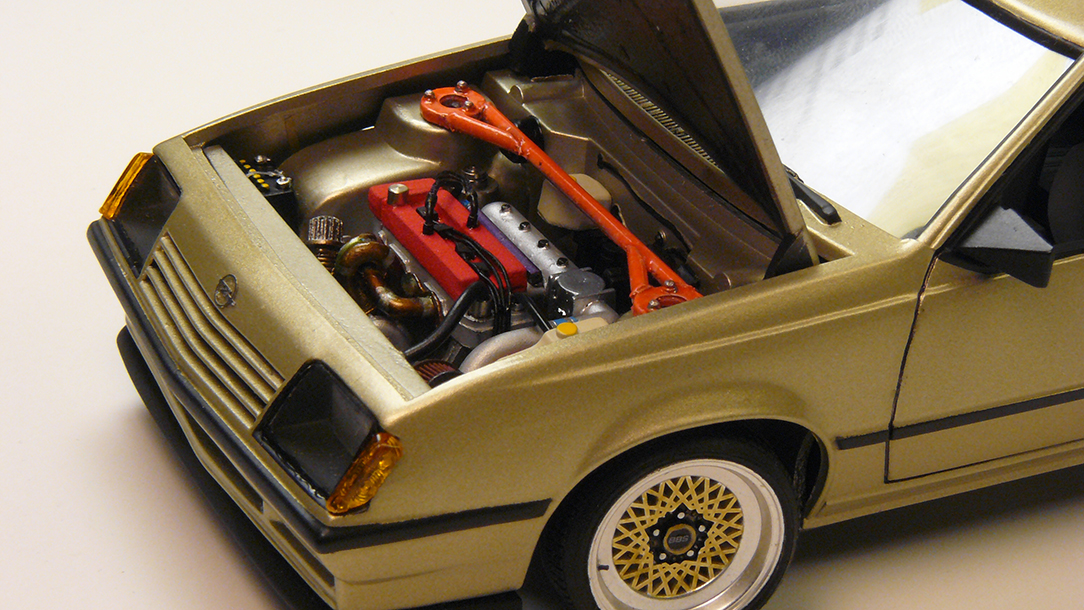
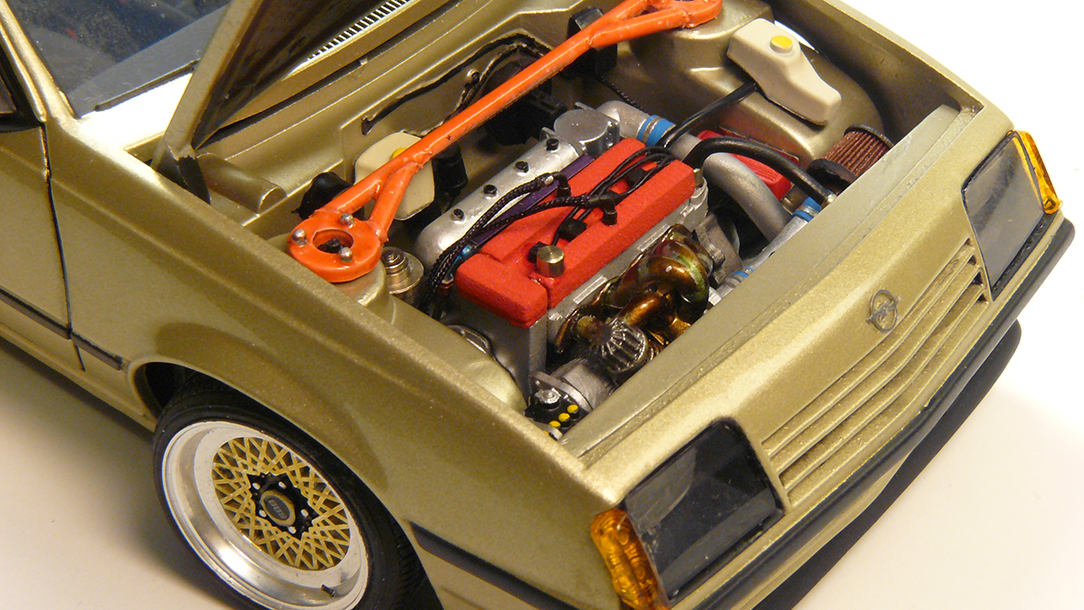
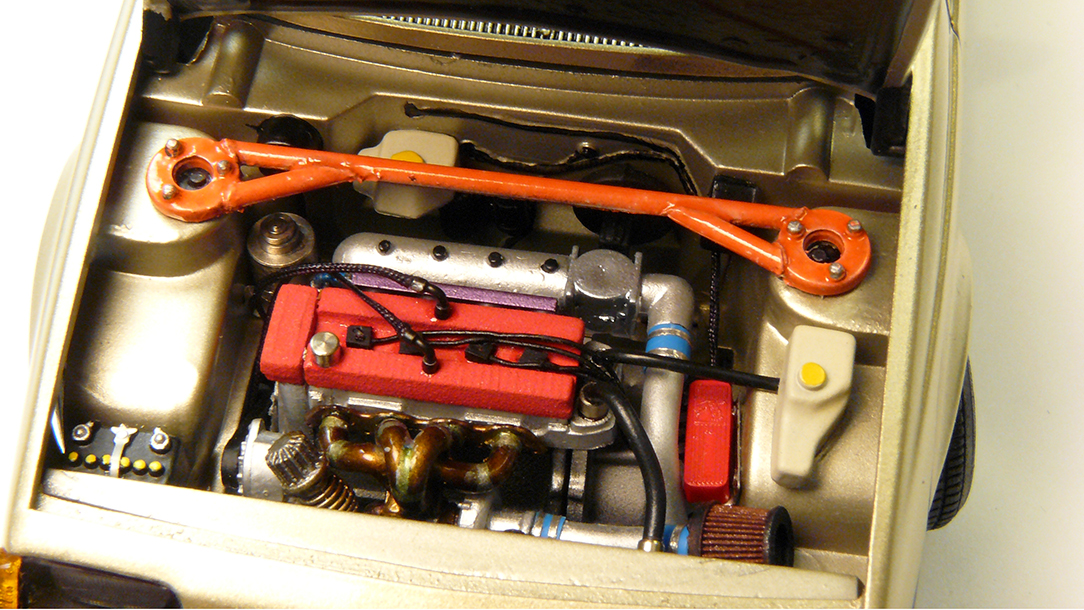
Airfix box says 1982 Chevrolet Cavalier. I modified the front lights to look like Opel Ascona C. Although Opel never made liftback version of 2 door model, they had 5 door model with similar rear end. Lots of modifications had to be done to suspension, to get it lowered and front wheels steerable. Original engine block were modified to have 16 valve head, turbo, fuel injection and direct coils.
-
Tamiya re-release. Lowered and fitted lower tires. Widened stock rims with wider lips.
-
Basic Aoshima kit. I lifted the bed and cabin. Made portal axles out of supercharger rear sections. Used resin 1:35 tyres.
-
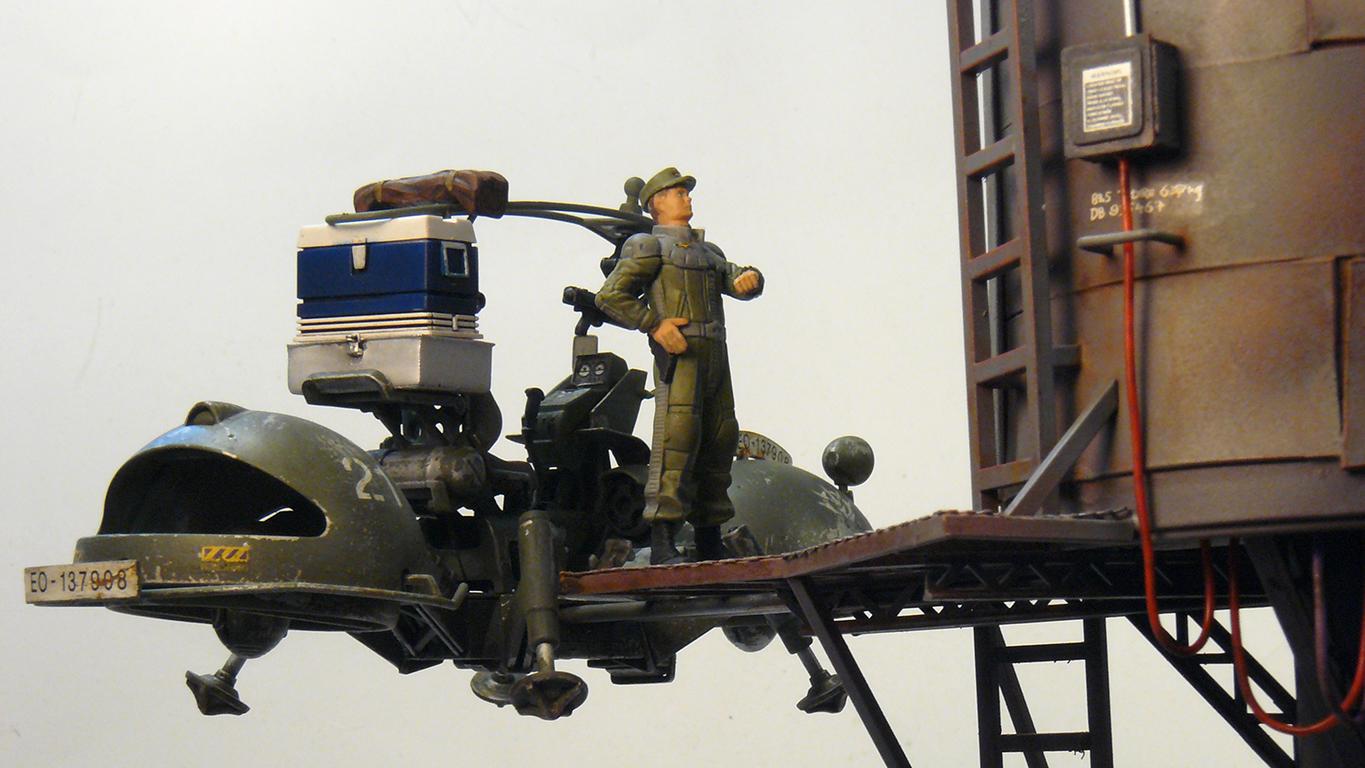
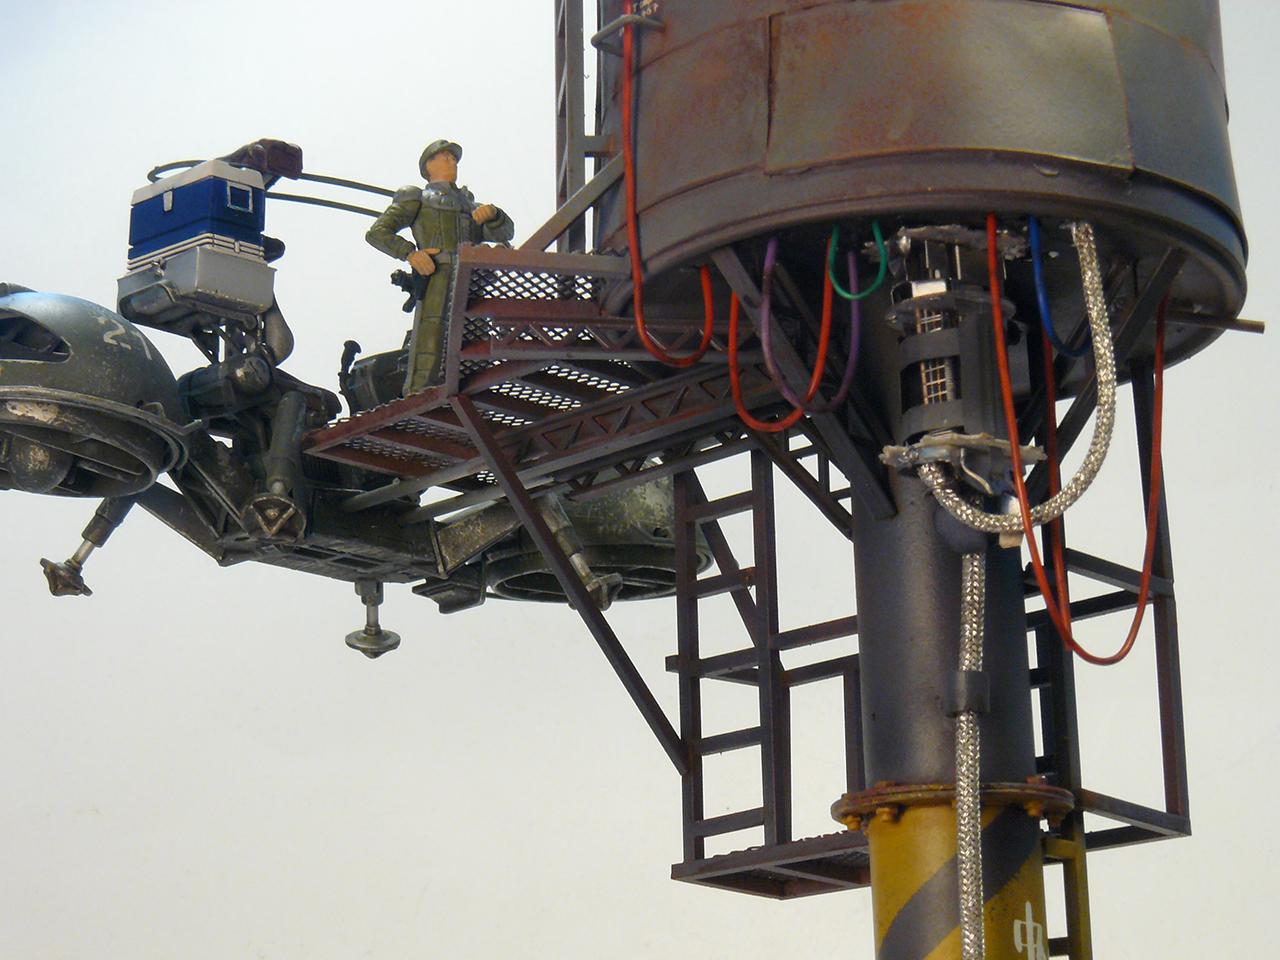
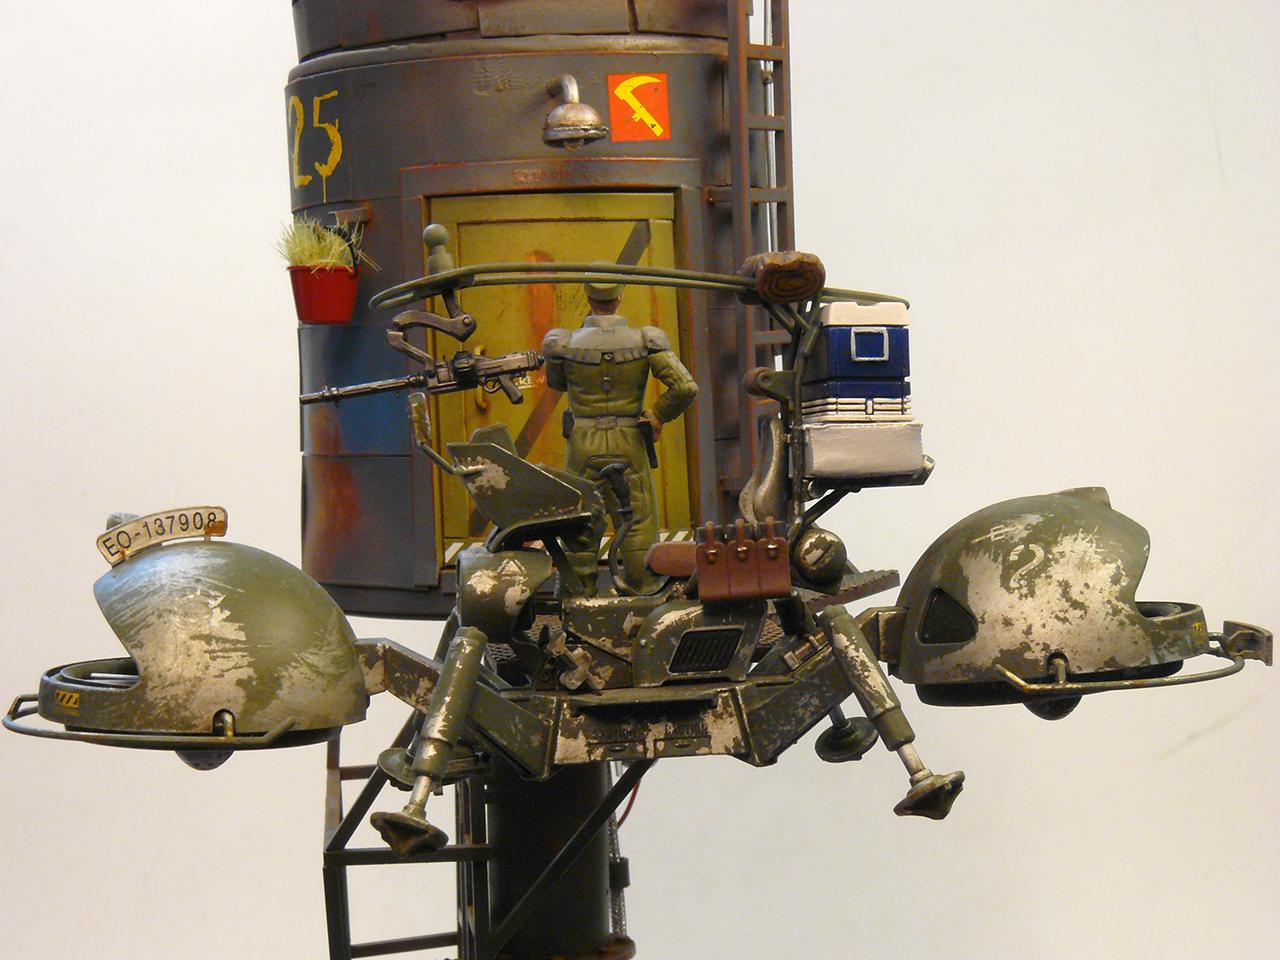
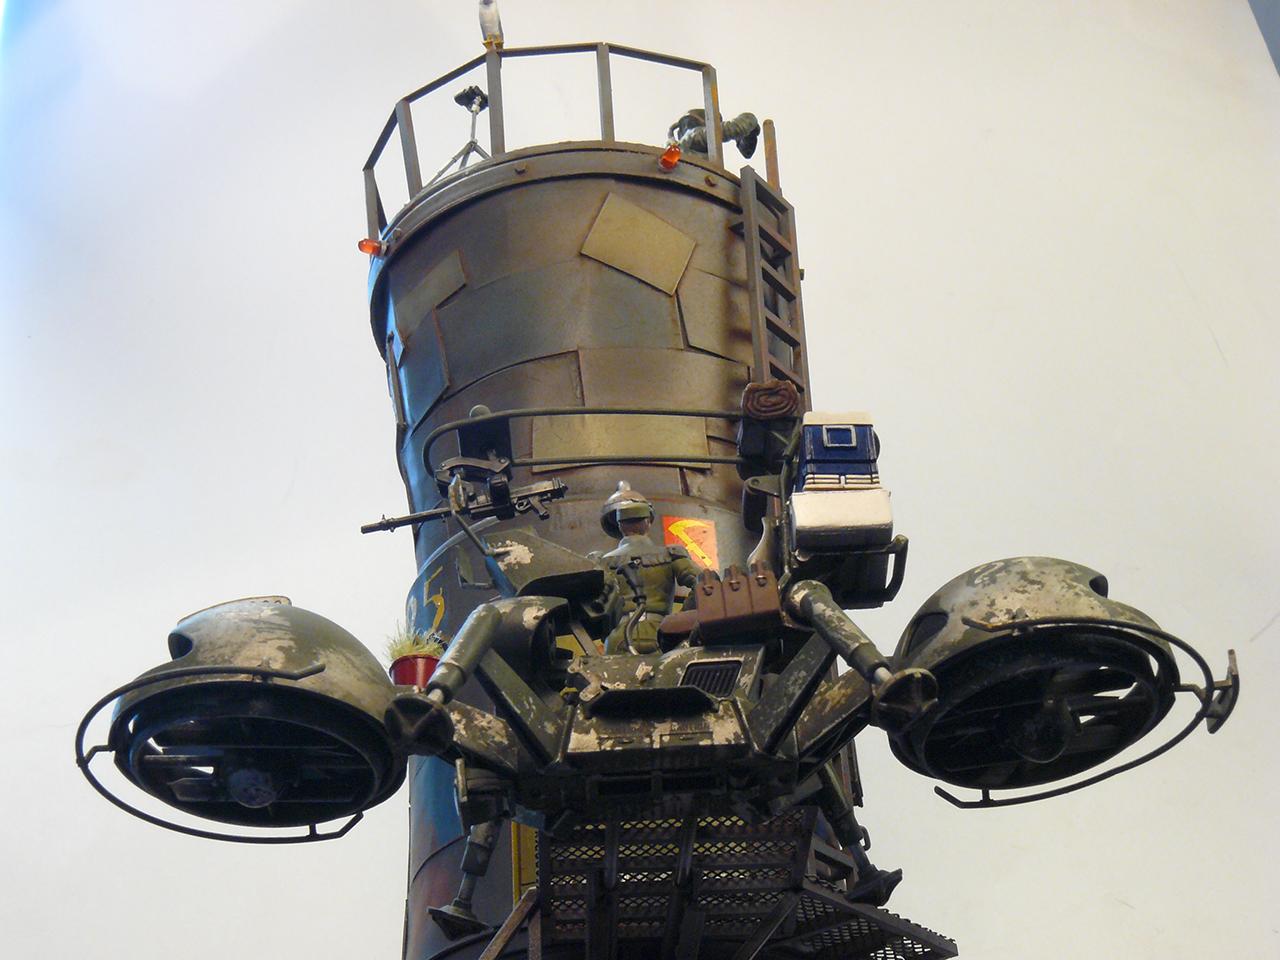
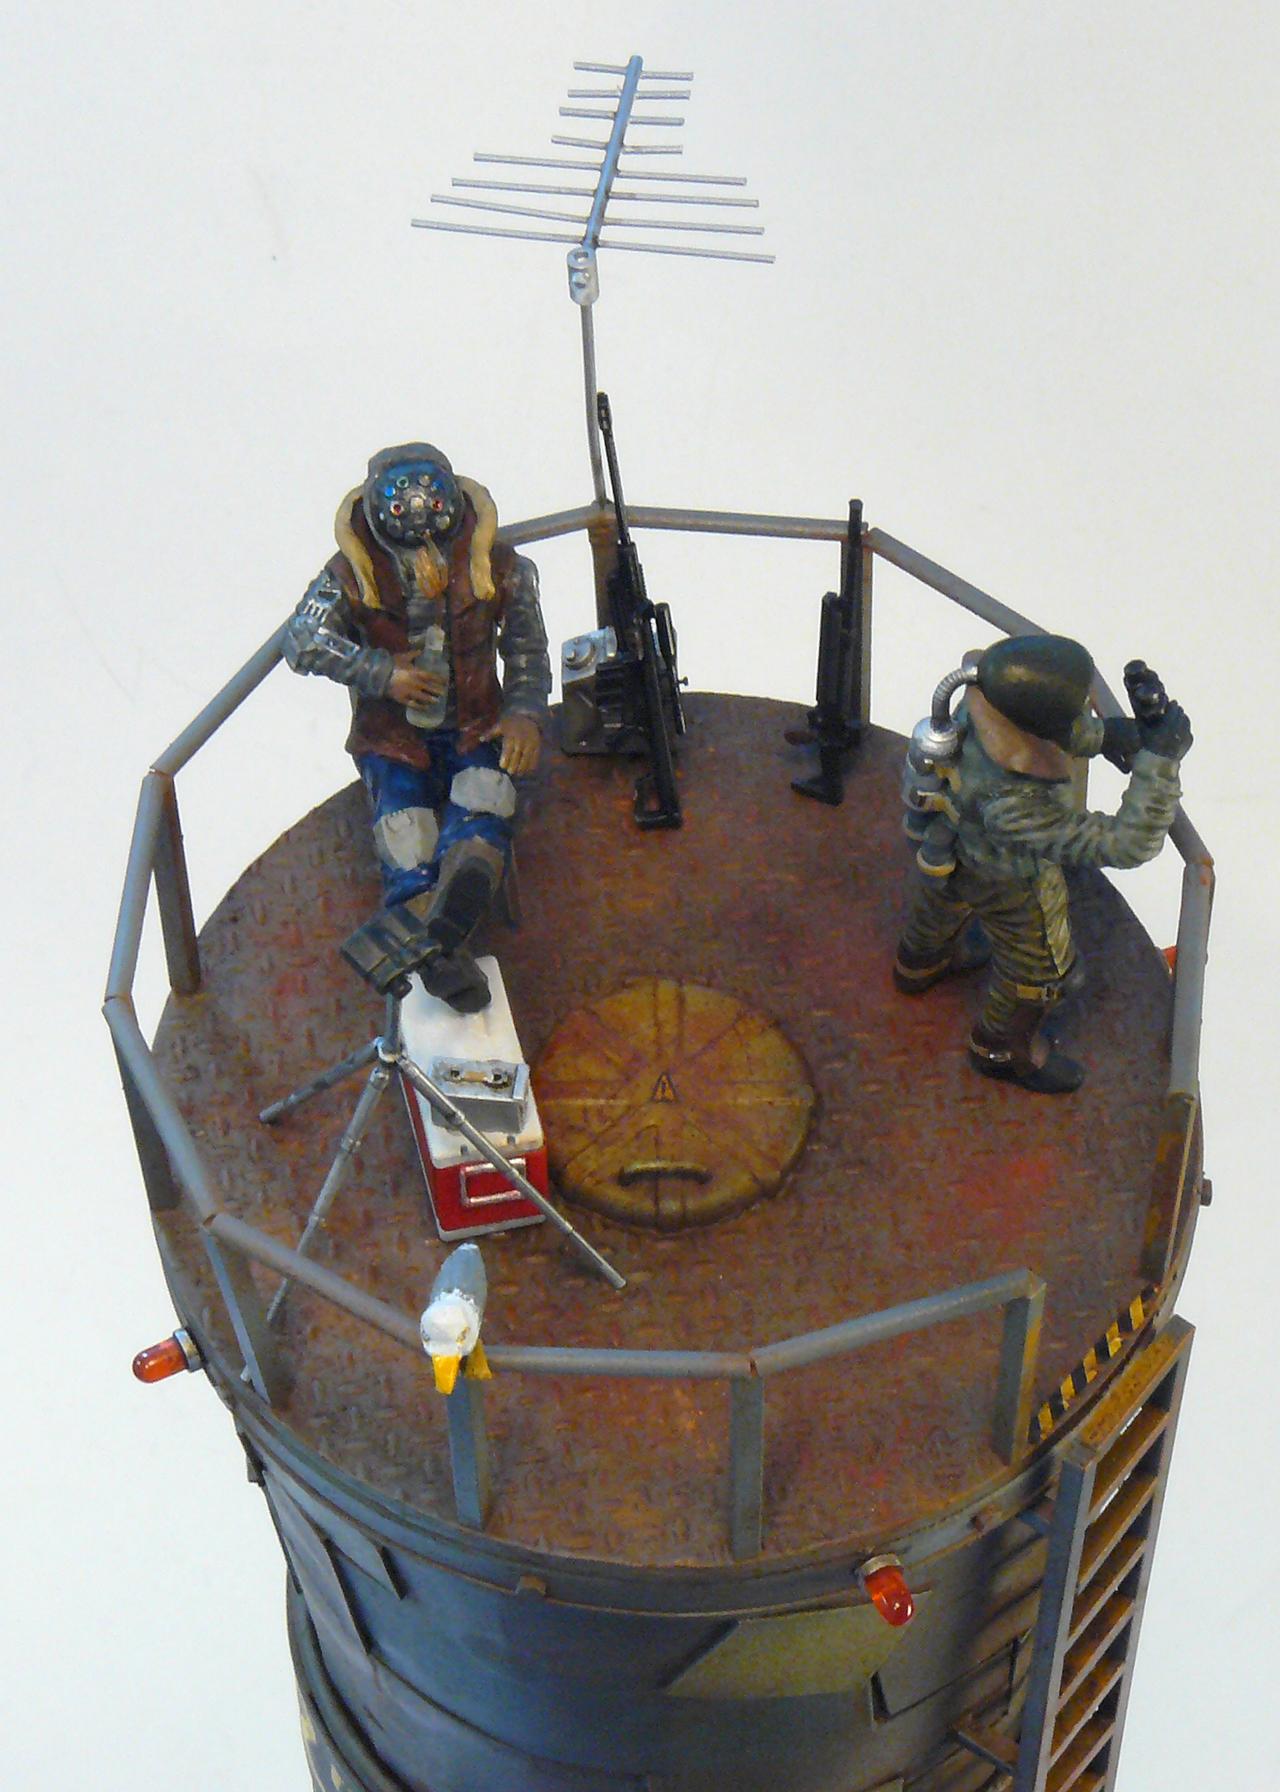
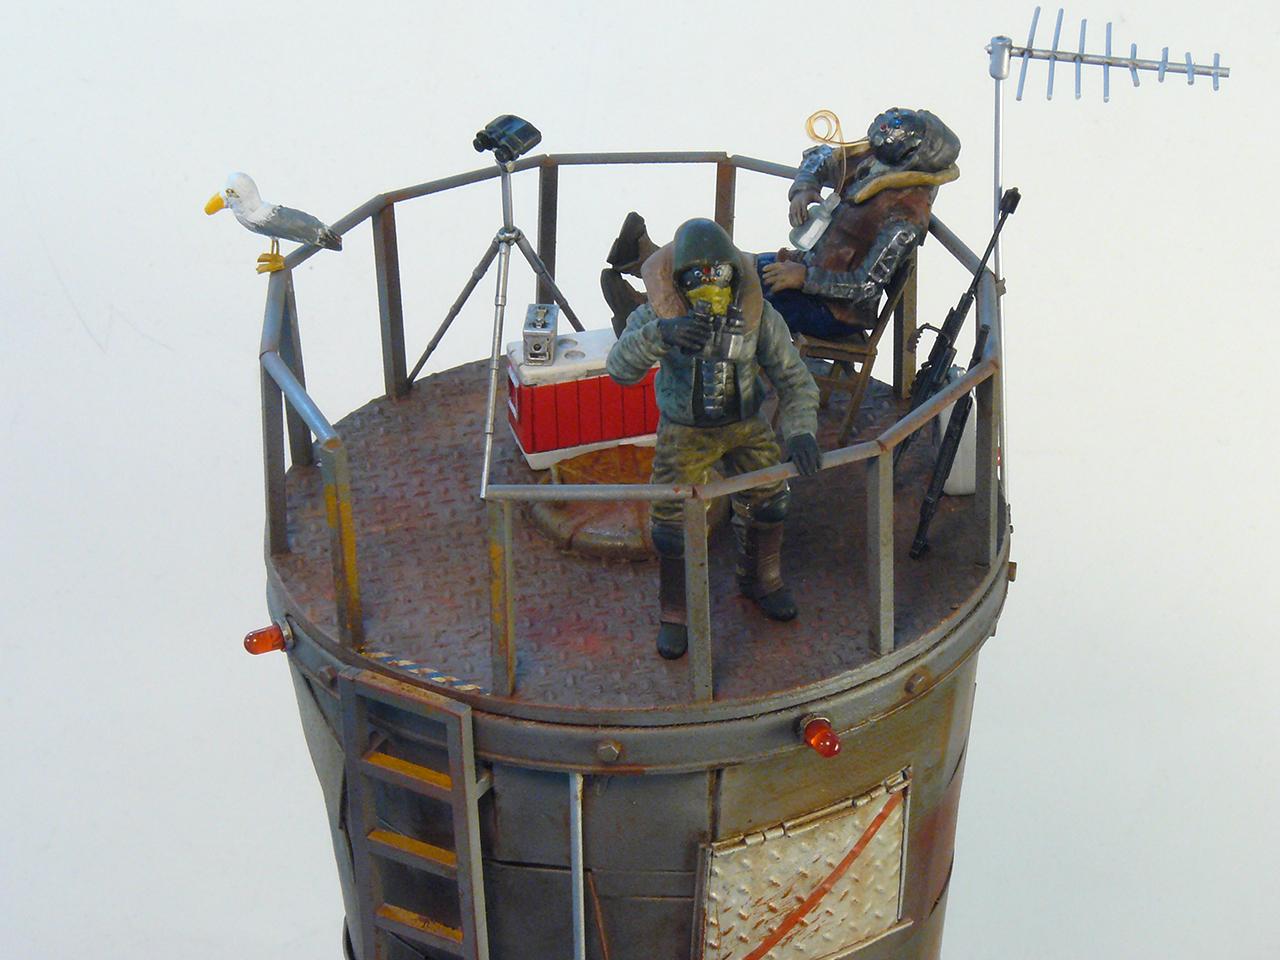
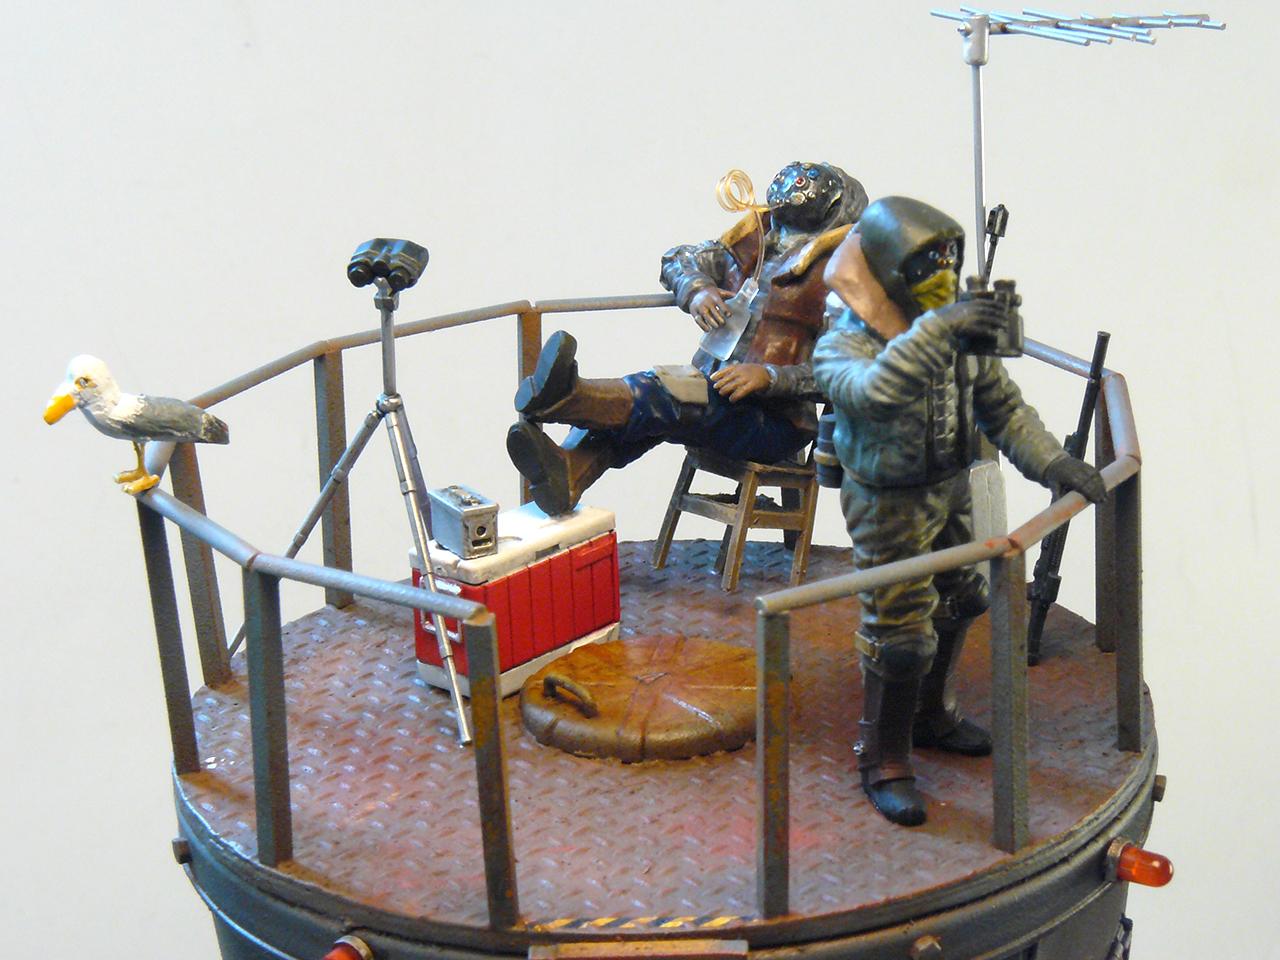
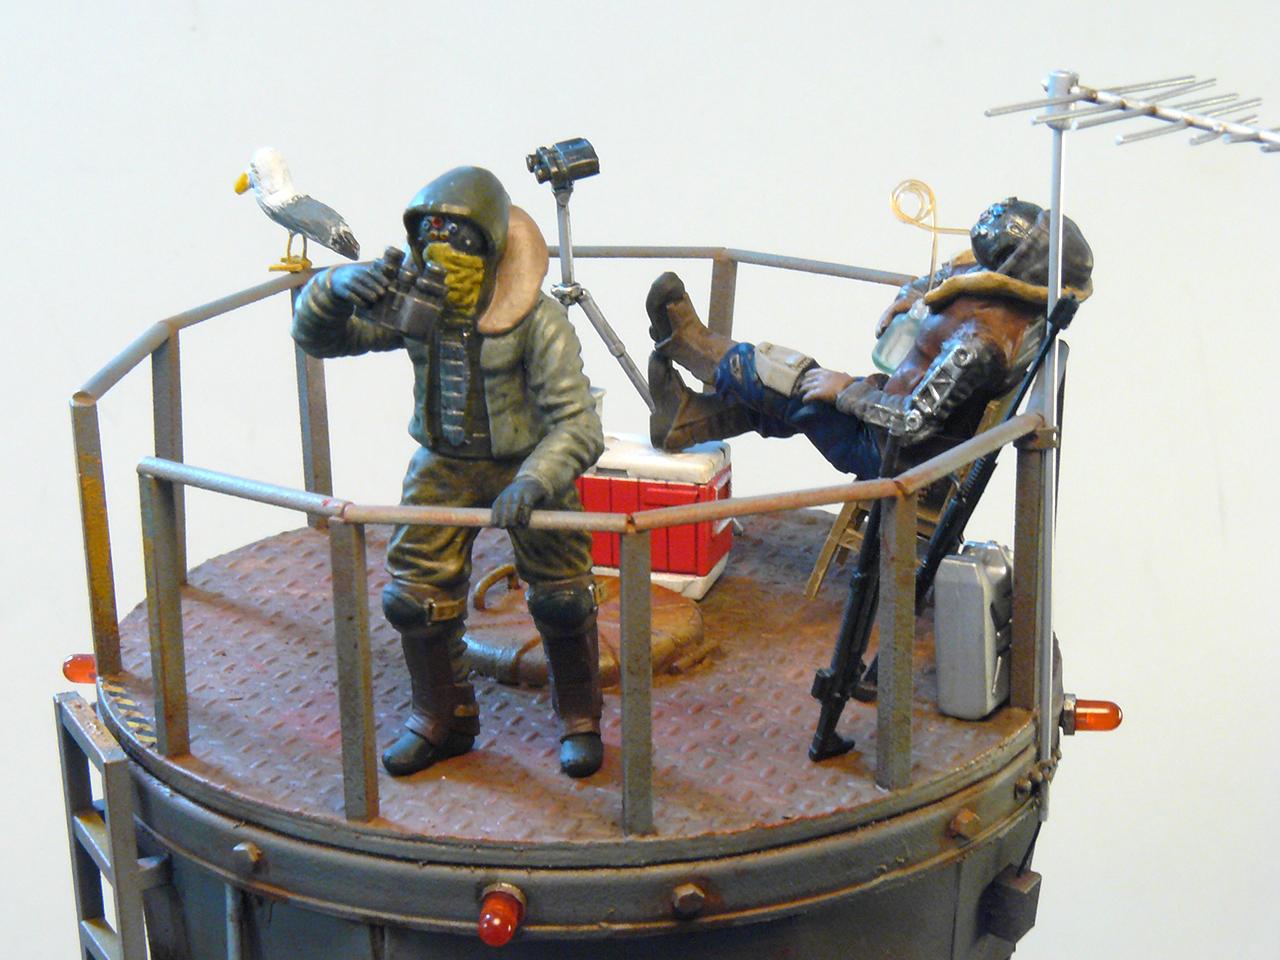
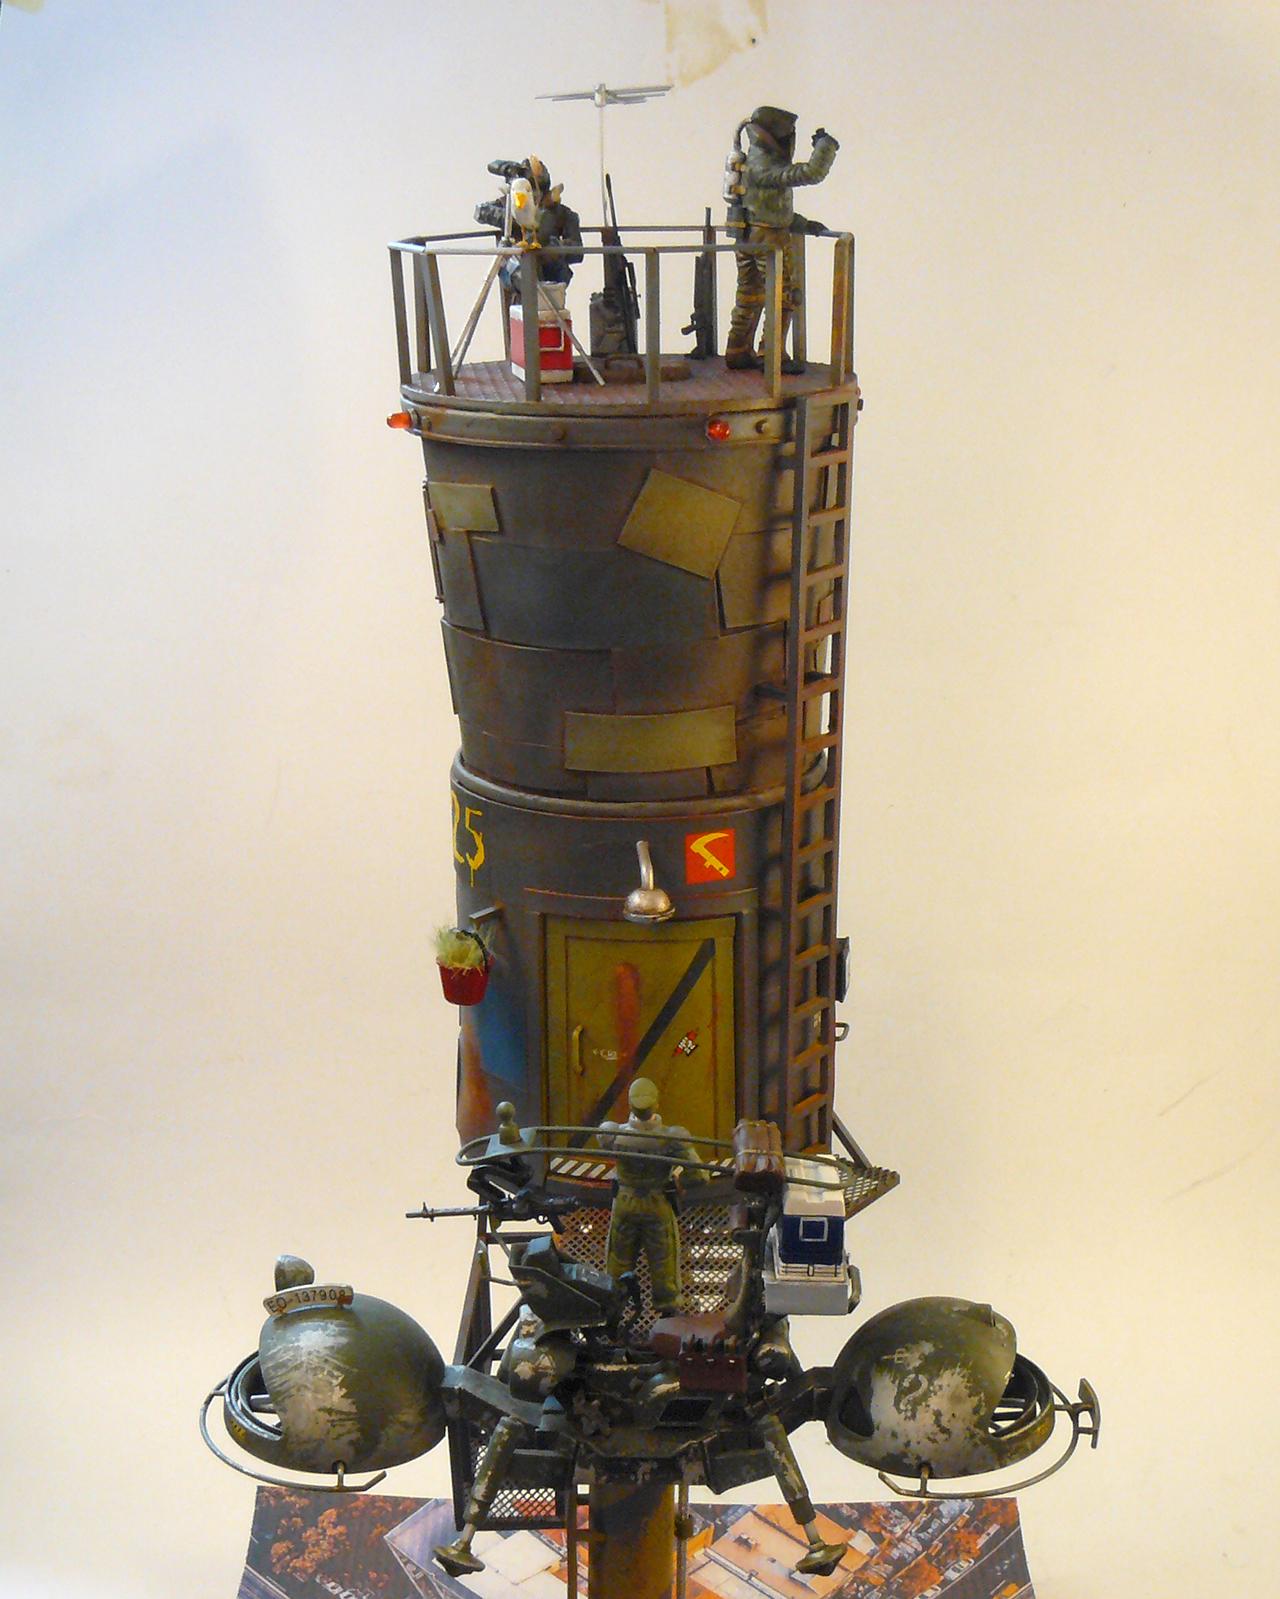
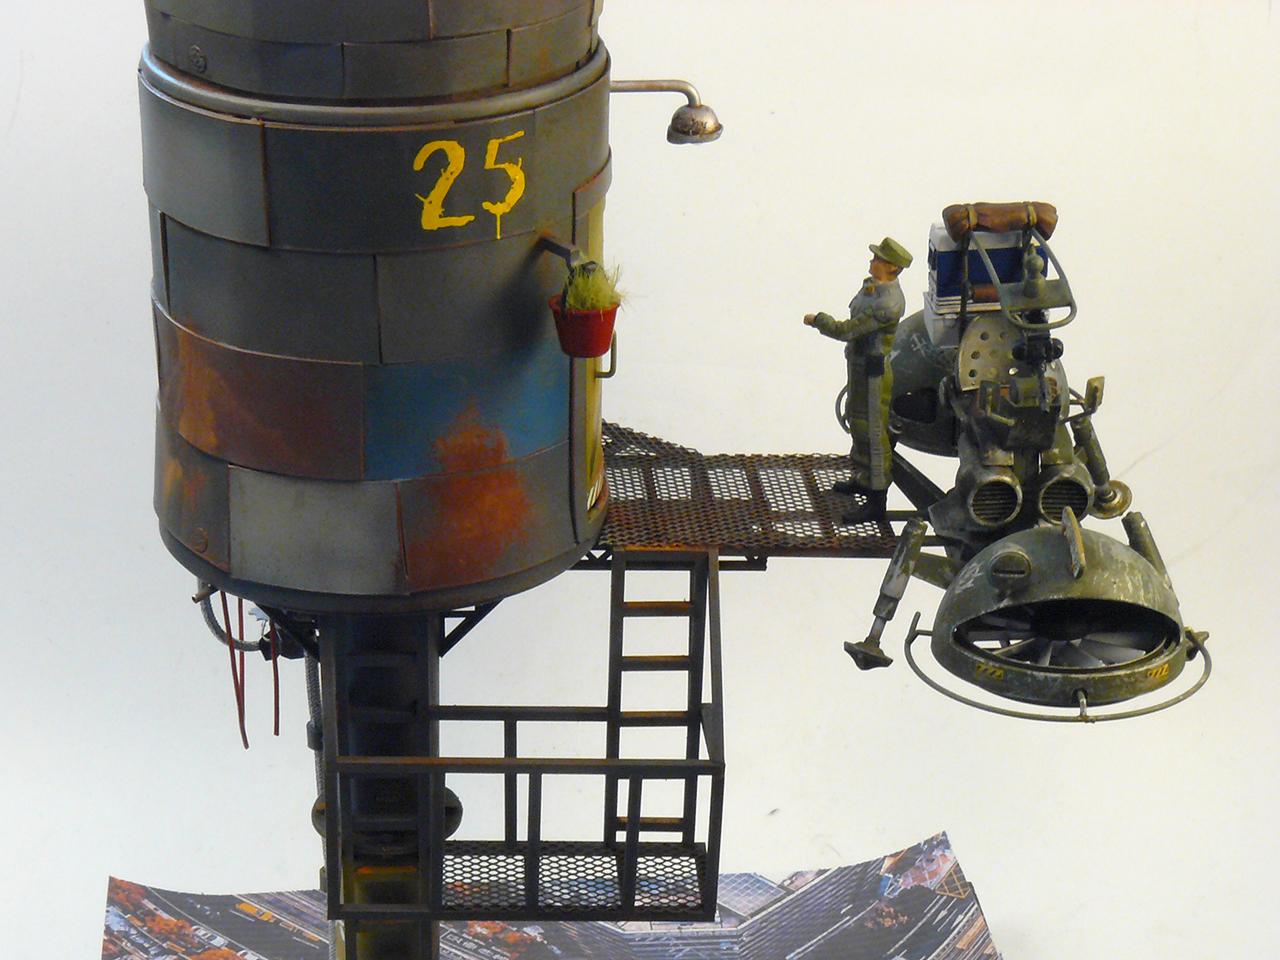
I made this 1/35 watchtower from scratch. Basic shapes are made from Pringles can and toothpick can. Lots of styrene profiles is used. Bottom character and flying thing are from Bandai. Top soldiers are from Industria Mechanika, but modified.