Jurva
-
Posts
235 -
Joined
-
Last visited
Content Type
Profiles
Forums
Events
Gallery
Everything posted by Jurva
-
I too use white glue. Then airbrush the color on top.
-
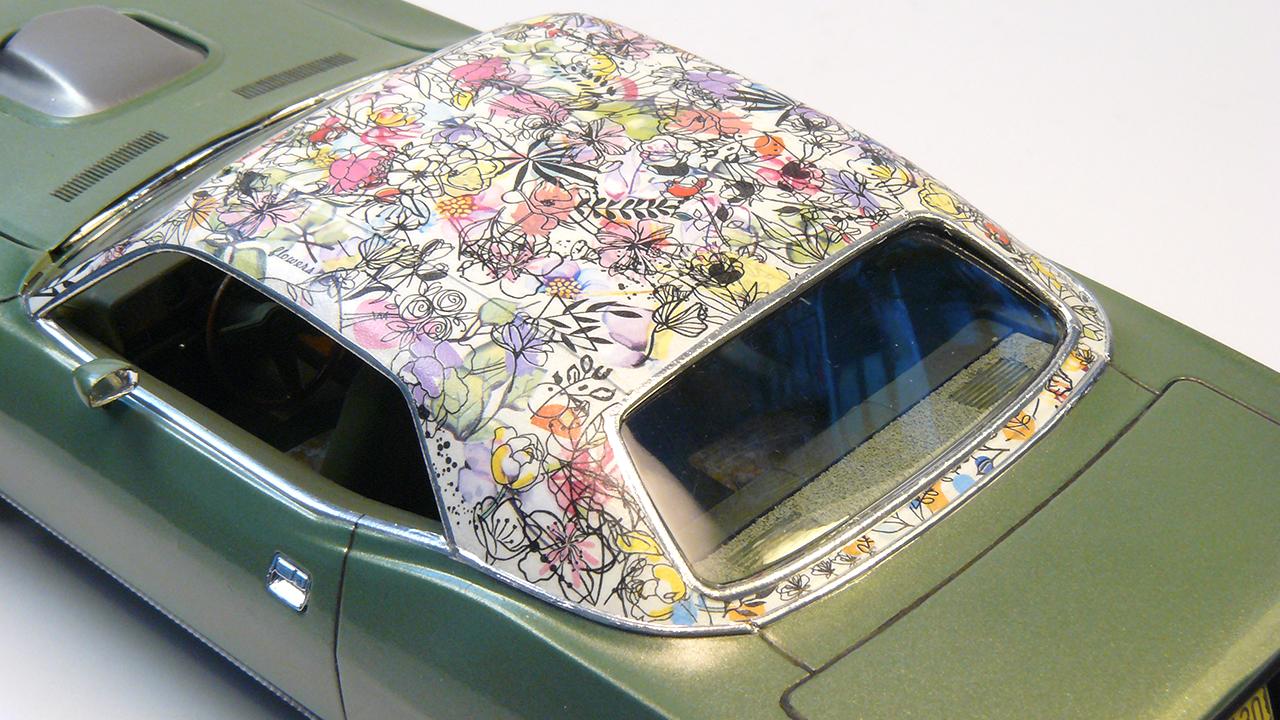
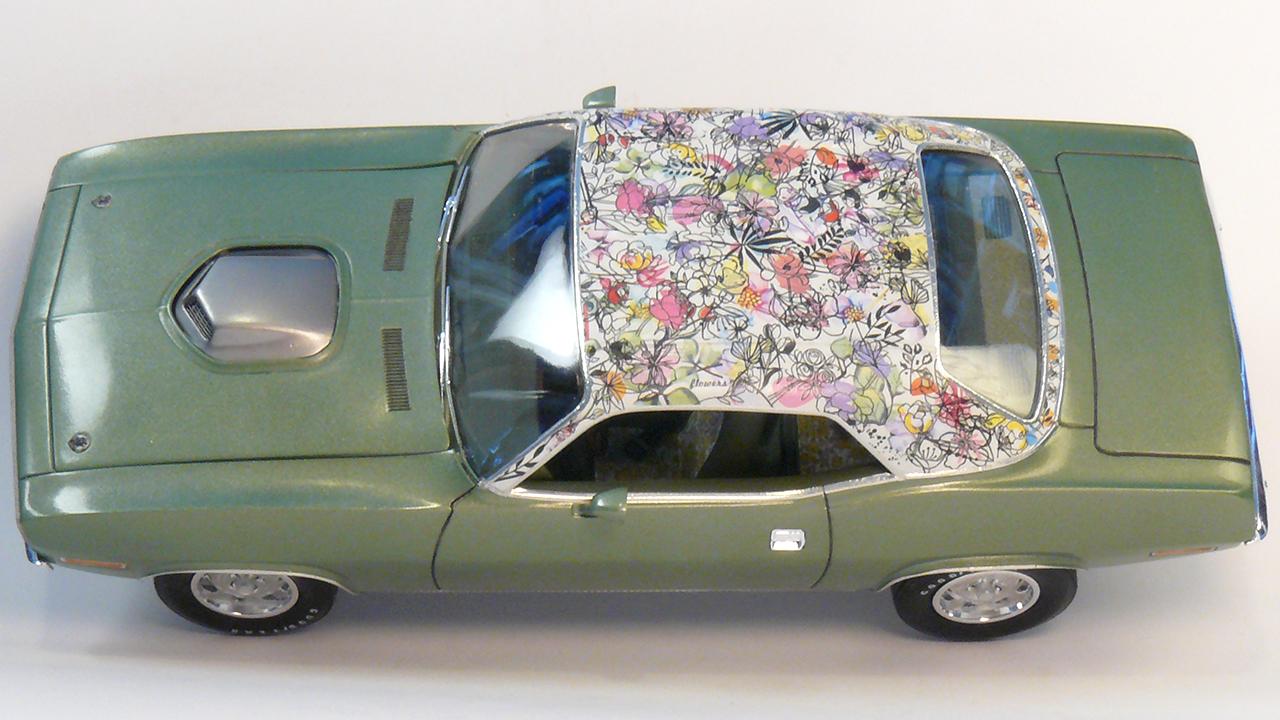
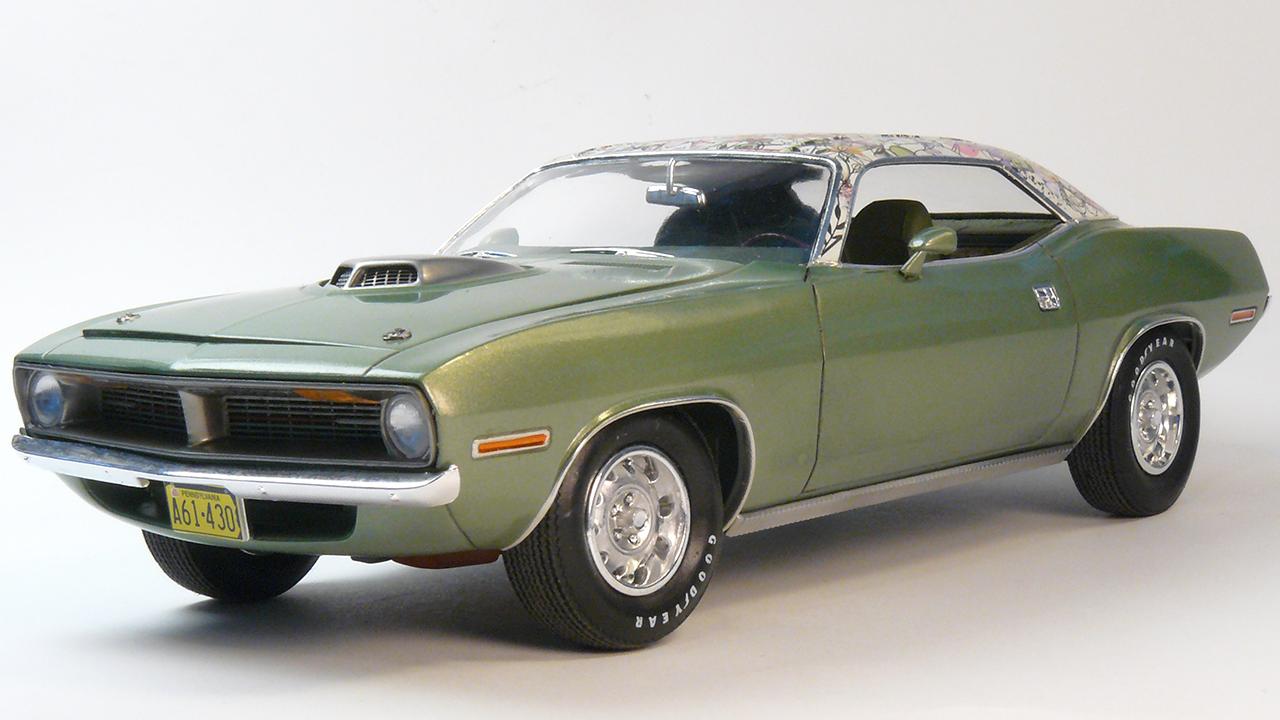
Plymouth offered "Mod Top" option back in the day, so that was the inspiration. Vinyl top texture is painted with airbrush. Then flower nail decals added on top one by one. Washi tape with flower pattern used for seats. Floor mat is painted embossing powder. Self mixed light green paint.

- 26 replies
-
- 20
-

-
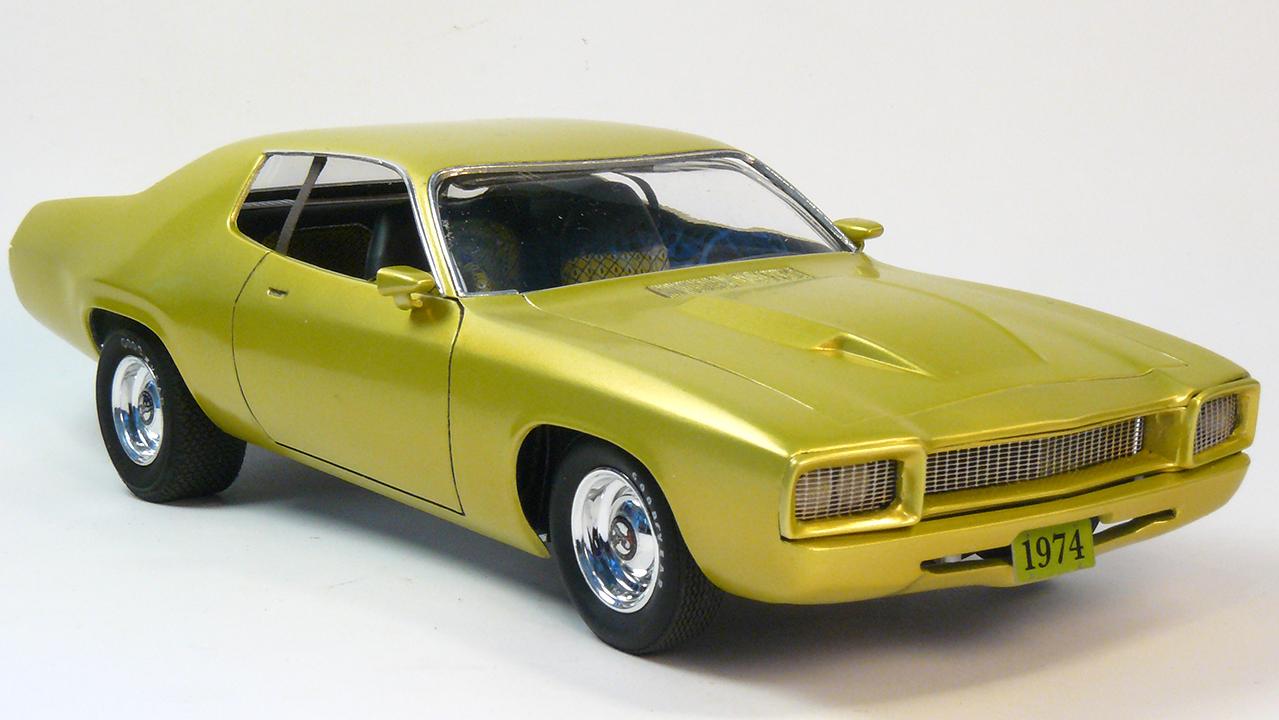
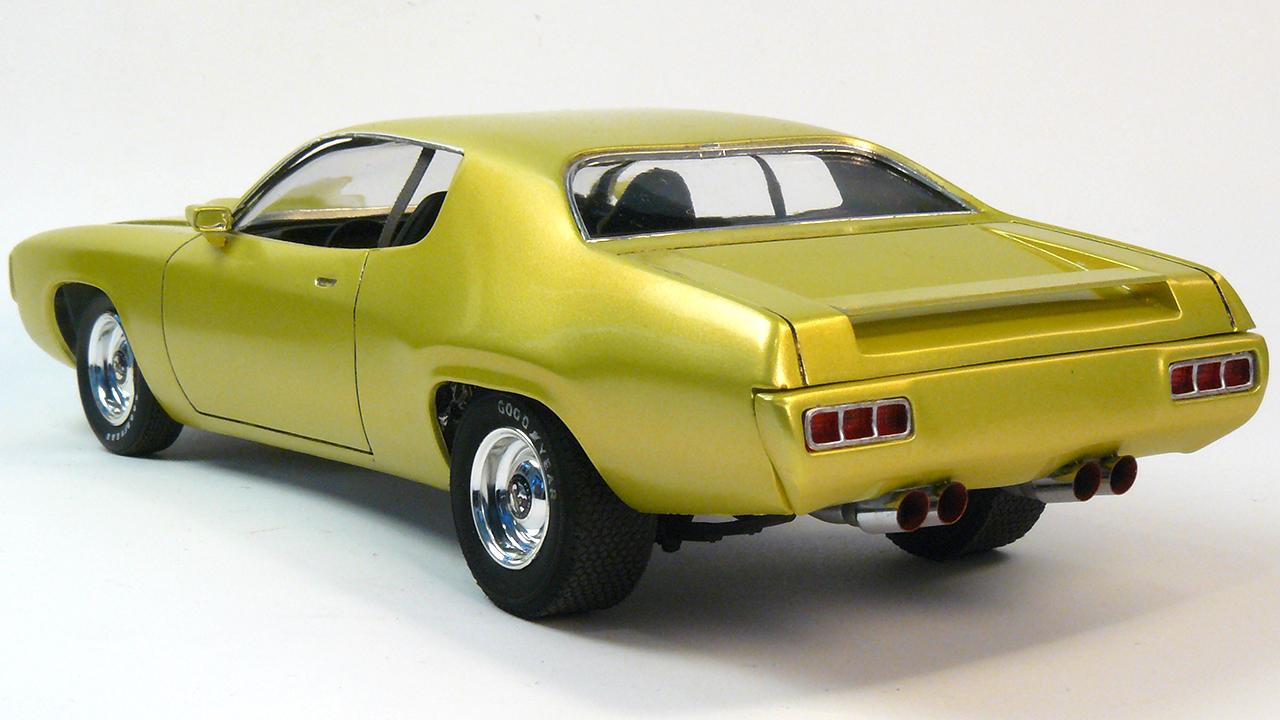
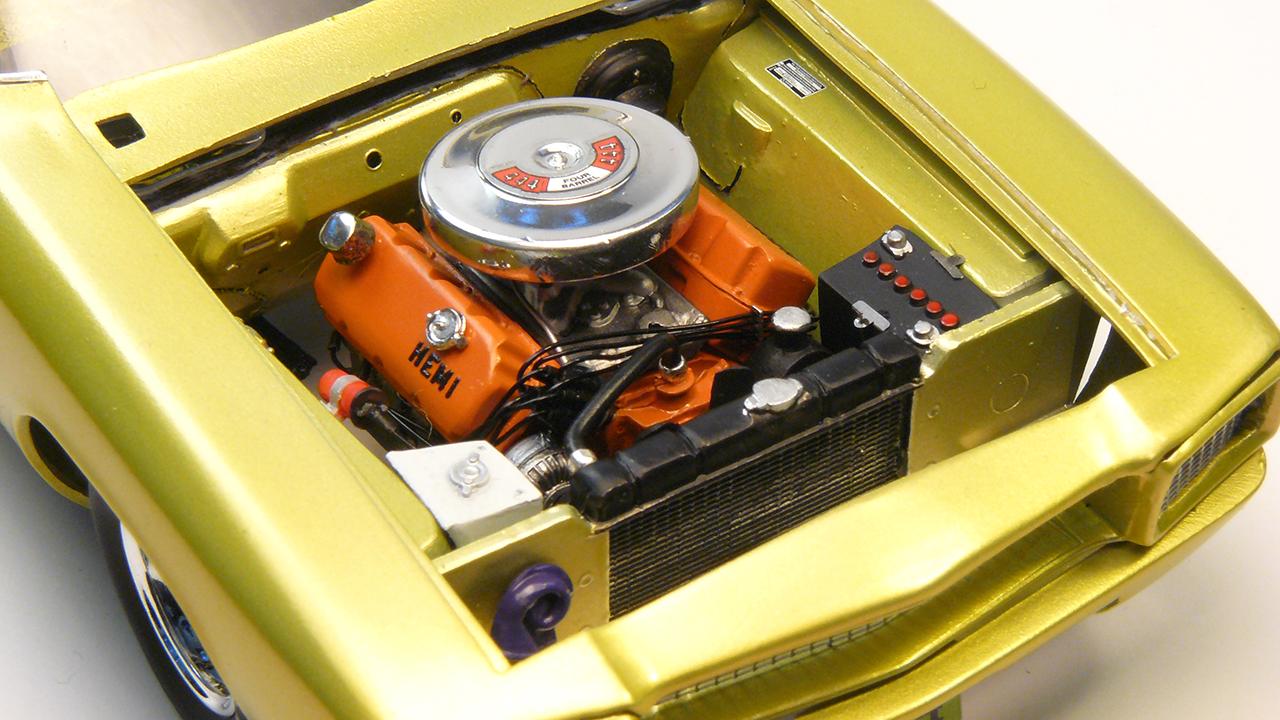
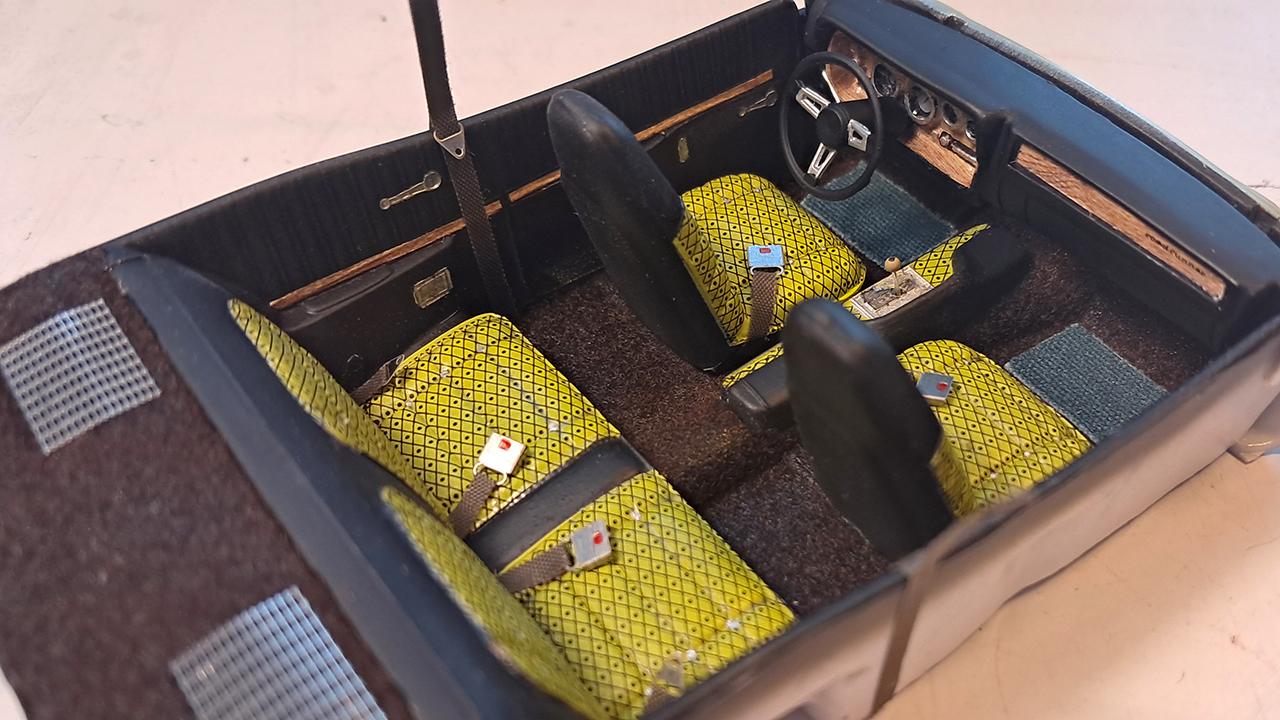
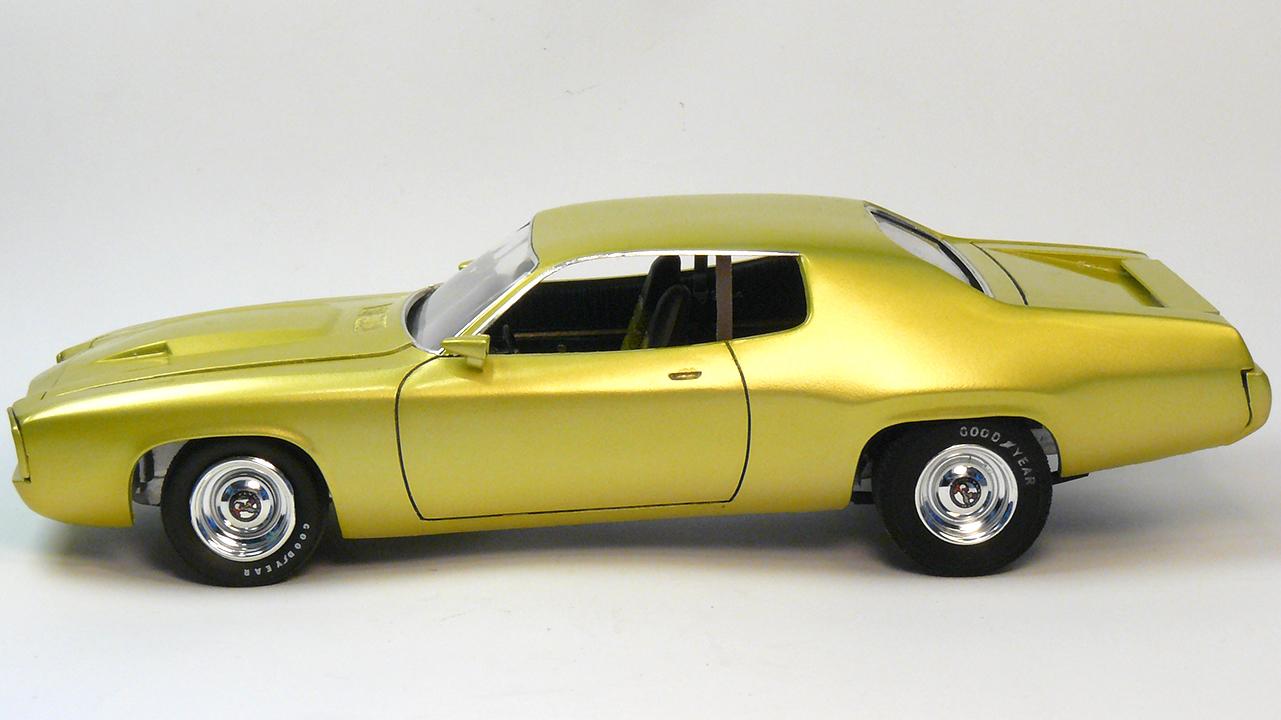
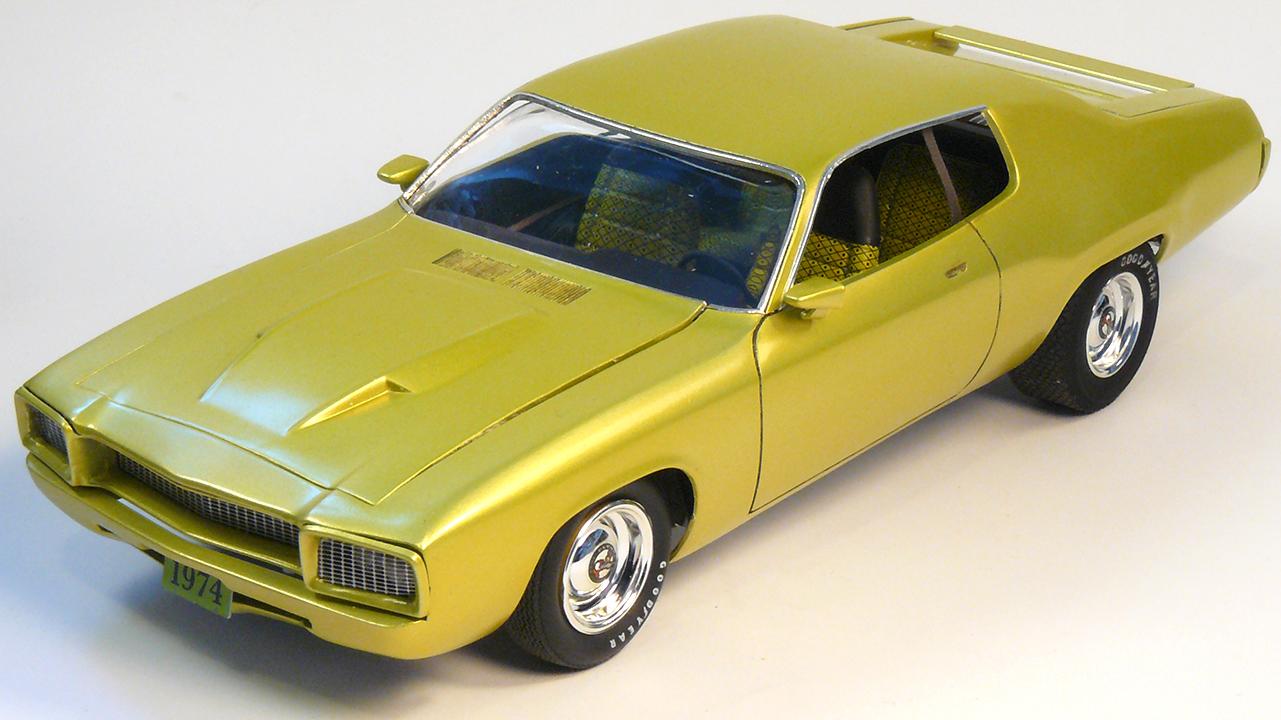
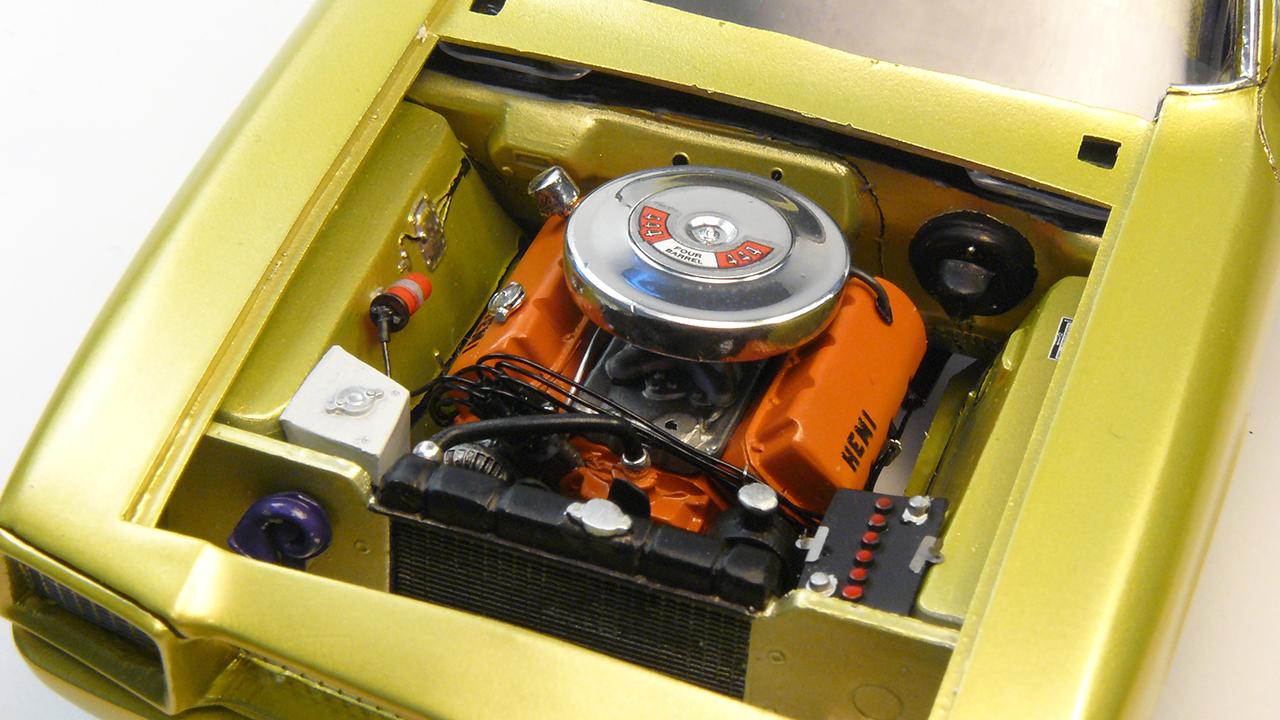
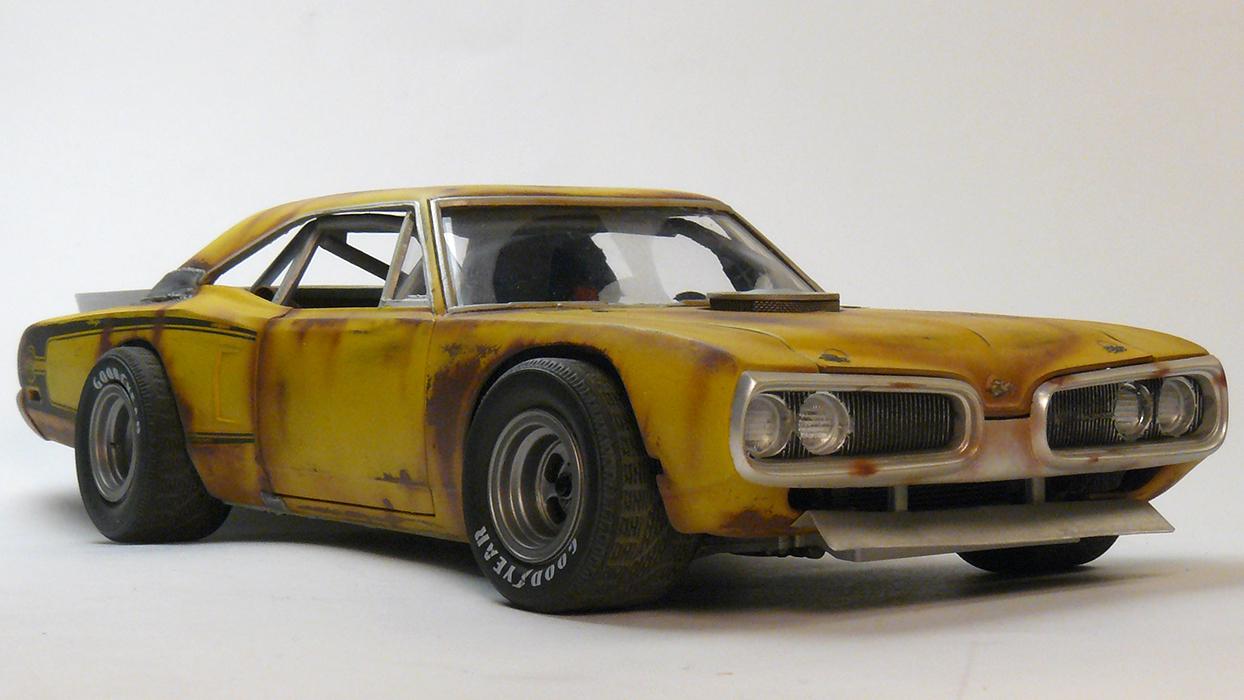
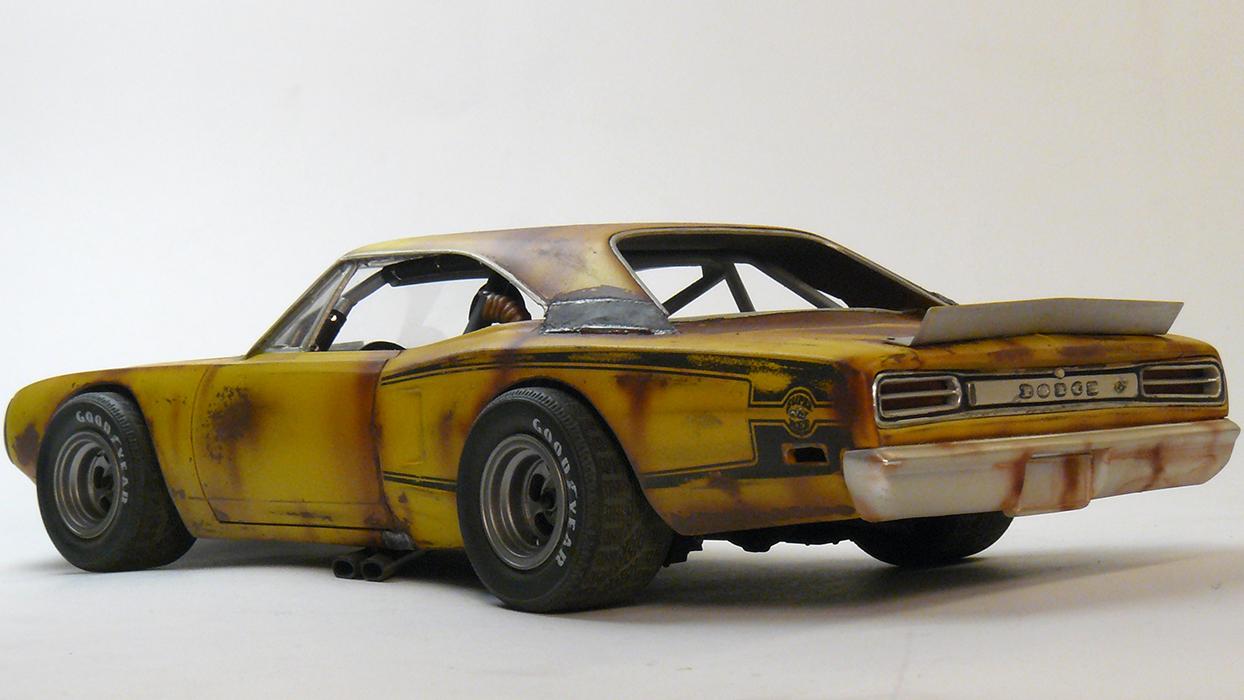
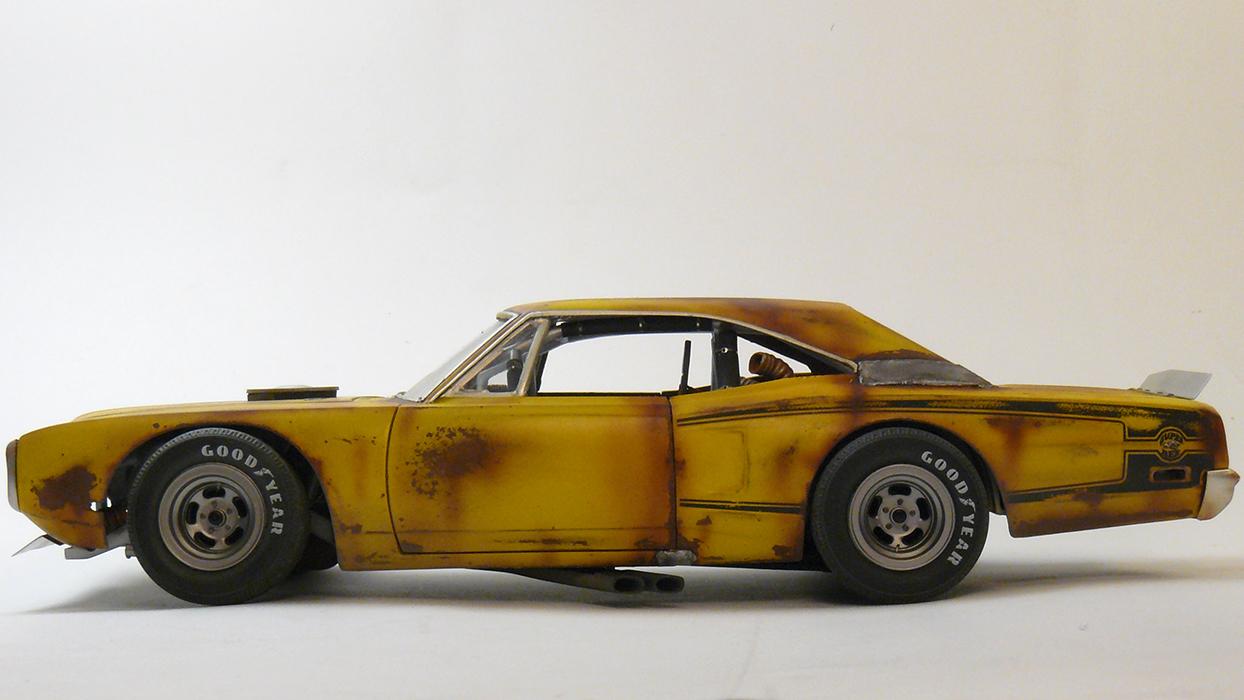
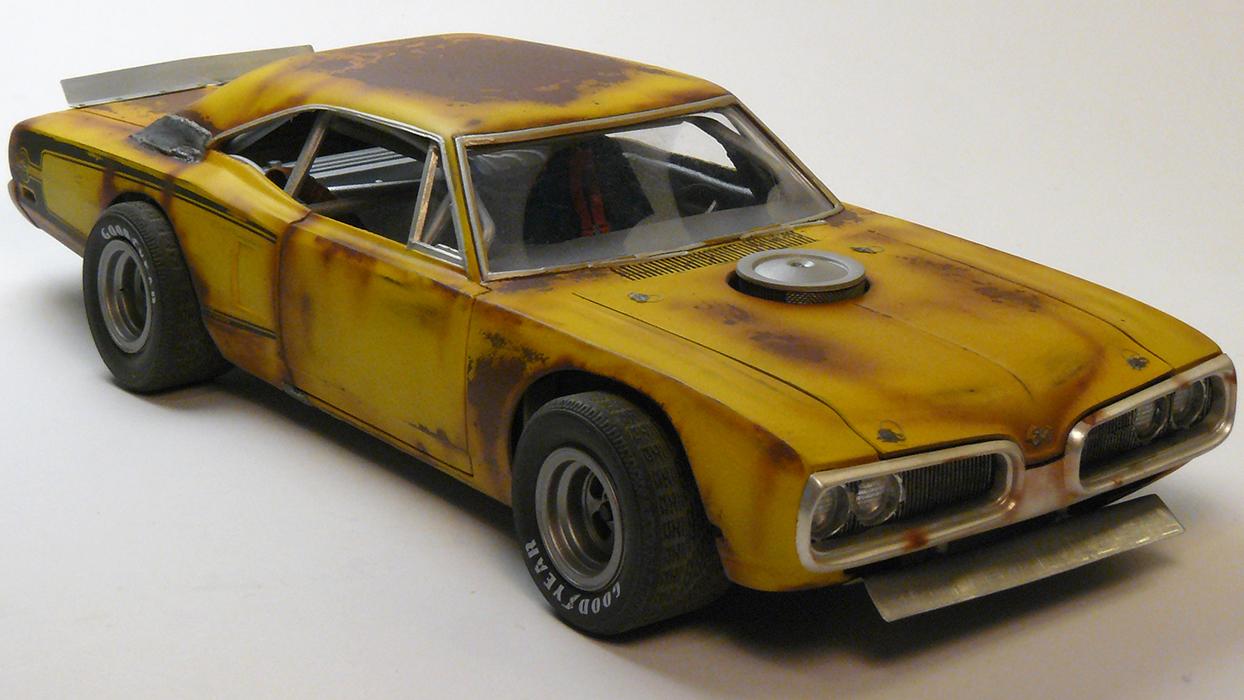
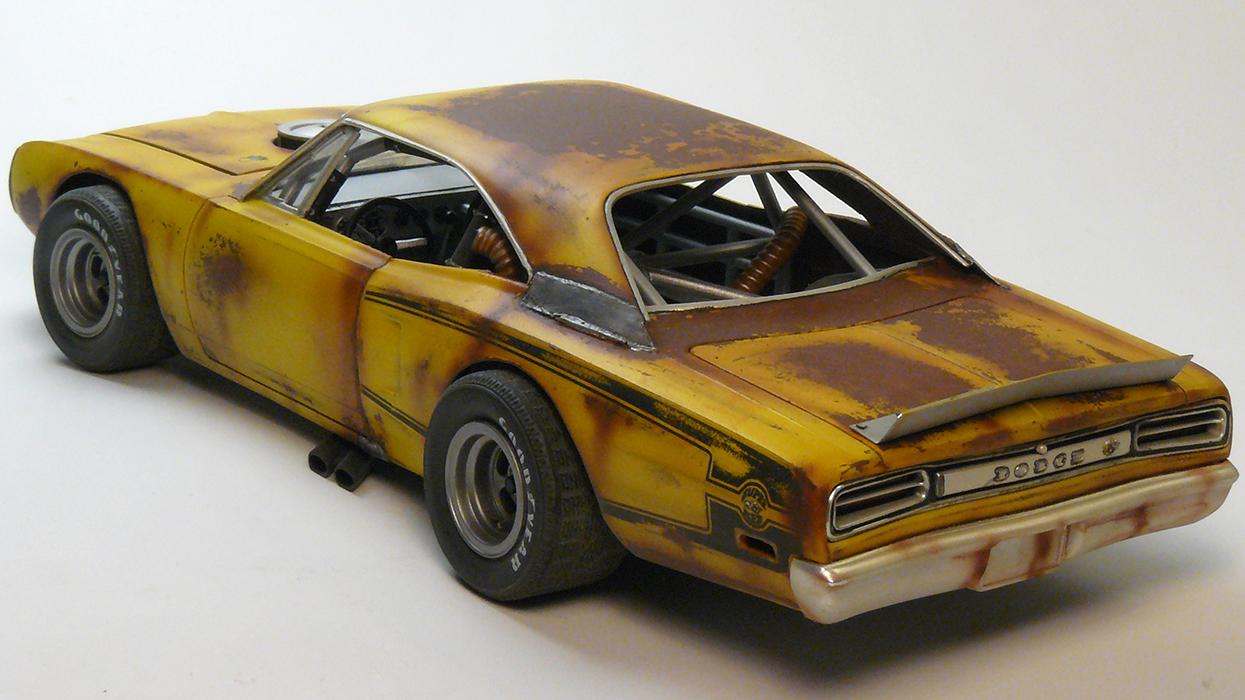
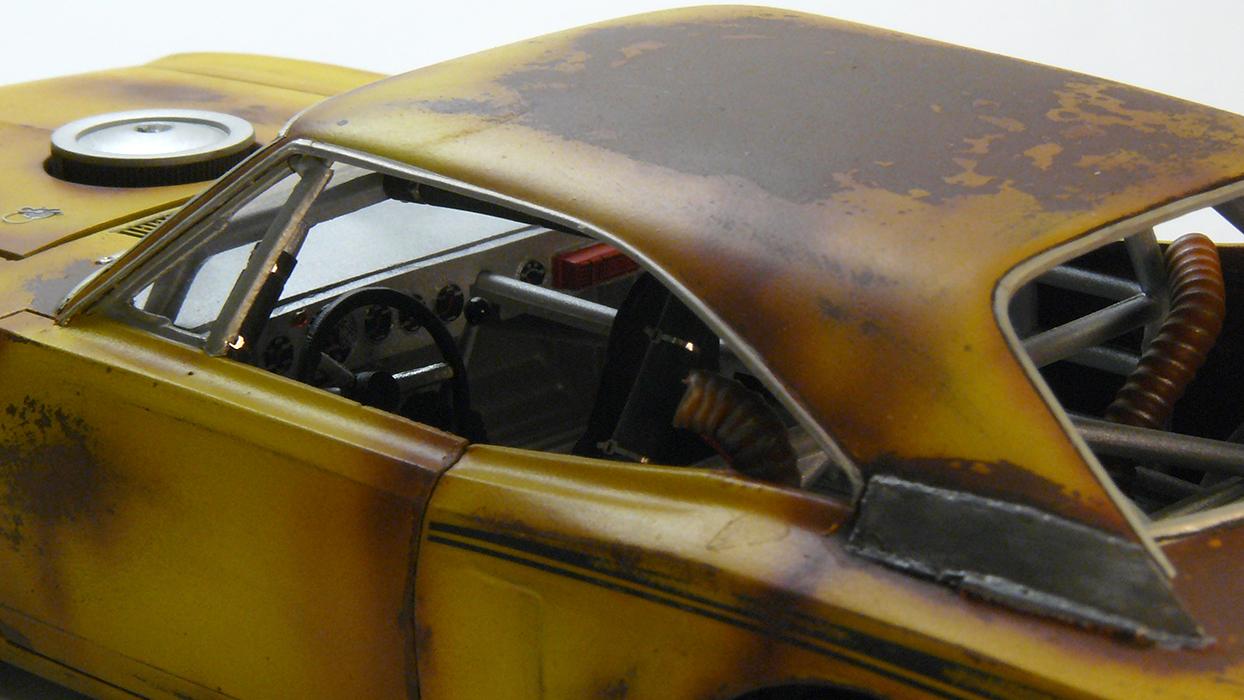
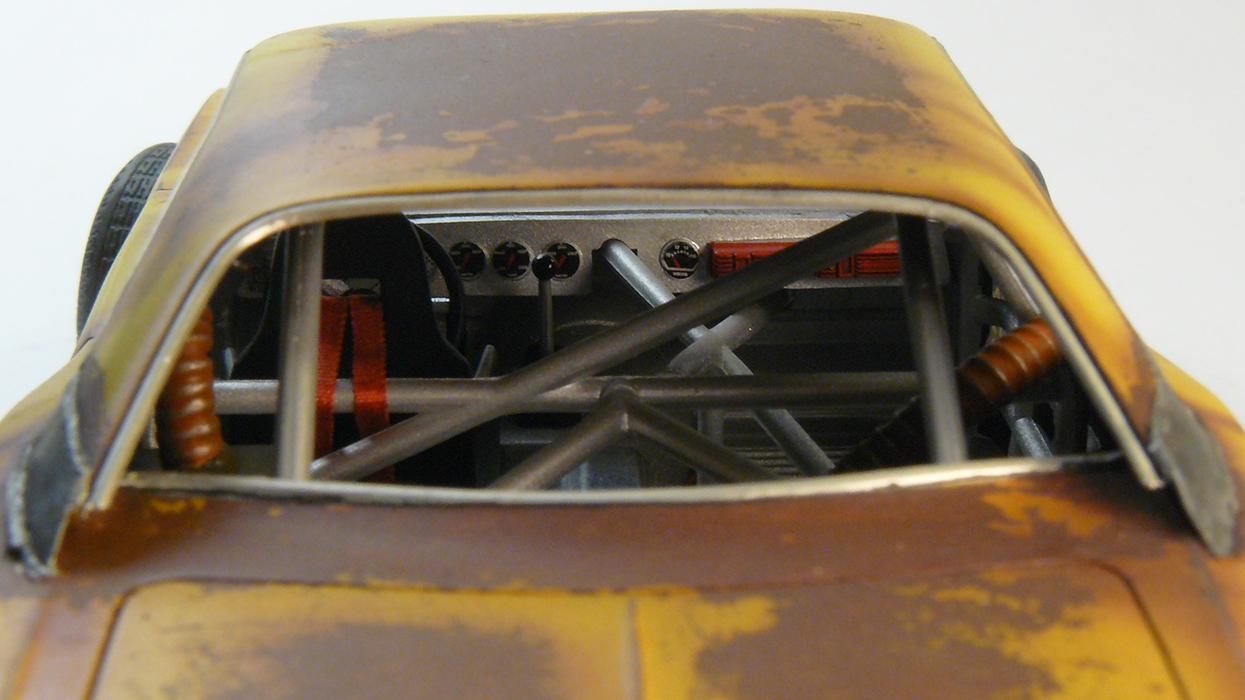
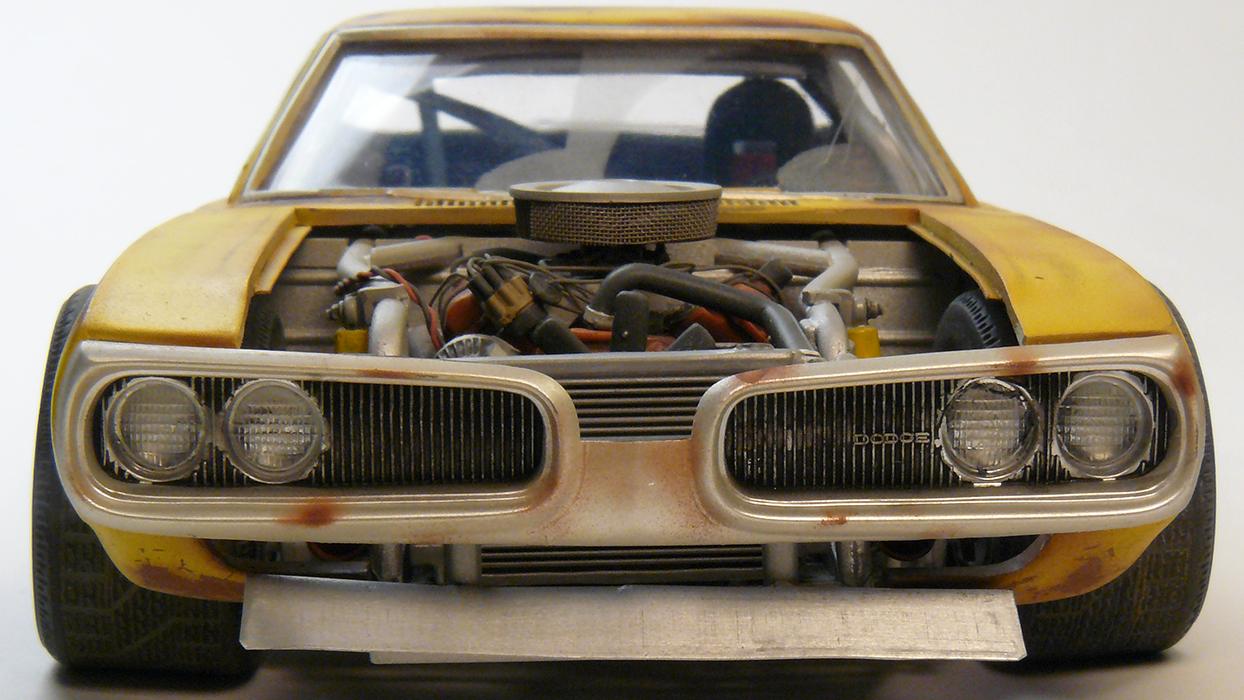
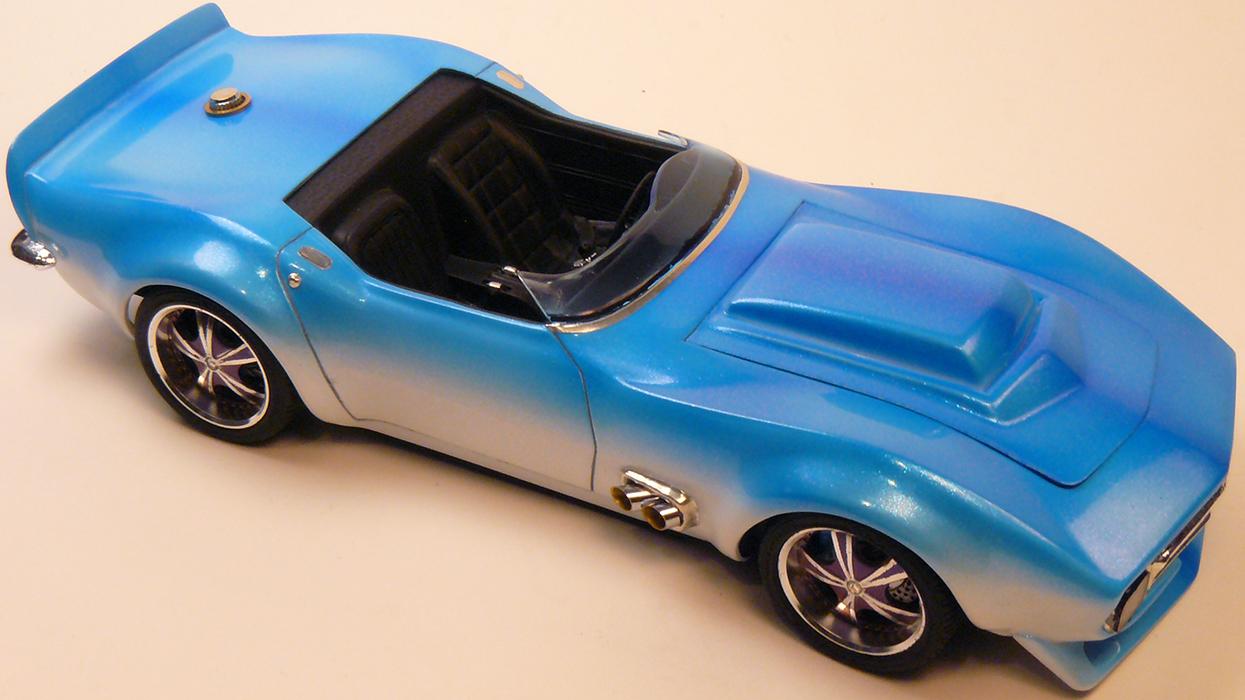
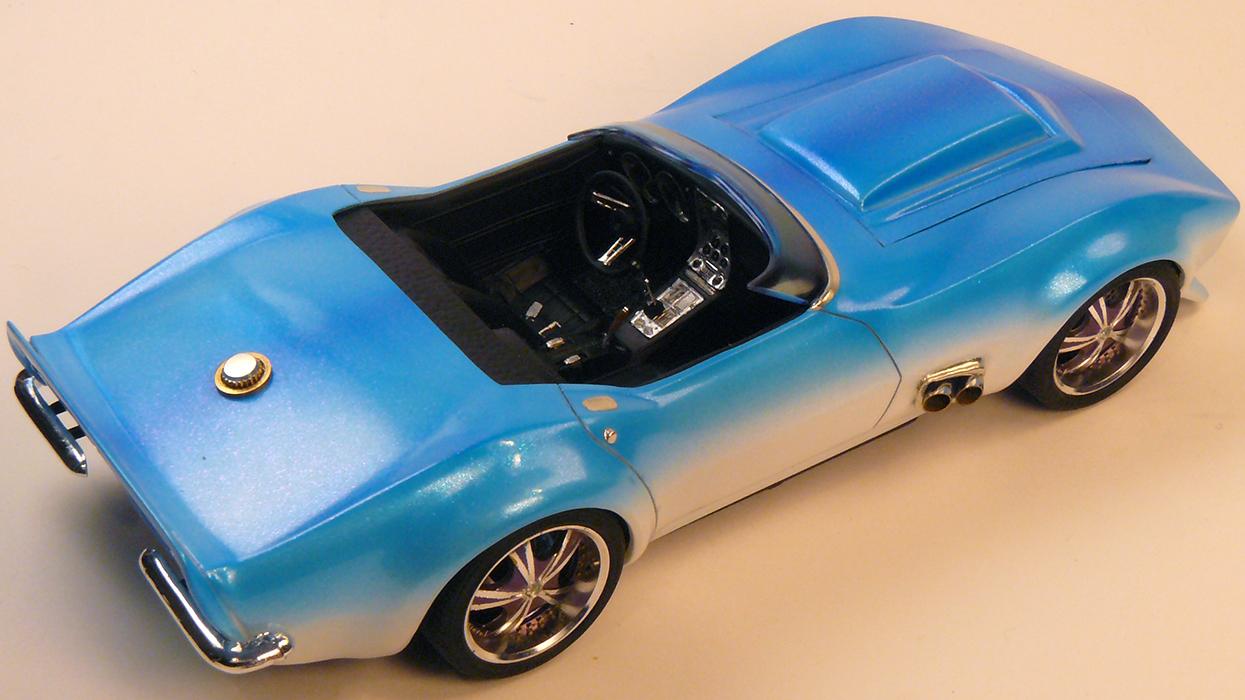
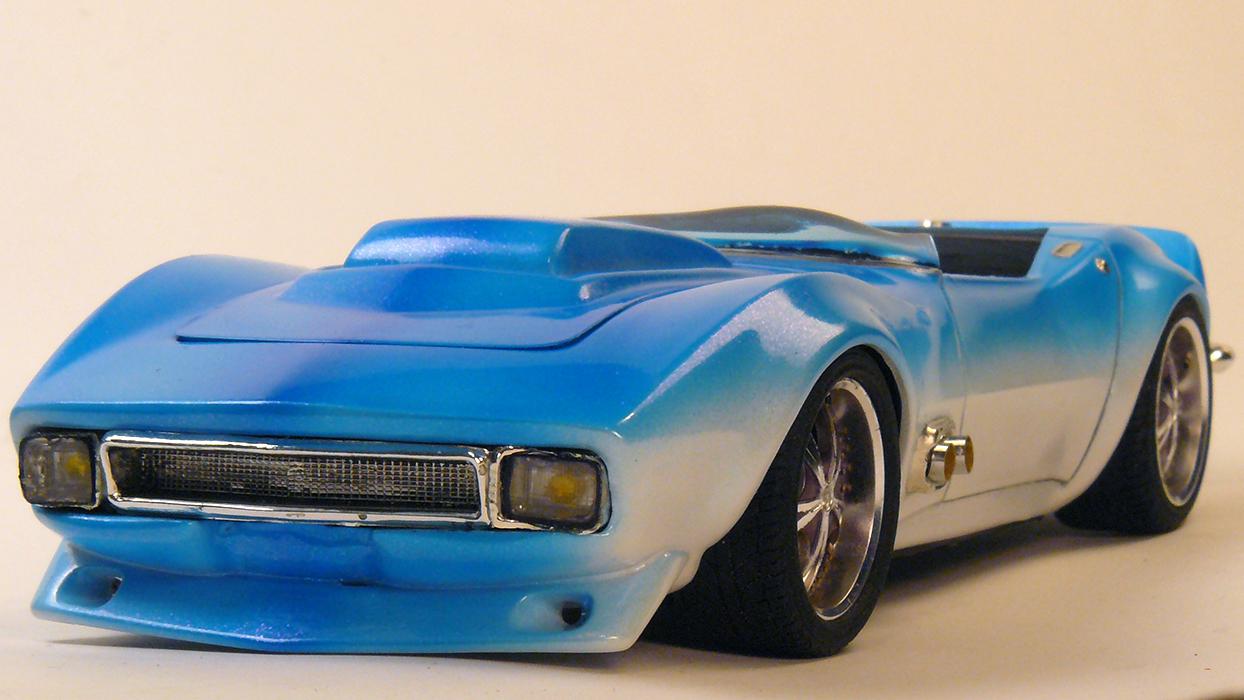
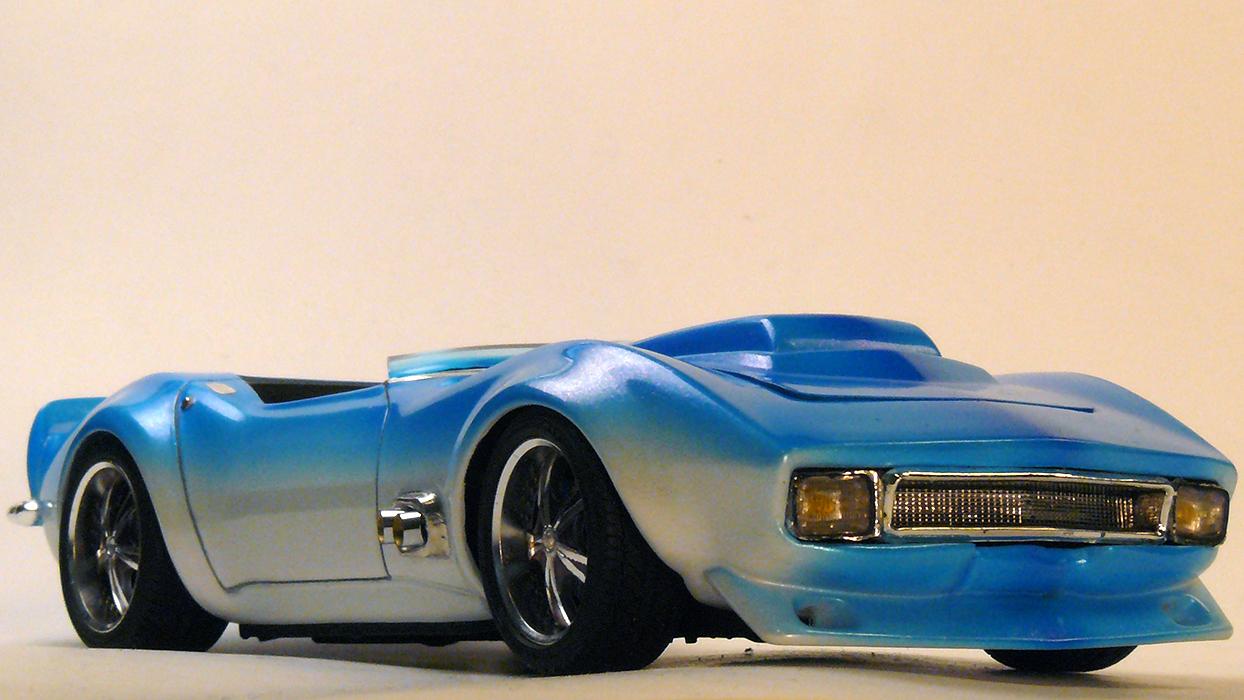
MPC kit made as imaginary concept car. Inspiration came from 1971 Plymouth Road Runner Rapid Transit concept. That's why rear decklid/bumper and front grill were modified. Engine is modified to look like Chryslers 444 cid Ball Stud Hemi prototype engine.
- 31 replies
-
- 24
-
-
Hasegawa kit built almost box stock. Added interior flocking and floor matts. Paint is mixed by me.
- 23 replies
-
- 17
-
-
I used Citadel Agrelland Earth for the crackled look. As that paste dries, it crackles. then washes and dry brushing.
-
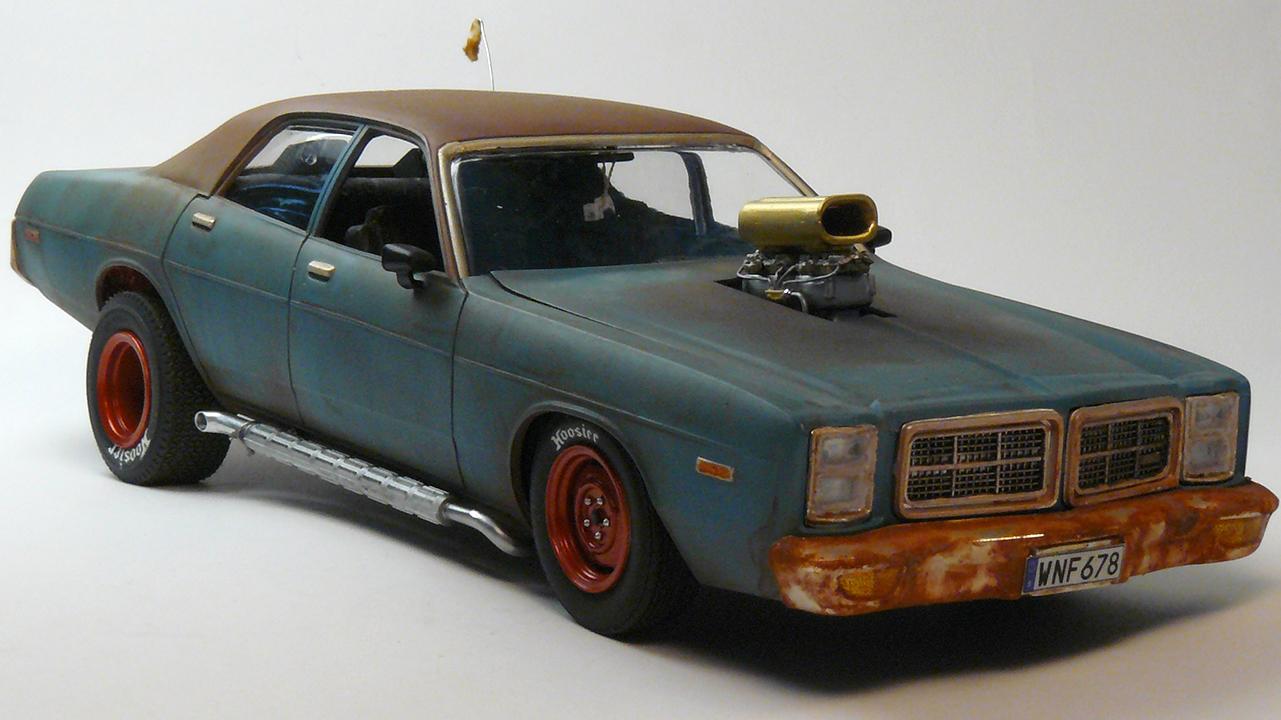
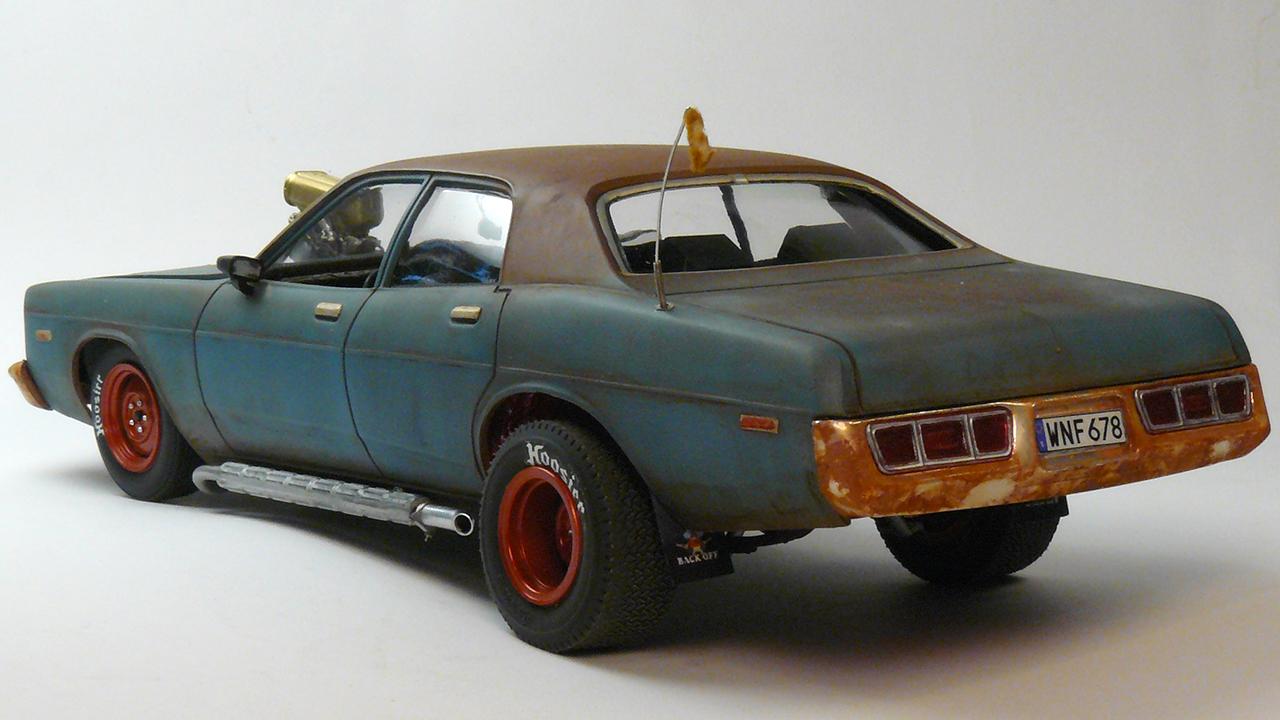
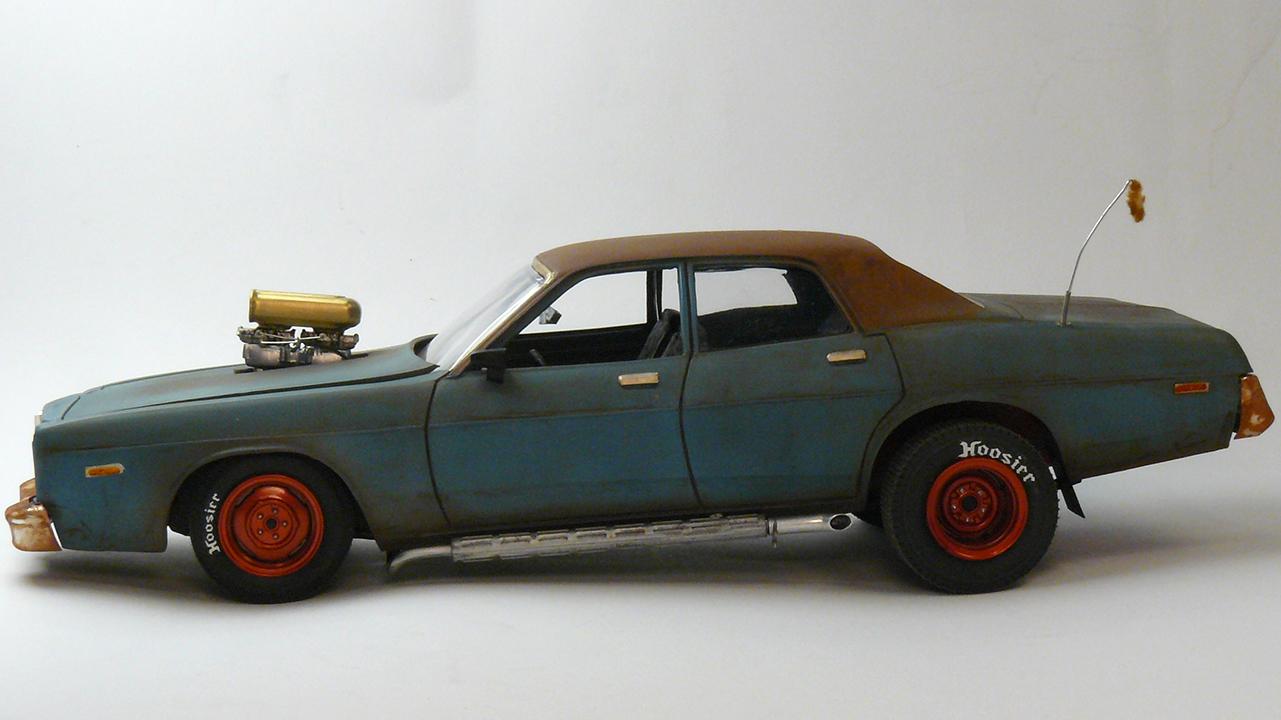
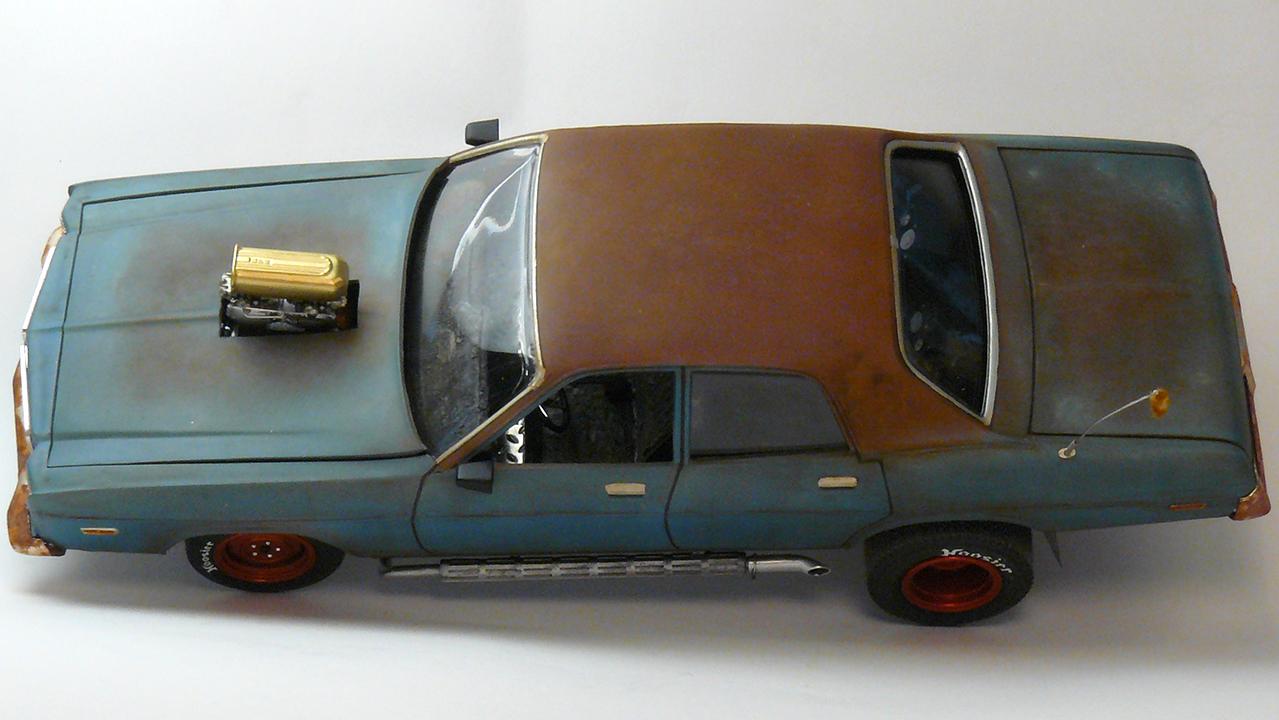
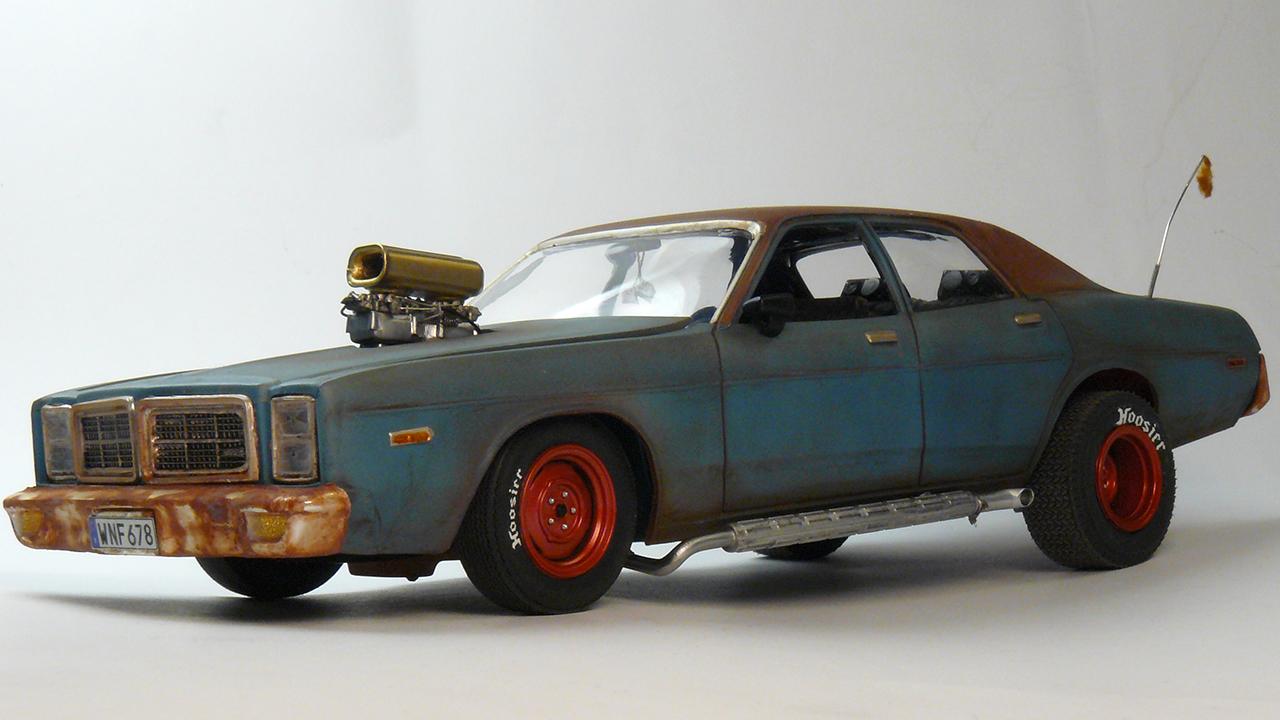
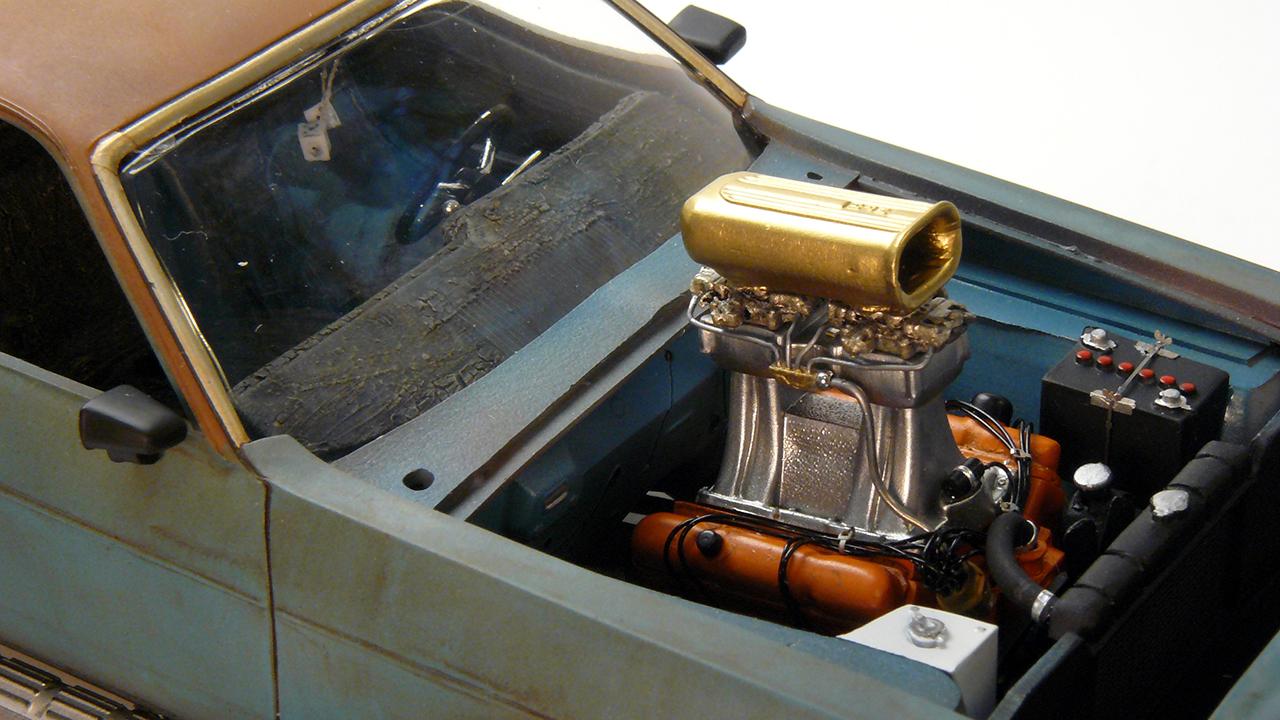
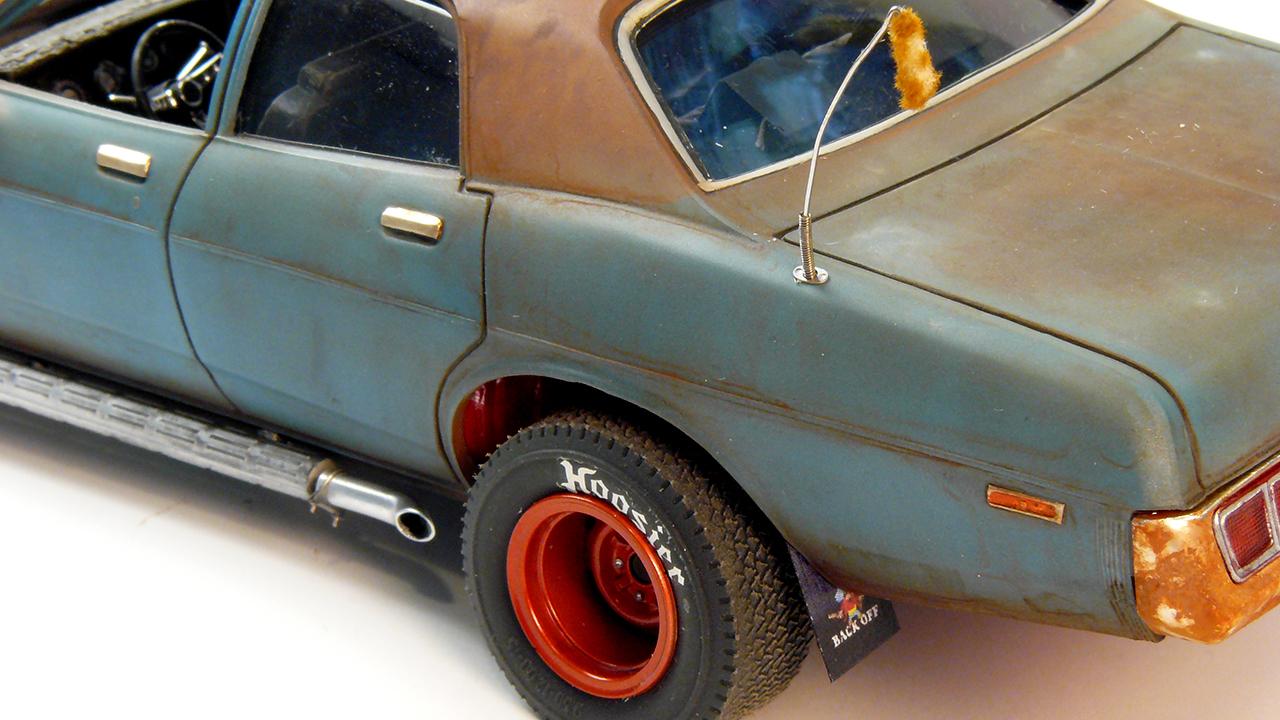
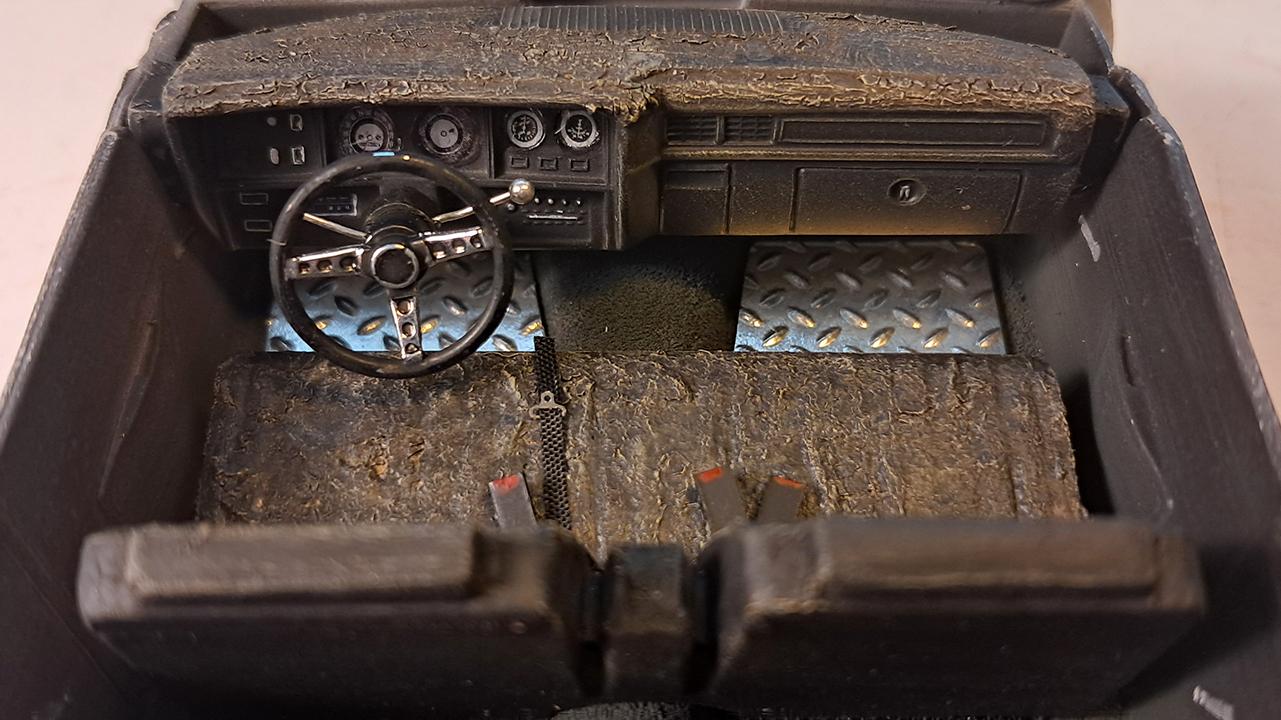
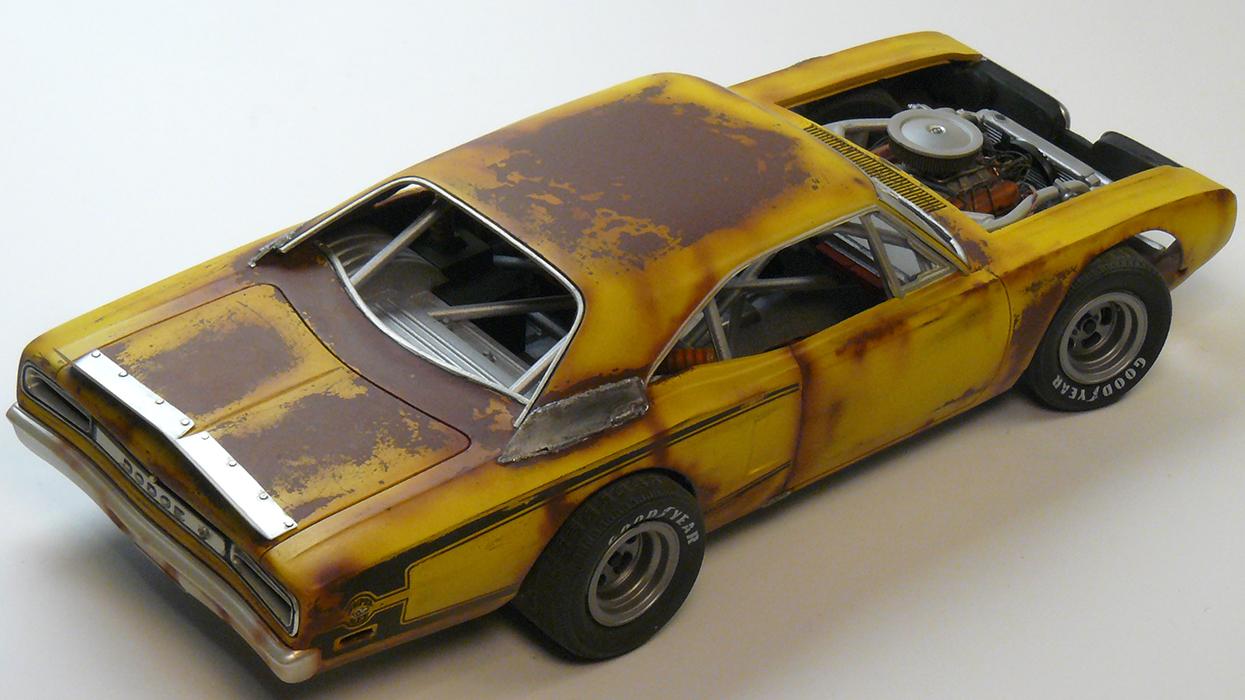
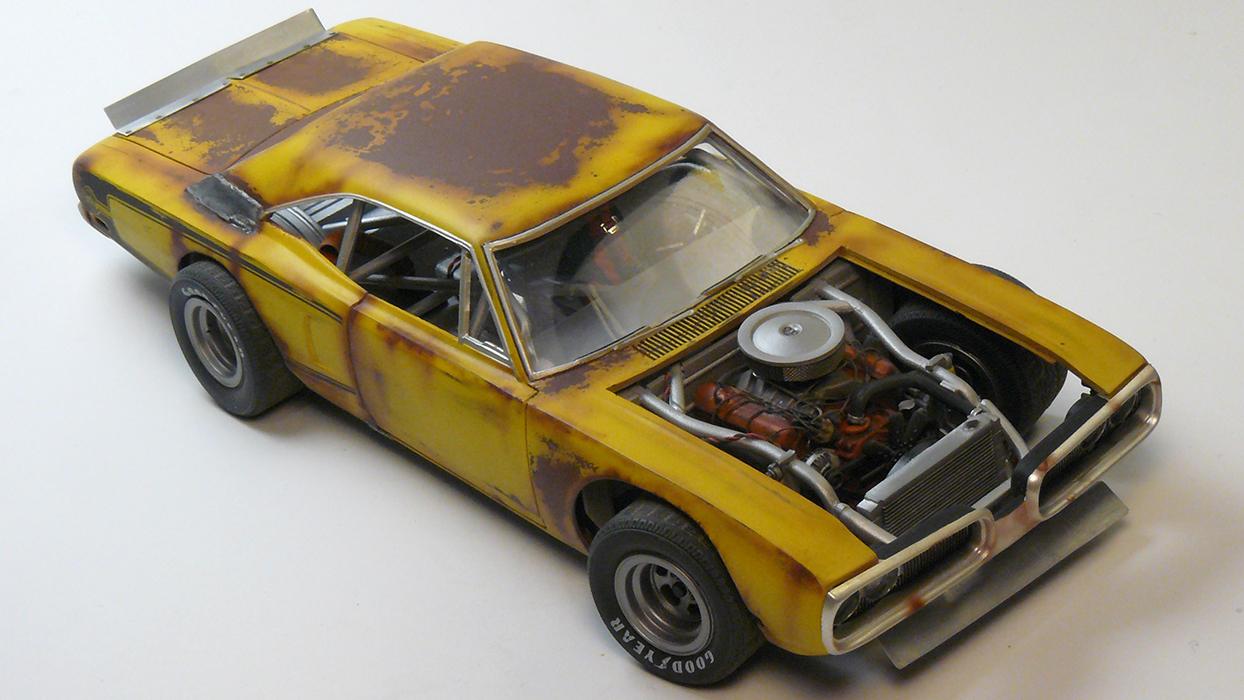
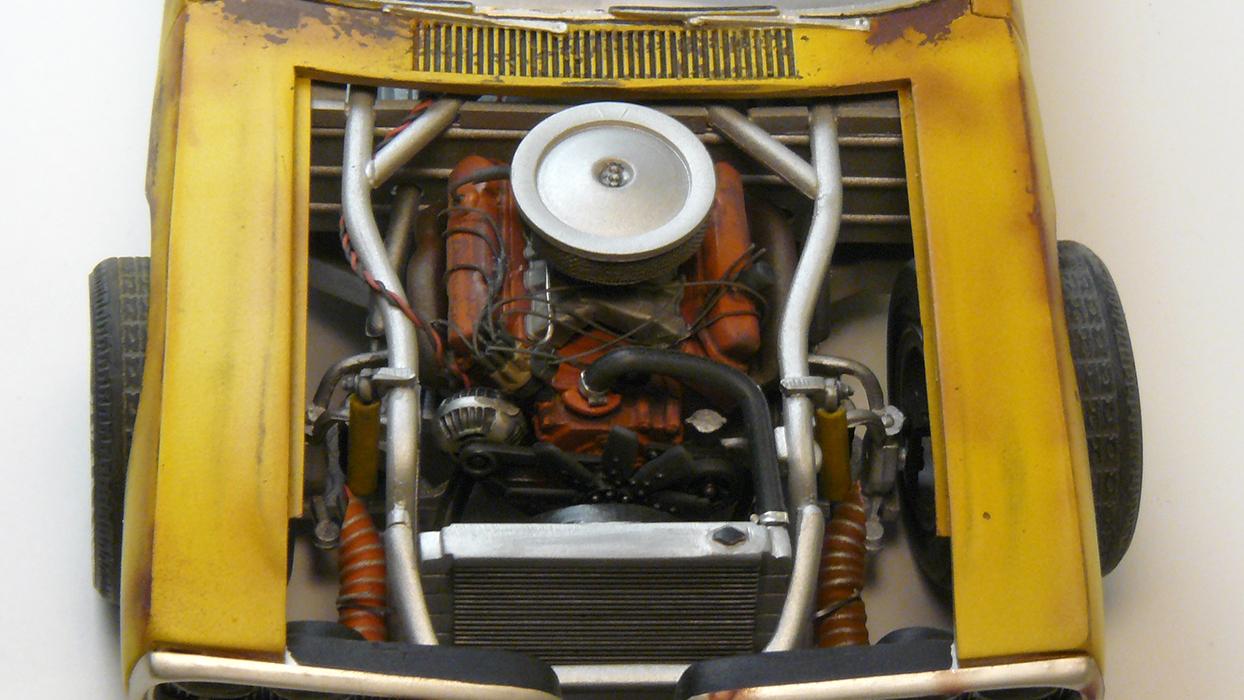
MPC police kit with couple of modifications: - Raised rear suspension and wider rear tyres - Tunnel ram with twin carburetors - Sidepipes, mud flaps, antenna added - Painted fuel tank and wheels wells
-
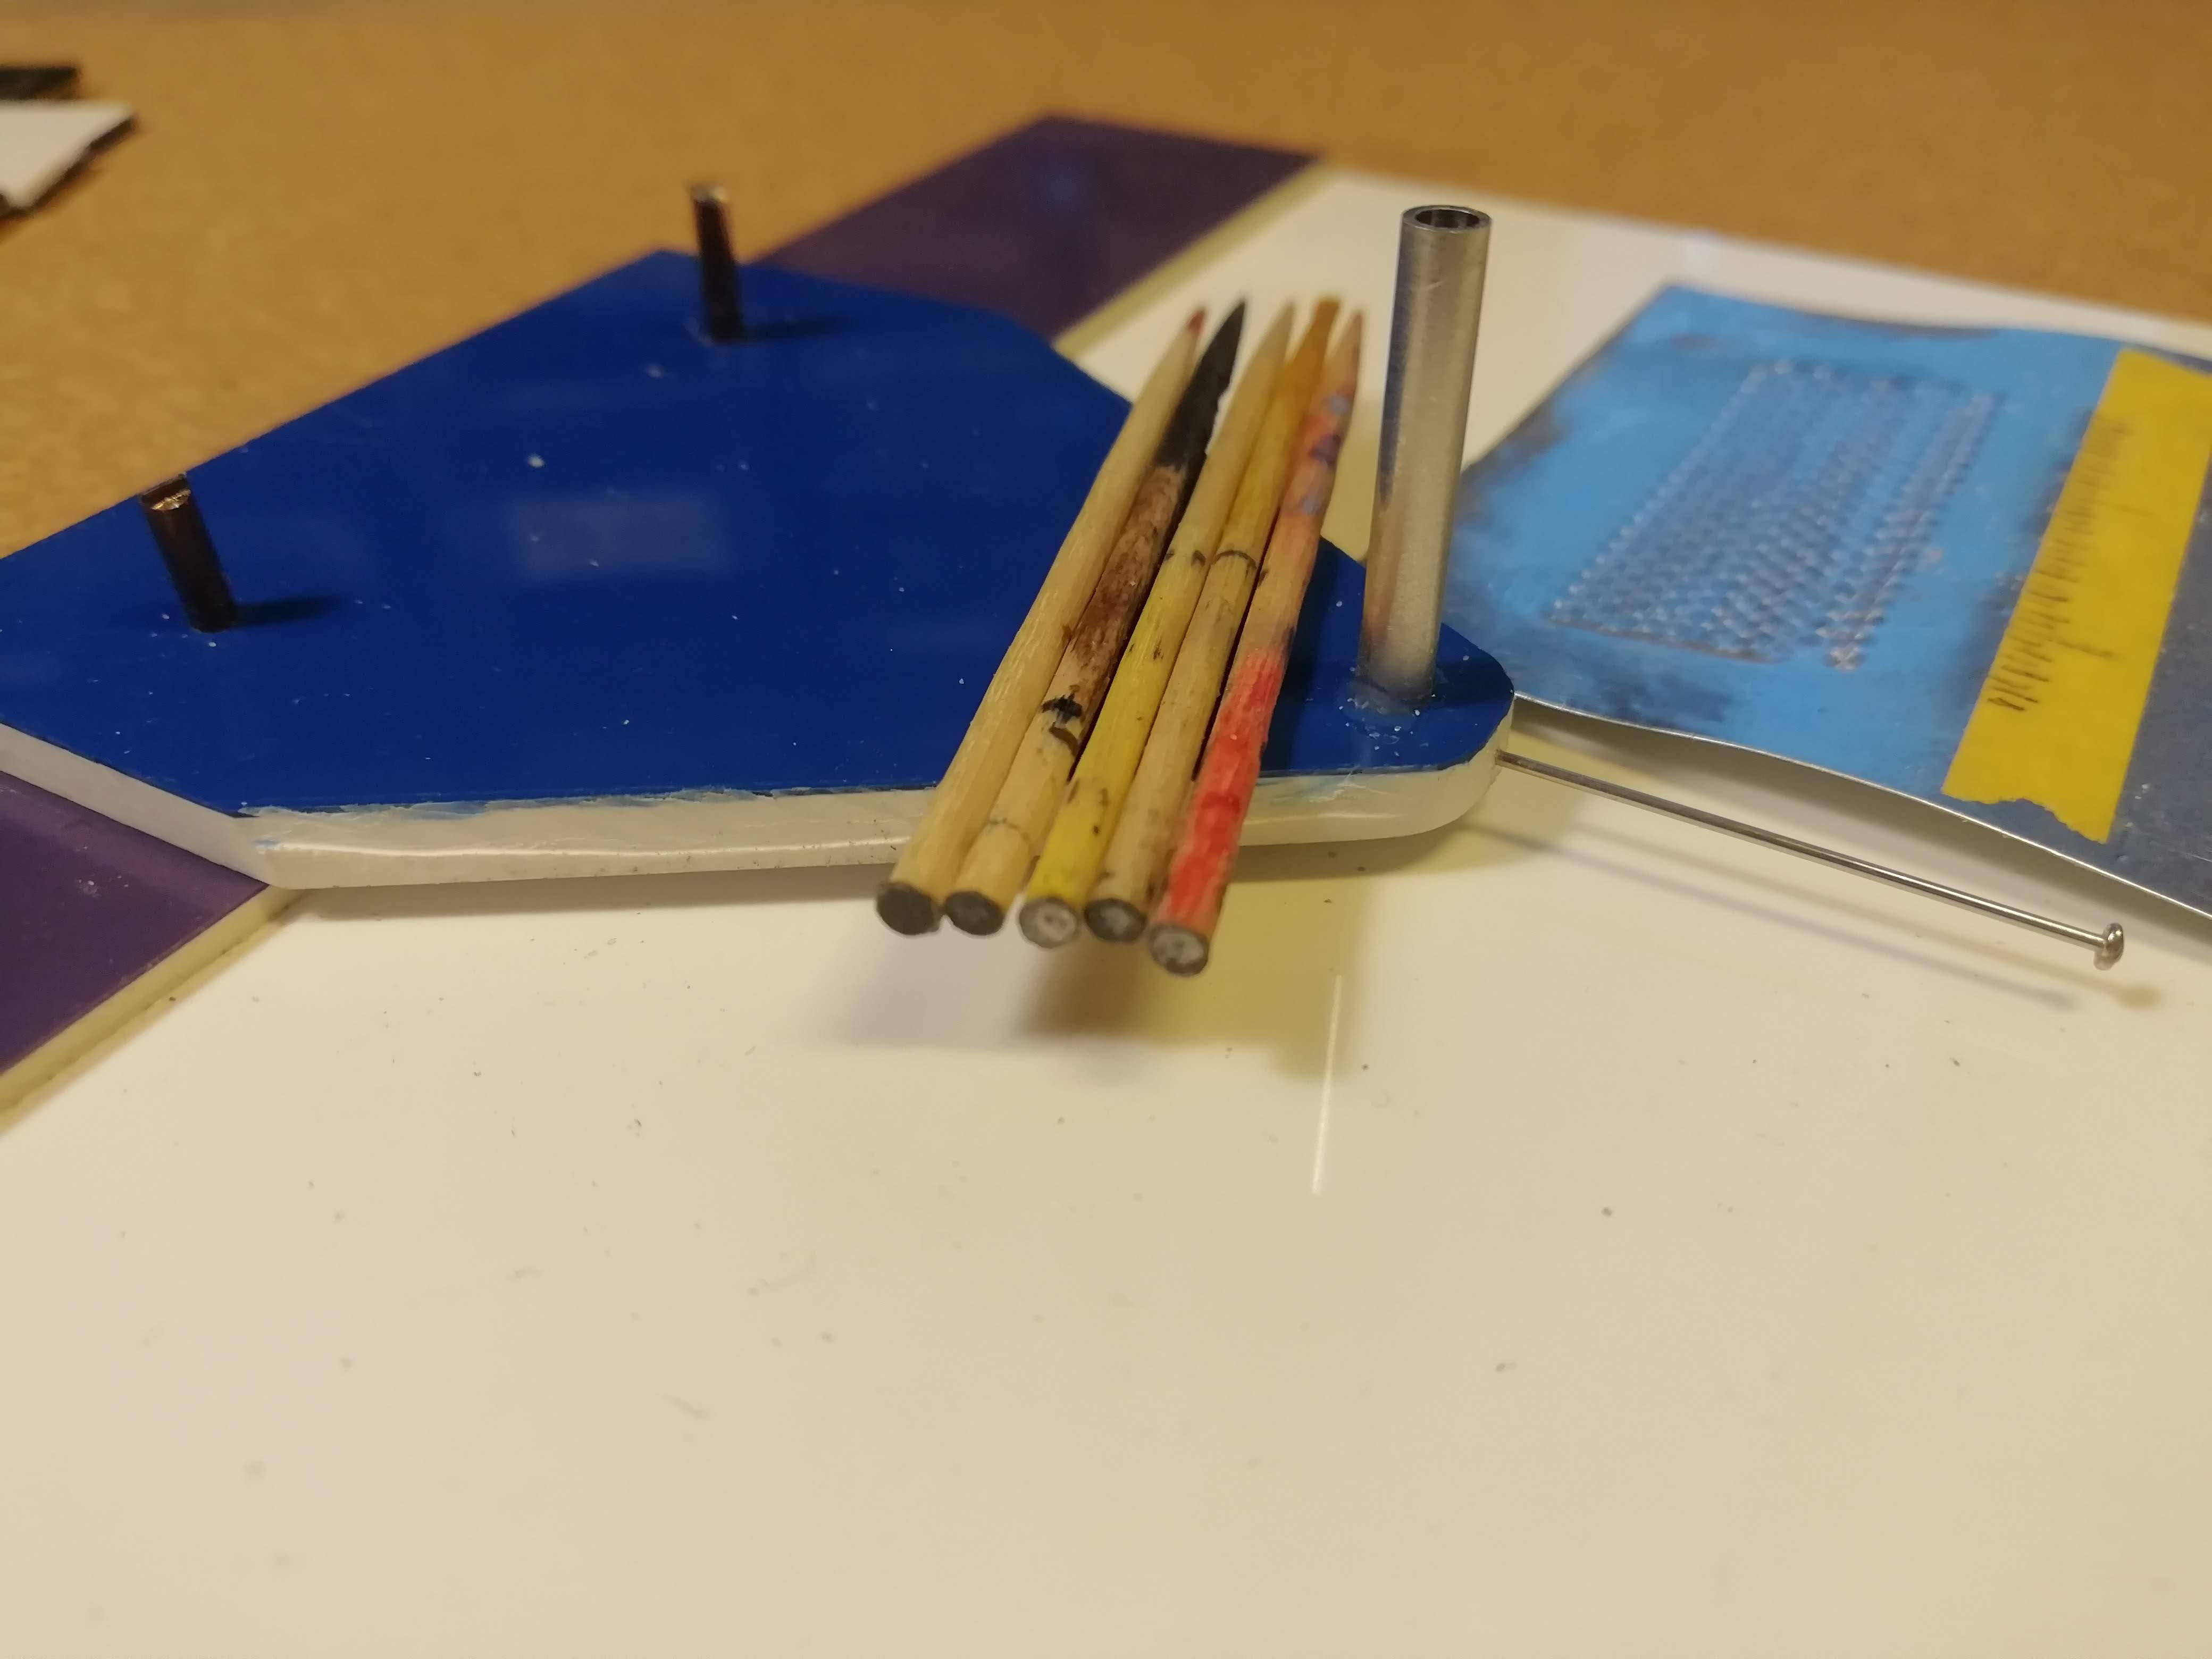
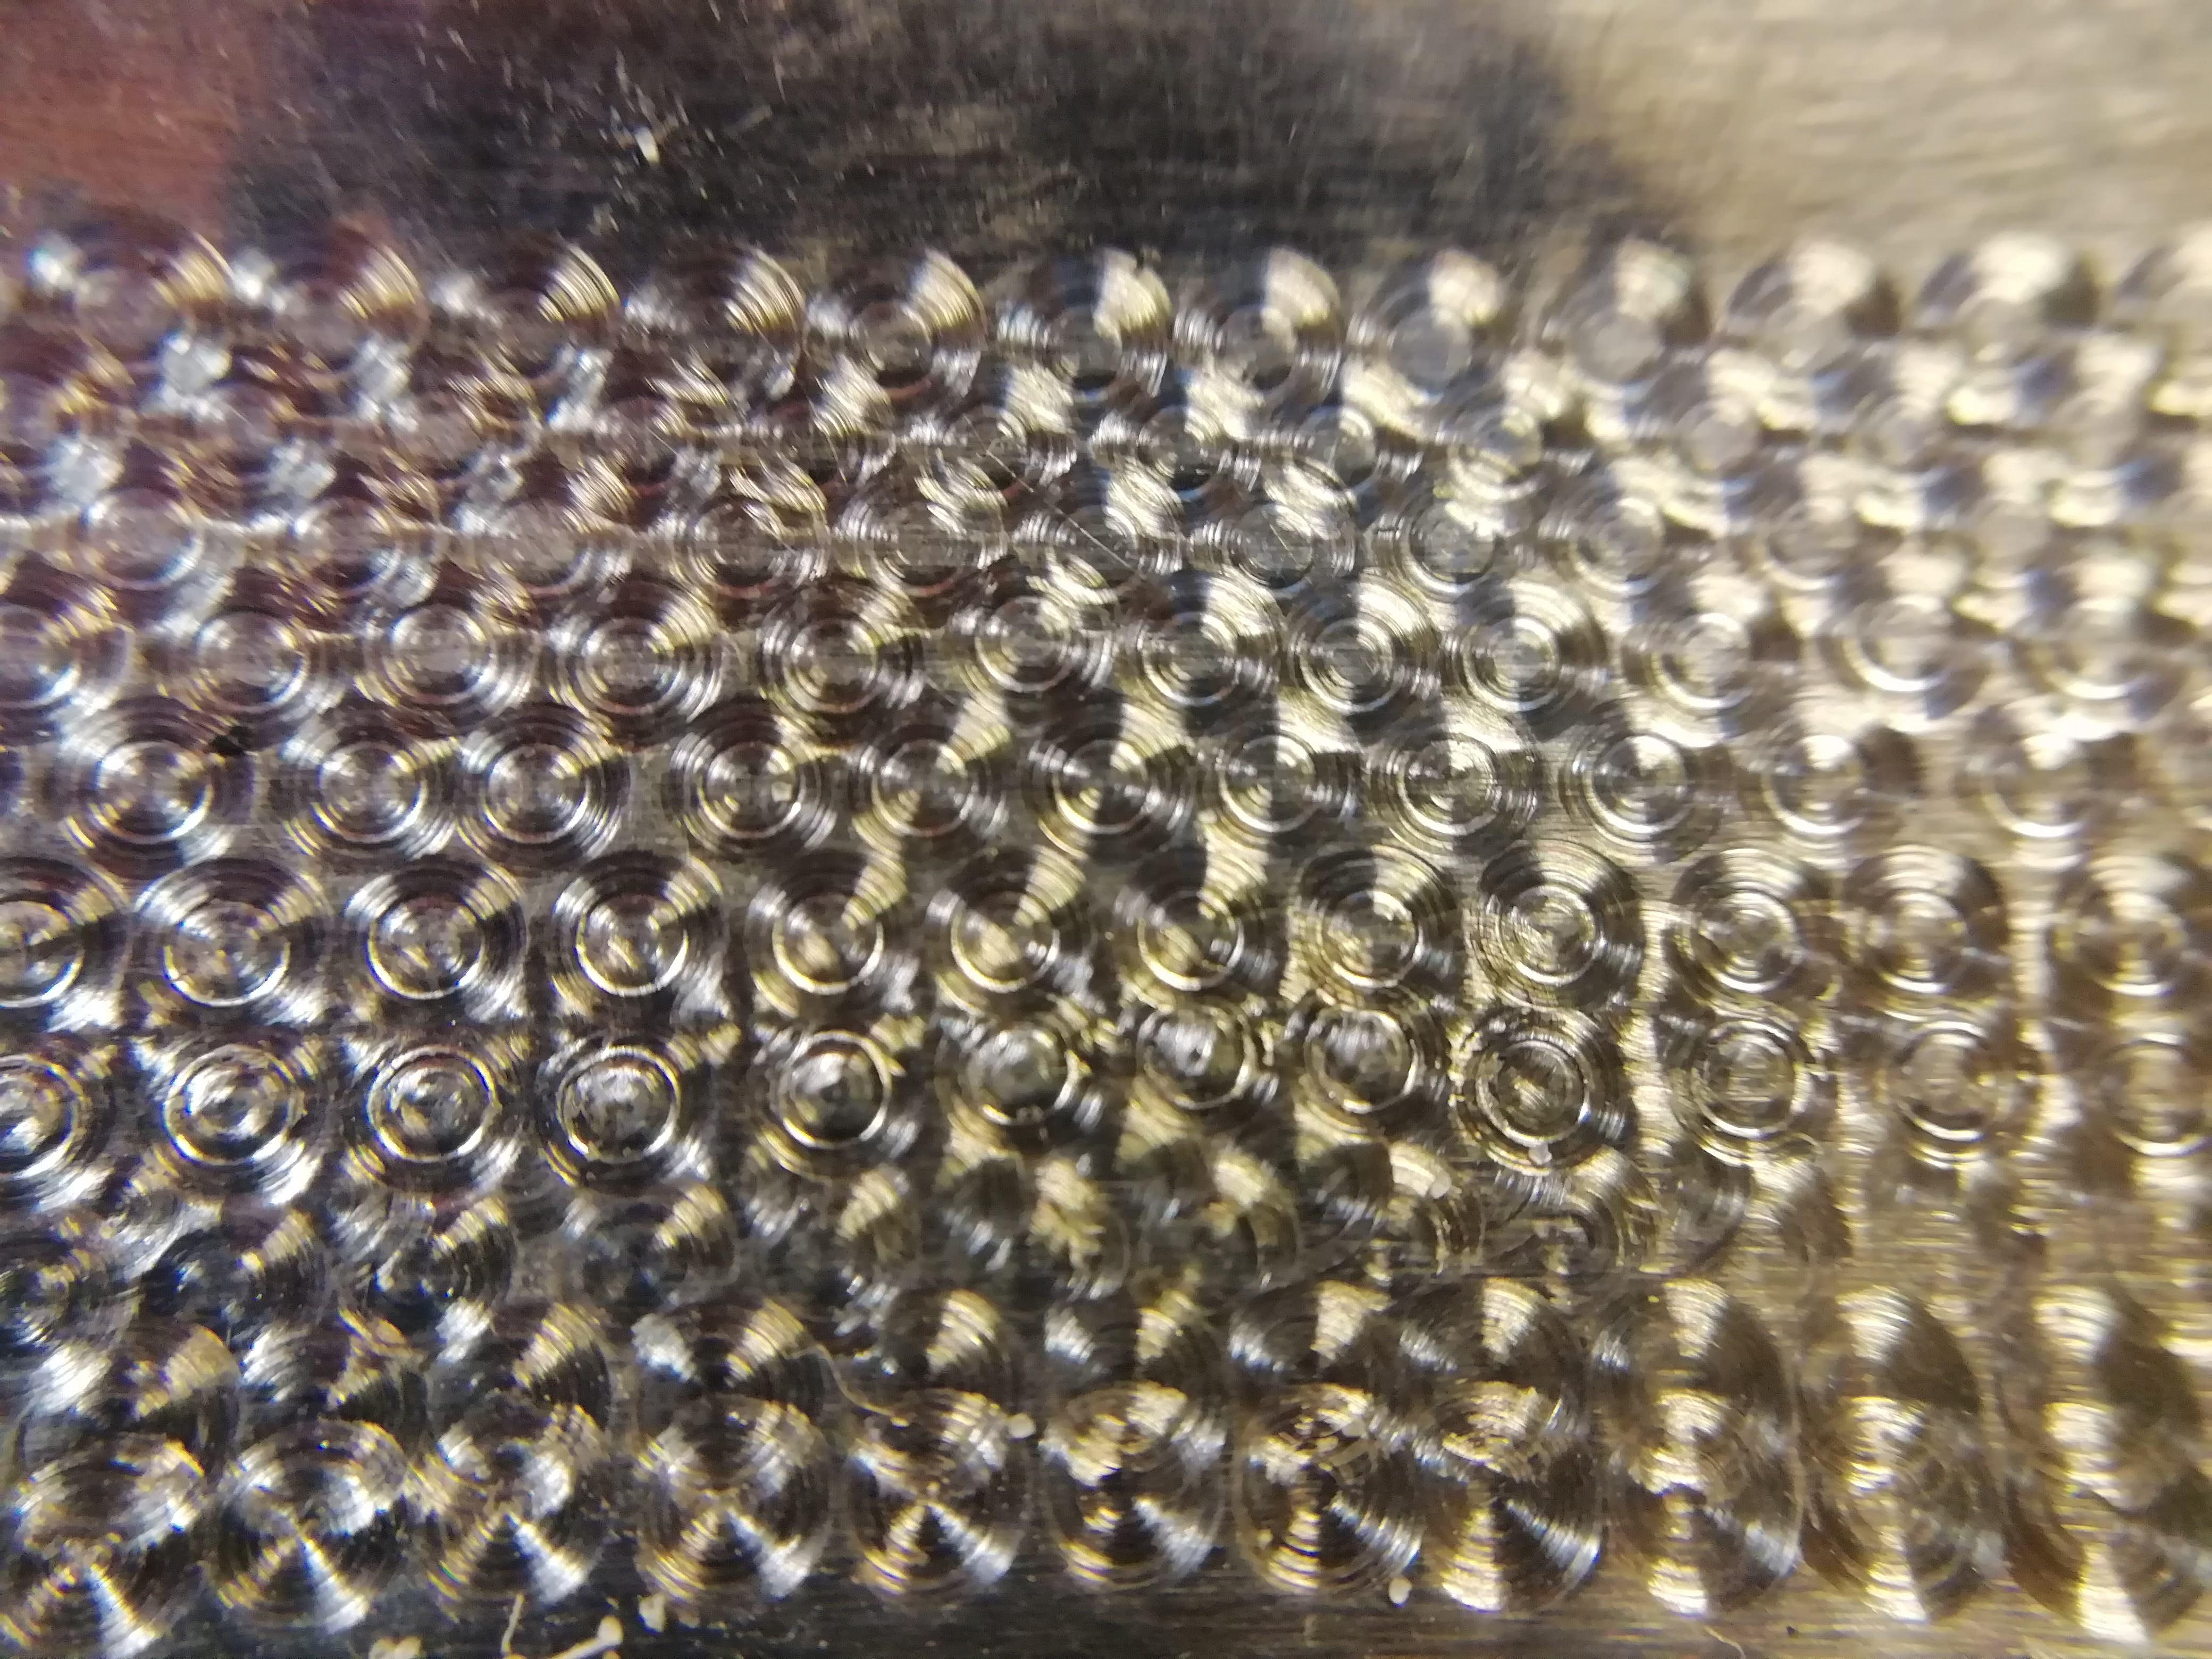
 I found this thread and made similar jig as Scott Colmer. My pics are there too. https://www.modelcarsmag.com/forums/topic/171650-engine-turning-aluminum/
 -
Yes i did. Seats were painted with cobra colors red leather, then washed with tamiya panel liner.
-
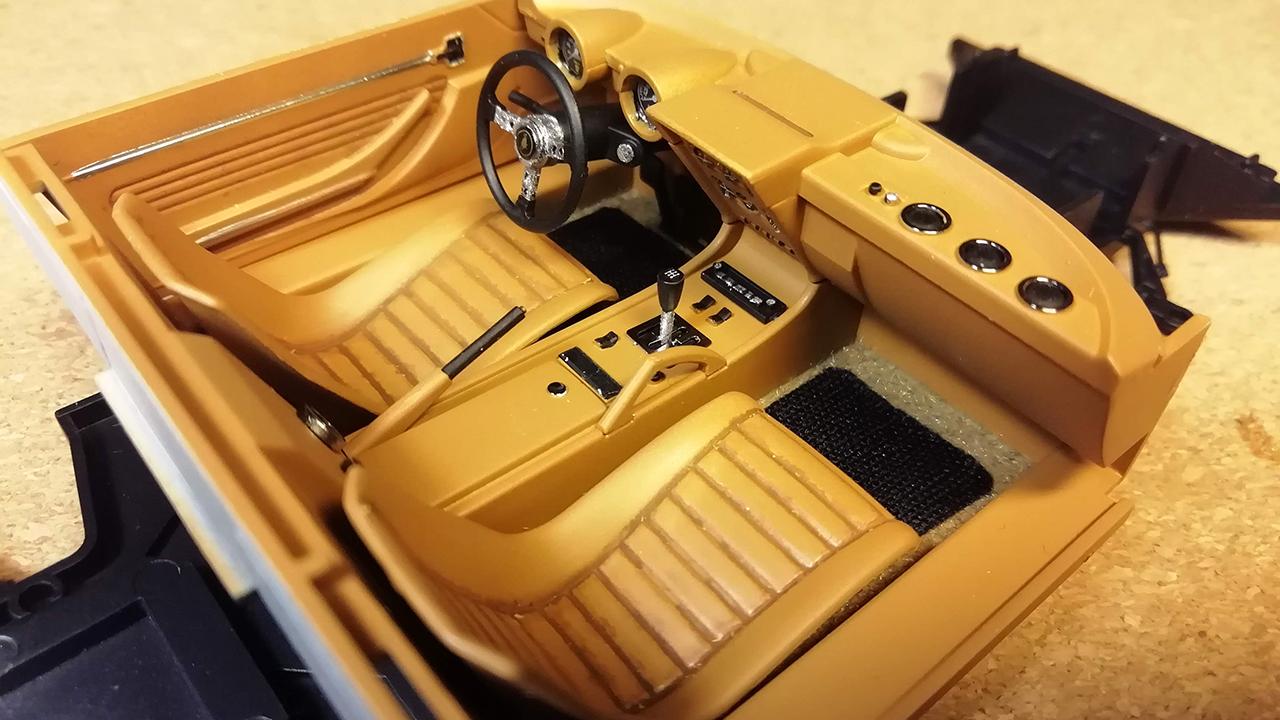
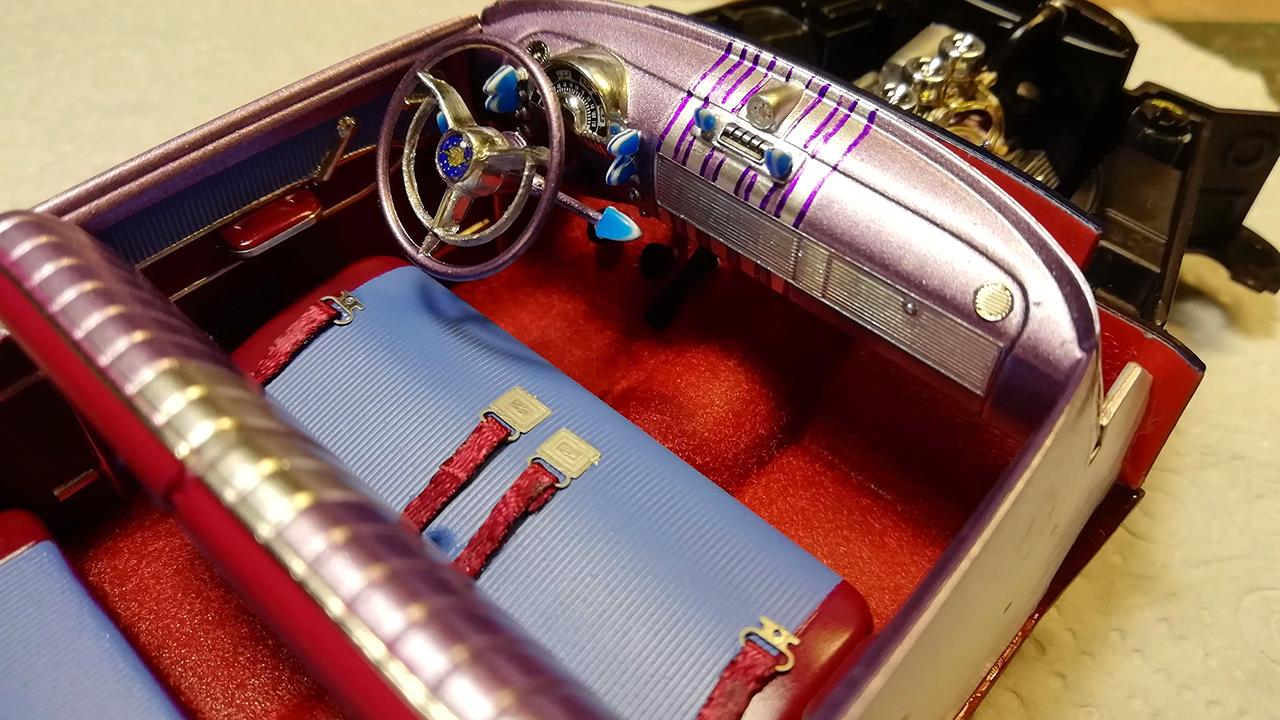
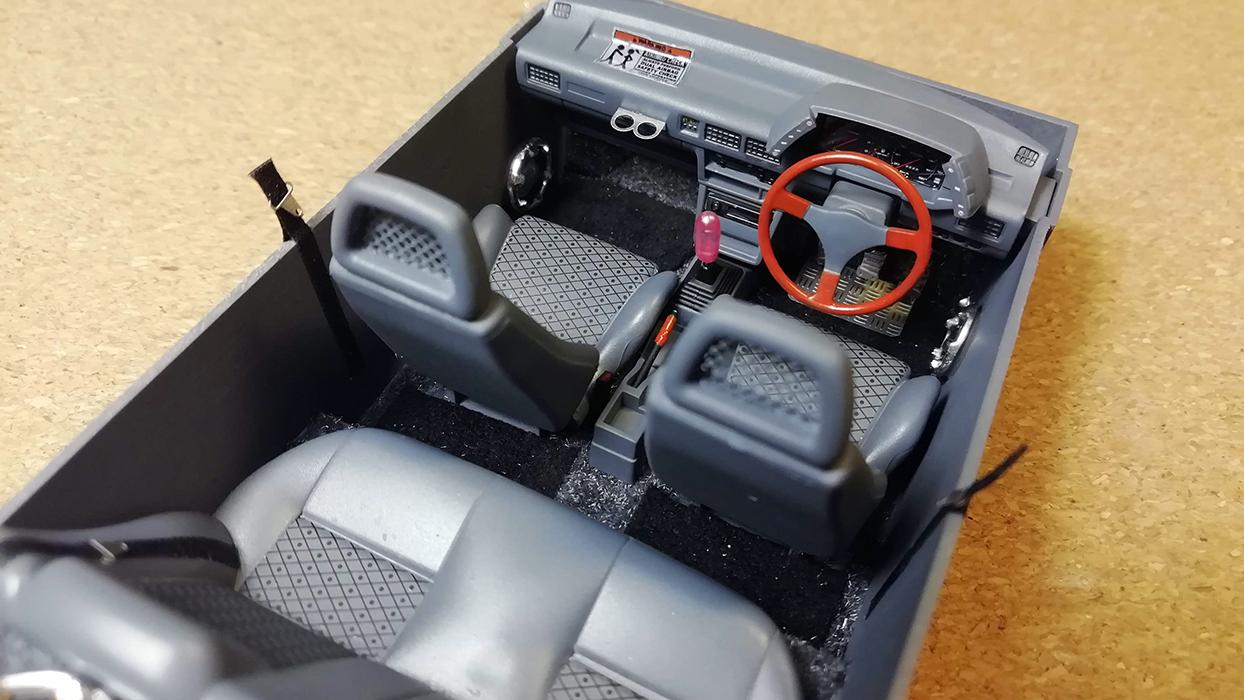
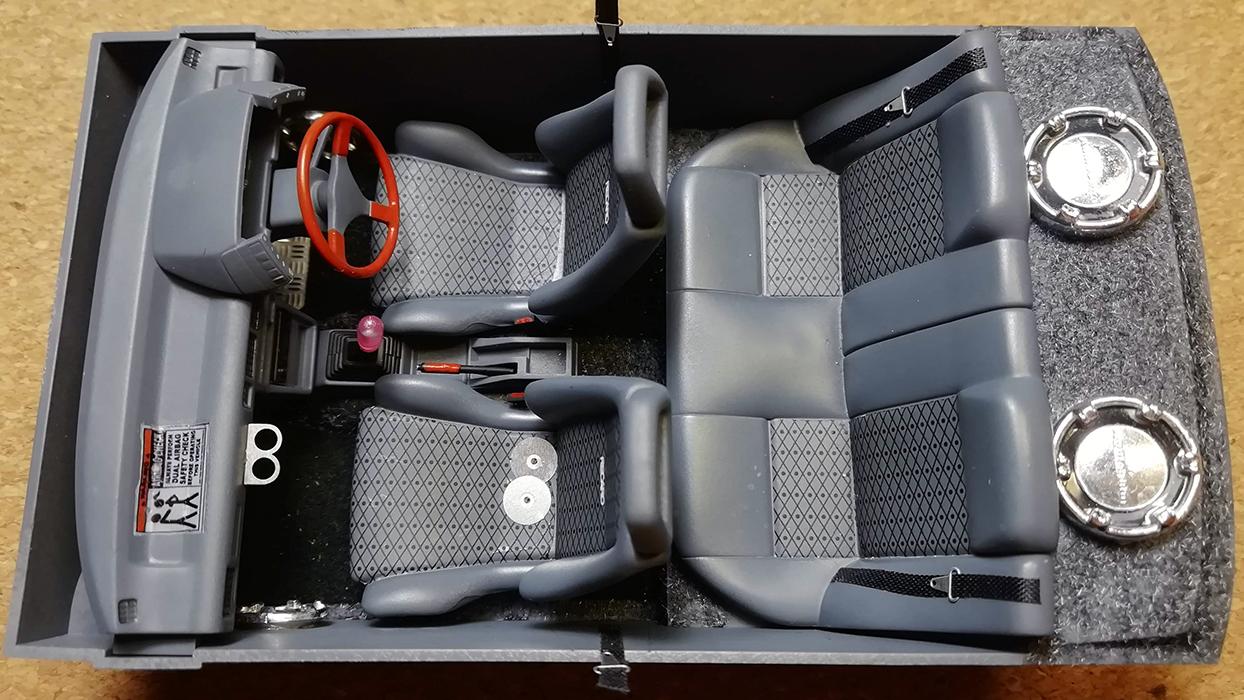
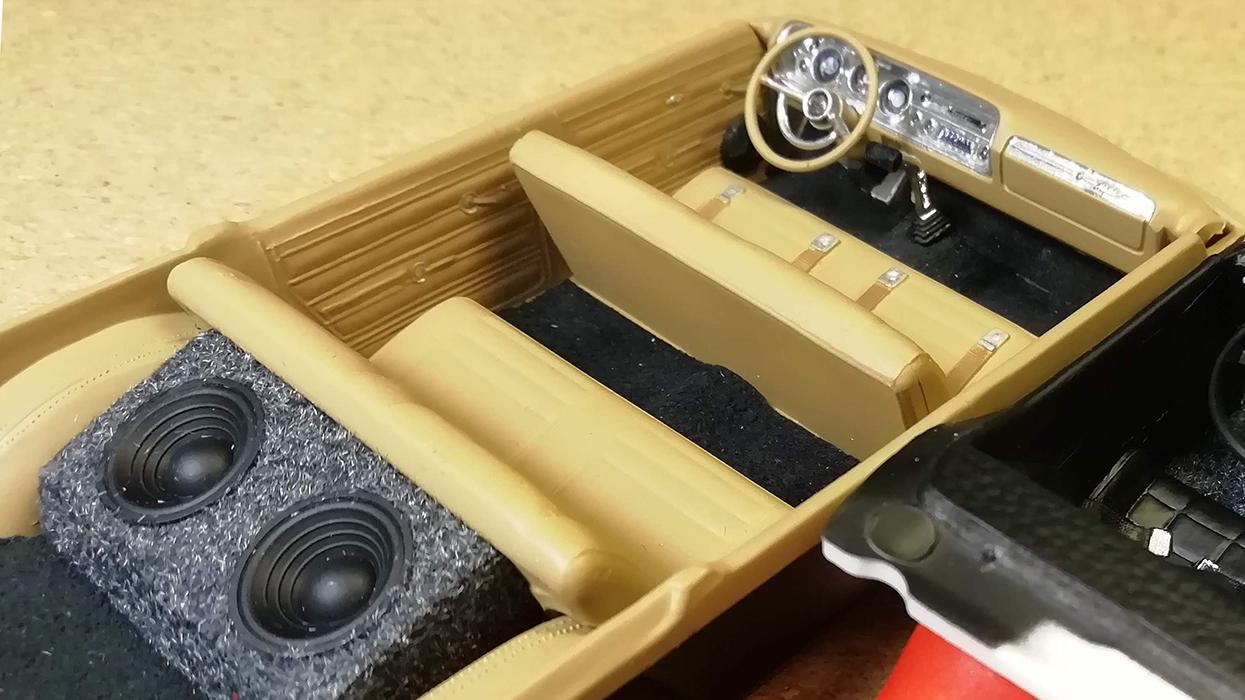
This was the road version. I only added wood decals, photoetched bits to the center console, plane landing lights to the vents seat belts and speakers. And of course the floor stuff.
-
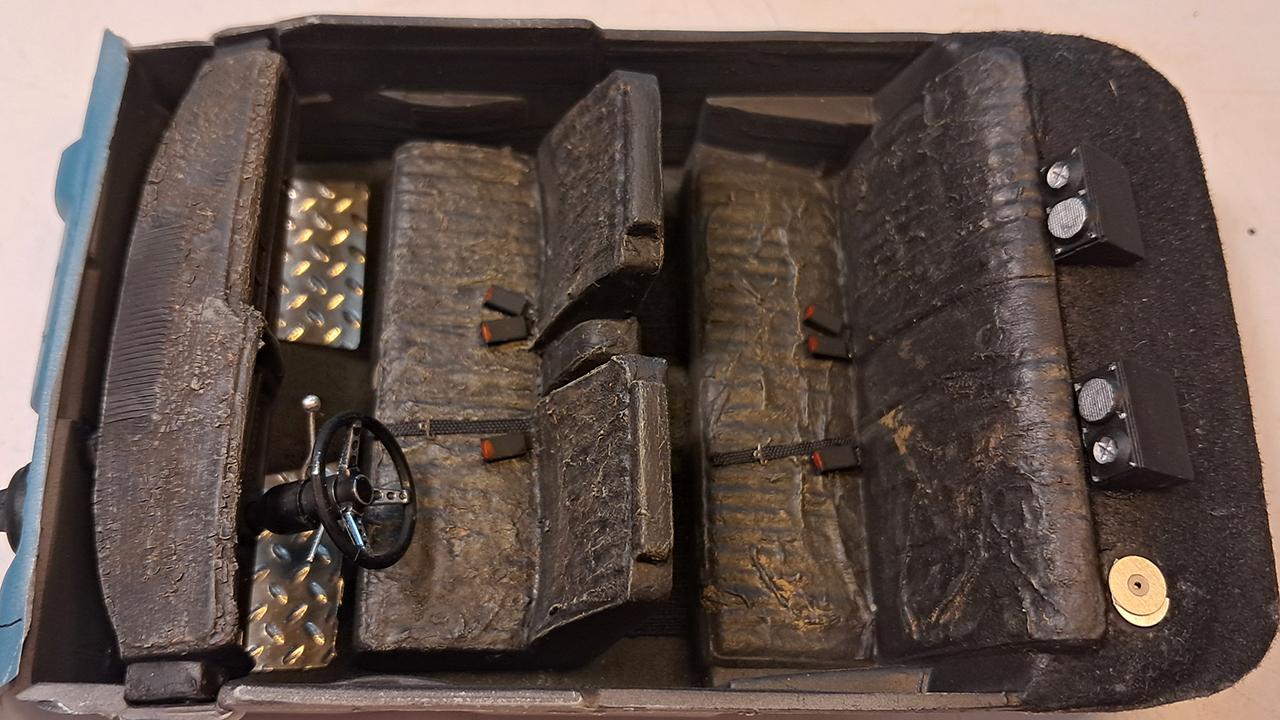
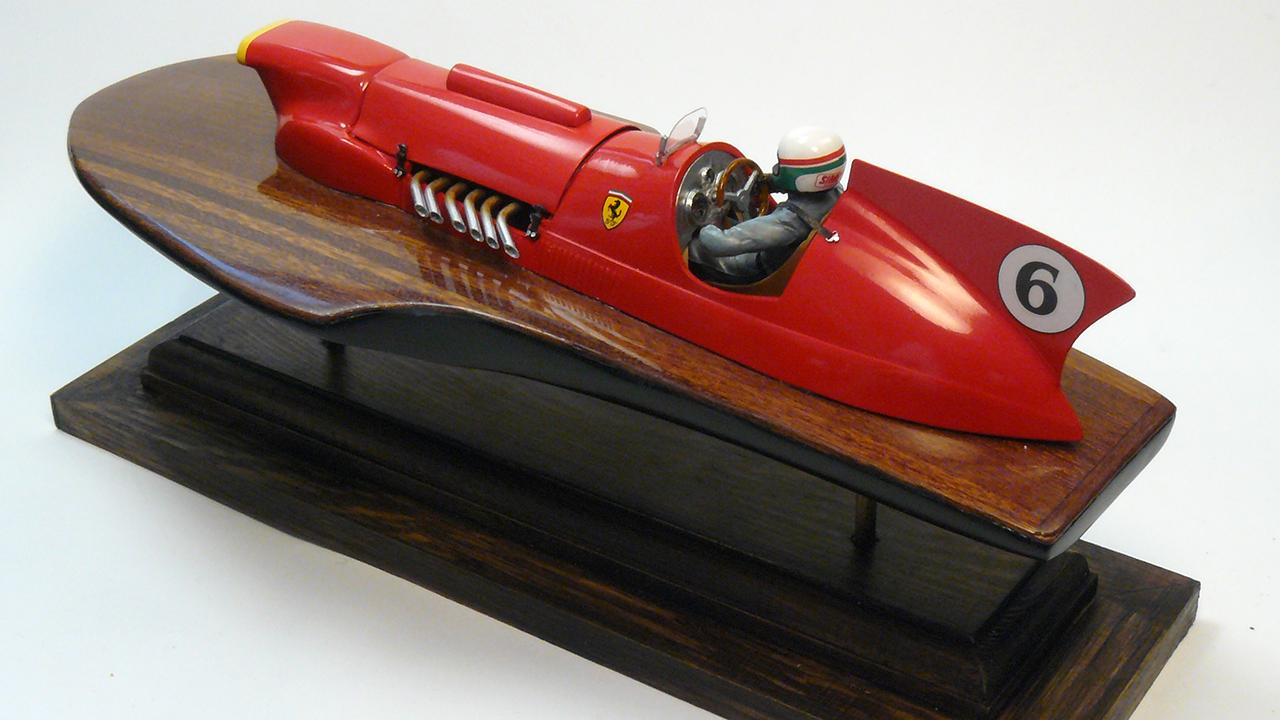
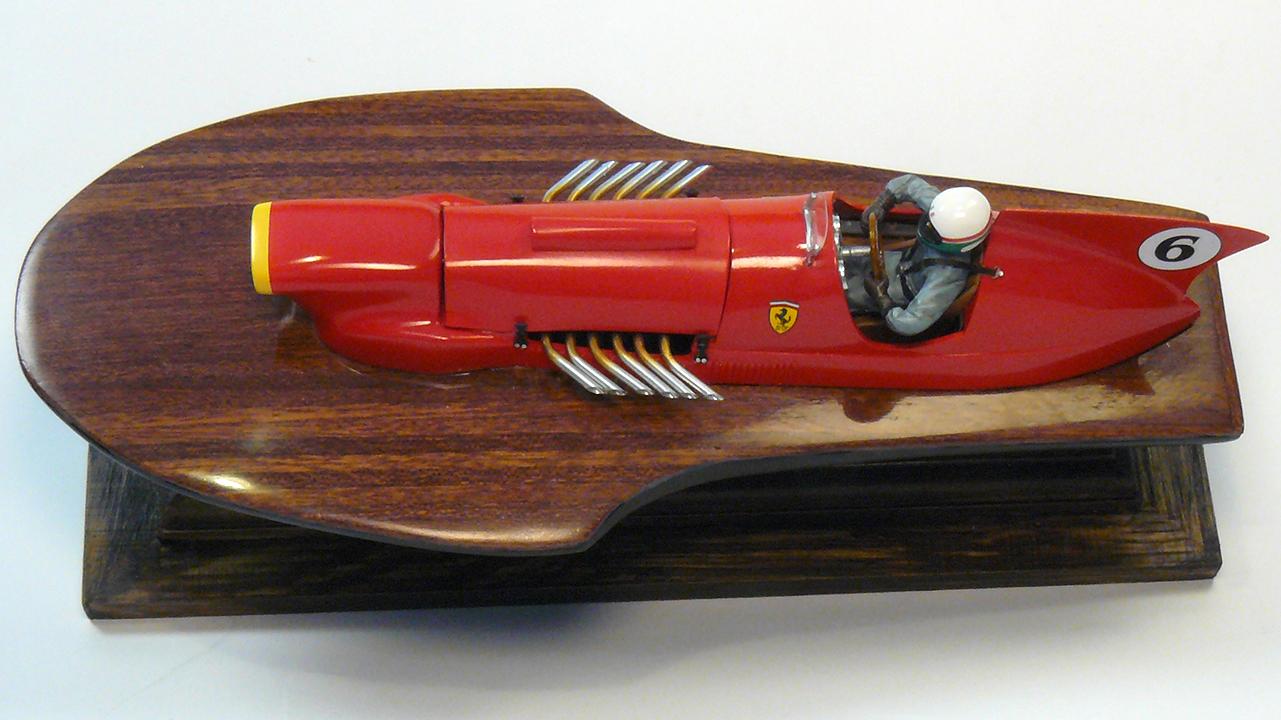
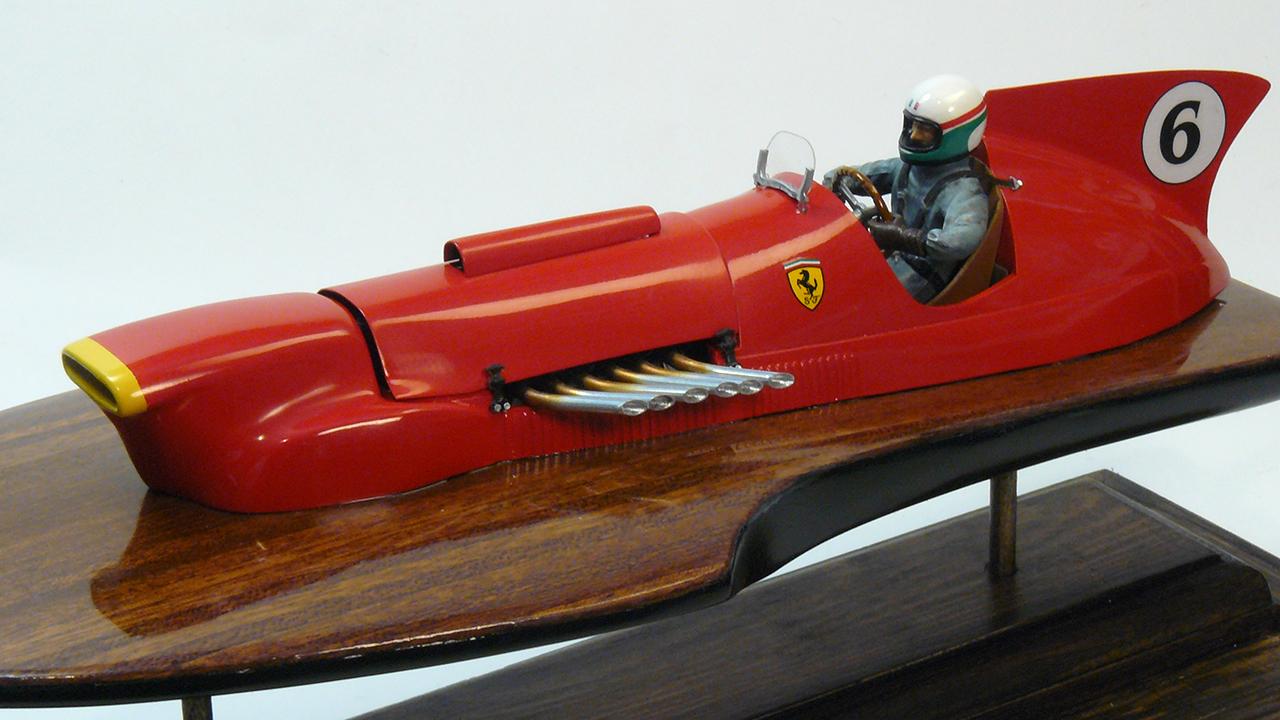
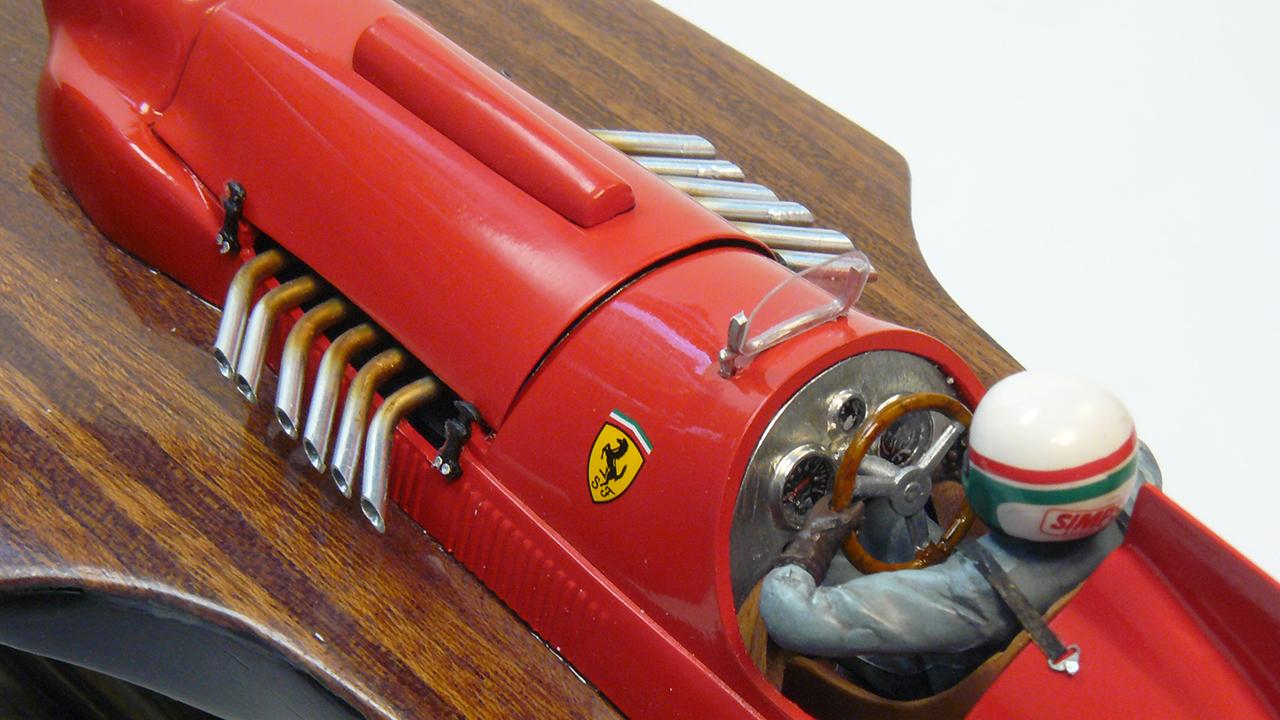
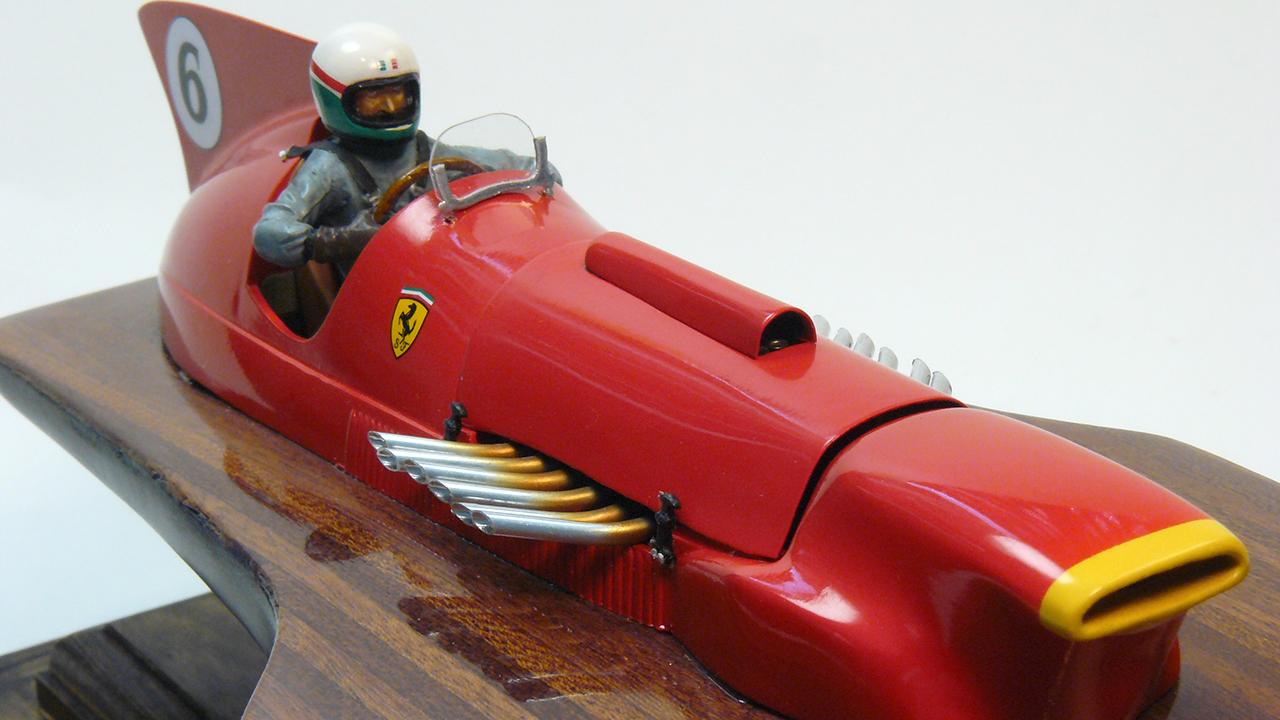
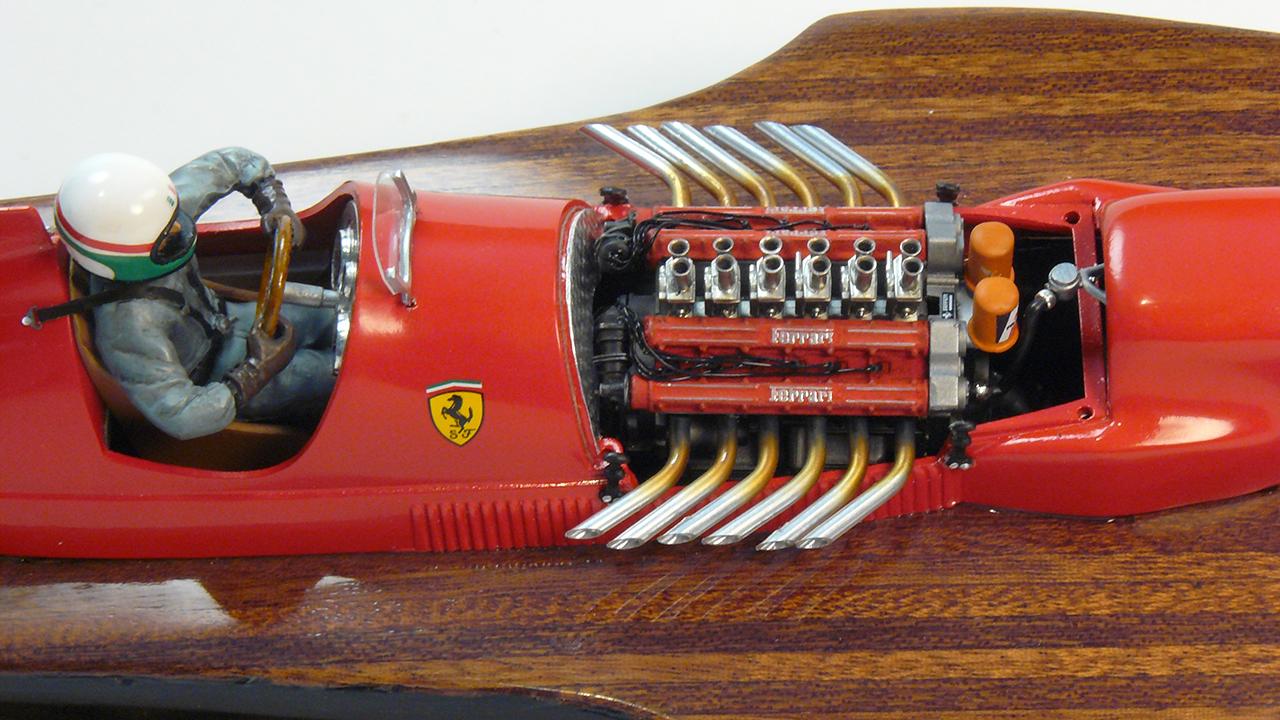
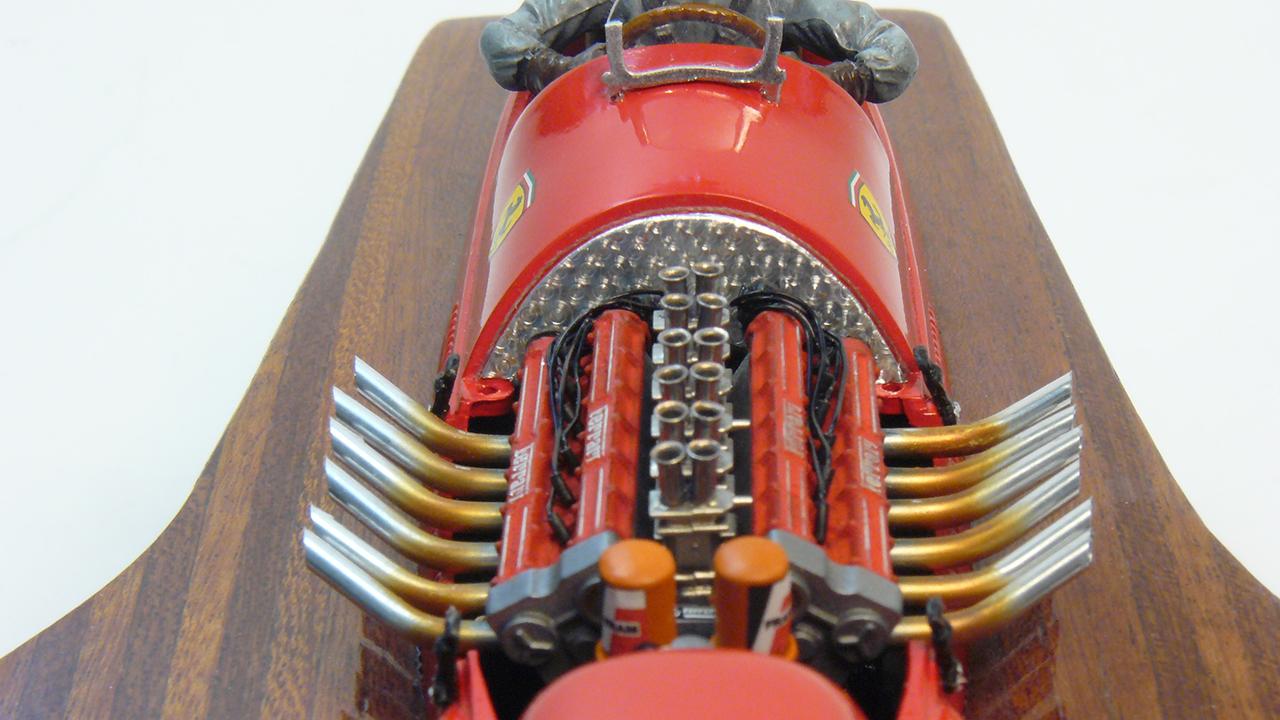
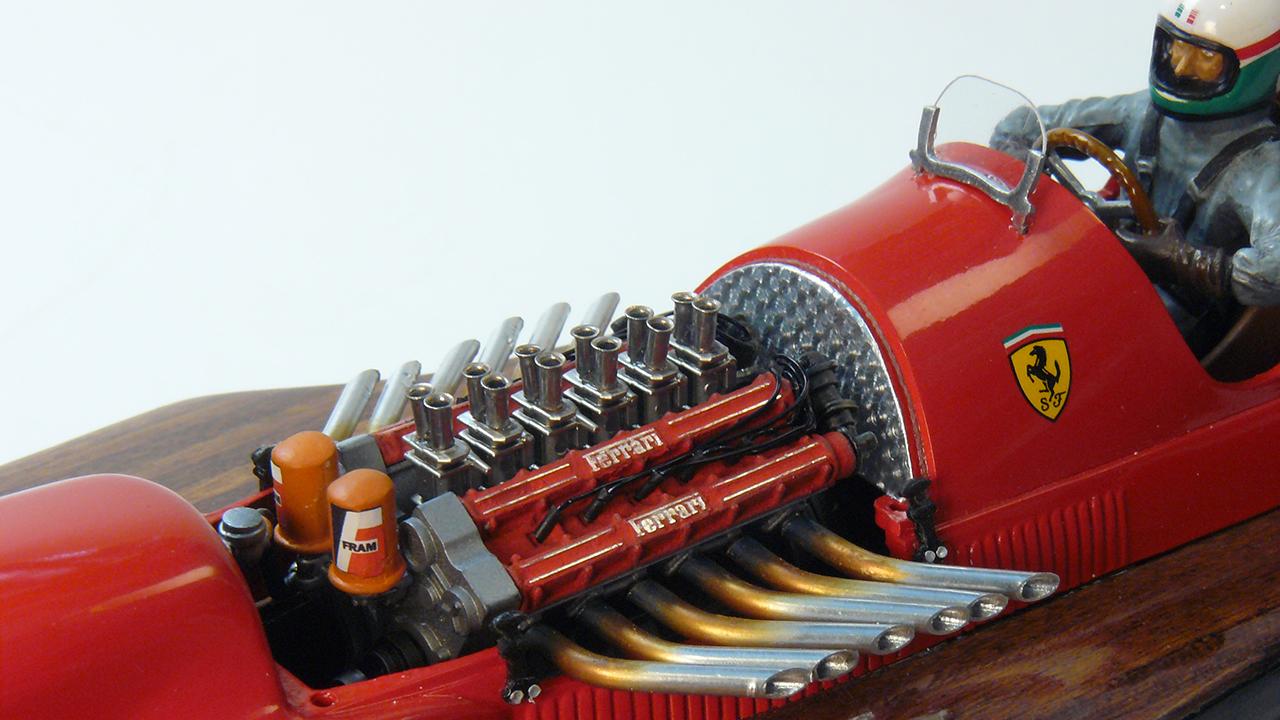
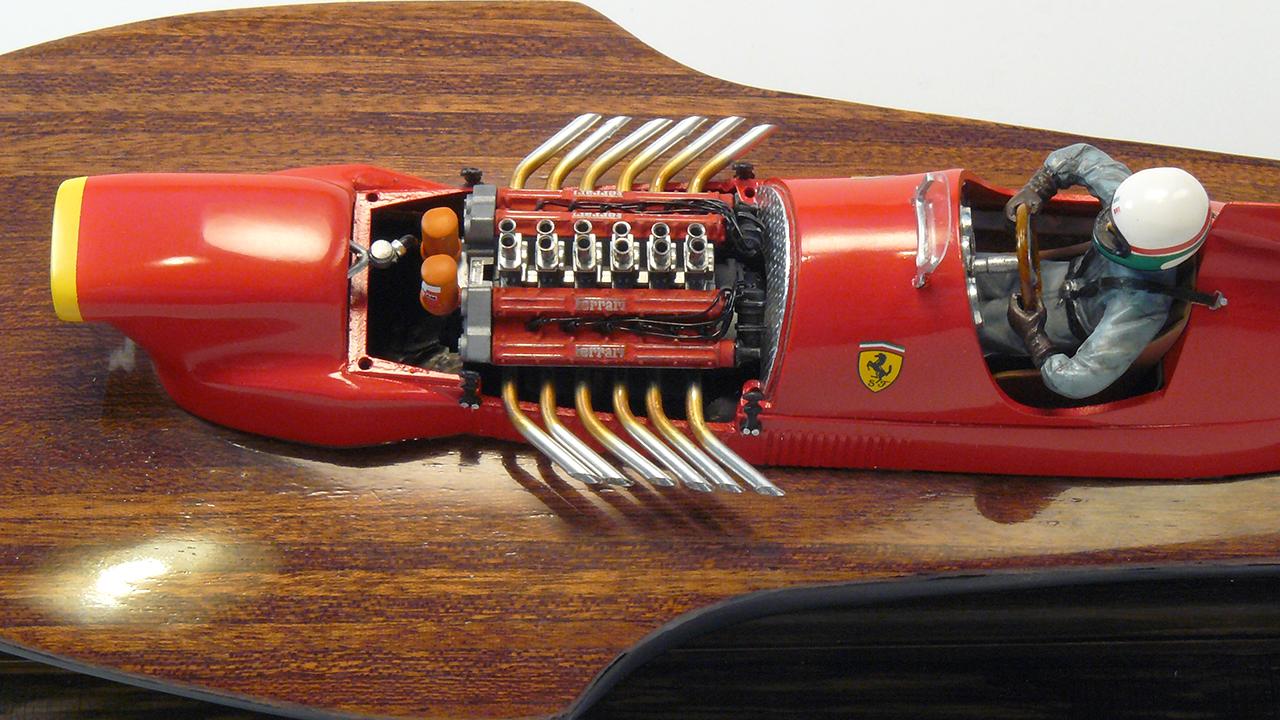
Lower hull is made out of insulation foam. Planking is mahogany wood strips. Then cleared multiple times. Upper hull is a 1950 Alfa Romeo Alfetta racecar by Smer. Pro Stock car scoop molded to the front. Rear part got a stabilizer fin. Firewall has real engine turned aluminium tape. Hood is made out of aluminium sheet. Figure added and posture modified to fit to a smaller cockpit. Engine is a Ferrari V12. Velocity stacks are crimp ends. Exhaust pipes are made out of aluminium.
-
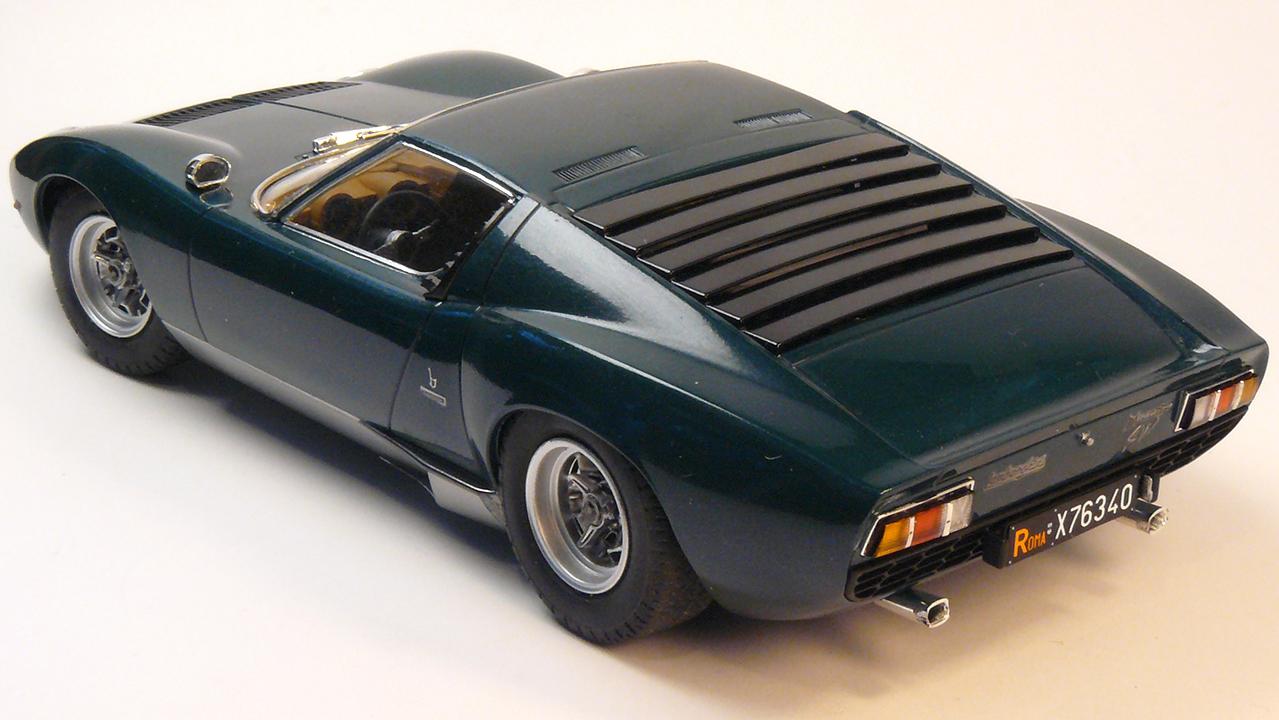
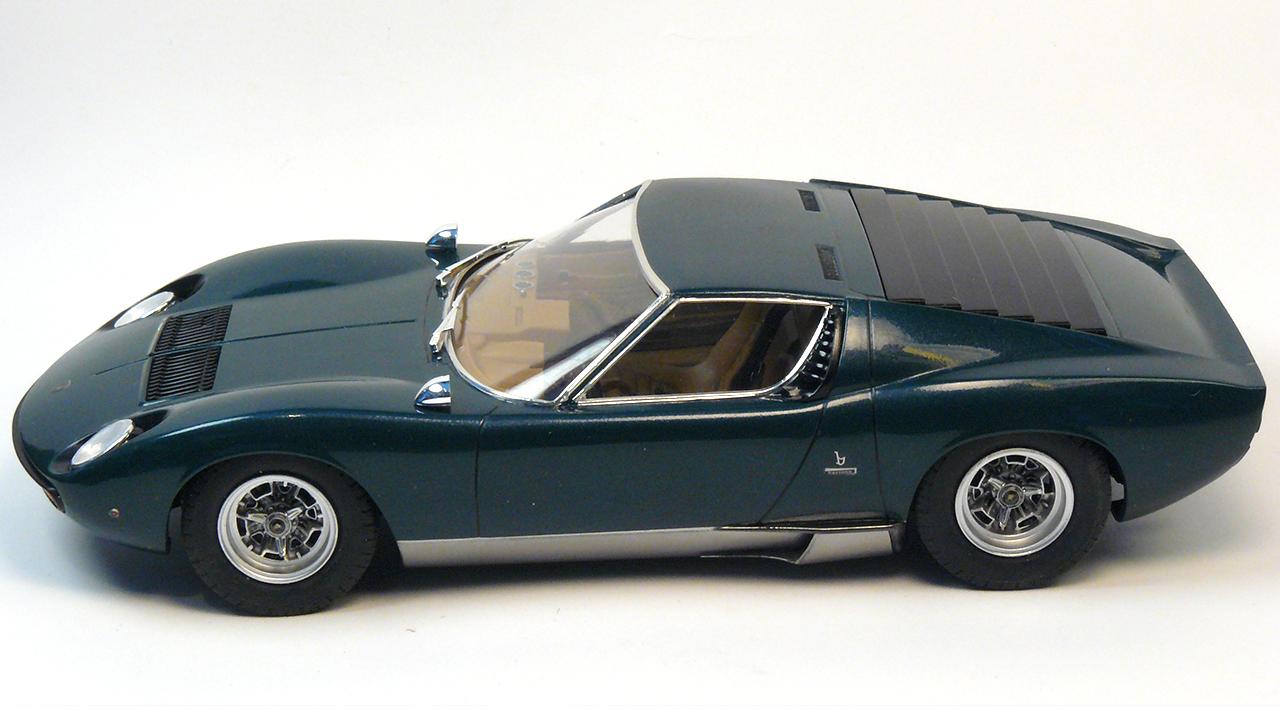
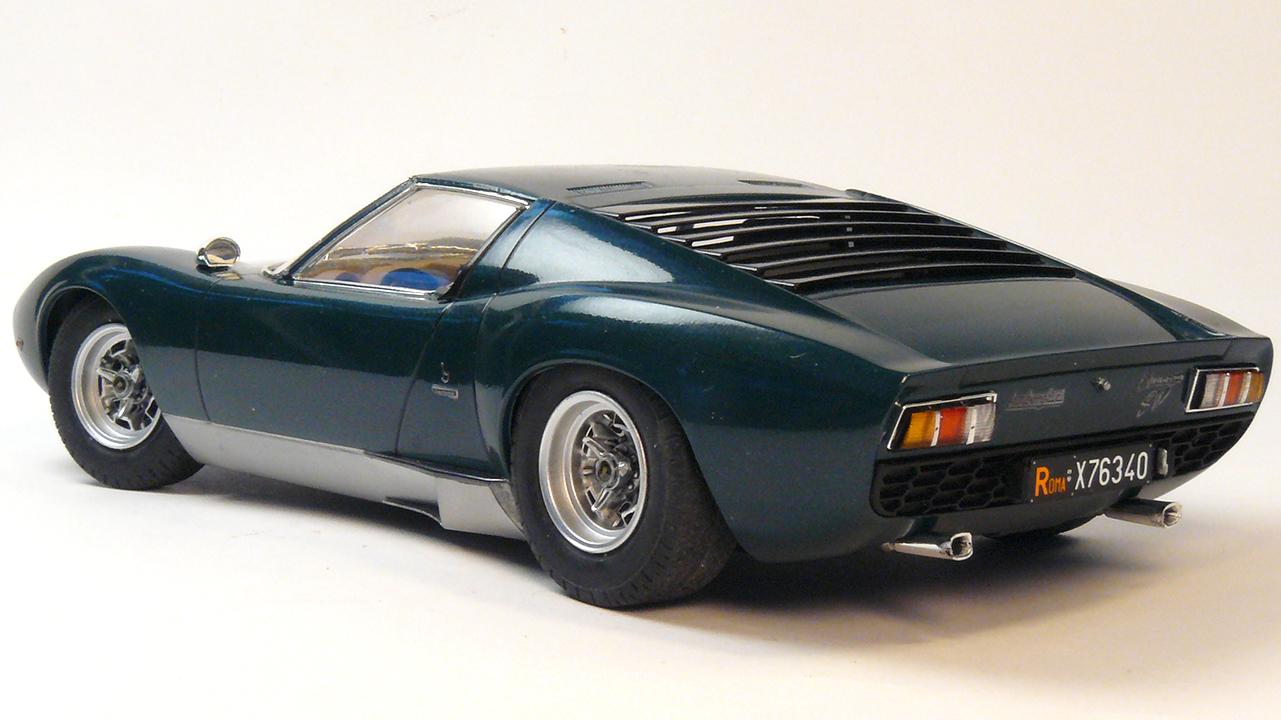
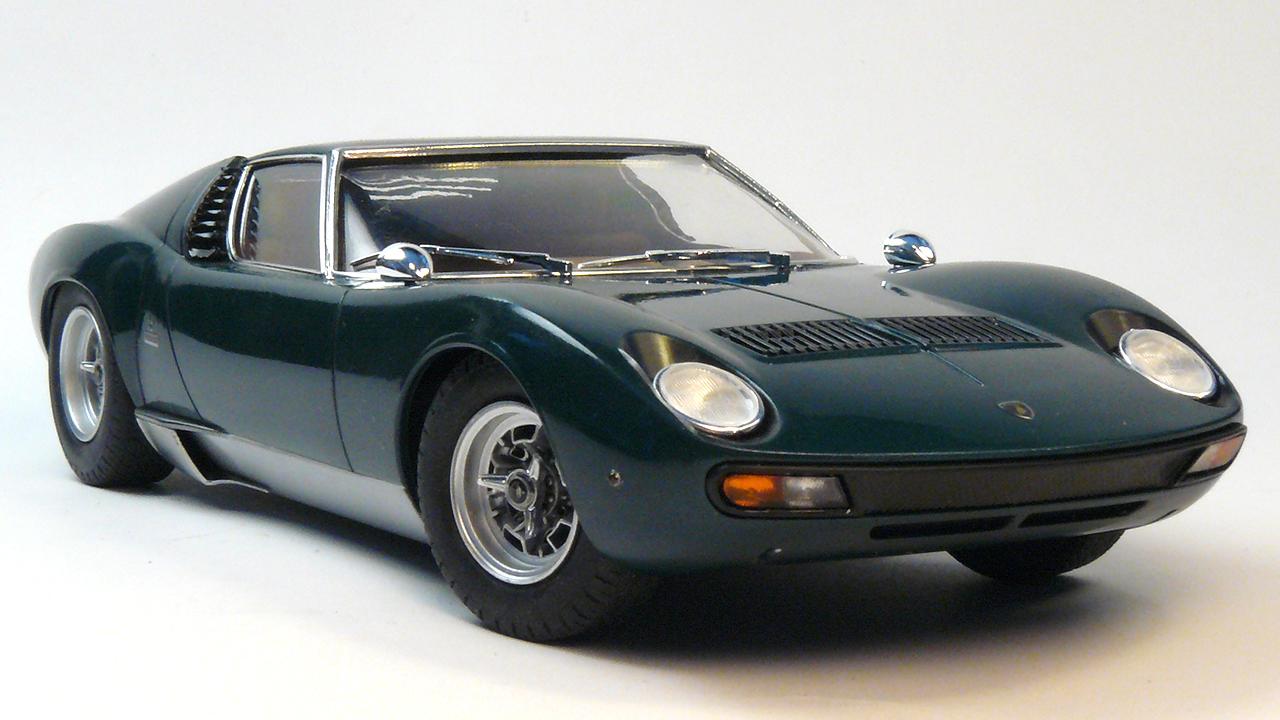
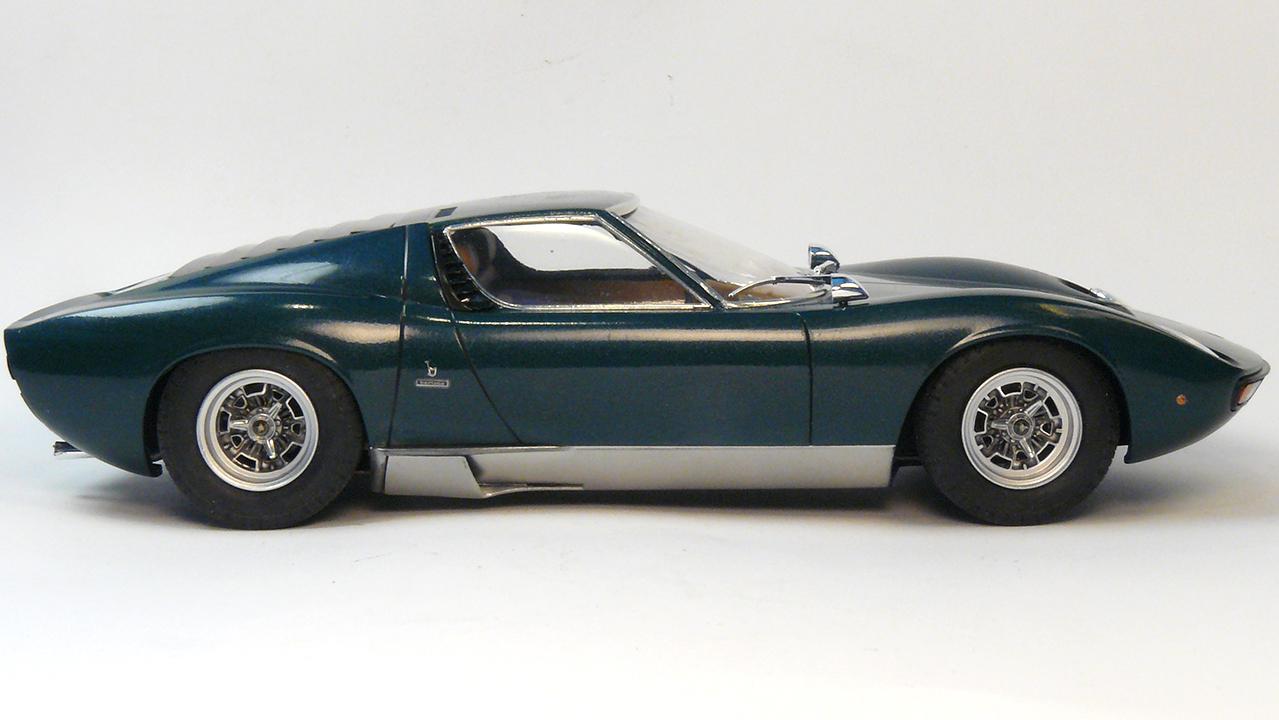
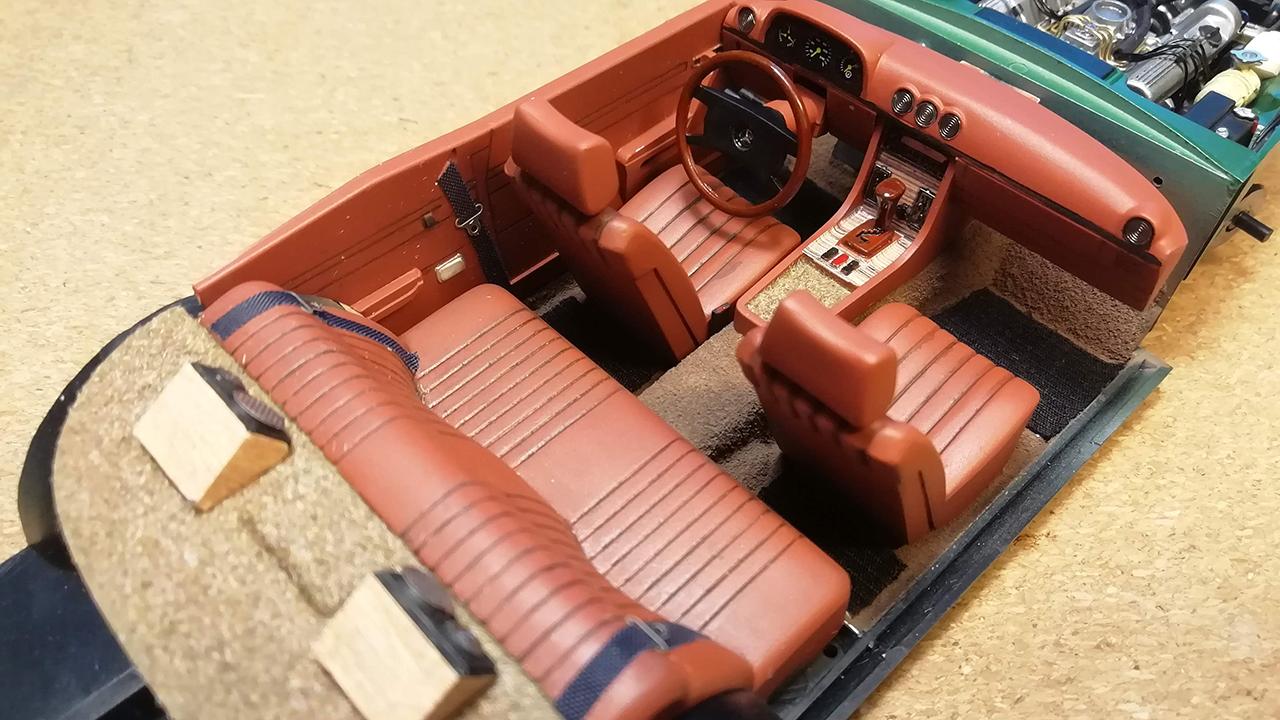
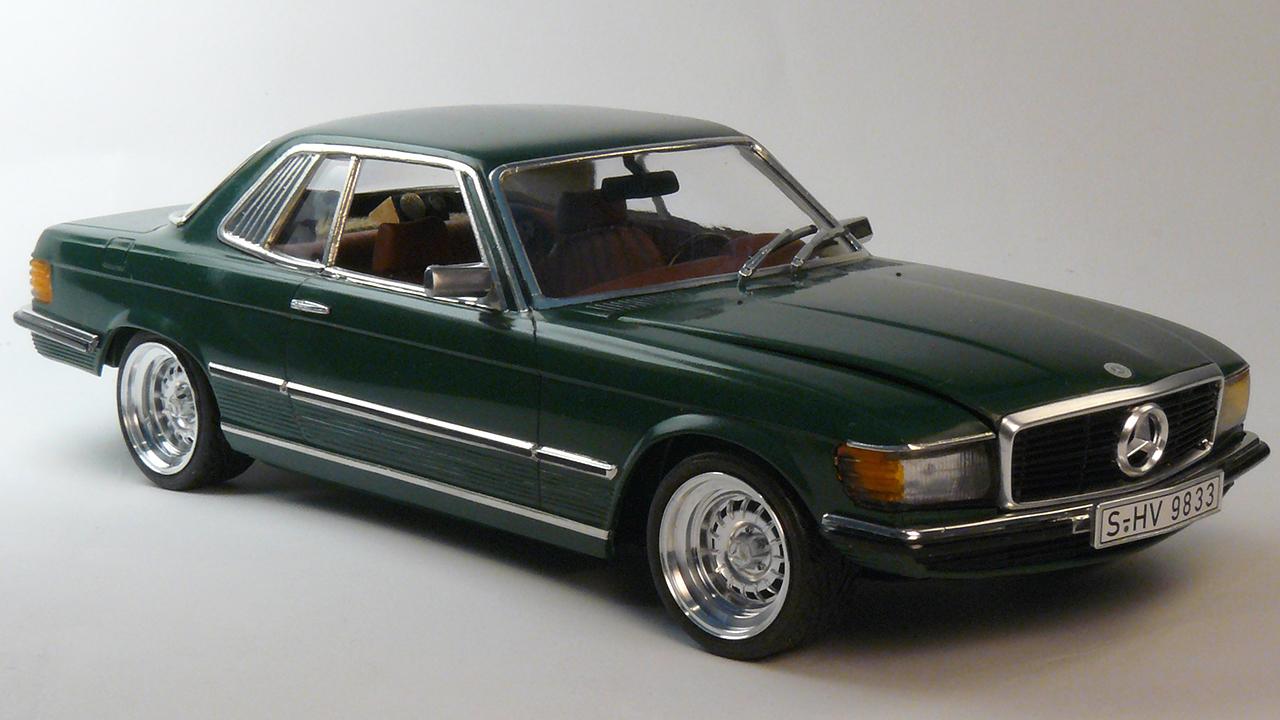
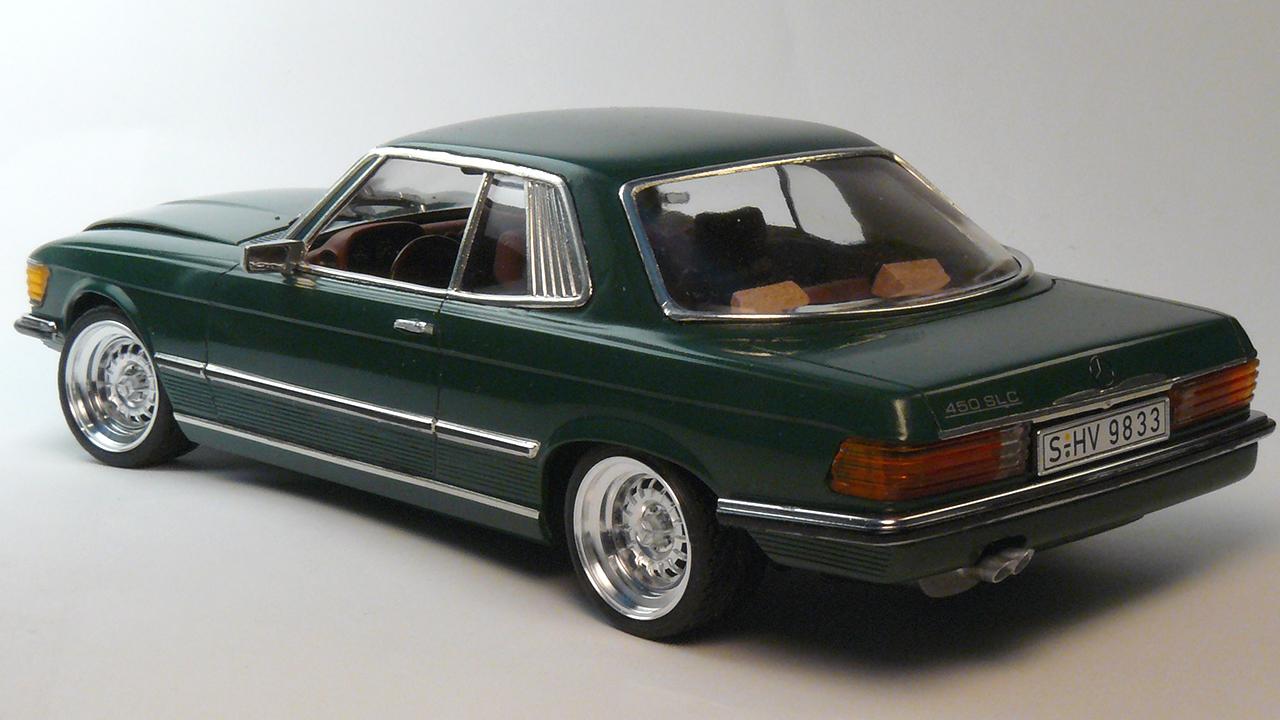
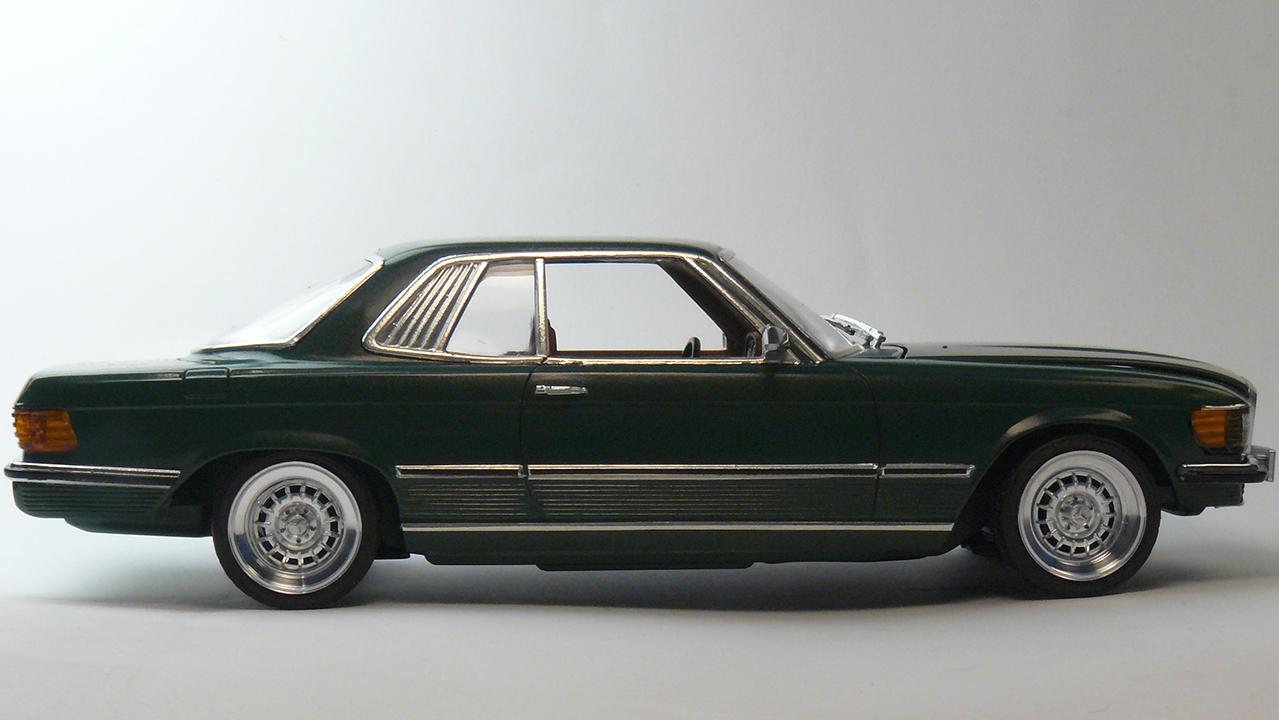
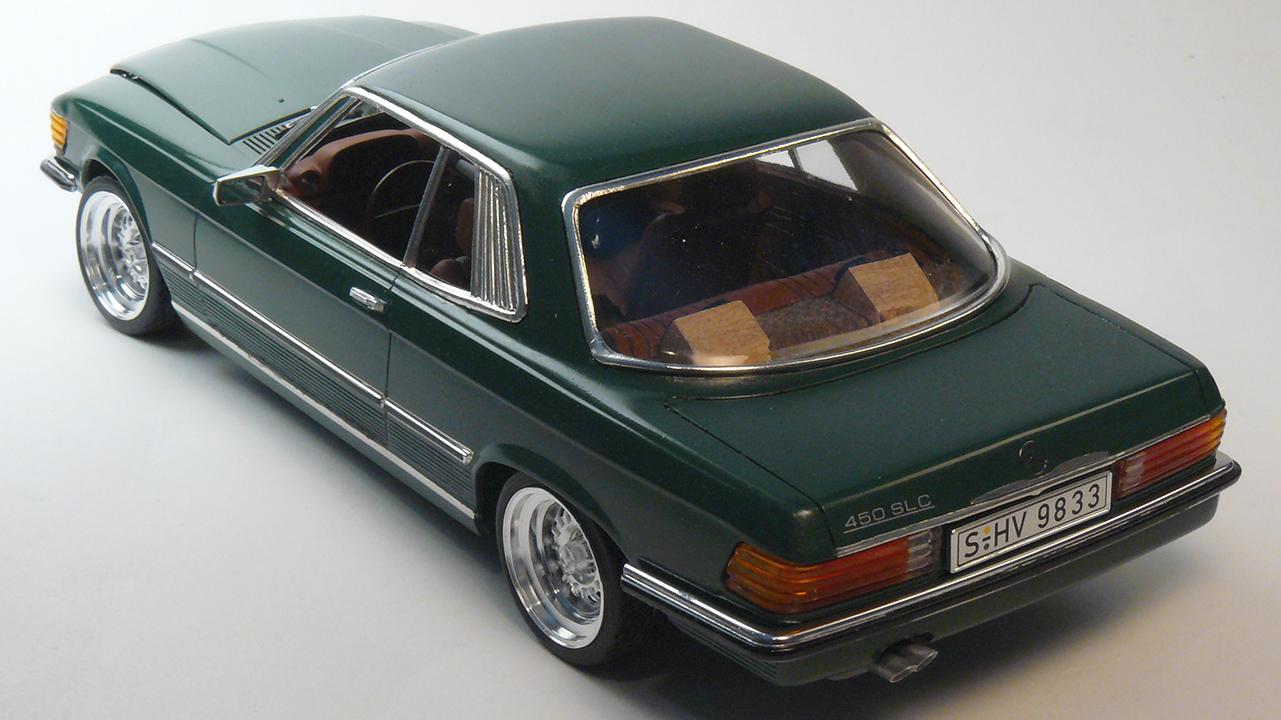
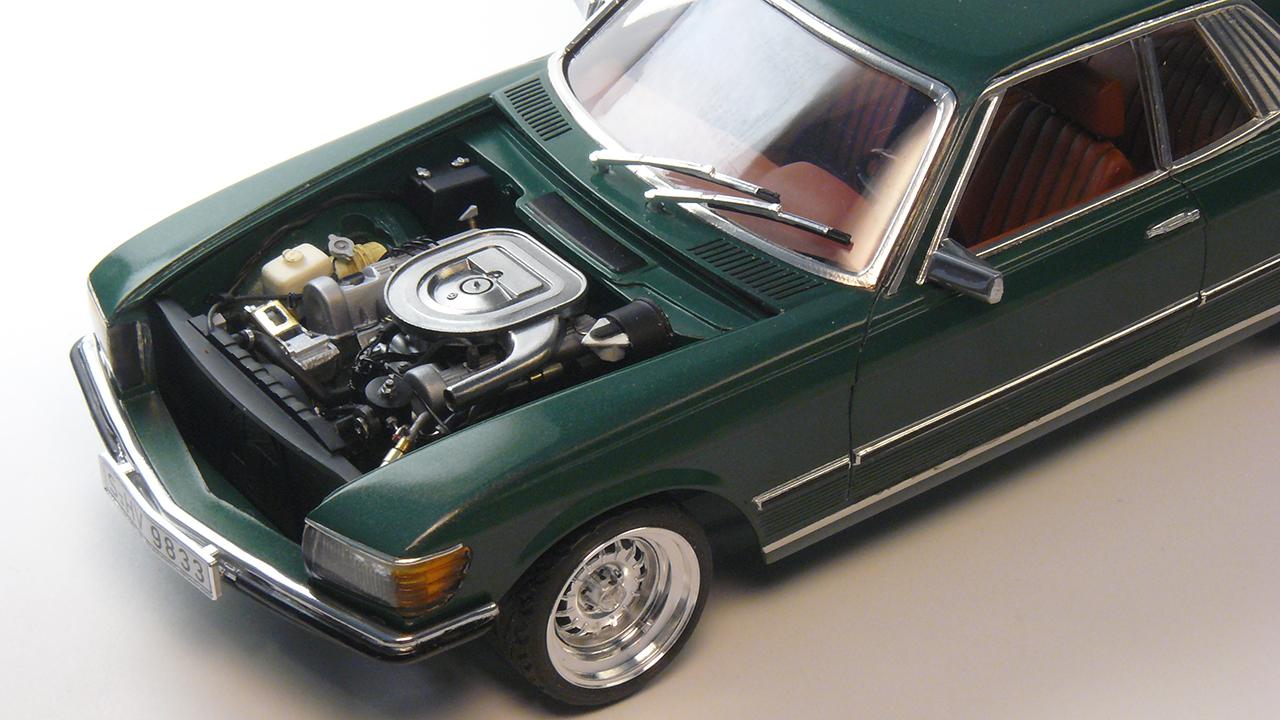
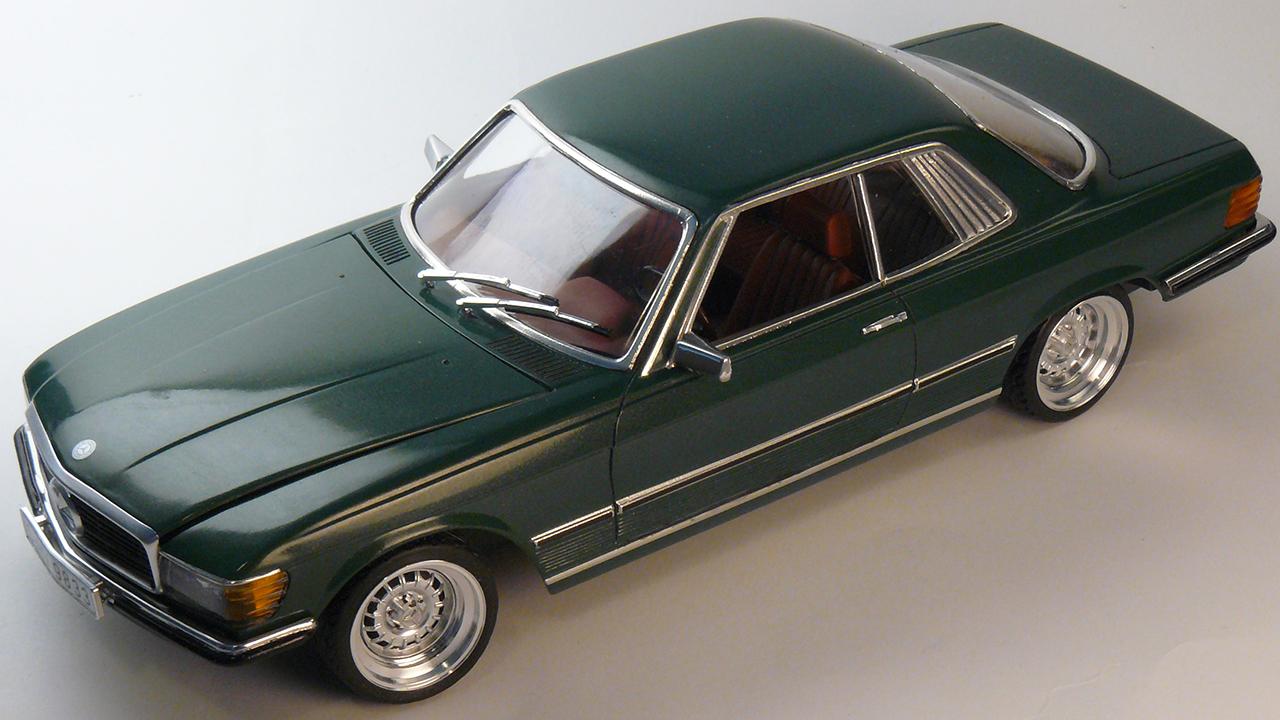
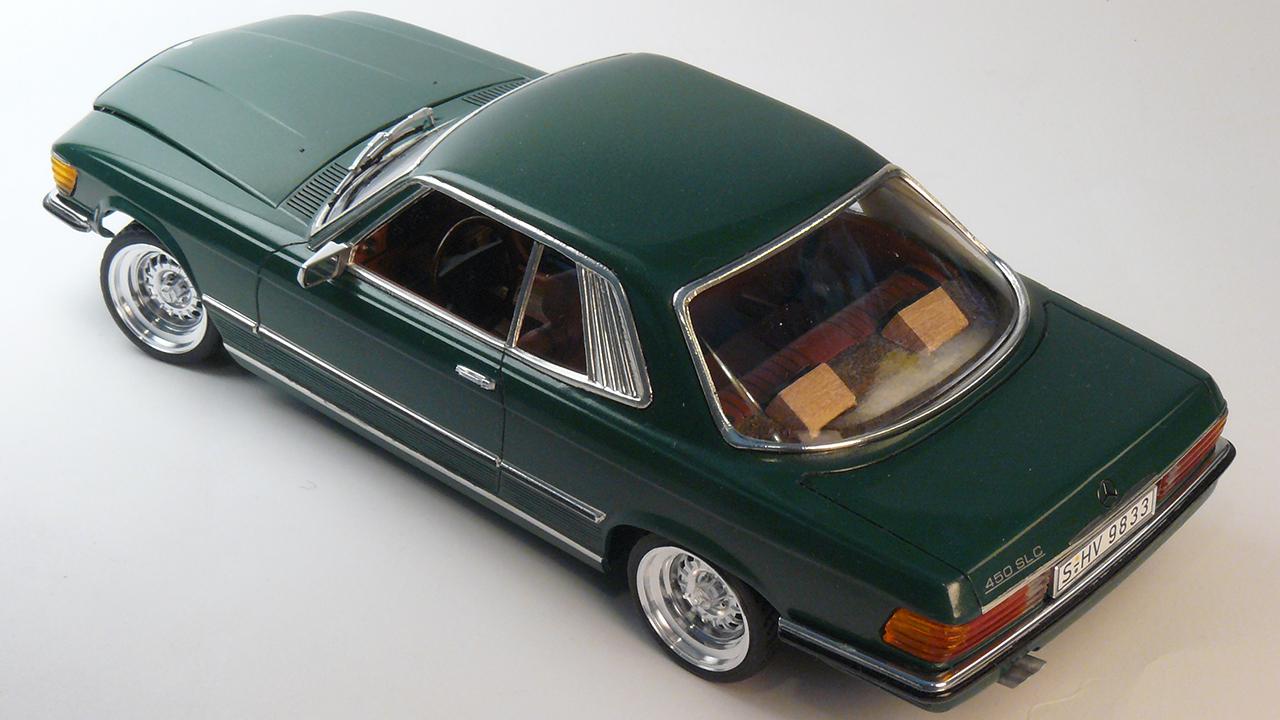
Italeri kit: Paint is a custom mix of green and gold mica powder. Aluminium wheel barrels fitted to stock Mercedes-Benz rims. Low profile tyres. Interior has wood decals, rear speakers, photoetched dashboard knobs added. Floormat is painted embossing powder. Parcel shelf is flocking. Seatbelts added. Engine bay has lots of parts added and scratchbuild. Hoses and wires added too. They were none at the start.
- 23 replies
-
- 14
-
-
Thanks Scott for the idea for this jig. Just made mine and I love the results. I used toothpicks with 1000 grit sandpaper for my polishing medium. Sorry about the big pictures.
-
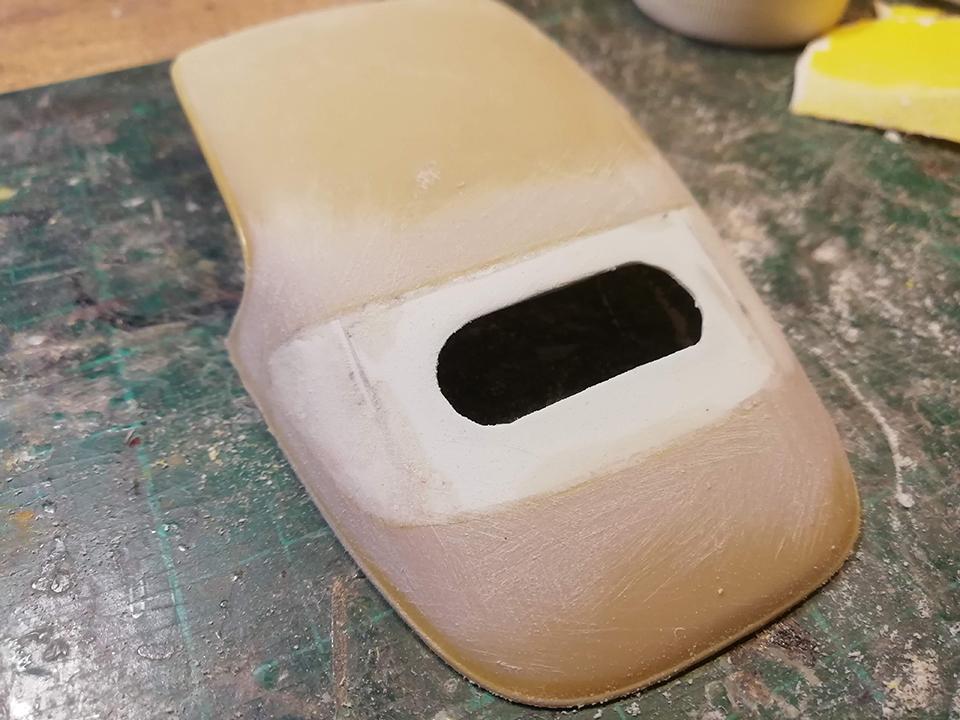
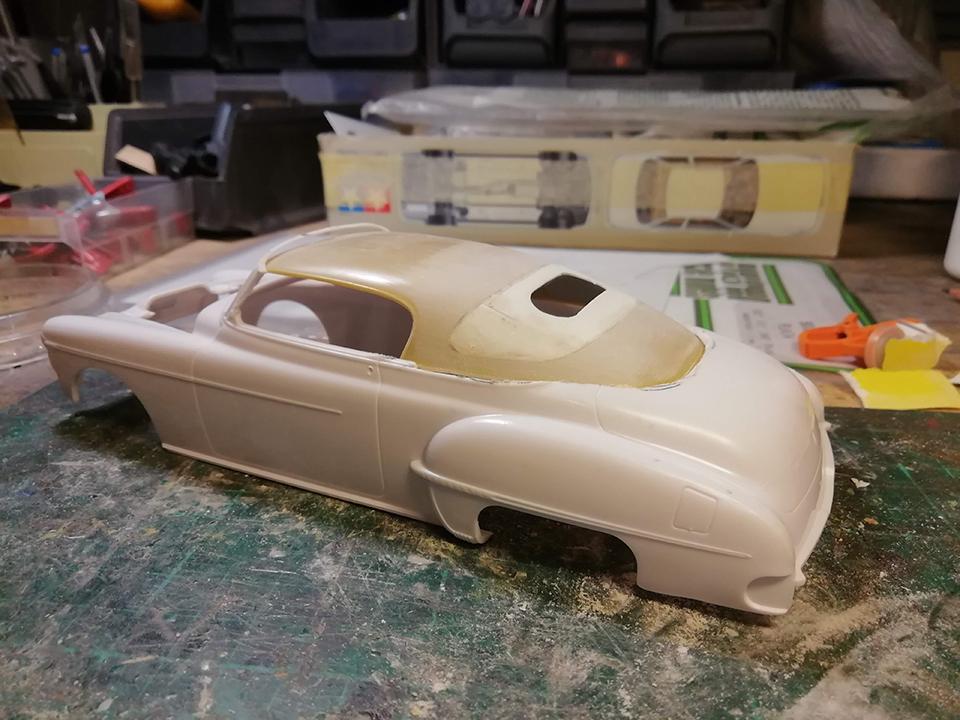
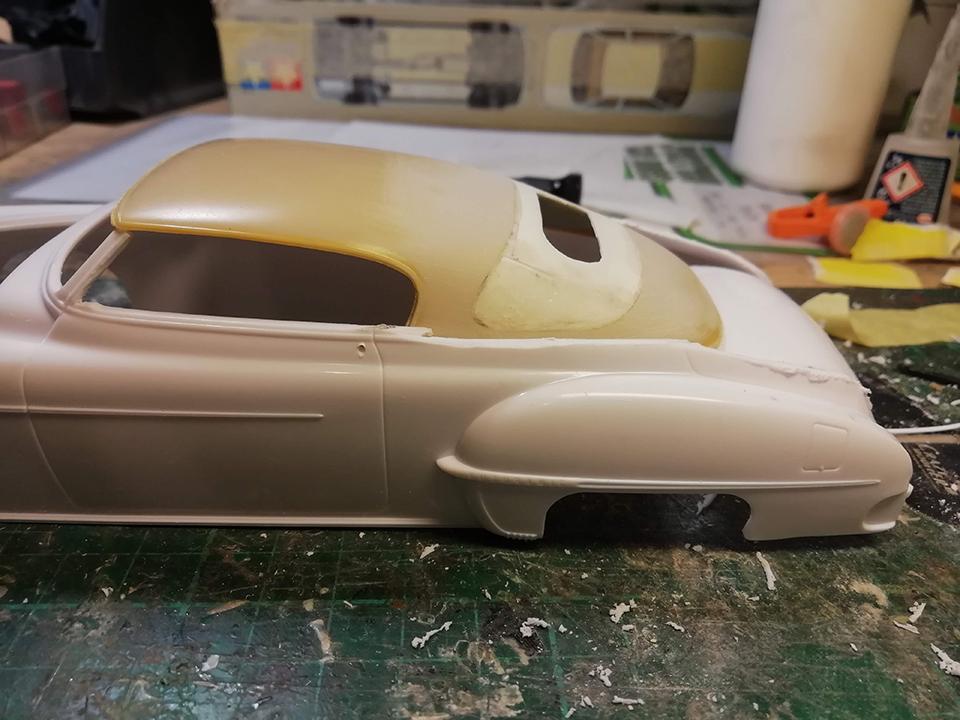
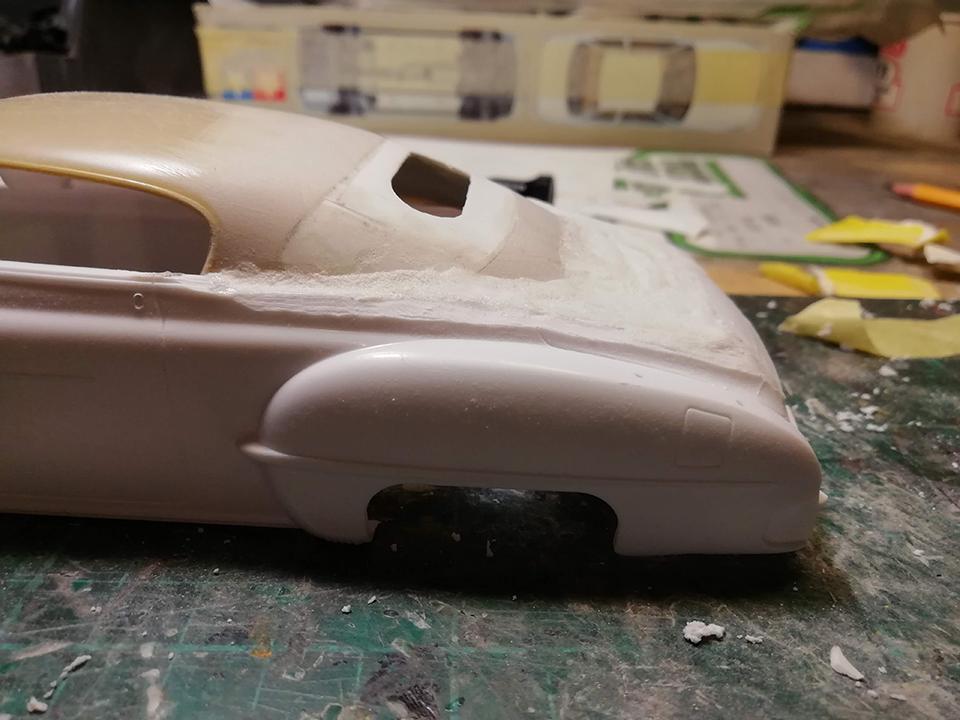
Here's photos of the roof job. 1. Fill the oversized back windows area. 2. Dry fit the rood, and notice that roof line doesn't continue neatly to the rear. 3. Make relief cuts to the rear hatch area. 4. Fill the hole with plastic and CA glue/microballoons 5. Sand, sand.
-
Juha's builds are exceptional. Seen lots of those at local shows. Your build is too. I like the total vision of your Caddy.
-
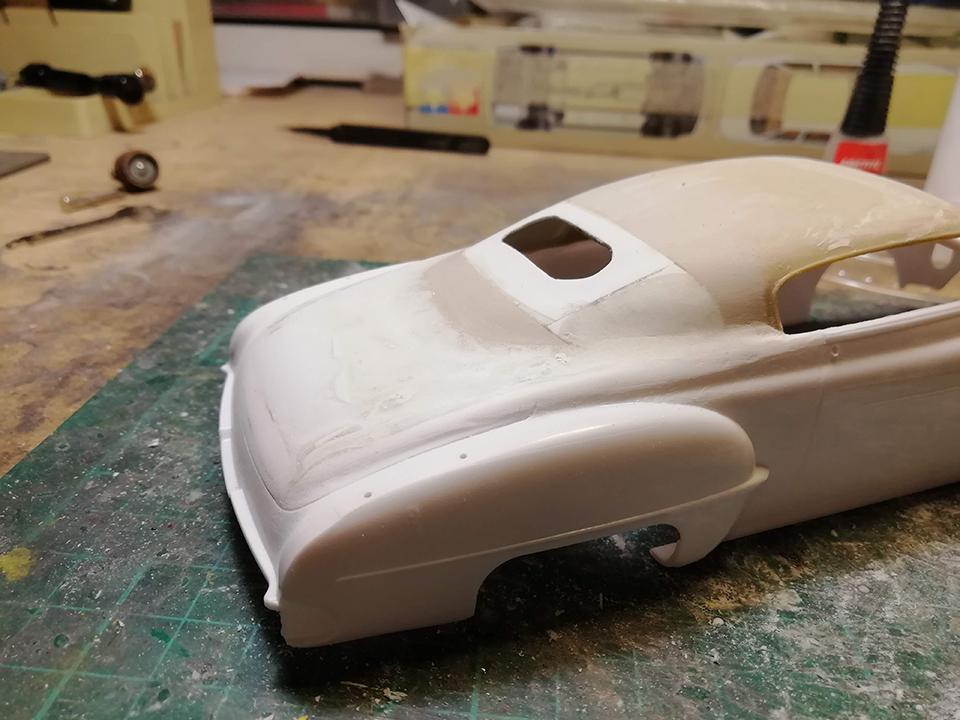
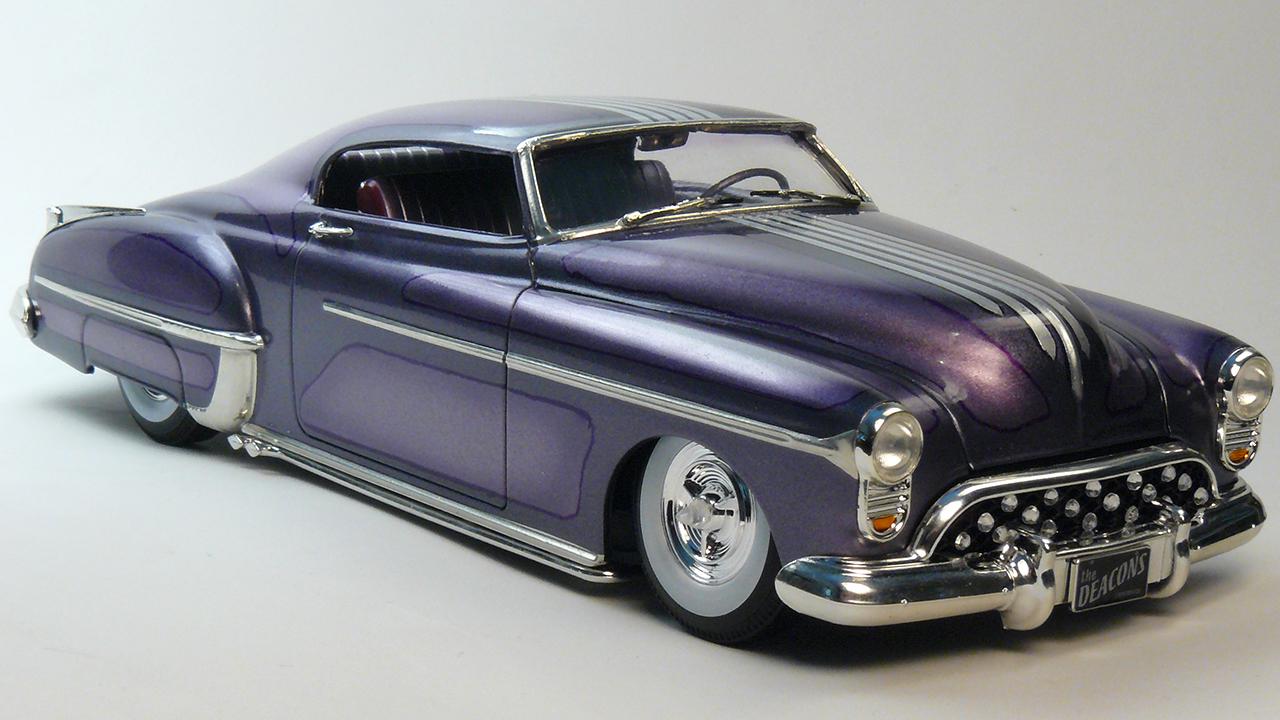
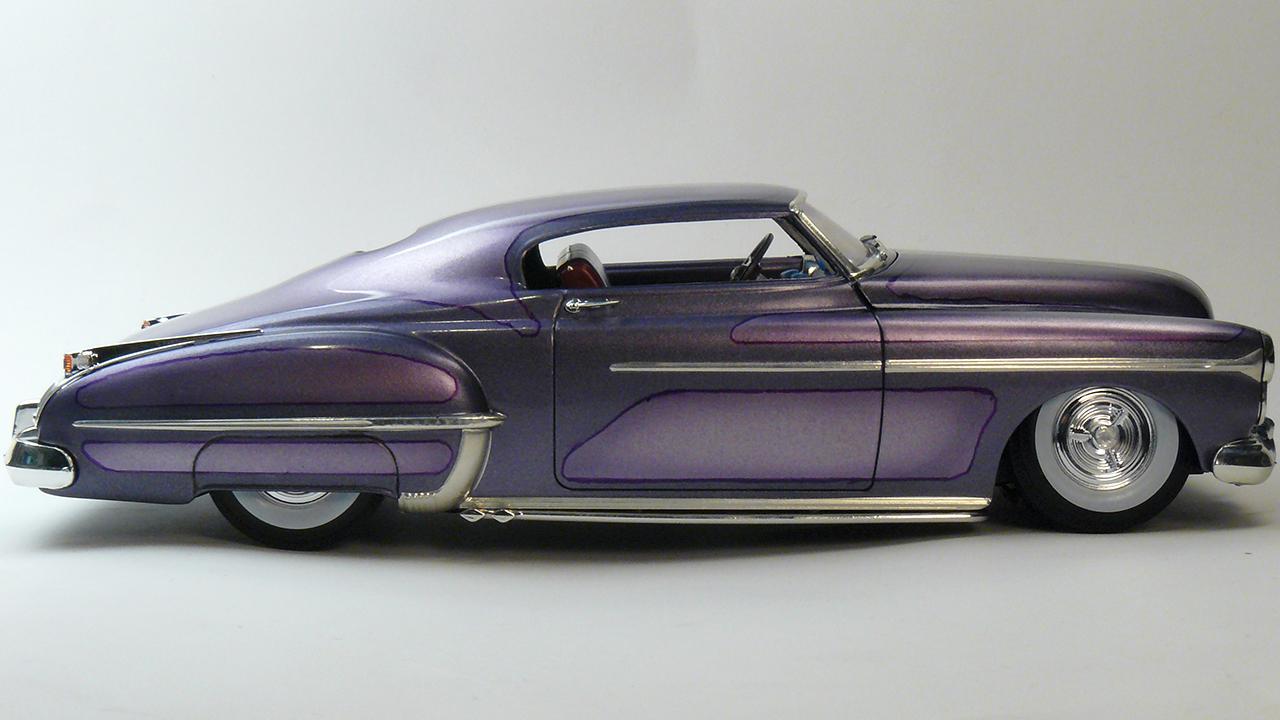
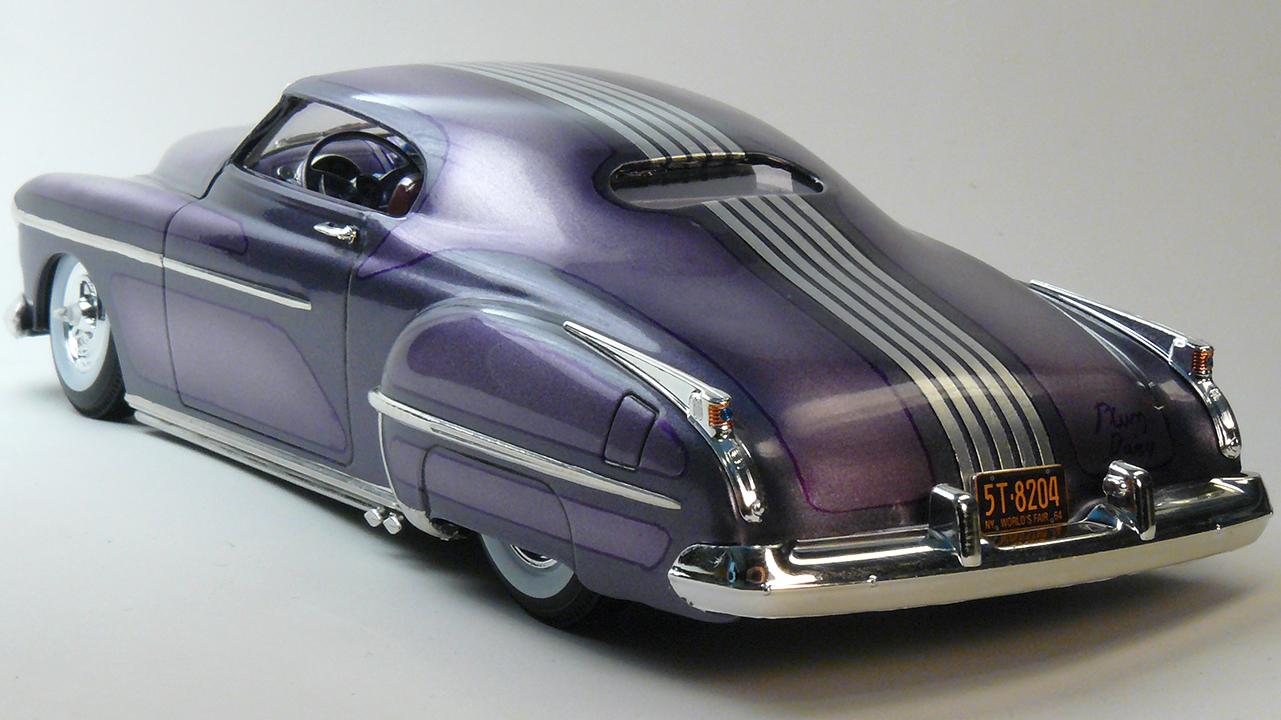
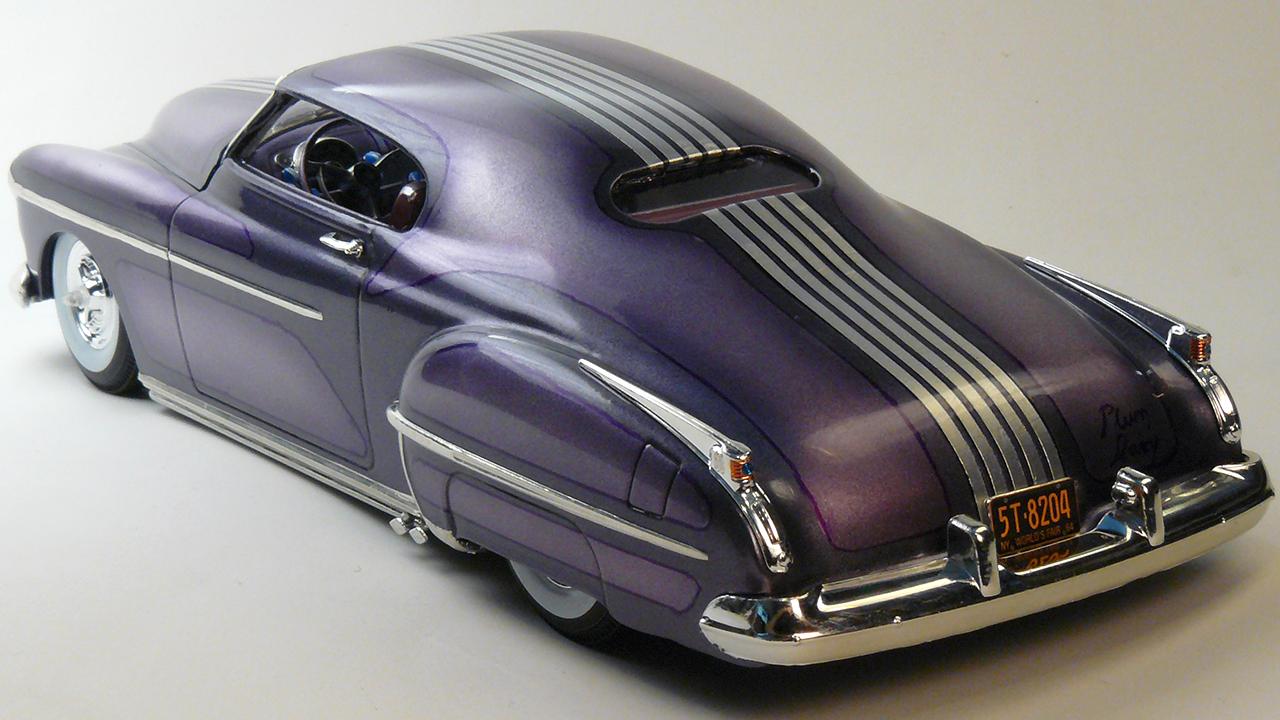
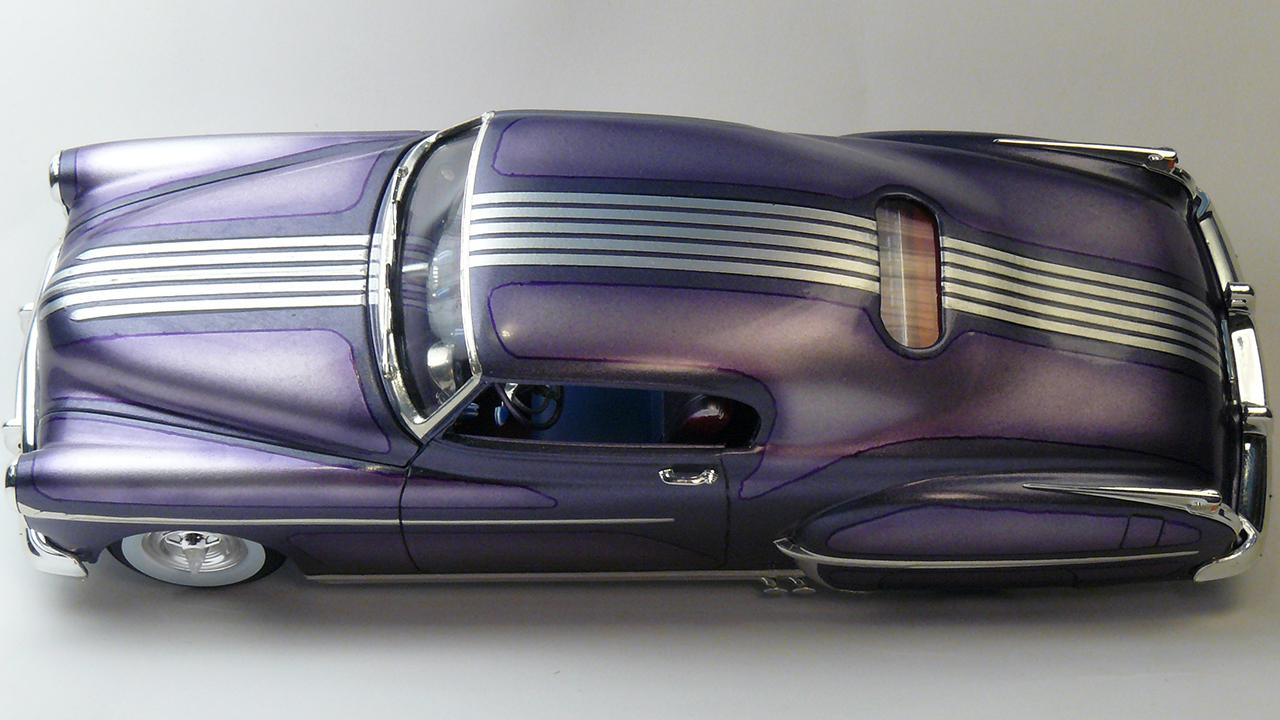
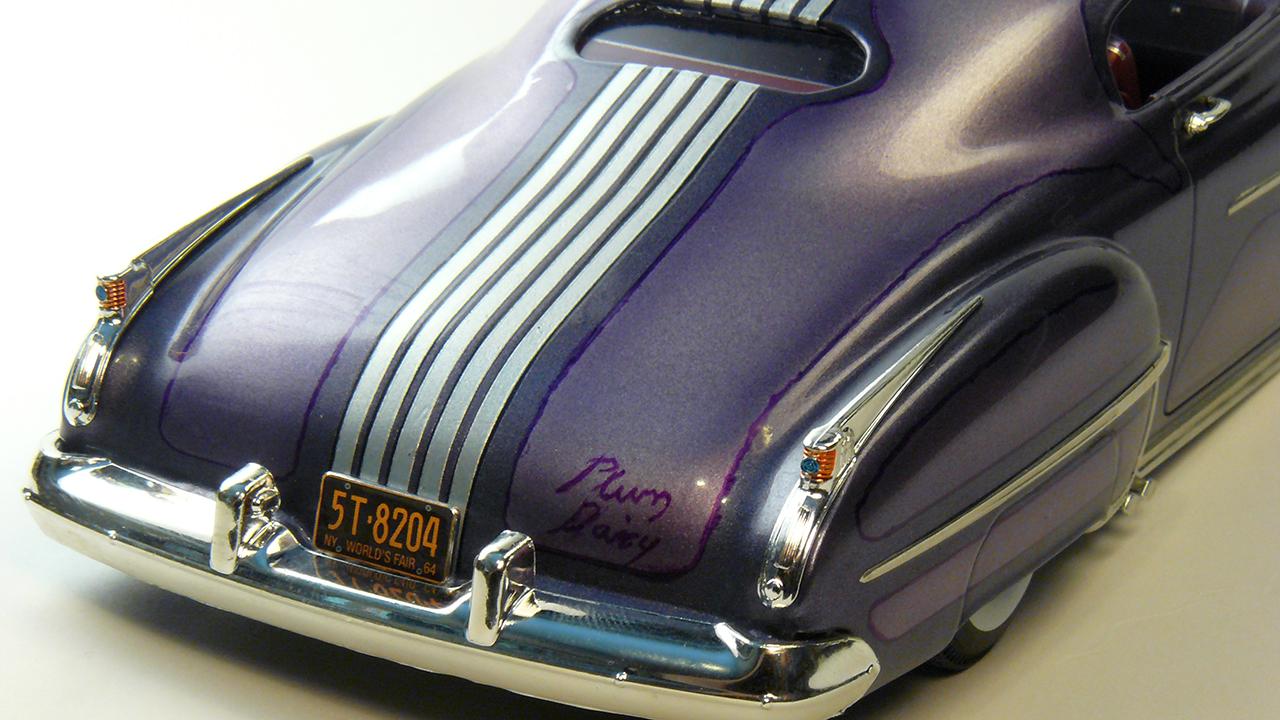
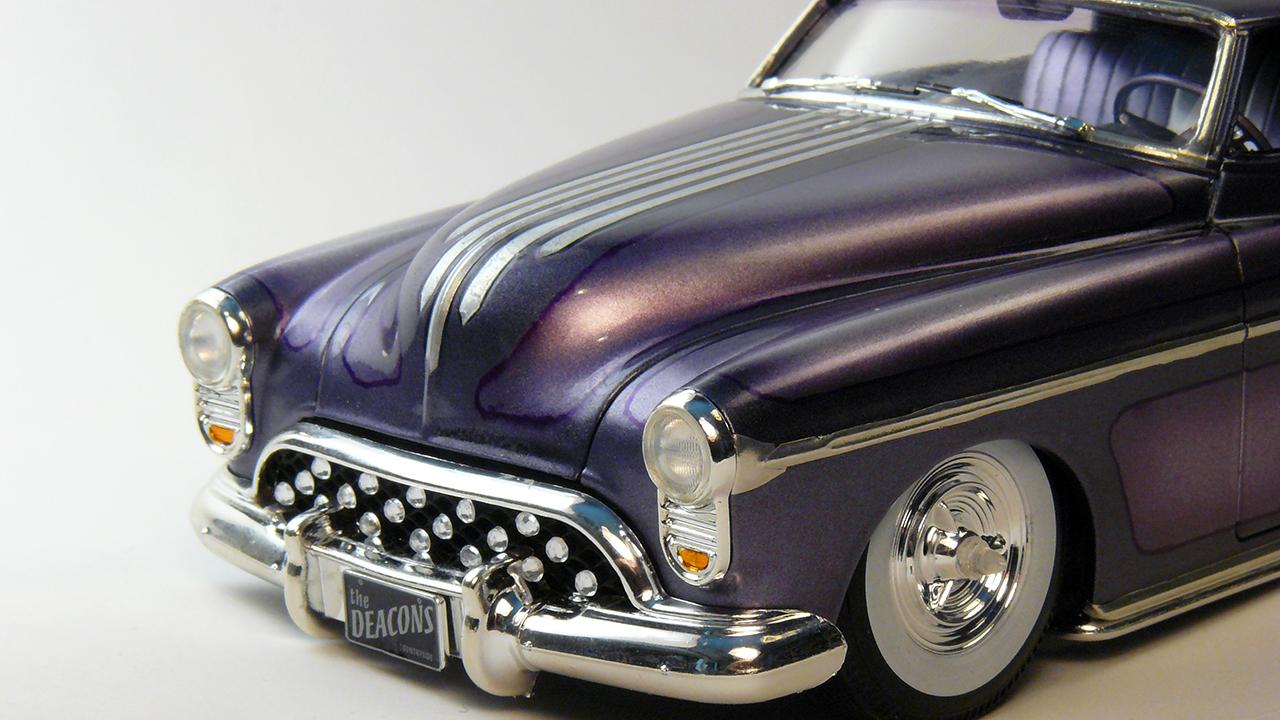
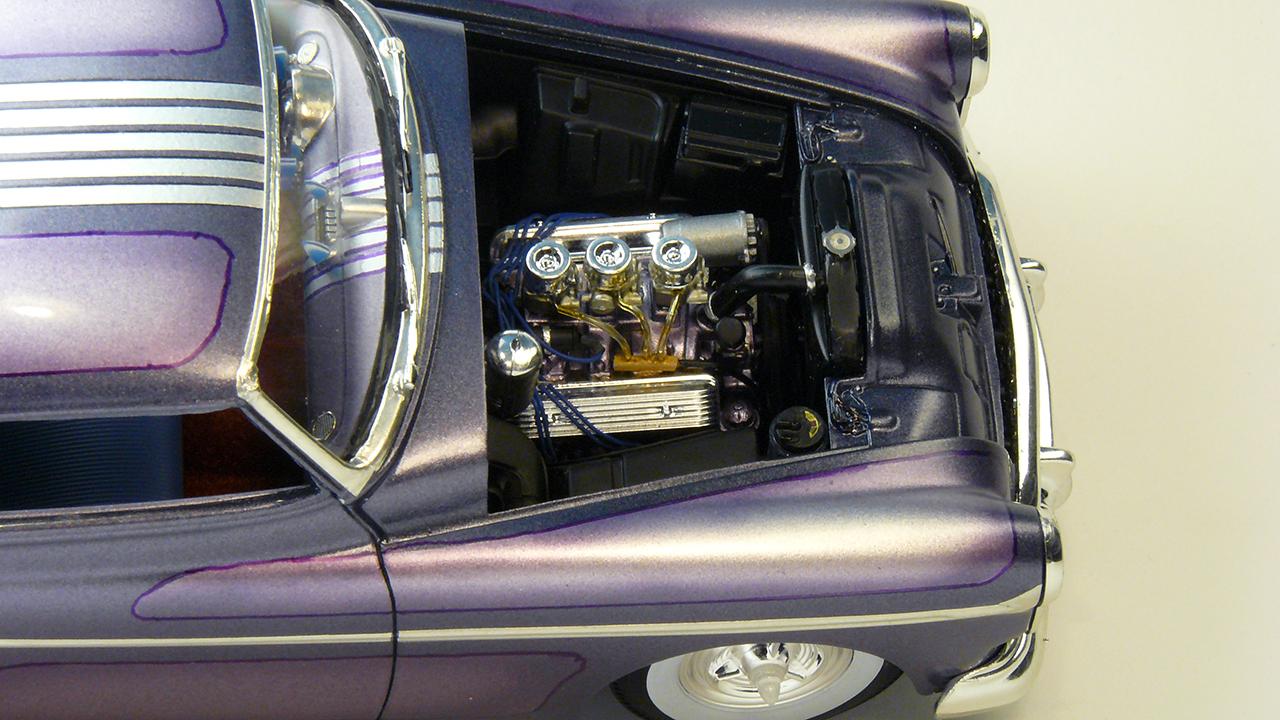
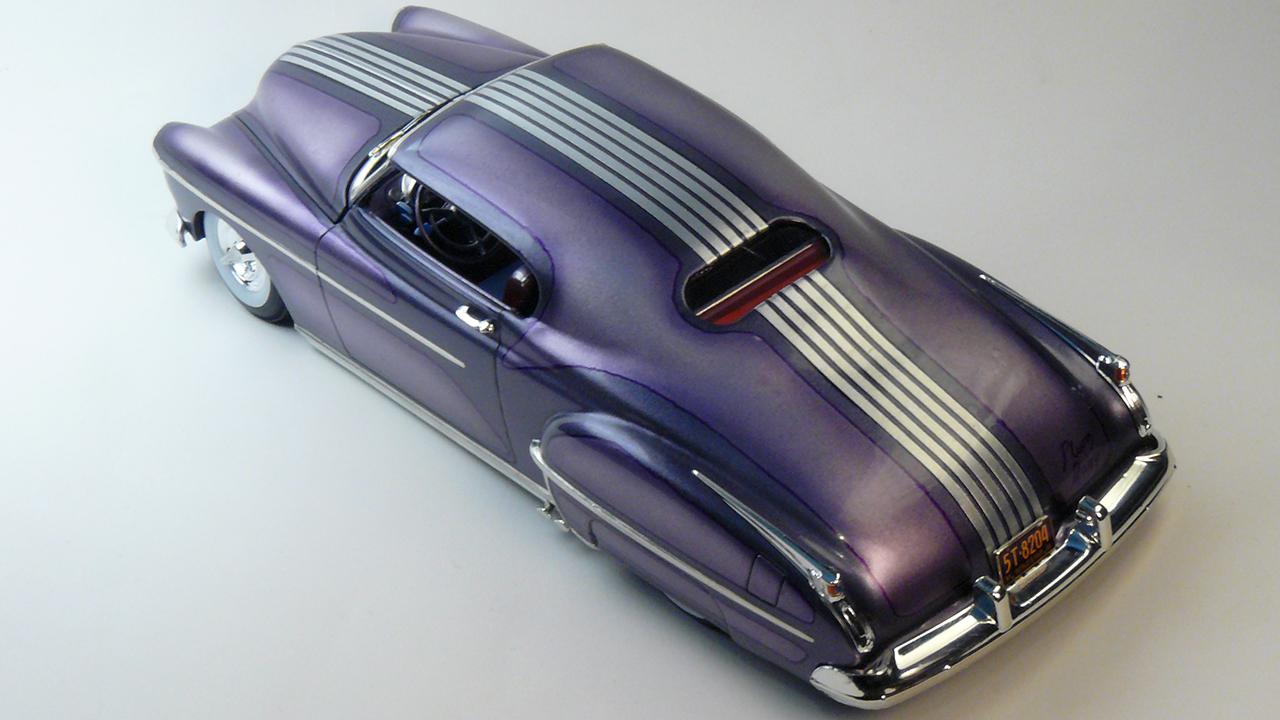
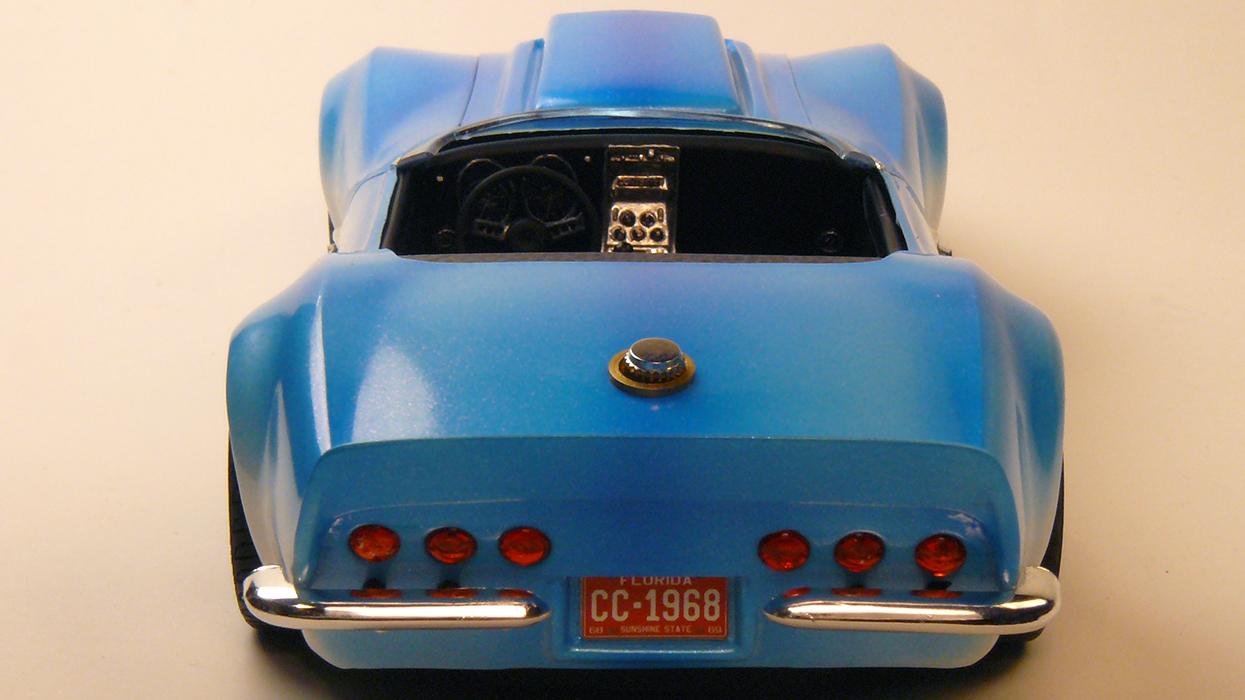
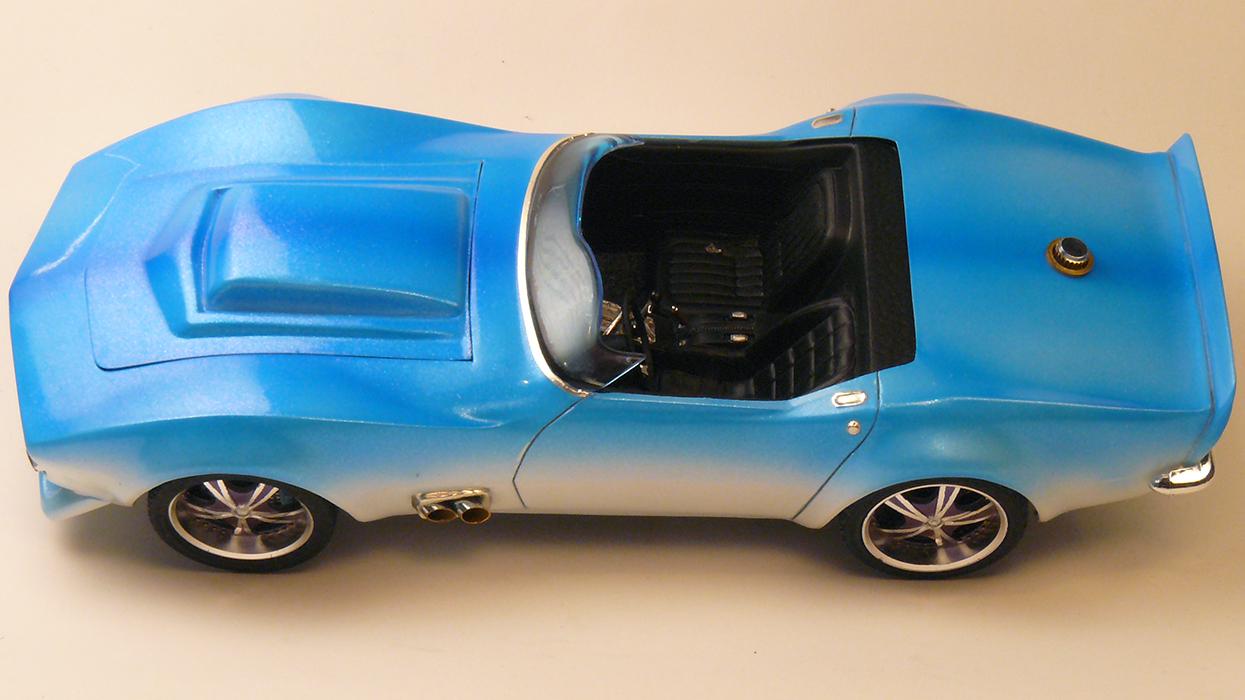
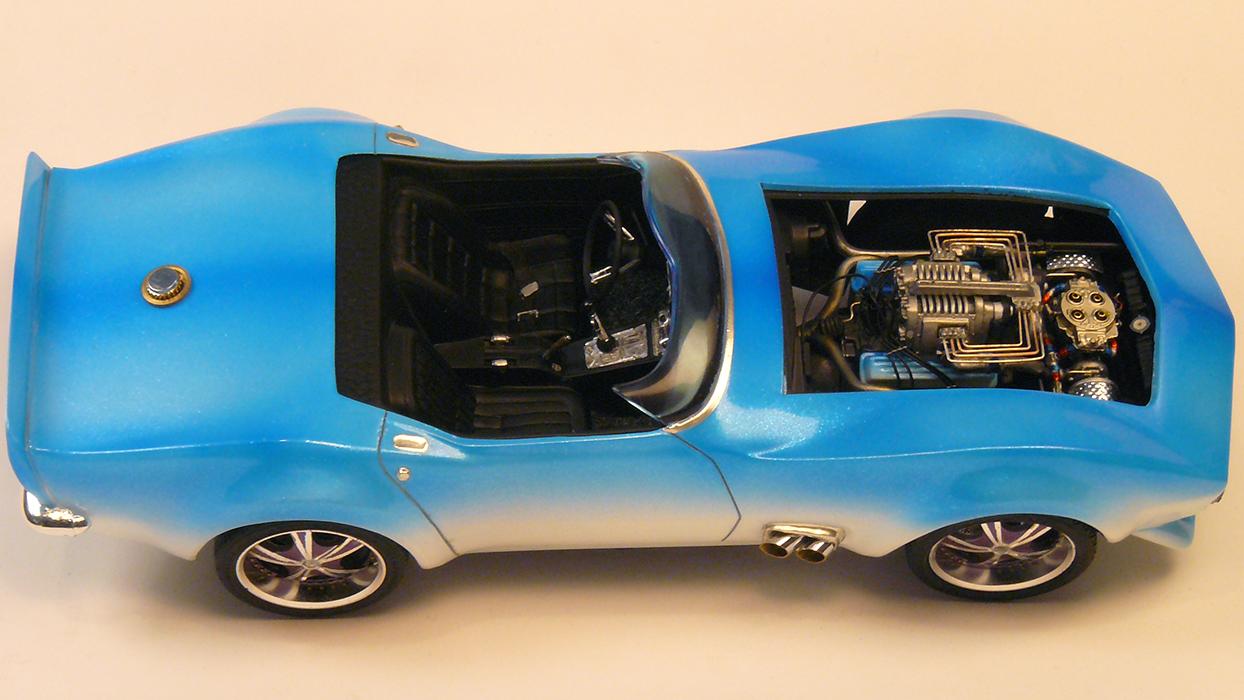
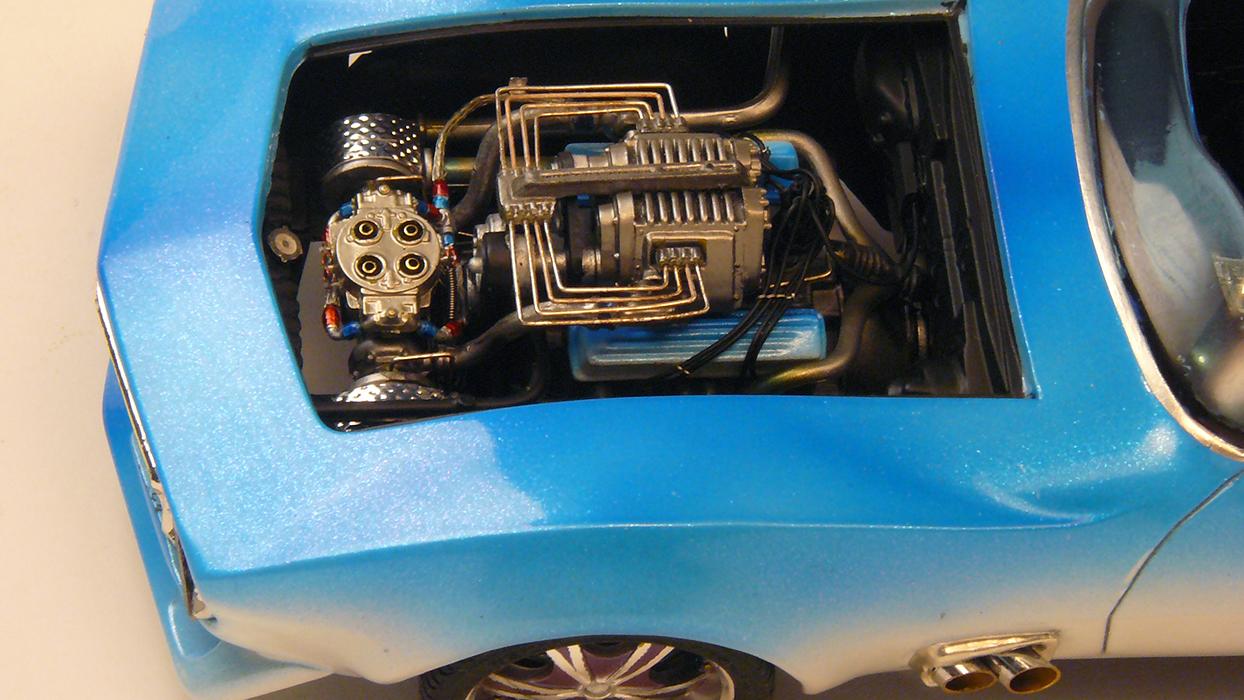
Revell kit with couple of changes - Roof is from AMT Thunderbird kit. Rear window area modified. - Rear hatch angle changed to follow the roof line. - Lowered suspension, sidepipes added. - Scratchbuild front grille. - Laminated dashboard knobs. - Painted with plum mica powder on top of blue and silver areas.
- 40 replies
-
- 17
-
-
A fellow Finnish modeler does paint to the BMF. He uses Enamel paints, as they are flexible for a while. Like wood patterns.
-
That's where the idea came from. I shortened the body same way they shortened Nascarlo.
-
Well I did have 9 free days from work, so there's that. And not having to wait shiny paint to dry, did make the process way faster.
-
Took 12 days to complete. Body is shortened behind the doors, to accommodate shorter Nascar chassis. That’s why there’s “welded” spots and no door handles / rear window. Removed side lights. Wheels and tyres from MPC Modified kit. Motorhome 440 cid from spareparts bin. Scratchbuilt cooling ducts and aluminium spoilers. Photoetch bolts heads, cable ties, hood pins and seatbelt buckles. Slixx gauge face decals.
- 29 replies
-
- 17
-
-
Those steel wheels are from Aoshima London Taxi kit with the hub caps. Can't remember where the tyres came from. I used resin copies of Fujimi spoked wheel lips for widening. Those are great for that, because one set comes with eight parts.
-
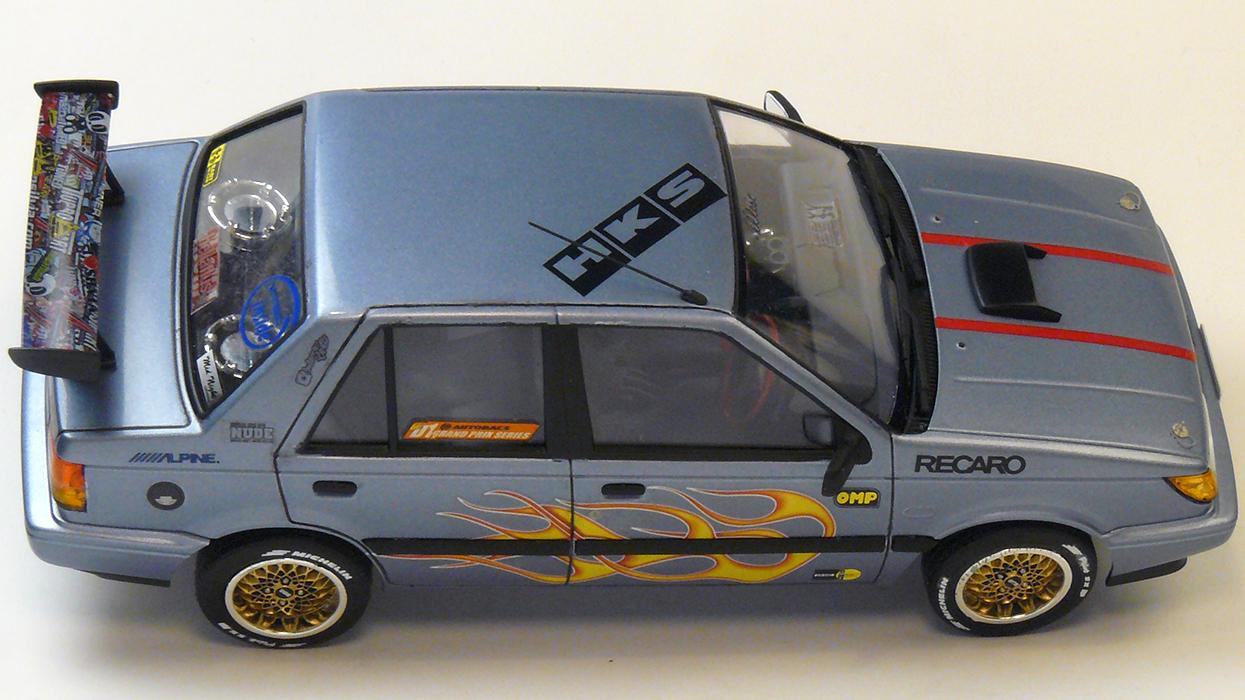
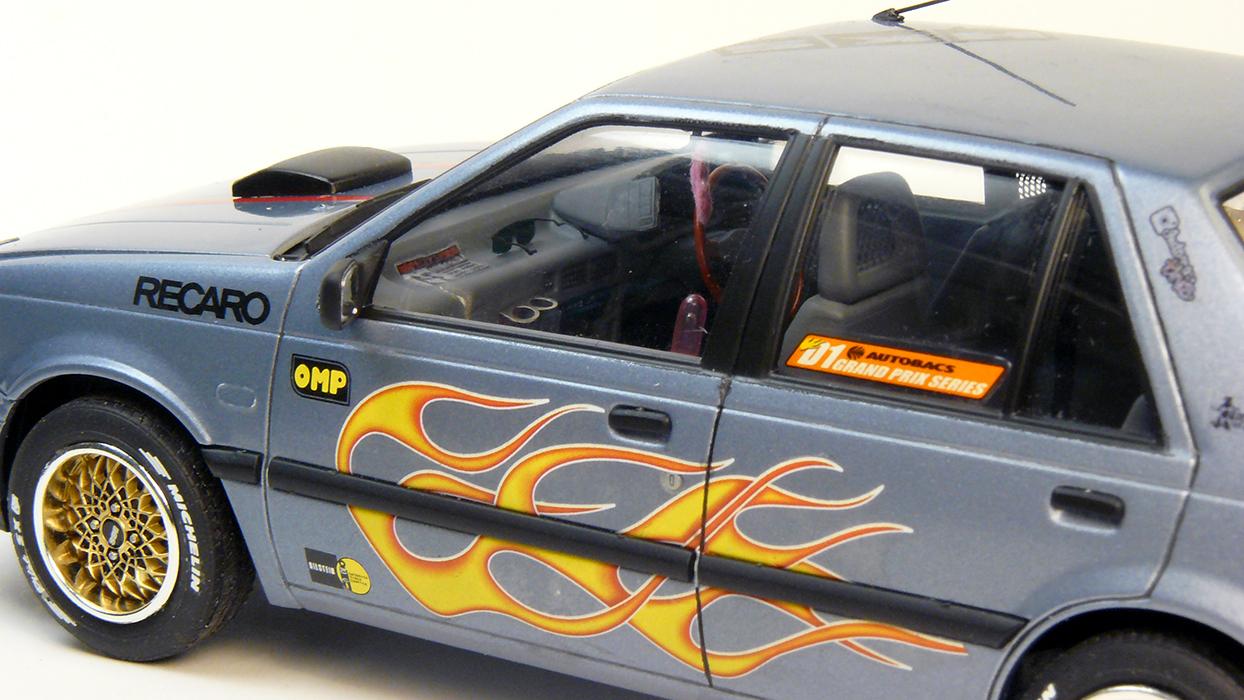
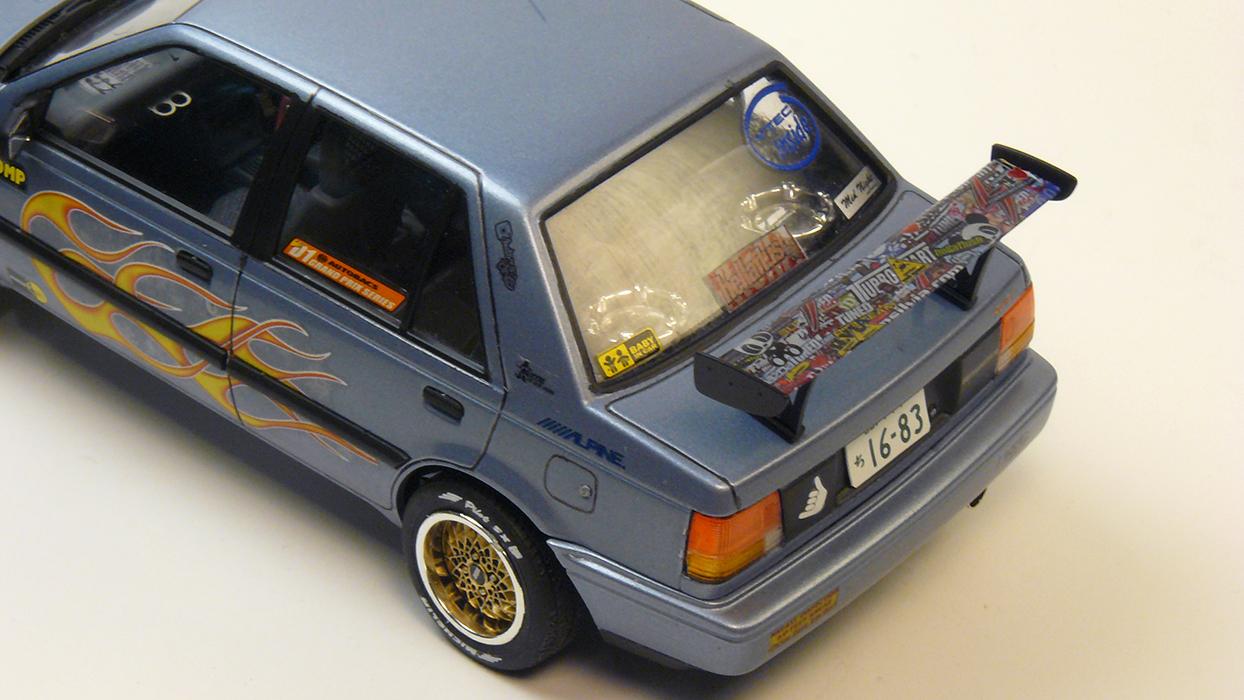
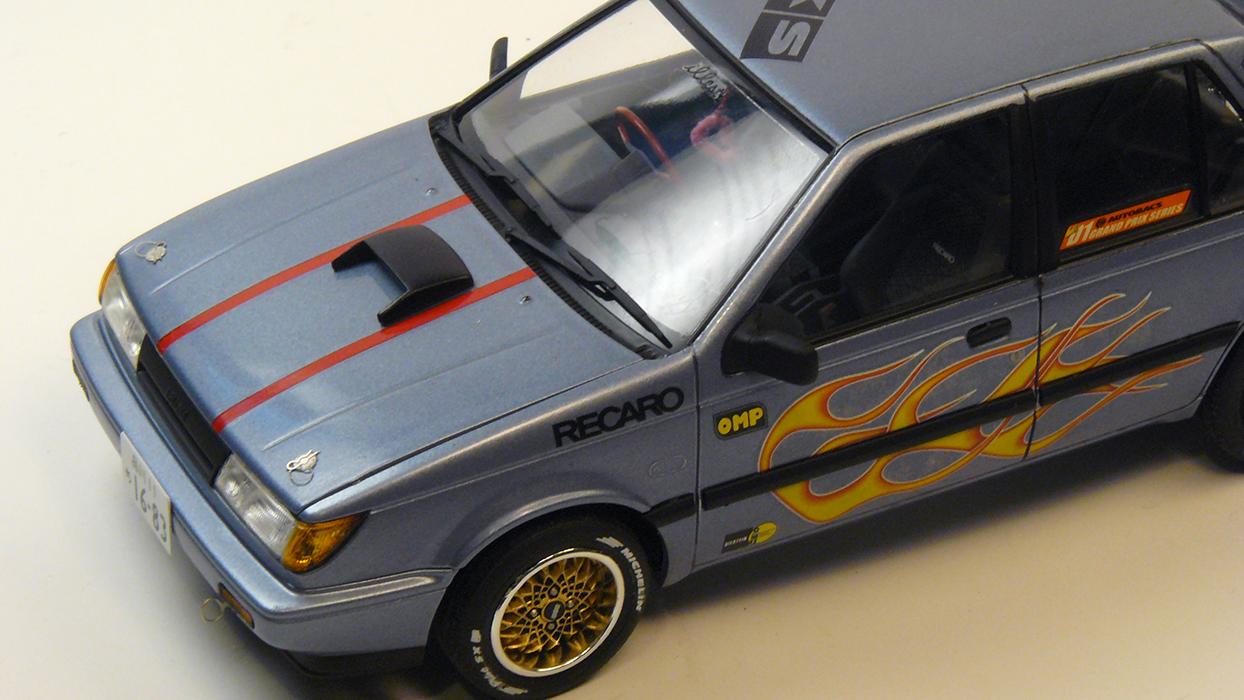
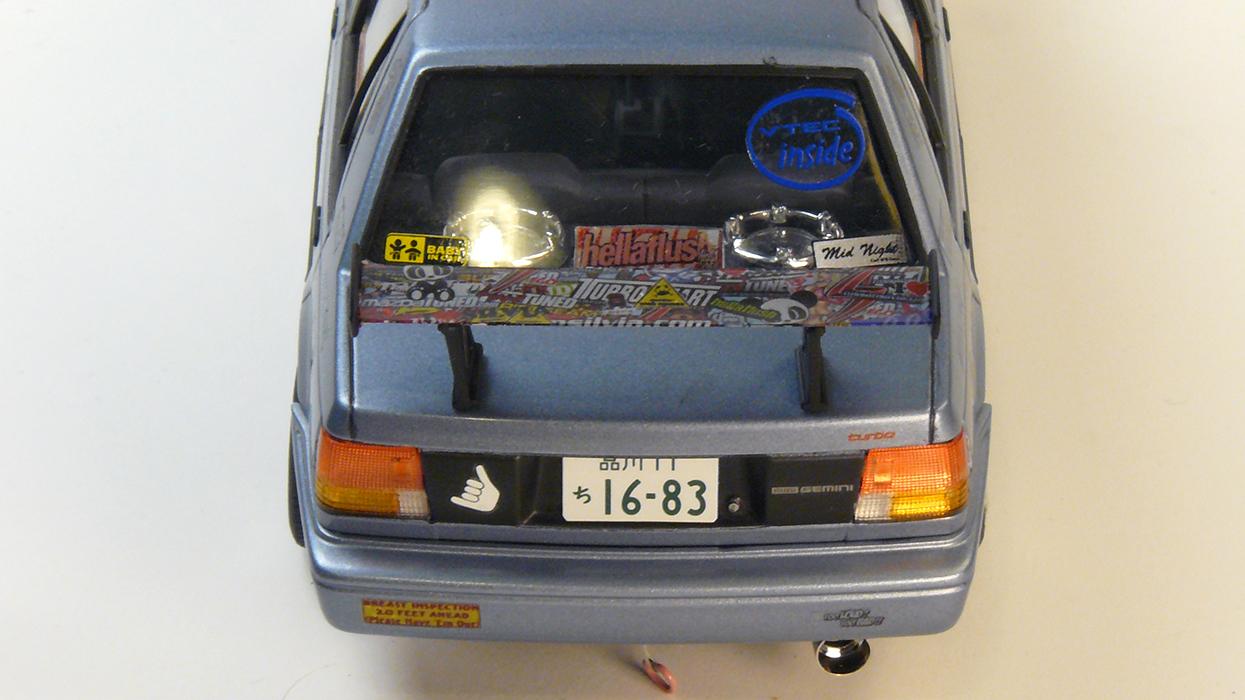
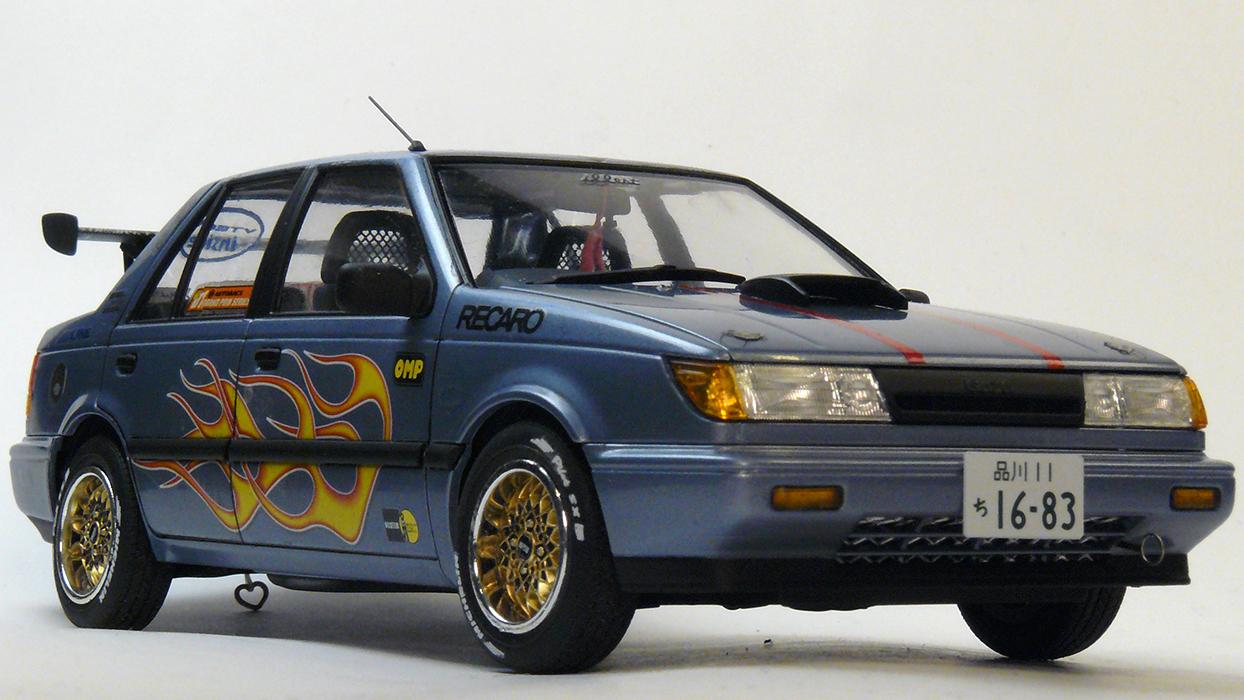
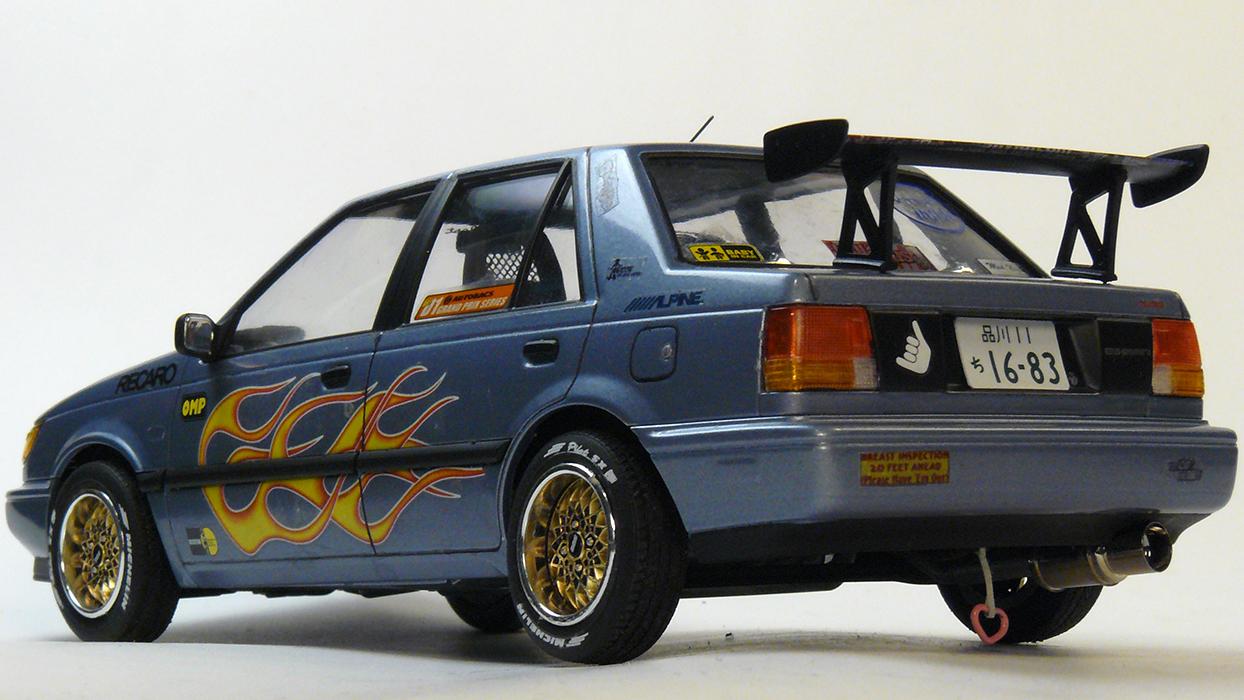
- Added load of stickers all around the car. Some are more tasteless than others. - Switched the rim lips to wider chrome ones. - Added real metal muffler. - Added fake bonnet scoop and rear wing with more stickers. - Added some speakers, gear shift knob, seat belts, cup holders and floor mats.
-
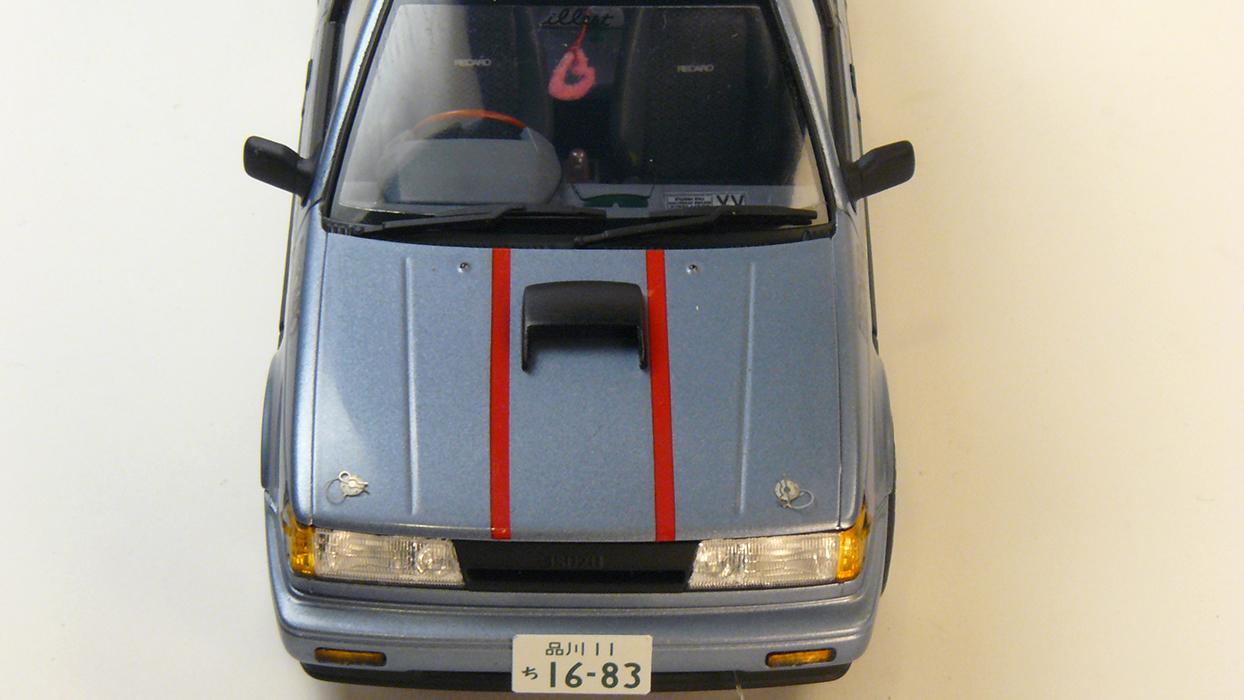
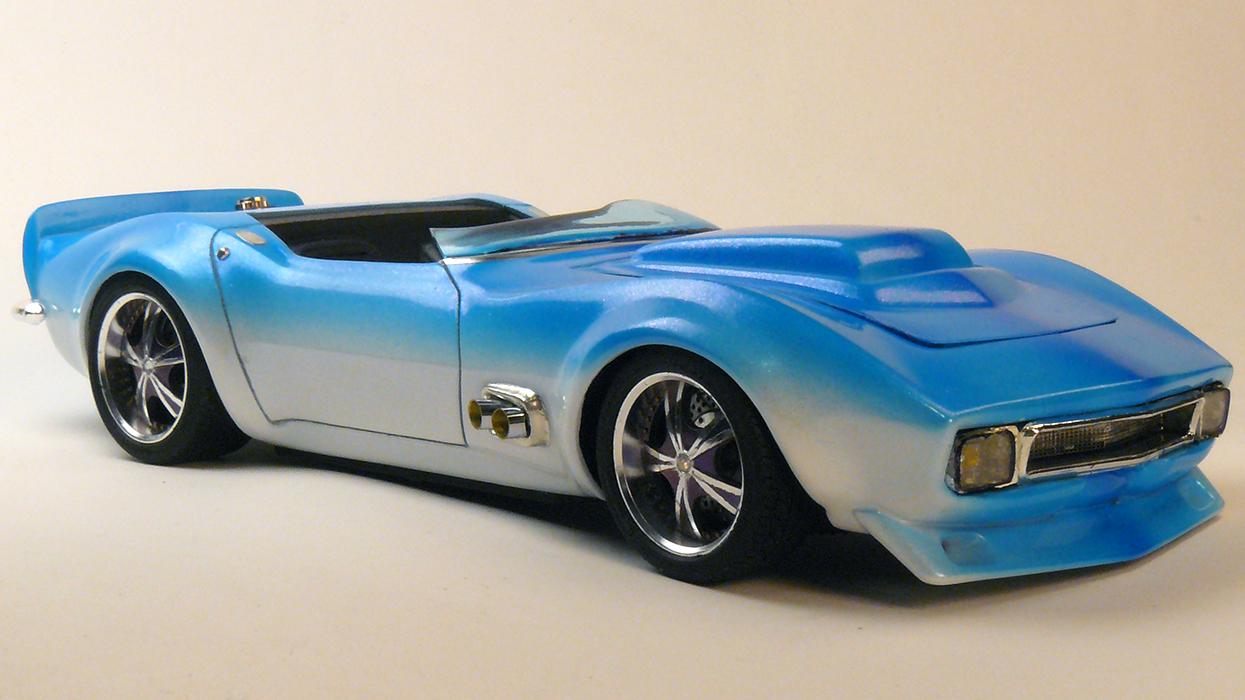
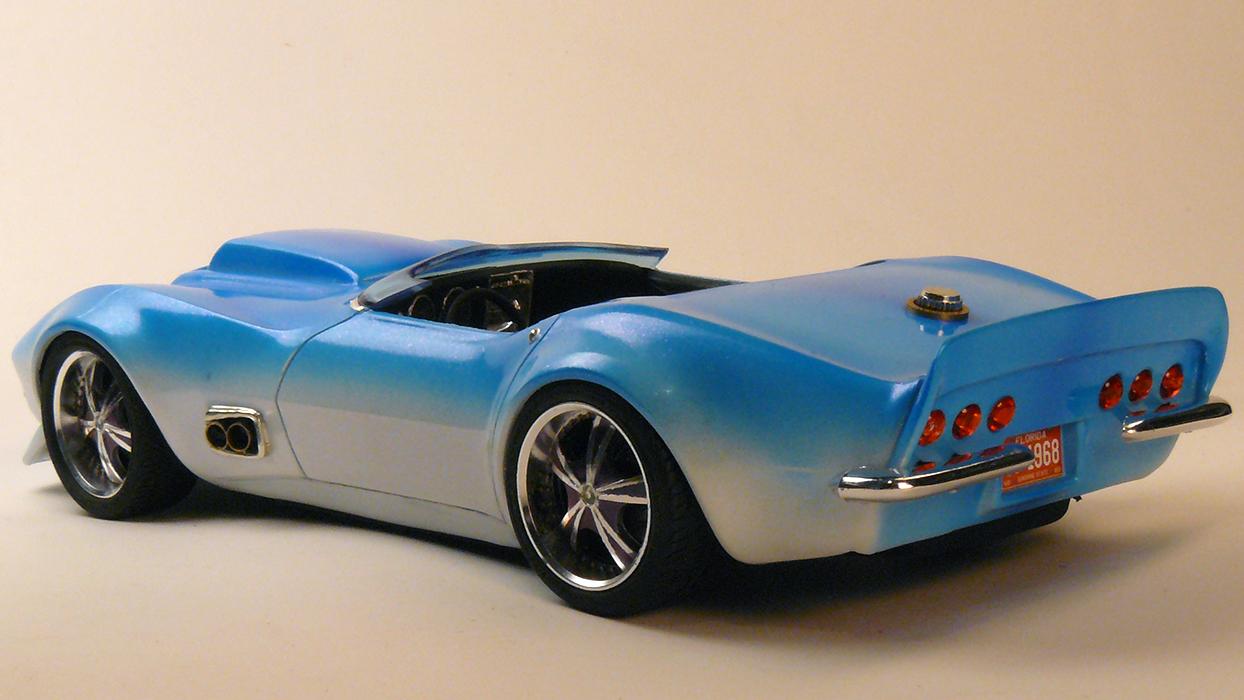
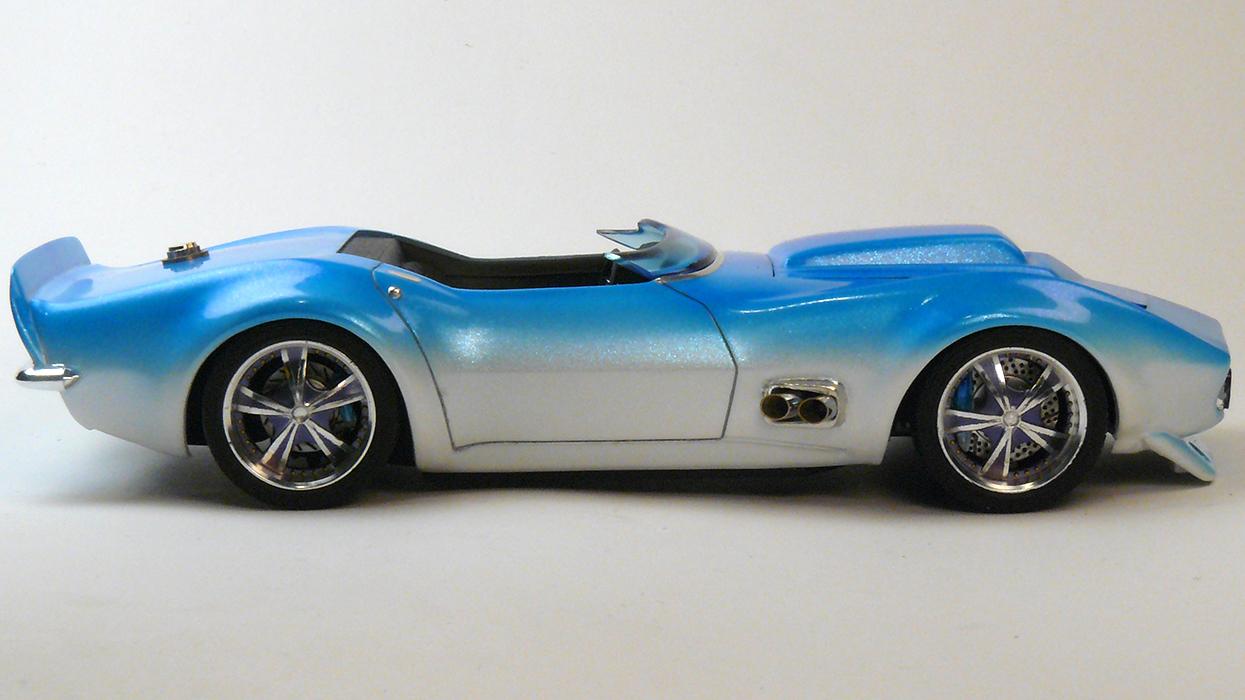
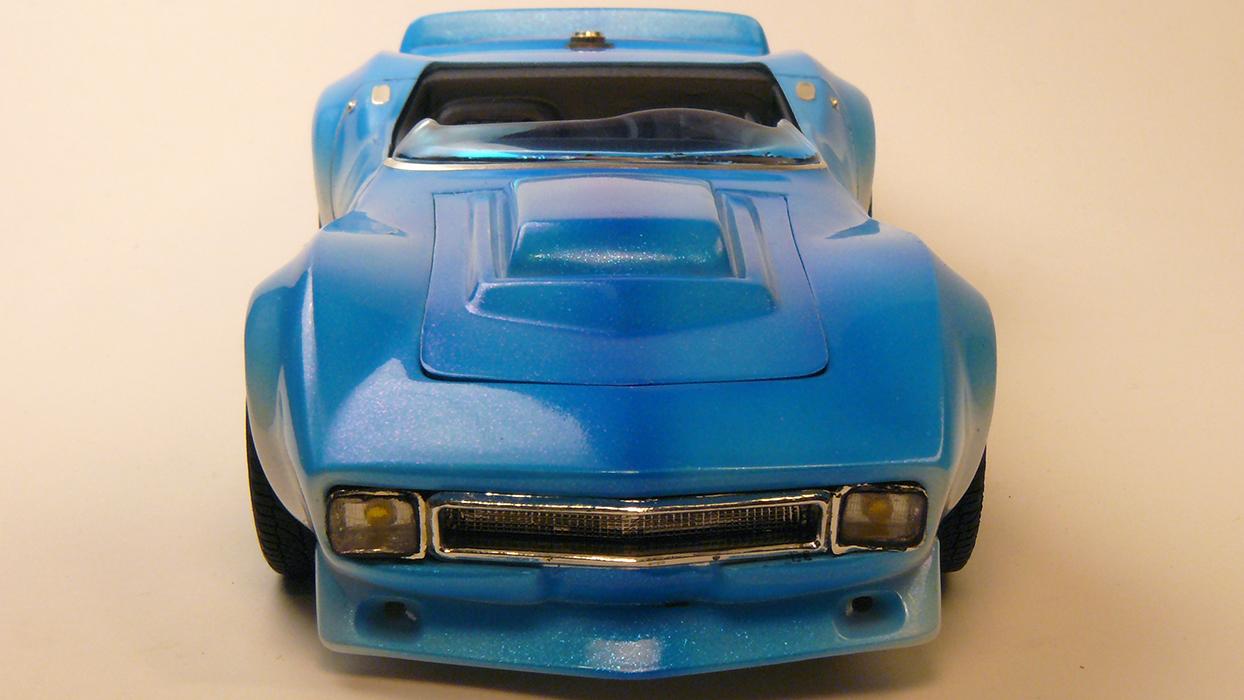
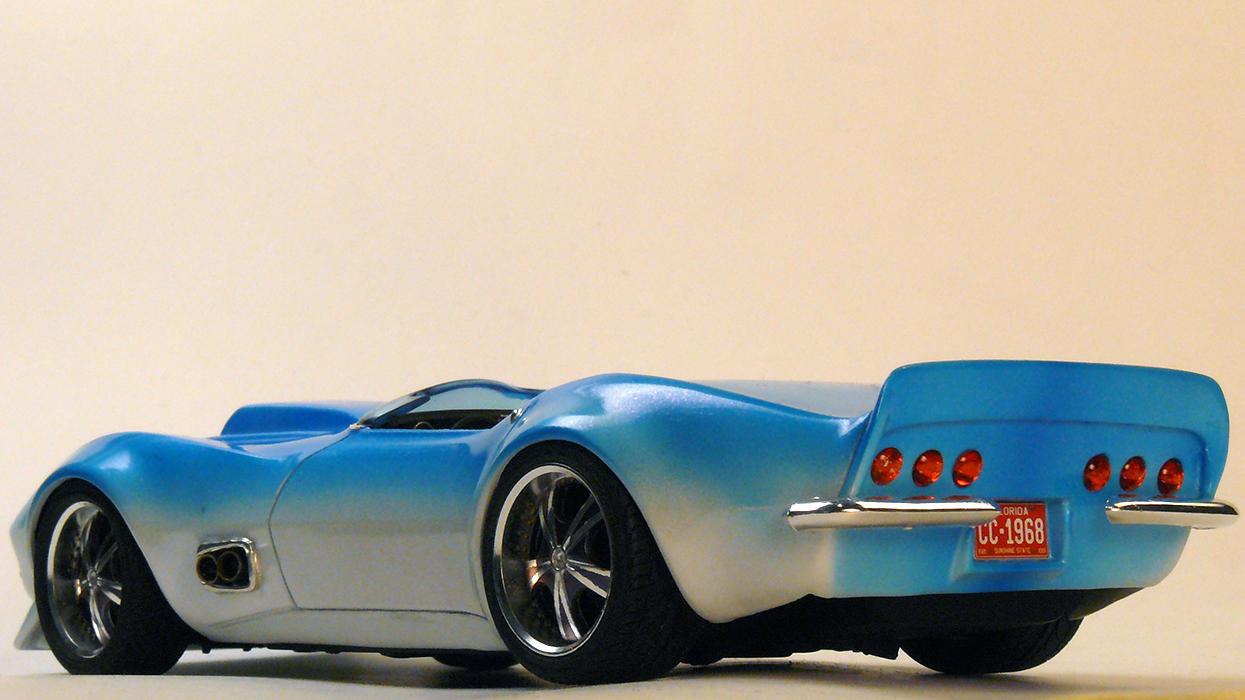
- Engine out of Rick Dobbertin's Radical J-2000 kit. Added fuel lines, ignition wires, metal NOS lines. - Added front and rear spoilers. Modified the rear to have three light per side. Made side exhaust. Used kits front window, but sides shortened. - Lowered chassis with Aoshima wheels. Added modern brakes with similar shadings as the car. - Custom made front grill and lights. - Paint is Tamiya Pearl white with shadings done with Tamiya clear blue. Clear coat done with blueish pearl nail polish.
-
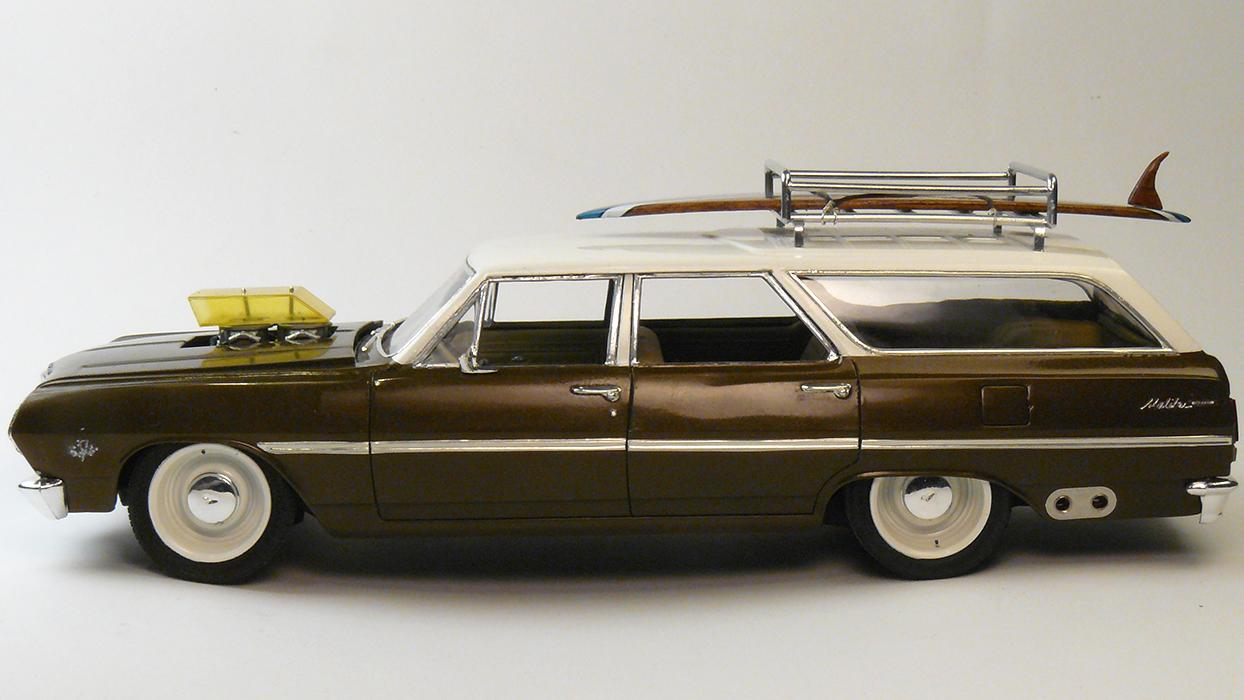
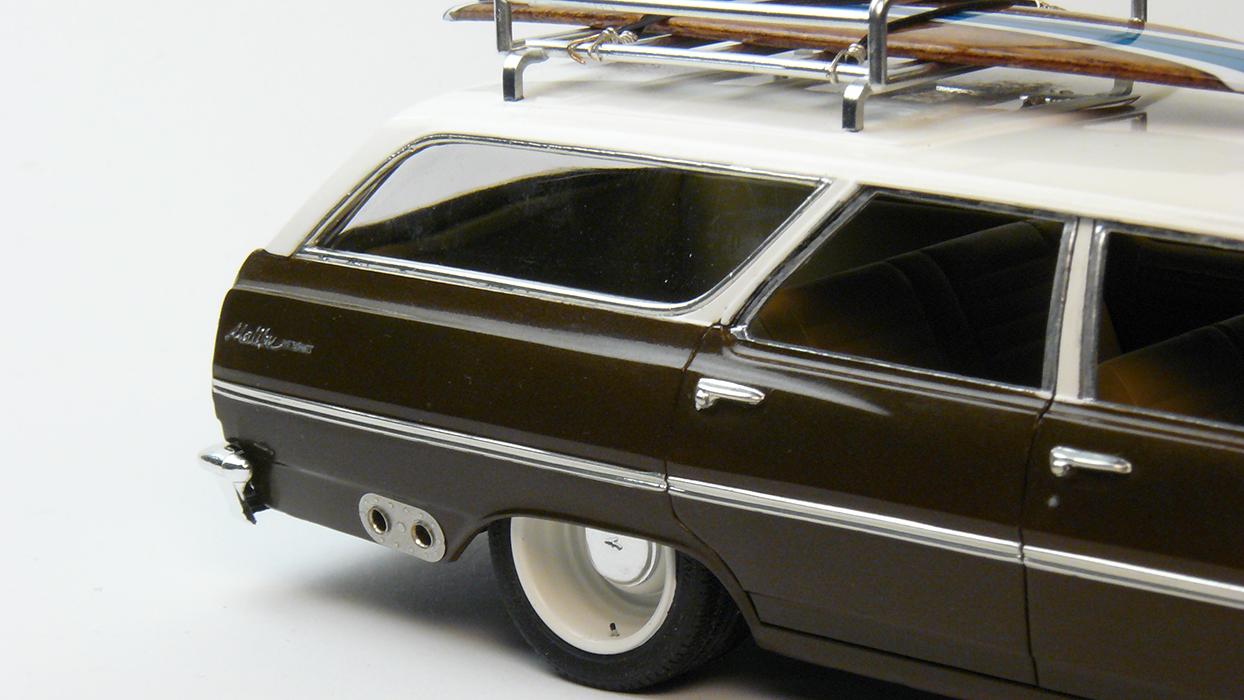
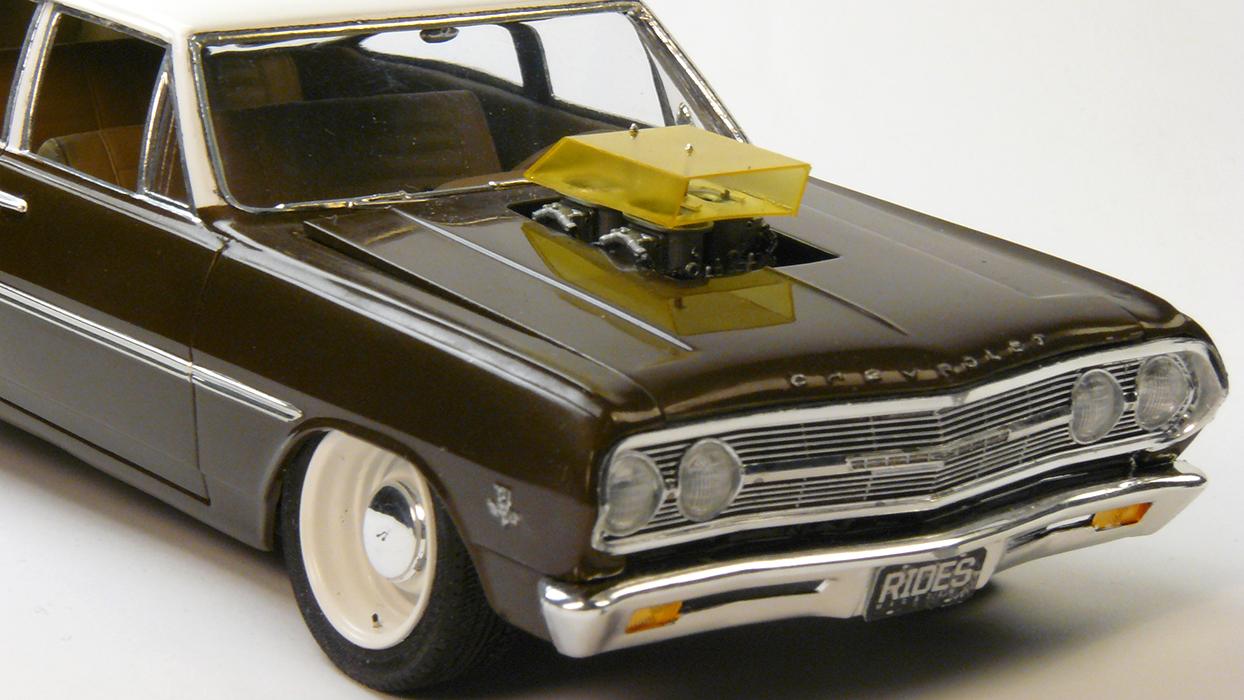
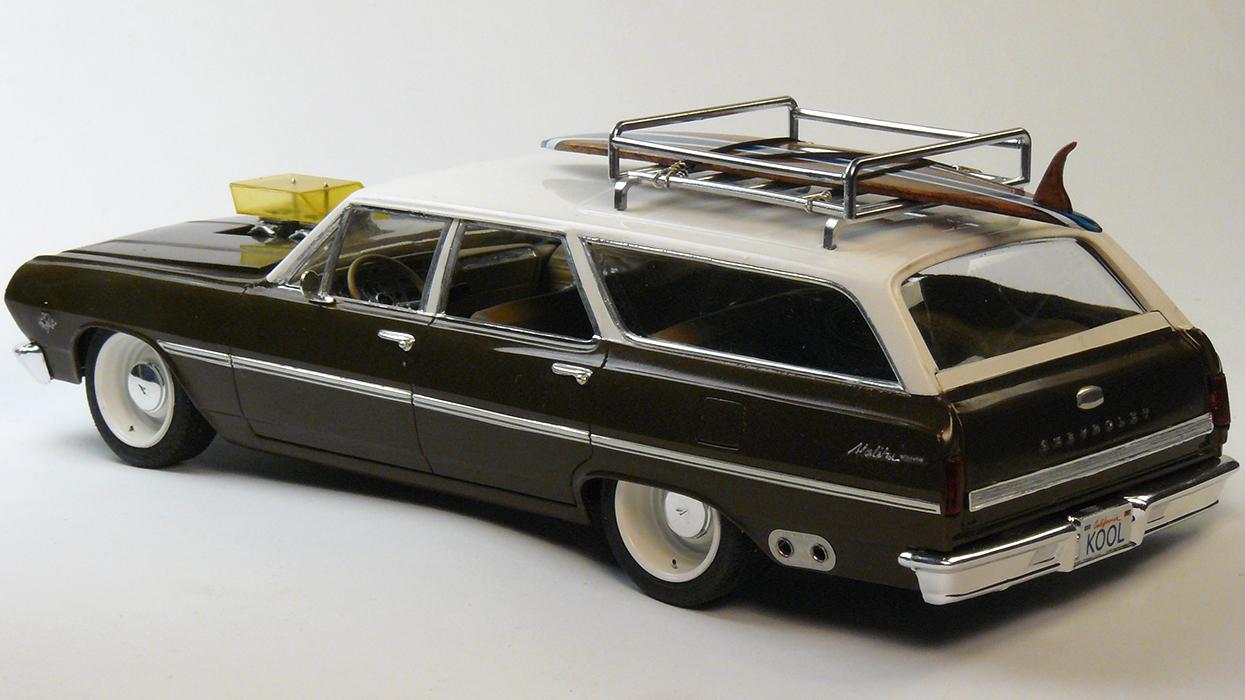
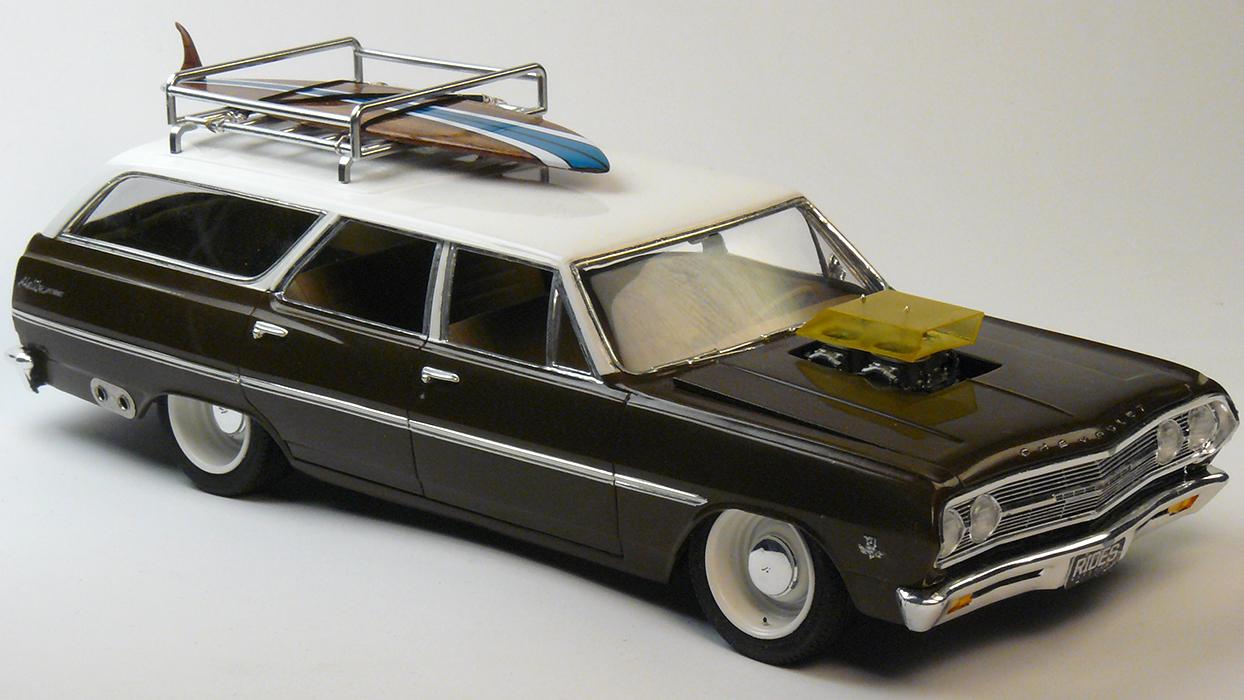
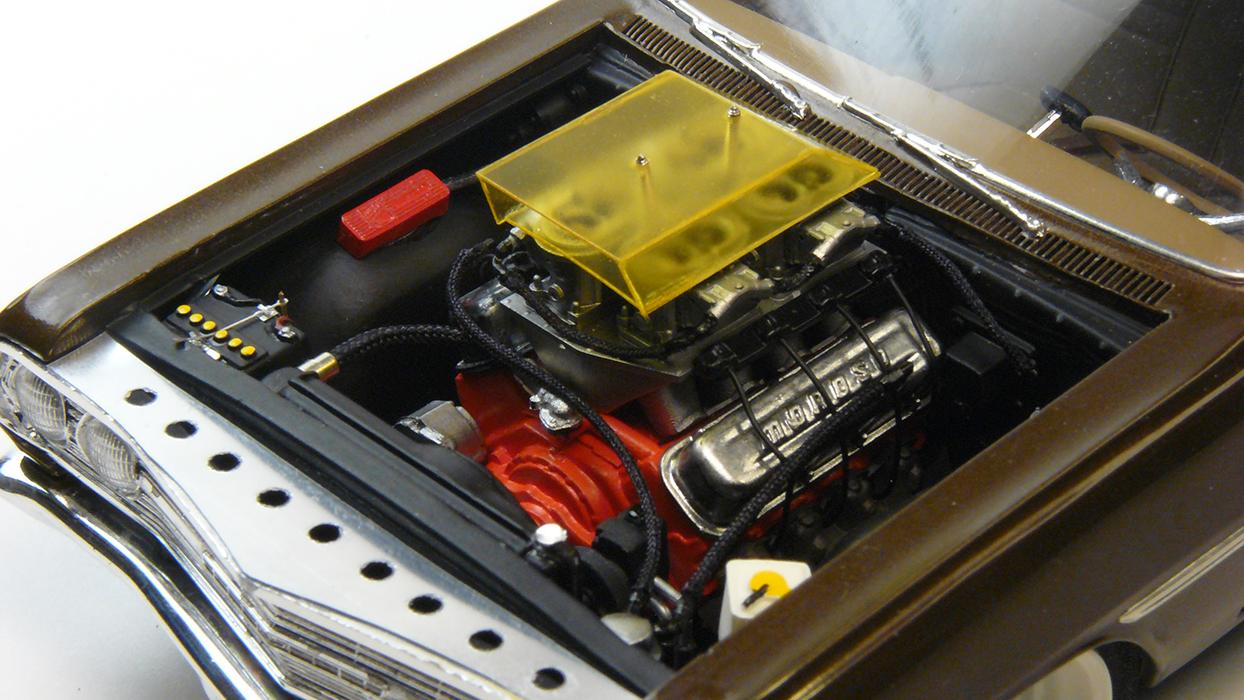
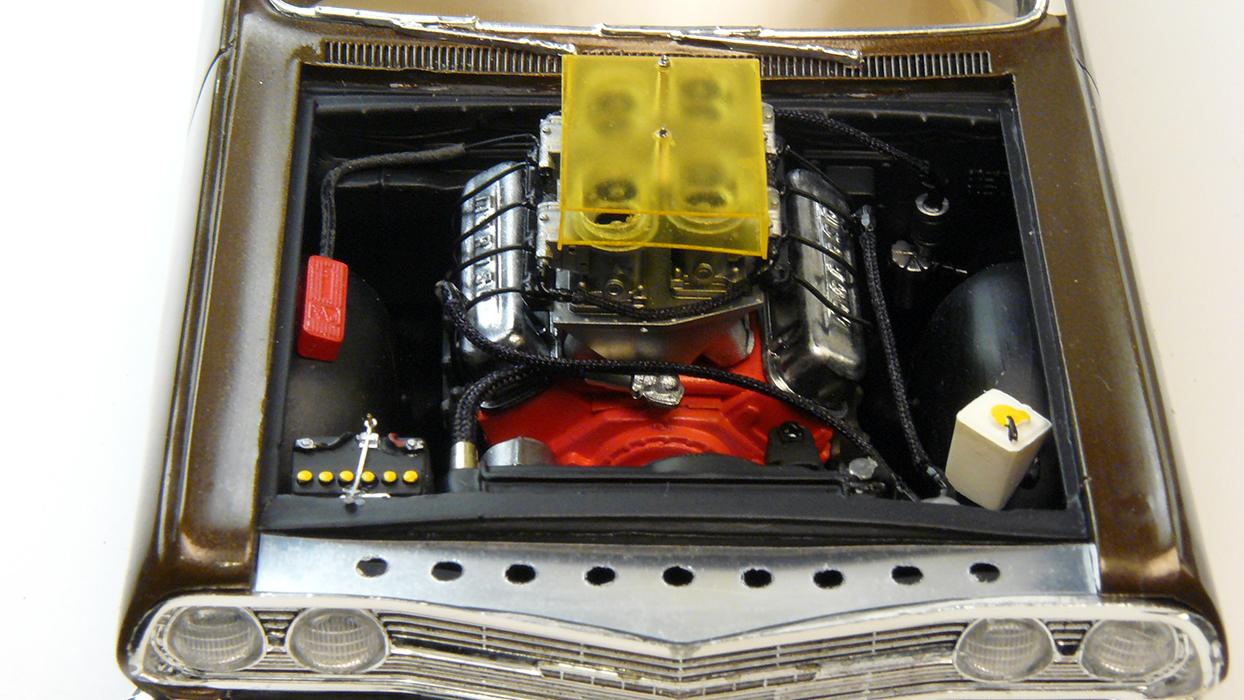
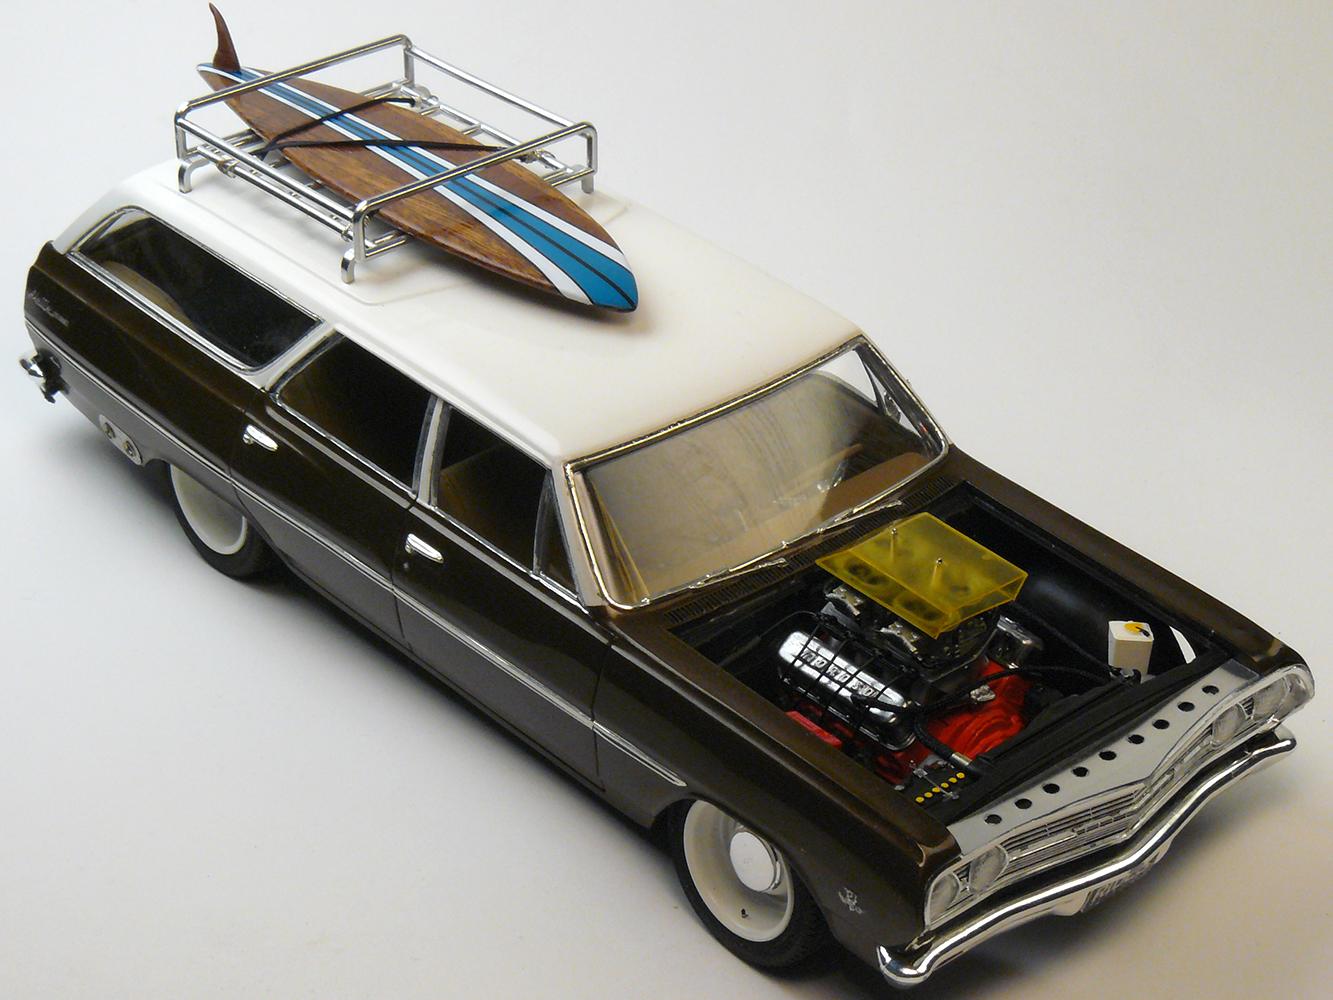
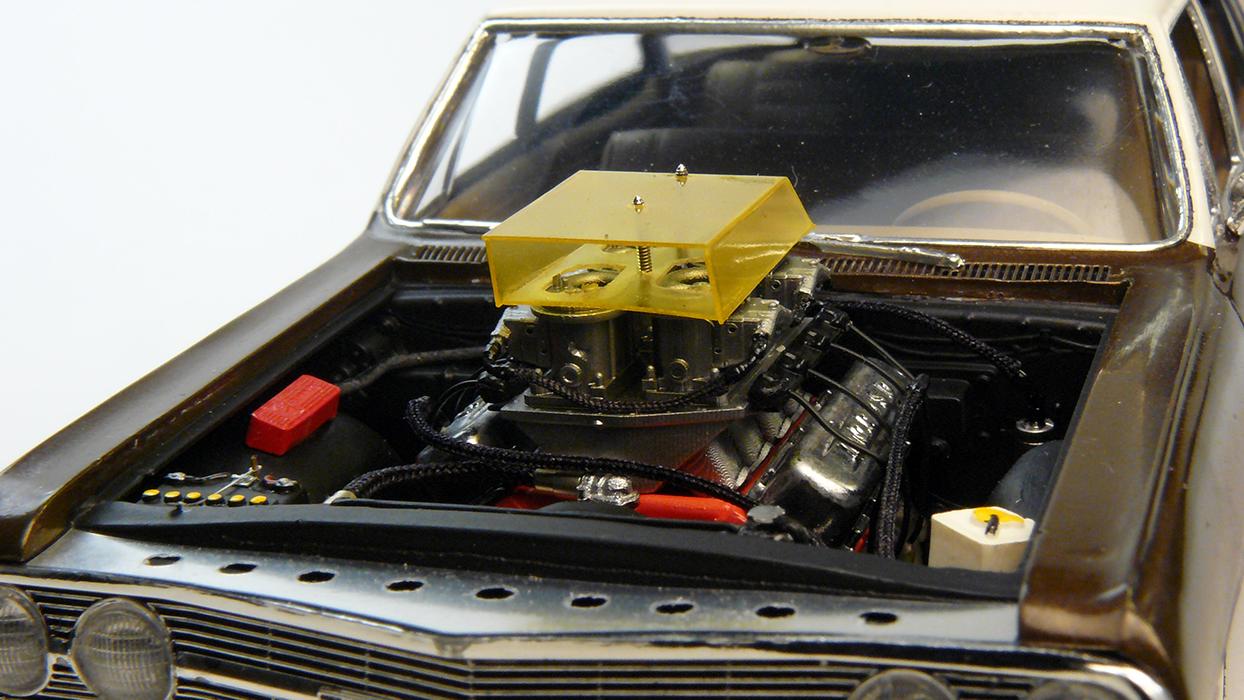
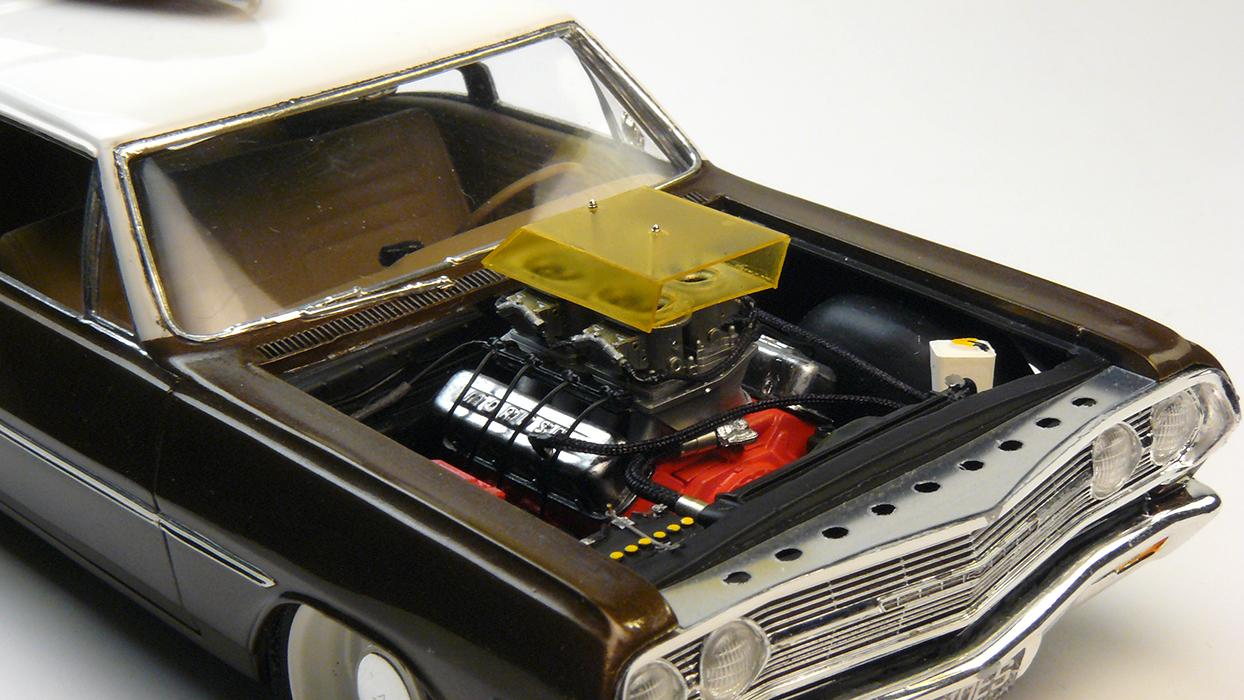
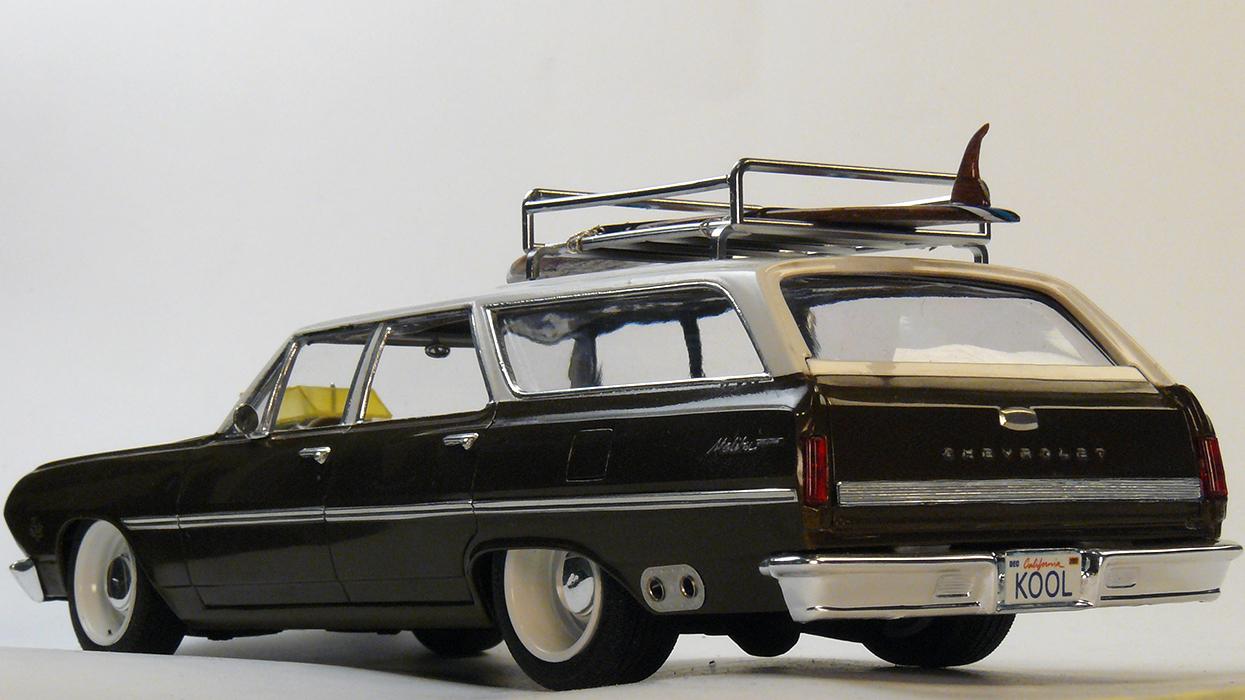
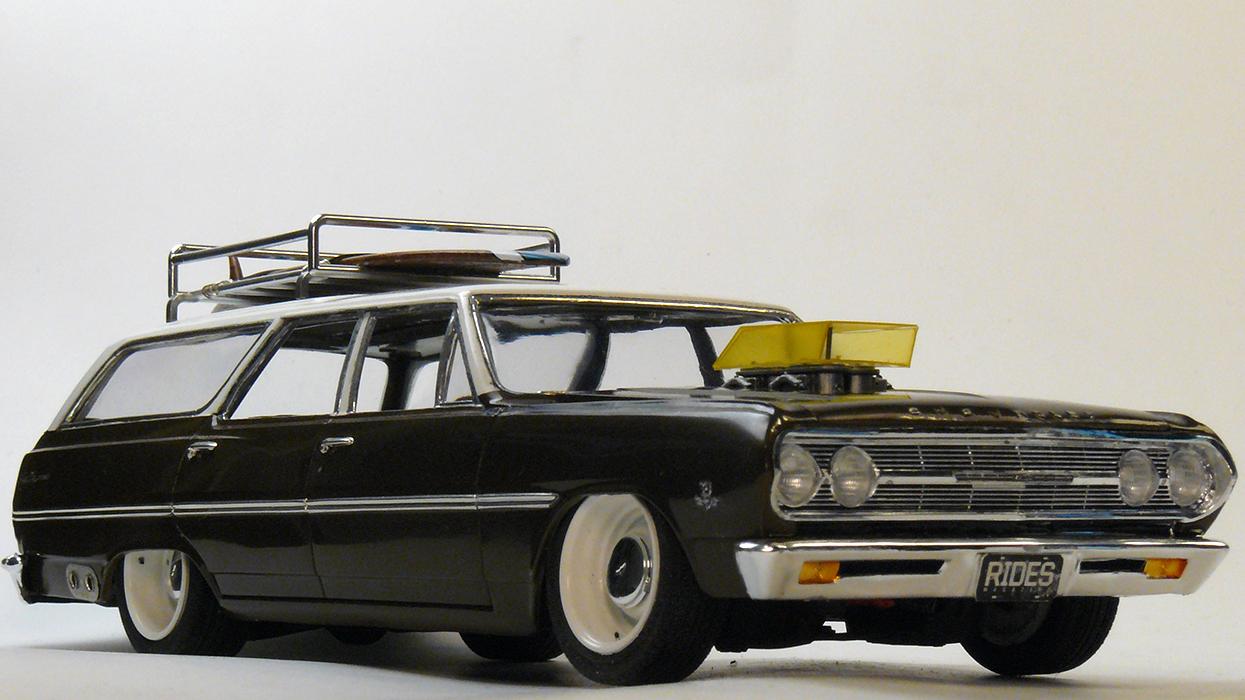
- Engine changed to 454 with 3D printed intake manifold. - Scratchbuilt ignition and fuel systems. Clear scoop made also. - VW beetle roof rack with real wooden surfboard. - Widened steelies made. - Side exhausts added. - Mixed gold brown paint at the bottom, cream on steelies and roof.
-
No. I used revell kit.
-
If you mean rear tires, they are from Torino nascar kit.