

Duntov
-
Posts
1,318 -
Joined
-
Last visited
Content Type
Profiles
Forums
Events
Gallery
Everything posted by Duntov
-
HI: Here is another bead store find.....these are magnetic clasps used for holding jewellry chains together.........they have a small magnet inside one of the tubes.......in the closed state they look likea fully compressed heavy duty shock.....maybe for a light truck or????? To pose them open I cut a 3 MM piece of 1/8 inch diameter Evergreen tube and dropped it into the larger end......see the pic..... Then.....when you put the smaller end back in place you get this........................ Have fun...... Regards Bill (Duntov)
-
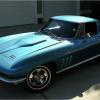
OK....first an easy one......1966 Corvette.....A.O. SMith bodied coupe......uses dark red primer / eliminator under the paint......you can see this in the area around the inside of the grille surround......an additional big bone of contention are the seldom modeled seat retainer brackets that are clearly visible on the underside riveted to the fiberglass......they can be either semigloss black or raw zinc chromate (medium green).....frames are always semi-gloss black with no overspray. THere should also be no overspray on the underside fiberglass panels......at all........some years 63 to 66 will have black mitting very sloppily applied (with a mitt) to various components mufflers, sway bars front & rear spare tier carrier etc. Two original cars below....both unrestored originals.......have fun.....!!!! Regards Bill (Duntov) See the example of green zinc chromate peeking out under the seat plate: See the example of red primer eliminator in the area around the grill
-
Radiator Hoses / Connectors & Something Else
Duntov replied to Duntov's topic in Tips, Tricks, and Tutorials
For braided line I use a wire product in the bead section. It has a loop on one end and is wrapped around itself.......It is different from what Steve Z is using.....I have found good uses for both though..... OK see the two pictures below.....the one on theleft is a 67 big block (Revell kit) I did for a friend.....using the wrapped wire from the bead section......right next to it on the right is a shot of my real big block coupe with braided wires.......the wire from the bead section replicates the real thing quite well.....take a look...... Later Bill (Duntov) -
Yes you are correct for SOME GM's of that vintage ......but as the owner (original) of several GM "beasts" (and I still have three of 'em - two in original paint ) it's pretty clear that red tint primer among several other shades were common.....again .....depending on the car....the year....the material.....and in every case the sub-assembly you have under consideration......So ....the red oxide can be ....and in many case IS.....correct..... Regards Bill (Duntov) my point is as others stated.....the primer does not matter................
-
Raymond......WOW.....nice work on that Suburban!!!!!! I really like this!!!! Regards Bill (Duntov)
-
I really like this one.....very clean and straight.....nice work!!!! Regards Bill (Duntov)
-
Radiator Hoses / Connectors & Something Else
Duntov replied to Duntov's topic in Tips, Tricks, and Tutorials
Hey Daniel: These are prtty cool......I saw a package but I drifted off and looked at other stuff......these are really great.....have to go back on Saturday.....Thanks!!!! Regards Bill (Duntov) -
Hey Pittsburgh.....these are really nice......personally I really like building a promo or curbside from time to time.......your work is proof positive that you can come up with a real looker with some effort and just a little time!!!! Nice stuff!!!! Regards Bill (Duntov)
-
I really like this one too!!!! It is a clean build and most important it is VERY believalbe!!! Great work and thanks for sharing this neat build up of a cool truck... Regards Bill (Duntov)
-
This is some nice stuff.....keep moving on it.....I really like the wheel / tire selection......very period and very understated.....classy stuff!!! Regards Bill (Duntov)
-
Radiator Hoses / Connectors & Something Else
Duntov replied to Duntov's topic in Tips, Tricks, and Tutorials
Here is just one example of what I have used a crimp tube for.......my current build ('39 Chevy) in the "On the Workbench" section shows a crimp tube used to detail the interior of that car.......I placed it between the speedo & tach to simulate a fuel gauge...see the pic..... -
Radiator Hoses / Connectors & Something Else
Duntov replied to Duntov's topic in Tips, Tricks, and Tutorials
To Steve Z's point.....I also use braided wire from the bead section. The stuff I found comes in 3 or 4 sizes and is a 3 inch or so piece of wire with a loop on the end and then more wire wrapped around the core....it simulates big block chevy braided plug wires perfectly......the heavier stuff can be used for the hand brake lines on mid-year Corvettes or just about any armored line you might need........I have one or two more bead aisle finds that I will pass along this weekend..... Later Bill (Duntov) -
Radiator Hoses / Connectors & Something Else
Duntov replied to Duntov's topic in Tips, Tricks, and Tutorials
Hi Kaleb: The rubber hose was in the bead section.....it is called "Pony Bead Tube" if I recall.....I am on the road so I don't have it right in front of me.....$1.27 for 5 yards!!! Regards Bill (Duntov) -
Thanks Bob.... .......glad you like it!!!!!
-
HI: Three ideas for "CHEAP" detailing. Visit Hobby Lobby and drop by the bead section. Three items are available for less than $2 each. They are crimp tubes with .8mm outside diameter, rubber bead hose to simulutate radiator hoses and "connectors"?????? For who knows what. The crimp tubes and connectors are sterling silver and are very shinny. I use the crimp tubes for fixtures at the end of brake lines etc. A set of 8 hex head connectors from a well know hobby supplier costs $9 .....that's for eight!!!! You get about 50 crimp tubes for $1.50.....see the picture: Next are the connectors......they are sterling and you get 8 for $1.50......they can be straightened easily and can be used for a number of detail items.....they also come in three lengths.....see the picture..... Finally a shot of all three including the rubber hose......this is great stuff....it is hollow and just the right size for radiator hose....I use a .033 brass pin to mount it to the engine and radiator......just dot of gap filling ACC and it stays in place.....it is super flexible and soft and does not kink (unles you get crazy and bend it back over itself!!!!) The best part is it costs $1.27 for 5 yards!!!! Again a hobby supply house sells radiator hose (6 inches of it) for $5......see the pics....have fun.
-
Here is an update on my ’39 Chevy build up. It has been slow due to travel demands but quite a bit of progress this weekend. First on the list is the completion and mounting of the engine. This is the box stock engine with a Parks distributor & coil and a reworked blower casting. The blower is painted with magnesium buffing metalizer. Here the engine has been mounted in the chassis and the body and fenders set on to test clearance. One item that needed to be changed was the firewall. I scratch built one since the kit item had a huge clearance hole in it that allowed the engine to be seen from the interior…..you can see the new unit in the pictures of the painted car below. Also added were exhaust tips made from aluminum tube….these will get polished out upon final detailing. The following shots are of the car just out of the paint booth. Simple stuff really….Tamiya Mica Blue over fine gray surface primer……came out very shinny and should get a bit better upon rubbing out. More as time permits………
-
Very nice!!! Both cars look great and the photos are very clear...... Regards Bill (Duntov)
-
Very nice build and very nice photos.....I like the pre-dusk shots.....really sets off a very nice model....super build... Regards Bill (Duntov)
-
Here is an update on my 39 Chevy build......traveling way too much so progress is slow but got into primer today....pinned the head-lights and filled the tail light voids....I will need to figure out a mild custom tail light set up. Also....added a lower radiator tank so the coolant hose will have something to attach to!!!! I also added a drain plug made from a nut-bolt-washer casting. I will add the electric fan from one of Revell 32 Ford kits. Here are the pics.......As mentioned before I scratch built some hood sides and added a panel line continuing from the side of the car....it's very understated and turned out pretty good. Regards Bill (Duntov)
-
Drew: This is interesting. Looks a bit like a moonshine runner! I also like your dads idea of "using what you have". I have done a couple of builds that were very successful by "limiting" myself to what the real 1:1 car (and builder) could have had on hand....given date-place-time of build etc. This one looks good and I really like the approach..... Regards Bill (Duntov)
-
HI Jason!!! This looks like a good start. I have my own JWC car to build (29 Ford Woody - Calendar car).....but I will be very interested to see how your truck progresses. This is one of those builds that will just look great when its done......keep moving forward....thanks for posting this....I really like it. Regards Bill (Duntov)
-
Hey Jeff....this looks really good. I like the 30's fat fender cars like this one a lot. Just seems like there is ton you can do to them.....keep moving forward with this one. I will be very interested to see where you take it......NICE WORK!!!! Regards Bill (Duntov)
-
Hey Tom....interesting stuff. I really like the Matranga Merc in the foreground. I have one that I started some time ago and did not like the way the paint came out so it is on the short list to get a major rework.......key us posted on what you do with this.......I was always fascinated with the kit and especially with the real car.......quite a story. Regards Bill (Duntov)
-
Hey Bill: Nice Merc!!!! I really like the wole package....it just really holds together really well!!!! Like the 64 442 as well............... Regards Bill (Duntov)
-
Christian.....I agree 100%....the character here is a big part of the thrill. Marklin equipment is an excellent analogy......keep pushing this....it's a great aspect of the hobby and a welcome change from the styrene dust!!!! Regards Bill