miatamadman
-
Posts
201 -
Joined
-
Last visited
Content Type
Profiles
Forums
Events
Gallery
Everything posted by miatamadman
-
I created the artwork using AutoCAD and printed the decals with my inkjet printer, using inkjet decal paper from Decalpaper.com.
-
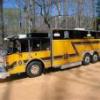
This ones a mouthfull ............ Maryland National Capital Park Police-Prince George's County Division. Stripped 1/32rd scale FRR Interceptor, repainted using Valspar Antique White and decorated with my own decals. Spotlight handle grip has been added since pictures were taken.
-
Latest updated pics. As you can tell, the replacement wing has arrived. I went ahead and cut open the cowl vents. You can also get a good look at the full cage now, which is tucked up real close to the interior panels. The almost completed chassis Now to come up with a color scheme. Right now, I'm leaning towards a blue with silver graphics....but that can always change
-
I actually do remember that kit! Built it when I was a kid.......a long time ago
-
The frame is starting to get painted and assembled as I work my way from the back to the front. Getting the exhaust tucked up was a real PAIN! I've got some strong elves in the shop so I had them flip the chassis over, climb up into the rafters and take some pics . Starting to fit the front nose and hood, which by the way didn't fit to well the new power plant fits like a glove Now for the shout out......does anyone here have an extra Revell IMSA wing that came in this kit and the firebird/camaro kits? I think mine was still taped to the piece of cardboard that got tossed
-
Absolutely stunning model and photography.
-
Rear suspension is almost ready to be installed. I pretty much had to scratch build everything except for the axle. I went ahead and cut open the louvers on the hood to get the heat out.
-
Frame is done and the body has been set in place. I've been working on new engine compartment panels and tubbing out the rear interior. Here you can get a peek of the new roll bar.
-
Suspension work is nearing completion and the motor is installed.
-
Chassis is mounted on the jig so let the cutting begin! Everything for this build is coming out of the parts box, or being scratch built.
-
Okay. Light bar is now properly painted .
-
I knew I forgot something ...gotta get it back in the shop and add some color to that lightbar.
-
Here's another Maryland city department. This time, Hyattsville. Paint is Testors light blue and the decals were made by me and printed using my inkjet printer. Not bad for 1/43rd scale
-
That's the beauty of modeling. Driveablity/practicality/street leagality goes right out the window .
-
When was the last time you saw one of these? Pulled this disco baby out of the parts box today. It's going to be getting a healthy dose of modern Corvette power and a new stance. I already cut some of the front air dam off to get wayyyyyyyyy down low and scored a healthy Corvette motor and tranny. Now to make it fit.
-
The wheel base needed a little adjustment to get the wheels centered in the wheel wells. I also drilled out the brake rotors and slid them over the wheel pins to get them closer to the back of the wheel face. For the Carbon Fiber, I used Scale Motorsports Twill Weave #1024. The side skirts, front splitter, roof, hood underside and center console were decaled with the CF sheet. The front splitter had to be done with 2 pieces. The roof panel and B-pillar are separate pieces as well. You'll need to use plenty o decal solvent for the roof panel and plenty of patients to get it right.
-
All shined up and ready to roll! Built box stock with the addition of Scale Motorsports carbon fiber decals. Paint is Tamiya TS-54 Light Metallic Blue over white primer and clearcoated with Testors High Gloss Clear
-
I had to downsize due to lack of space . I can squeeze these little guys in between the big guys.
-
Here's my latest and greatest custom to date! This one is a full on custom build featuring a highly modified 1/43rd scale First Response Replicas Police Interceptor and my own, ink jet printed, decals. The artwork alone took me close to a week to complete. The biggest and most tedious modification to this model was gluing the front doors shut, removing the body side molding, smoothing out the body lines with bondo and finally rescribing the door gaps. The large "POLICE" logo on the side was applied over a white Alps printed decal. I first tried printing it on white decal paper, then cutting each letter out, which didn't turn out bad except I wasn't very happy with it since it required some touching up. After taking the pictures, I noticed I forgot the interior spotlight handle. So that still needs to be added.
-
Now that the wagons finished, it's on to this next dust collector. I'm not even sure as to when this one was started or stalled . First order of business, find the missing parts.
-
I'm just going to go back to playing with legos after seeing this. Amazing work!
-
I did it! I finally finished one this year......granted I started this 3 years ago. Anyway, here she is. The wagon has been dechromed, door handles have been ditched, rocker panels have been lowered, parts box exterior mirrors, rear bumper replaced with a roll pan, a small roof spoiler has been added, front bumper narrowed and modified to match the new rocker panels, resin cowl hood with Nova hood vents, custom exhaust and finally, the interior features a 4th gen Camaro dash, custom center console and bucket seats pirated from a Viper. The rear windows have been replaced with exposed film to give it that nice tinted look. Paint is all Dupli-Color shot from straight from the can and cleared with Testors high gloss clear.
-
Today, I rolled the wagon back into the body shop for a few new modifications, mainly to the front bumper. I really wasn't to happy with the fit, so out it goes. I got another bumper and narrowed it and carried the side skirting from the fender into the bumper. Once the primer dries, I'll shoot some new paint onto it tomorrow. I'm still having problems with the modified hood so I think I'm going to try something a little different this time.............stay tuned!
-
Interior is just about done.
-
Today I got the new hood painted. Tomorrow, I have to strip it. For some unknown reason, the paint crinkled. Oh well. One step forward two steps back. Here it is mocked up with the grill and bumper in place. I also need to do some searching for the other chrome hood vent insert. But if someone has one in their parts box let me know. Also, I got the exhaust installed with it tucked into the roll pan