69NovaYenko
-
Posts
826 -
Joined
-
Last visited
Content Type
Profiles
Forums
Events
Gallery
Everything posted by 69NovaYenko
-
Wow..that`s one sweet looking bitching ride..I also have owned two 1:1 Javelin's back in the day..a `68 and a `70. You have also been lucky to be able to snag a very RARE Johan kit for this awesomely outstanding build!! 👍
-
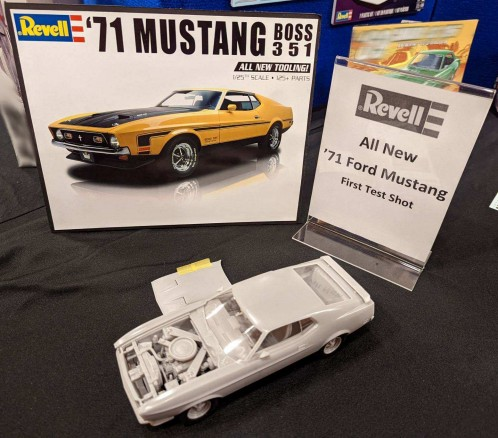
Revell `71 Mustang 351 Release date

-
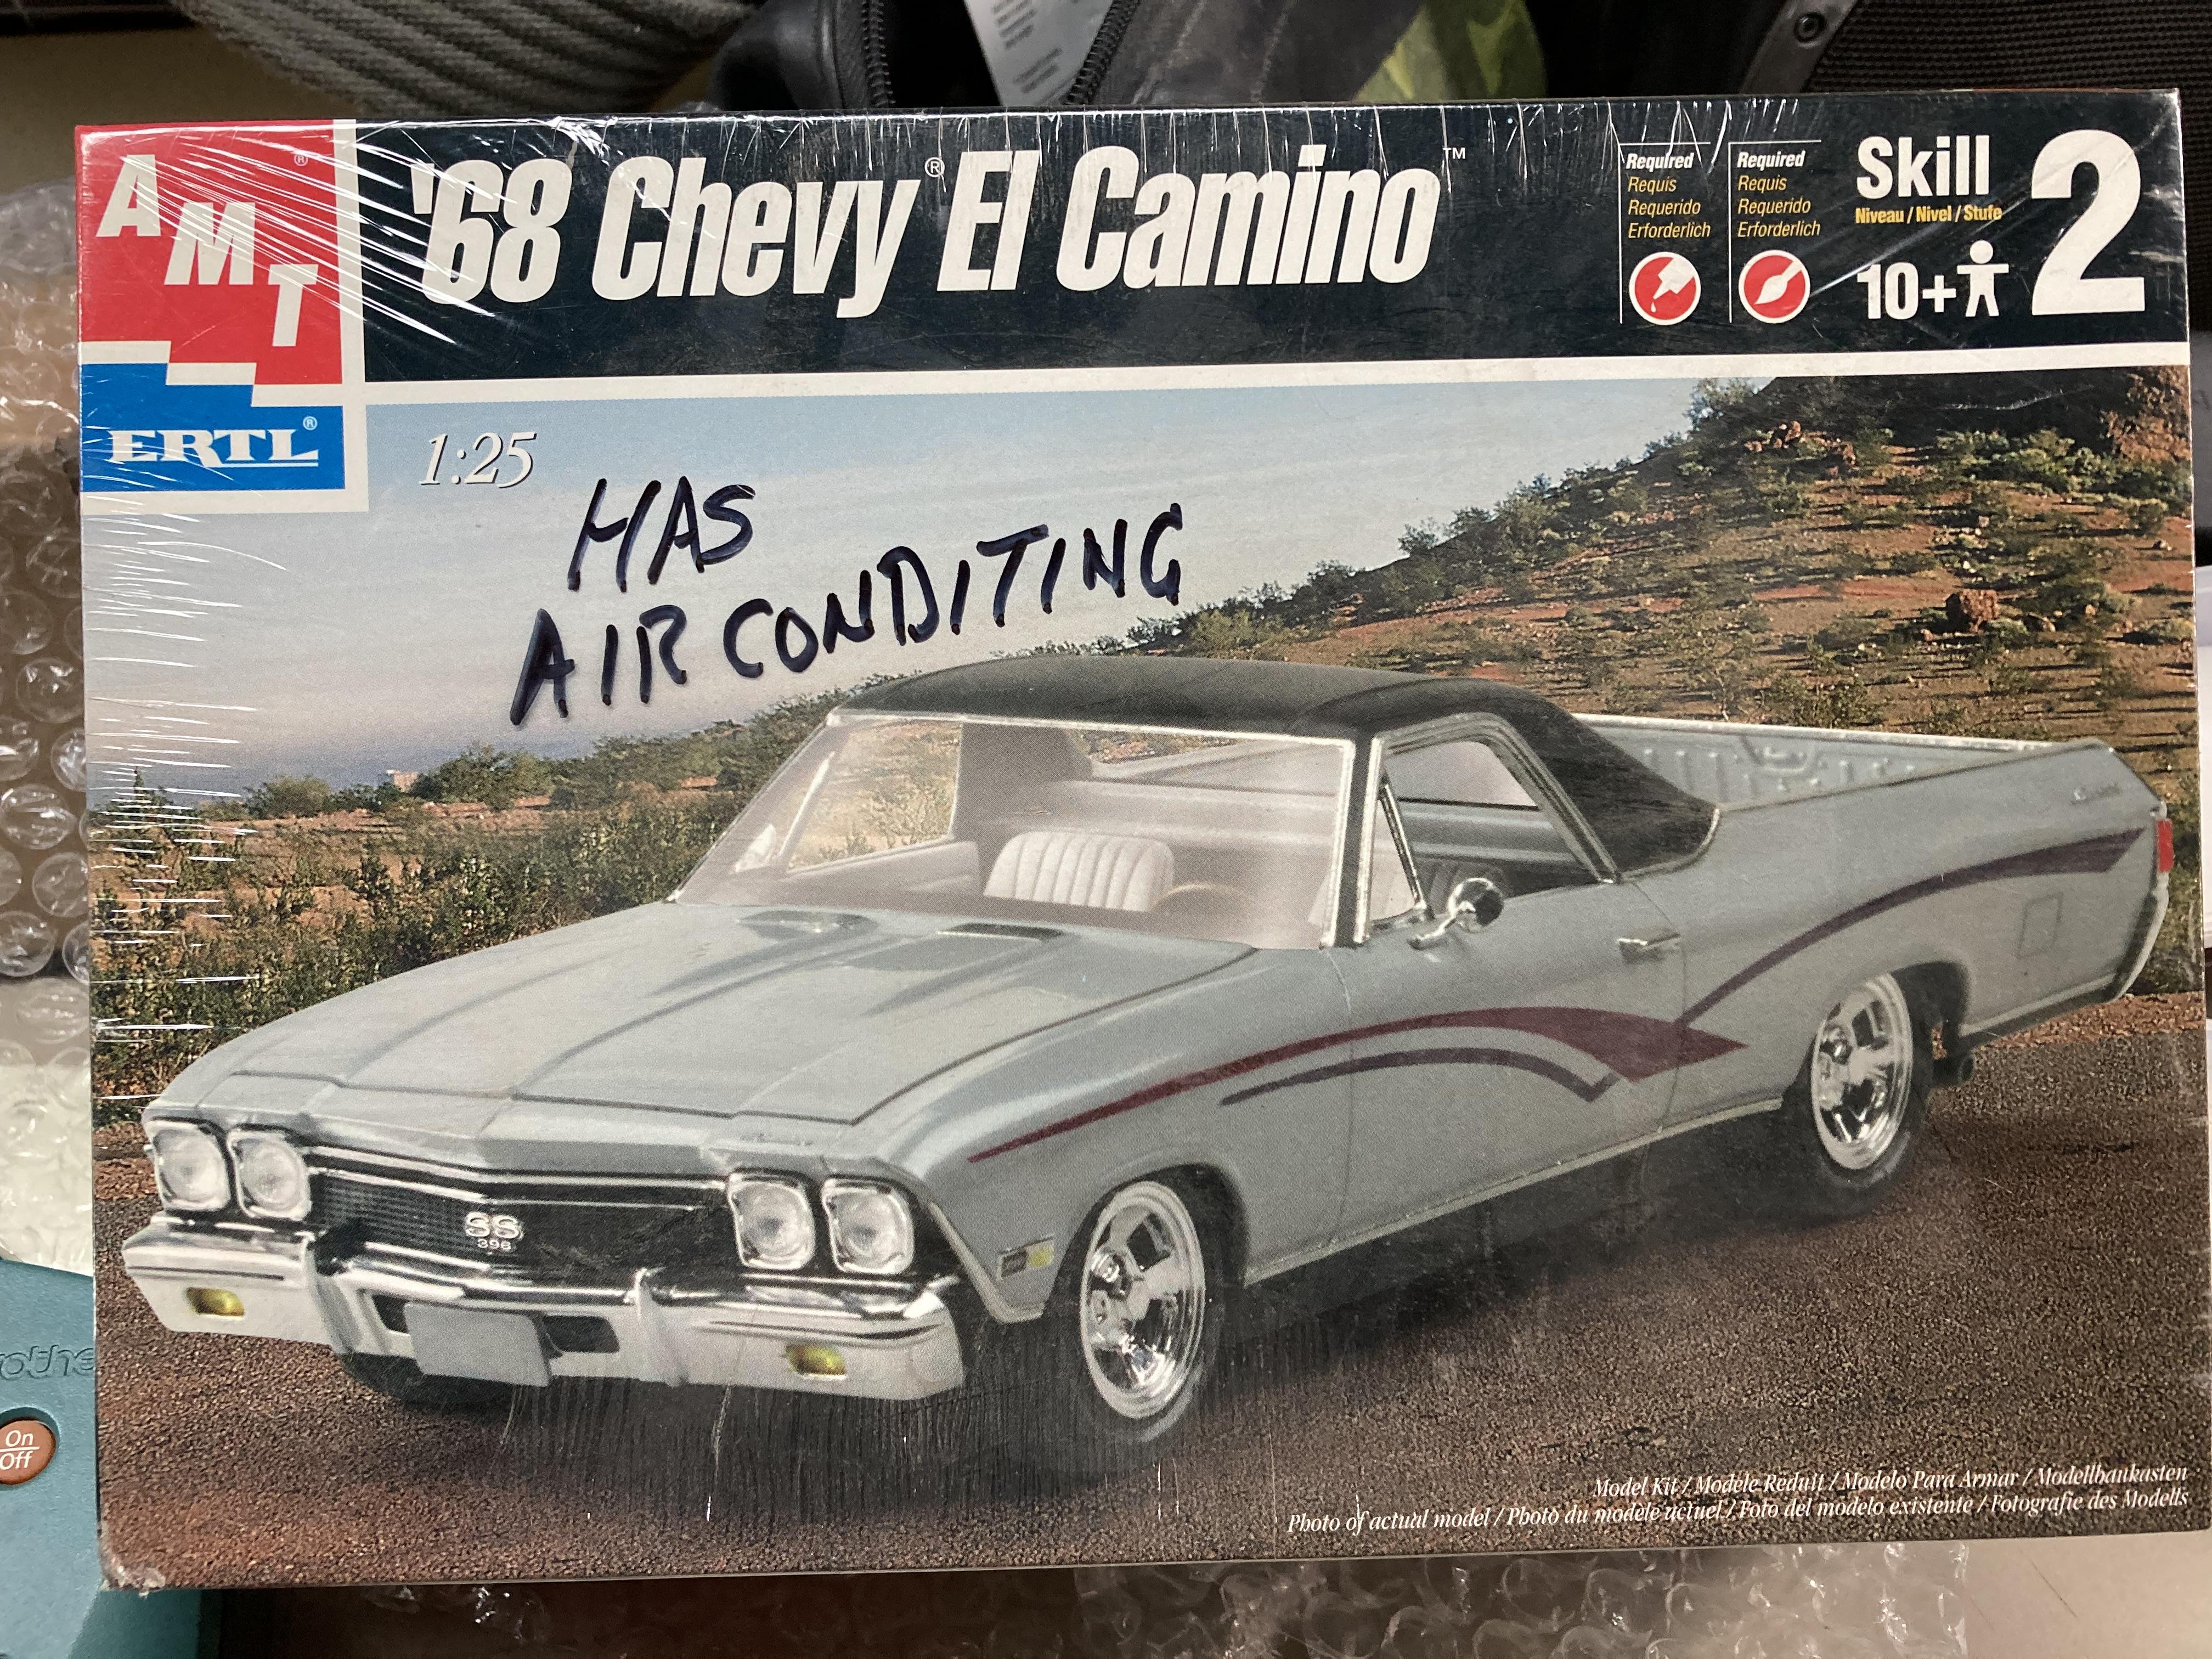
Looking for front windshield for AMT `68 Chevy El Camino. Acquired opened kit at garage sale. It is missing several parts...the front windshield is one of the MAJOR pieces needed to start project. Any assistance with ANY others parts for this kit will be overwhelmingly appropriated. Thanks in advance for the assistance.
-
 In the day I recall guys had a back and forth to work, grocery getting, take your girl to the movies daily driver. But come Saturday & Sunday they would be tearing up the asphalt at the local drag strip. Can anyone with a better memory than mine recall what NHRA classes these street legal daily drivers may have ran in during the late 60ties & early 70ties. I want to replicate the correct class letters/numbers on the windshield of the car I`m currently building.
 -
Resin Body Pin holes
69NovaYenko replied to Len Woodruff's topic in Model Building Questions and Answers
Truth be told when you consider the time & effort that the caster puts into popping a body or part they should want to put out a quality product. If nothing else they need to consider what these kind of hiccups do to their brands name. I do understand that pressure pots `aint cheap by no means nor is the resin however, neither is the price casters sell their products for. If it`s the only game in town then you SHOULD want it to be then best thing since sliced bread NOT "it will do" because it better than nothing! Most of us are willing to pay an upscale price for an upscale body or part. The now defunct Model Hause is a good example of QUALITY bodies and parts! Their resin products were OUTSTANDING in every sense of the word !! I like many others, were willing to pay the asking price because the end product was well worth it! Oooh..how I miss Model Hause..I hope he & his spouse are enjoying their retirement. As I type this I have a resin body on my work bench that revealed it was full of pinholes once I started sanding it. I also discover it SHRANK in length and width once I attempted to drop it on the recommended donor kit chassis. With absolute certainty I will not purchase another resin kit from this caster...EVER AGAIN!!! That`s my humble opinion and my 2 cents on the matter. On that note I will now step off my soap box and gladly relinquish the floor to others. -
Resin Body Pin holes
69NovaYenko replied to Len Woodruff's topic in Model Building Questions and Answers
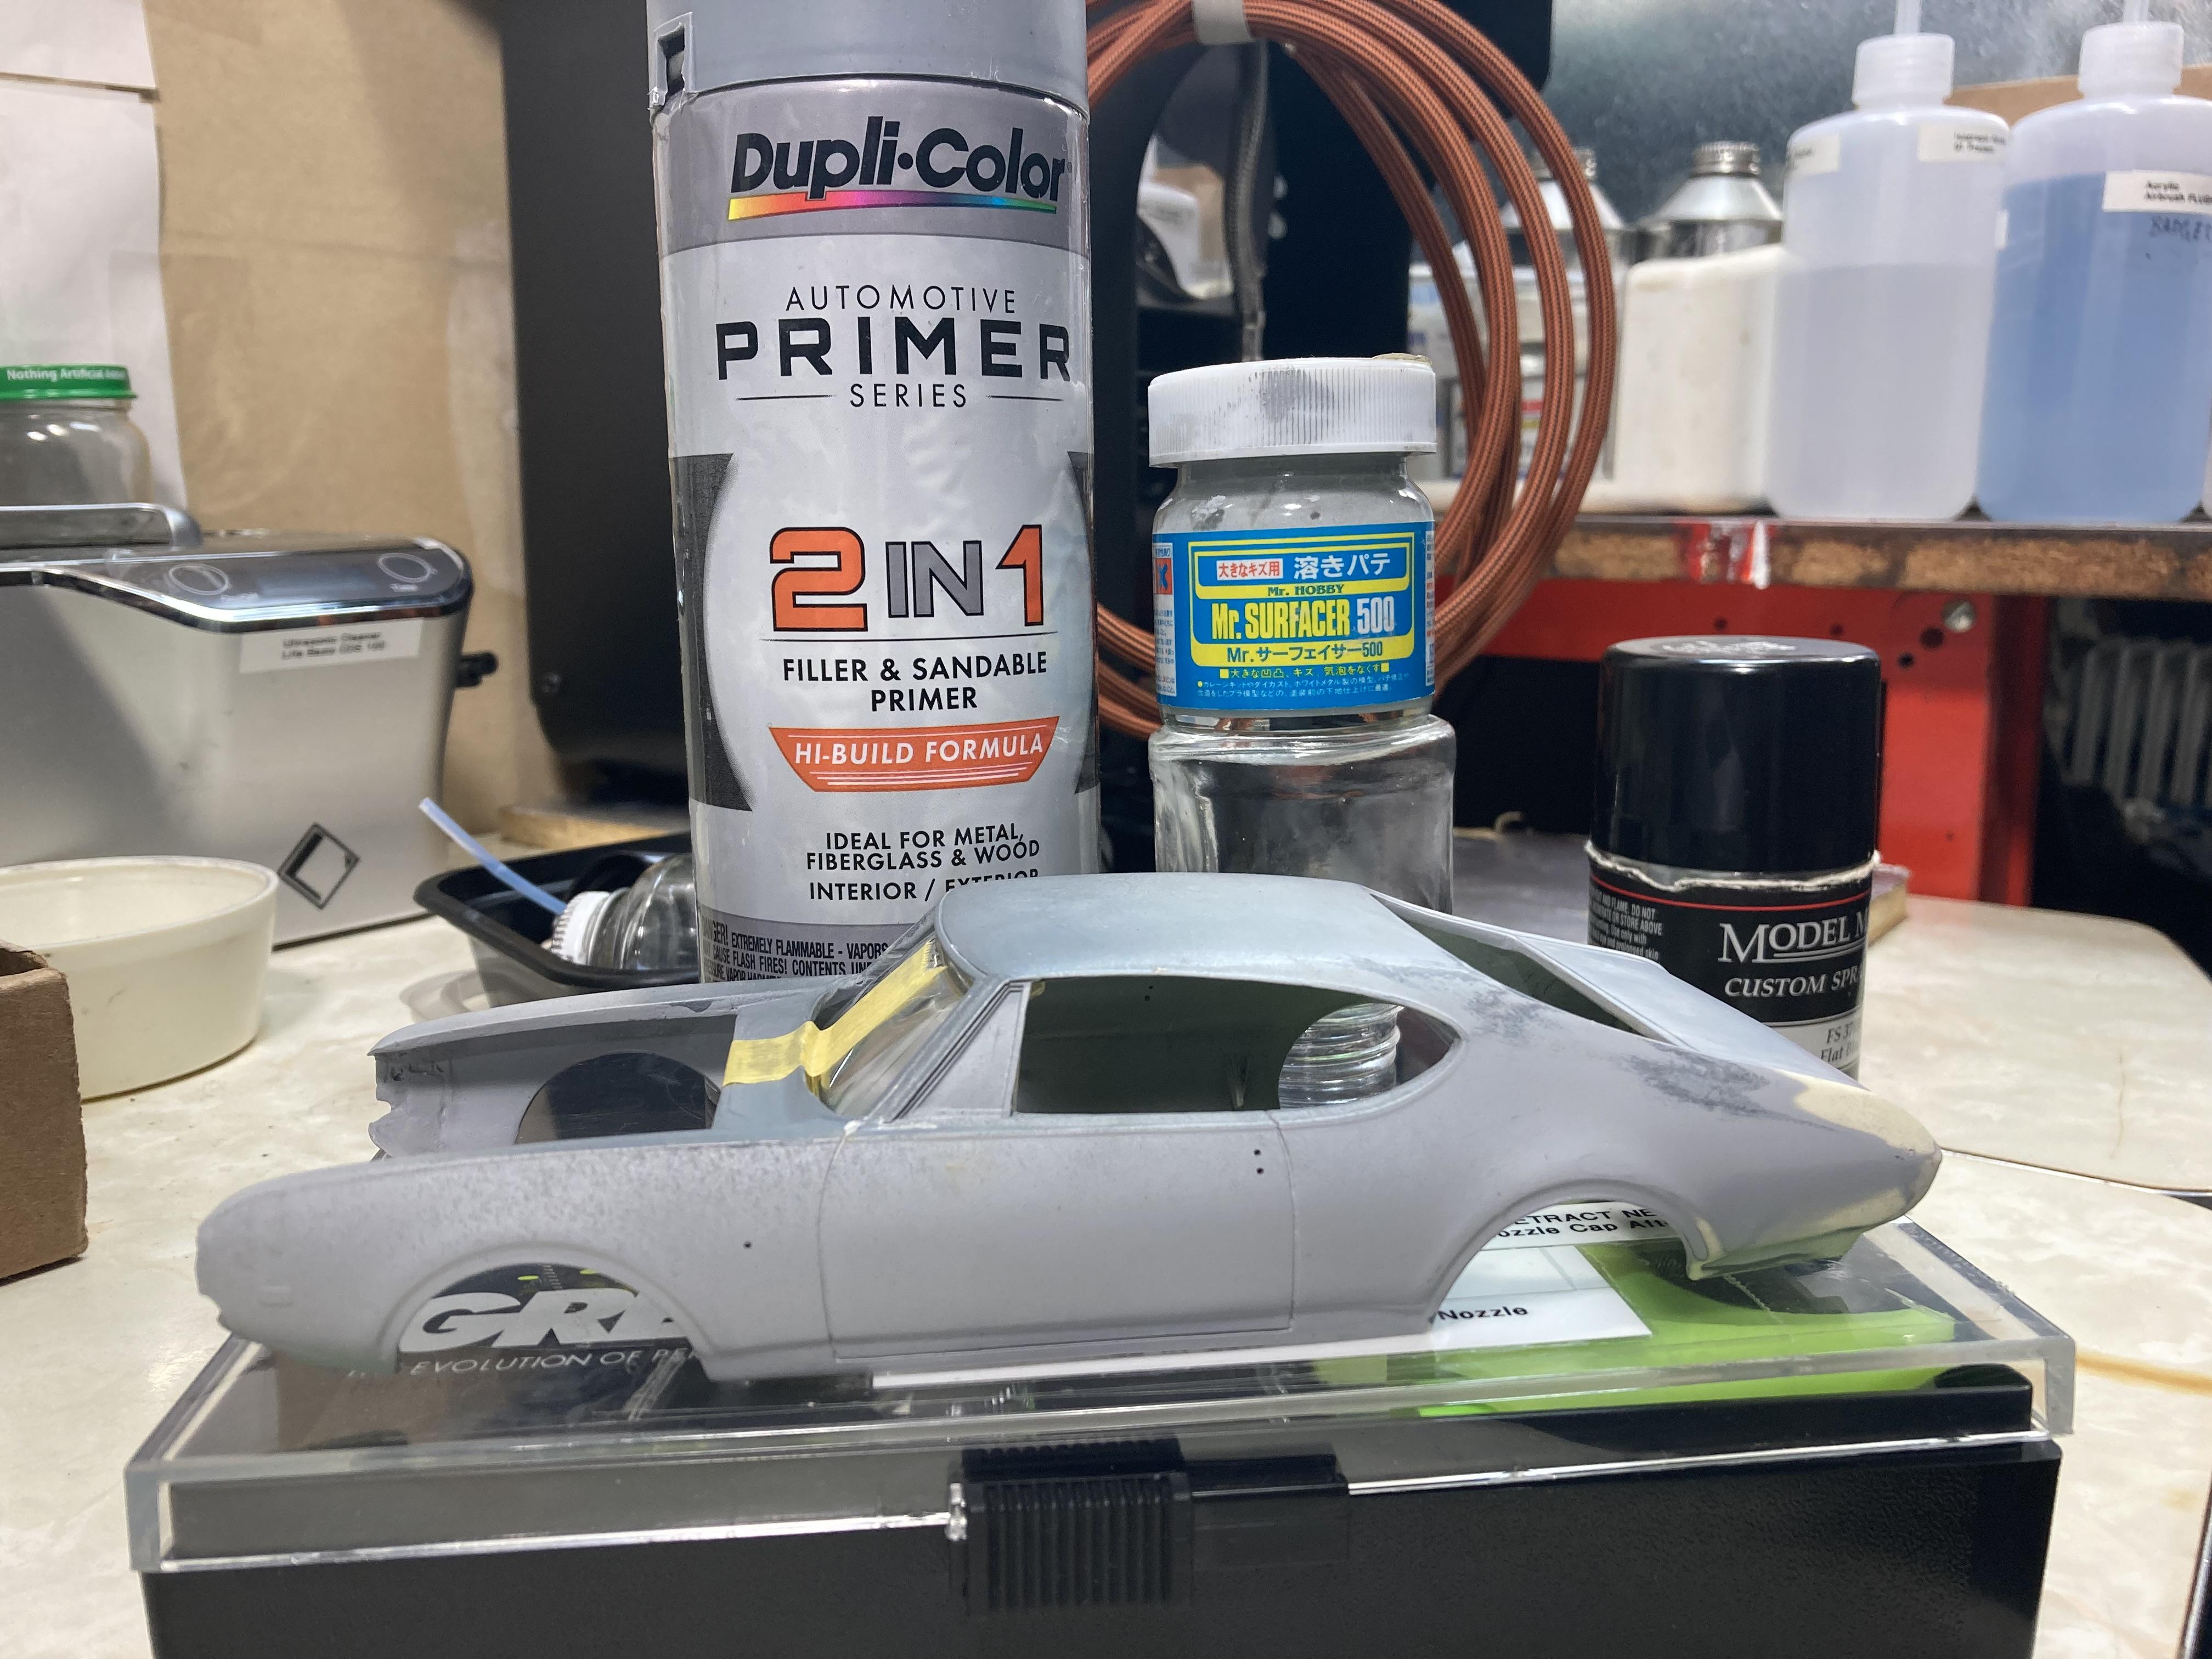
All the aforementioned solutions are valid ways for dealing with you pinhole issue. I currently have a resin cast body on the bench. The more I`d sand it the more pinhole would pop up; in fact some were potholes. I resolved the issue by using Mr Surfacer500 on the tip of a toothpick to fill the larger pot holes and Dupicolor 2-1 Filler Sandable Primer to cover the tiny potholes. Note: Actually any brand of sandable scratch filler primer will work..I just use the Duplicolor `cause that's what my nearby auto parts store carry's and it does a great job of filling the itty-bitty pinholes. I`m just putting option on the table for you to consider. Note: The three tiny holes you see in the body are witness marks I drilled to assist in correctly placing the resin door handles and photo etched door lock and fender badging at a later date. Also be mindfully with the rattle can filler sandable primer and spay in light coats so you don't bury any of the cast body details. After all the nozzle on this can is meant to spray 1 to 1 bodies and will dump a lot of primer if your heavy handed. I suggest you sneak up on it. Mist light coats on problem areas then let it dry and lightly sand..then mist coat again and let it dry and again lightly sand until the tin holes no longer rear their little ugly heads. Repeat until your satisfied with the final results. Good luck.
-
What are You using As A Clear Topcoat
69NovaYenko replied to 69NovaYenko's topic in Model Building Questions and Answers
Sandboarder my modeling brother from the land down under the Mr Hobby Super Clear is looks quite impressive. Ive seen it in the paint rack at my LHS. I`ll have to pick up a bottle and give a try on my next lacquer paint job. -
What are You using As A Clear Topcoat
69NovaYenko replied to 69NovaYenko's topic in Model Building Questions and Answers
Plowboy I appropriate you setting me straight on the fact that Pledge WILL yellow over time..particularly when sprayed over "white" color coats. -
What are You using As A Clear Topcoat
69NovaYenko replied to 69NovaYenko's topic in Model Building Questions and Answers
StevenGuthmiller many thanks for the followup tips. After seeing your results I`ll have to give it a try on my next lacquer project.👍 -
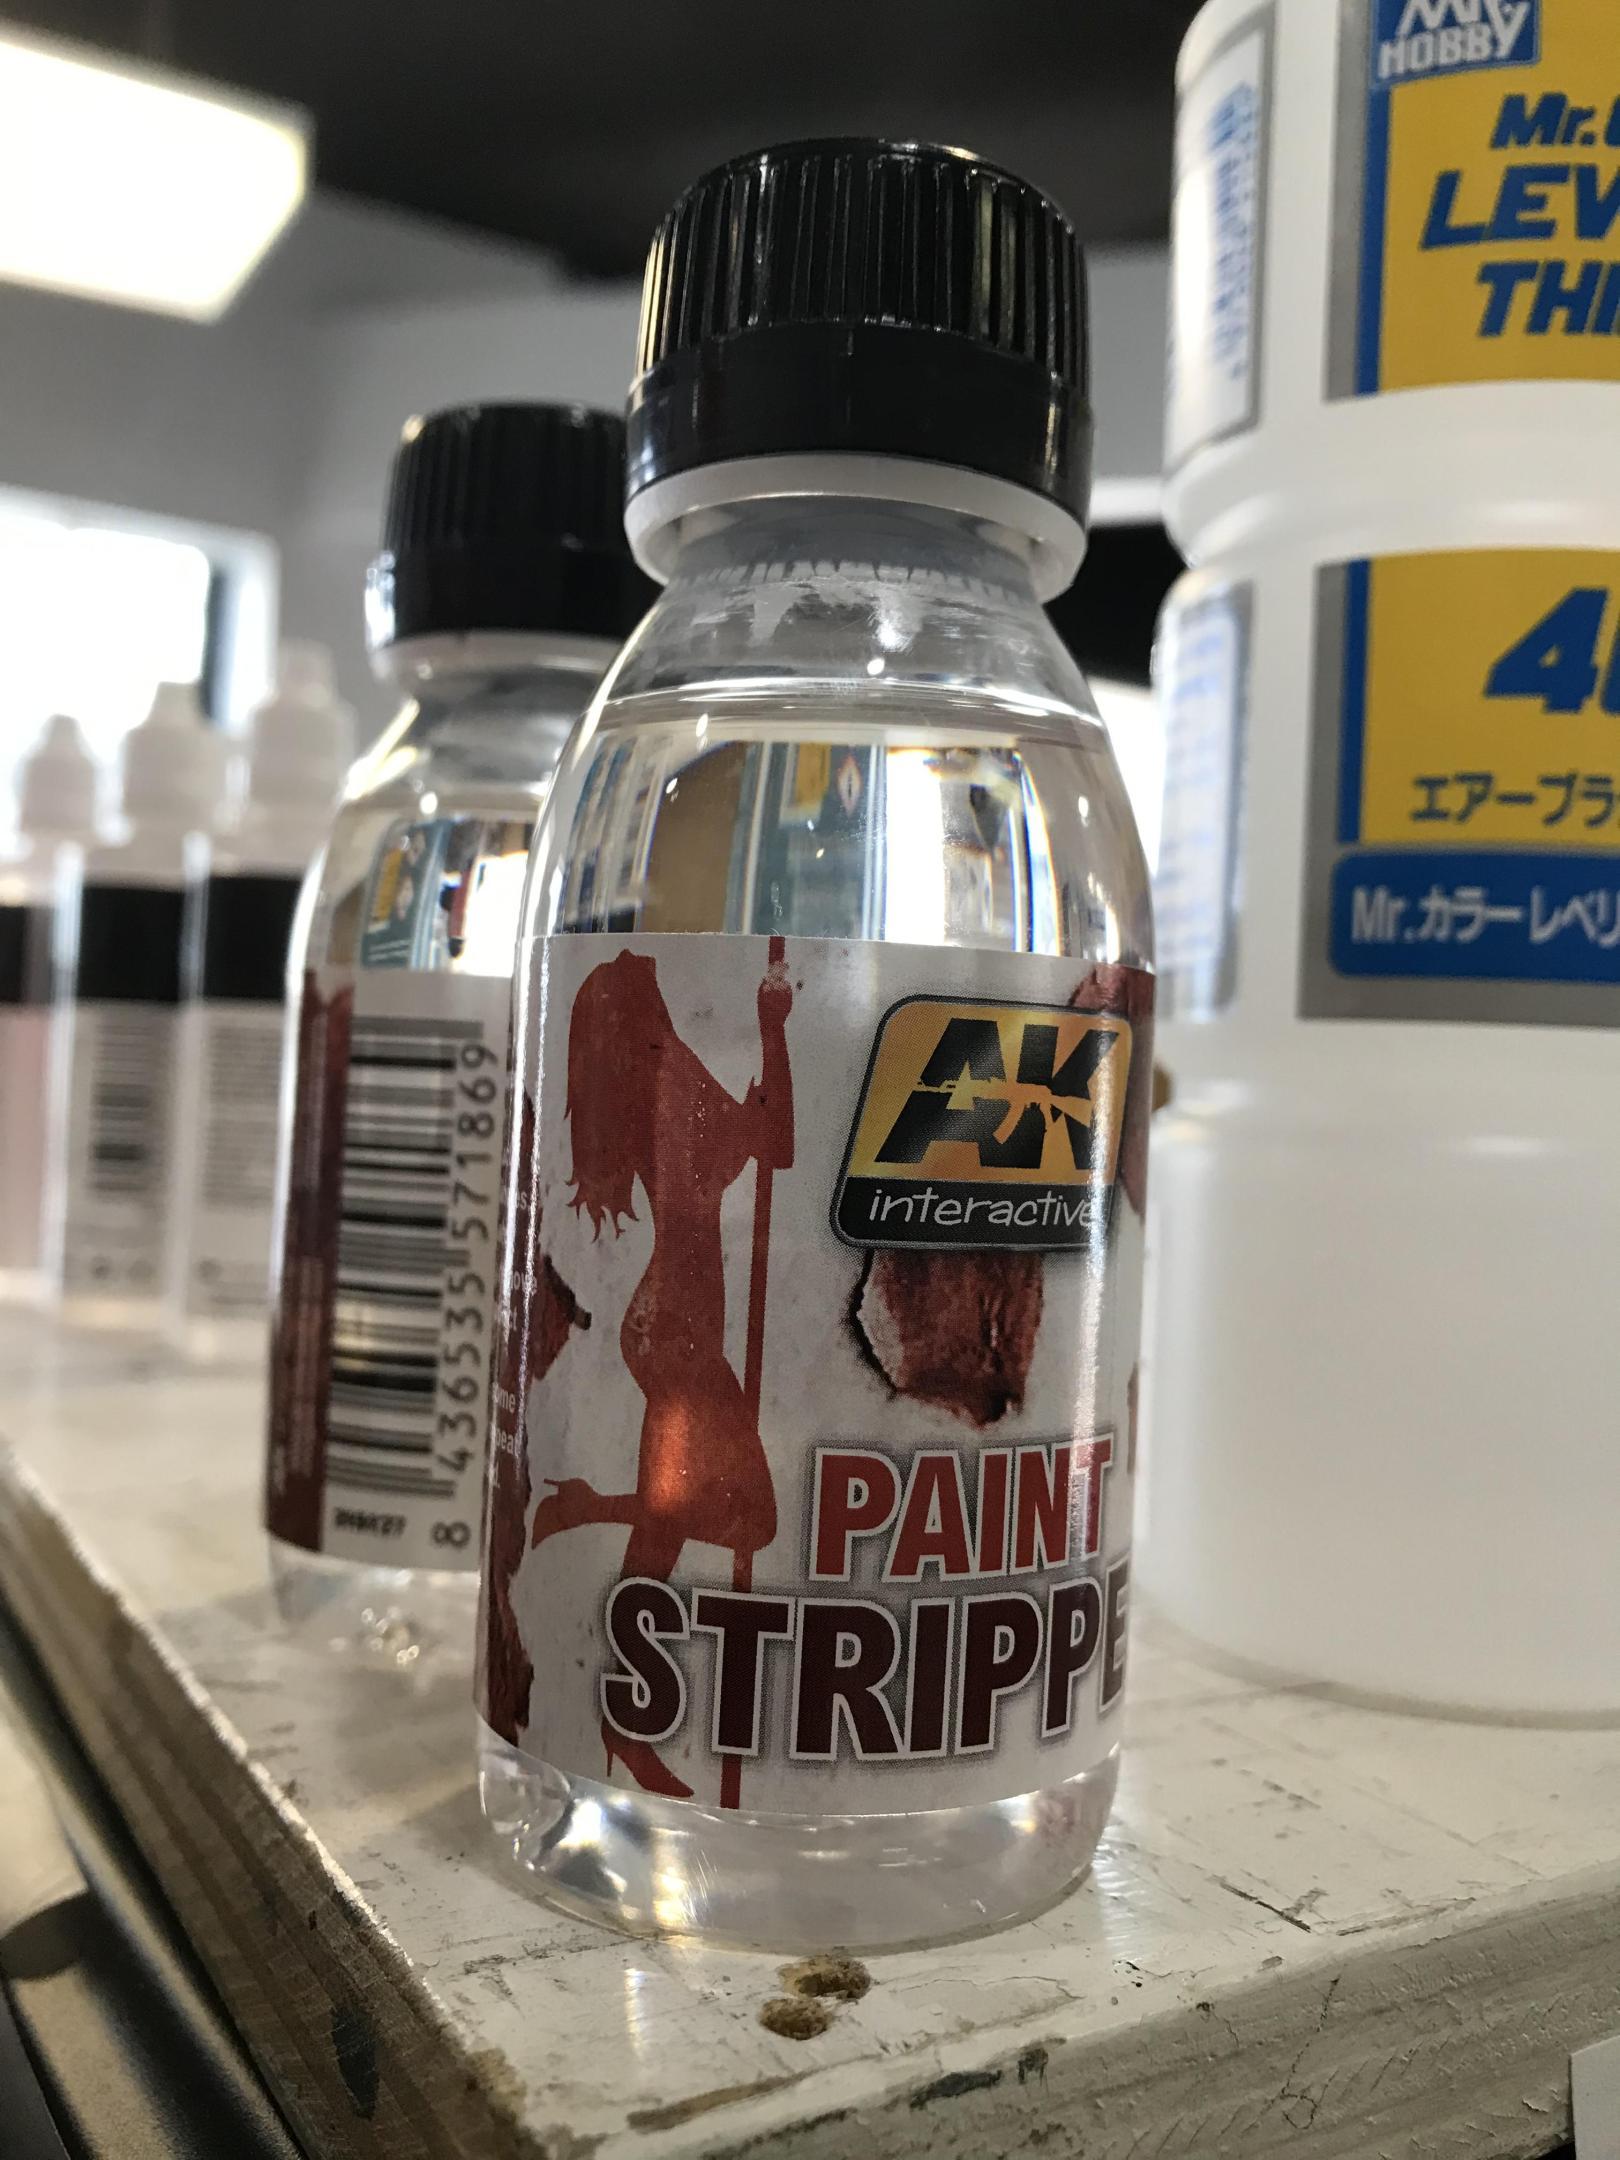
Ak Interactive Paint Stripper
69NovaYenko replied to 69NovaYenko's topic in Model Building Questions and Answers
yh70thanks for sharing the YouTube clip..it was very informative!!! -
What are You using As A Clear Topcoat
69NovaYenko replied to 69NovaYenko's topic in Model Building Questions and Answers
WOW...StevenGuthmiller what an AWESOME finish...it looks 7miles deep!!! 😍By the way what are you using to polish out the Duplicolor Clear Protective Top Coat???? Also, do you know if it will yellows with the passing of time, in particularity white color coats? -
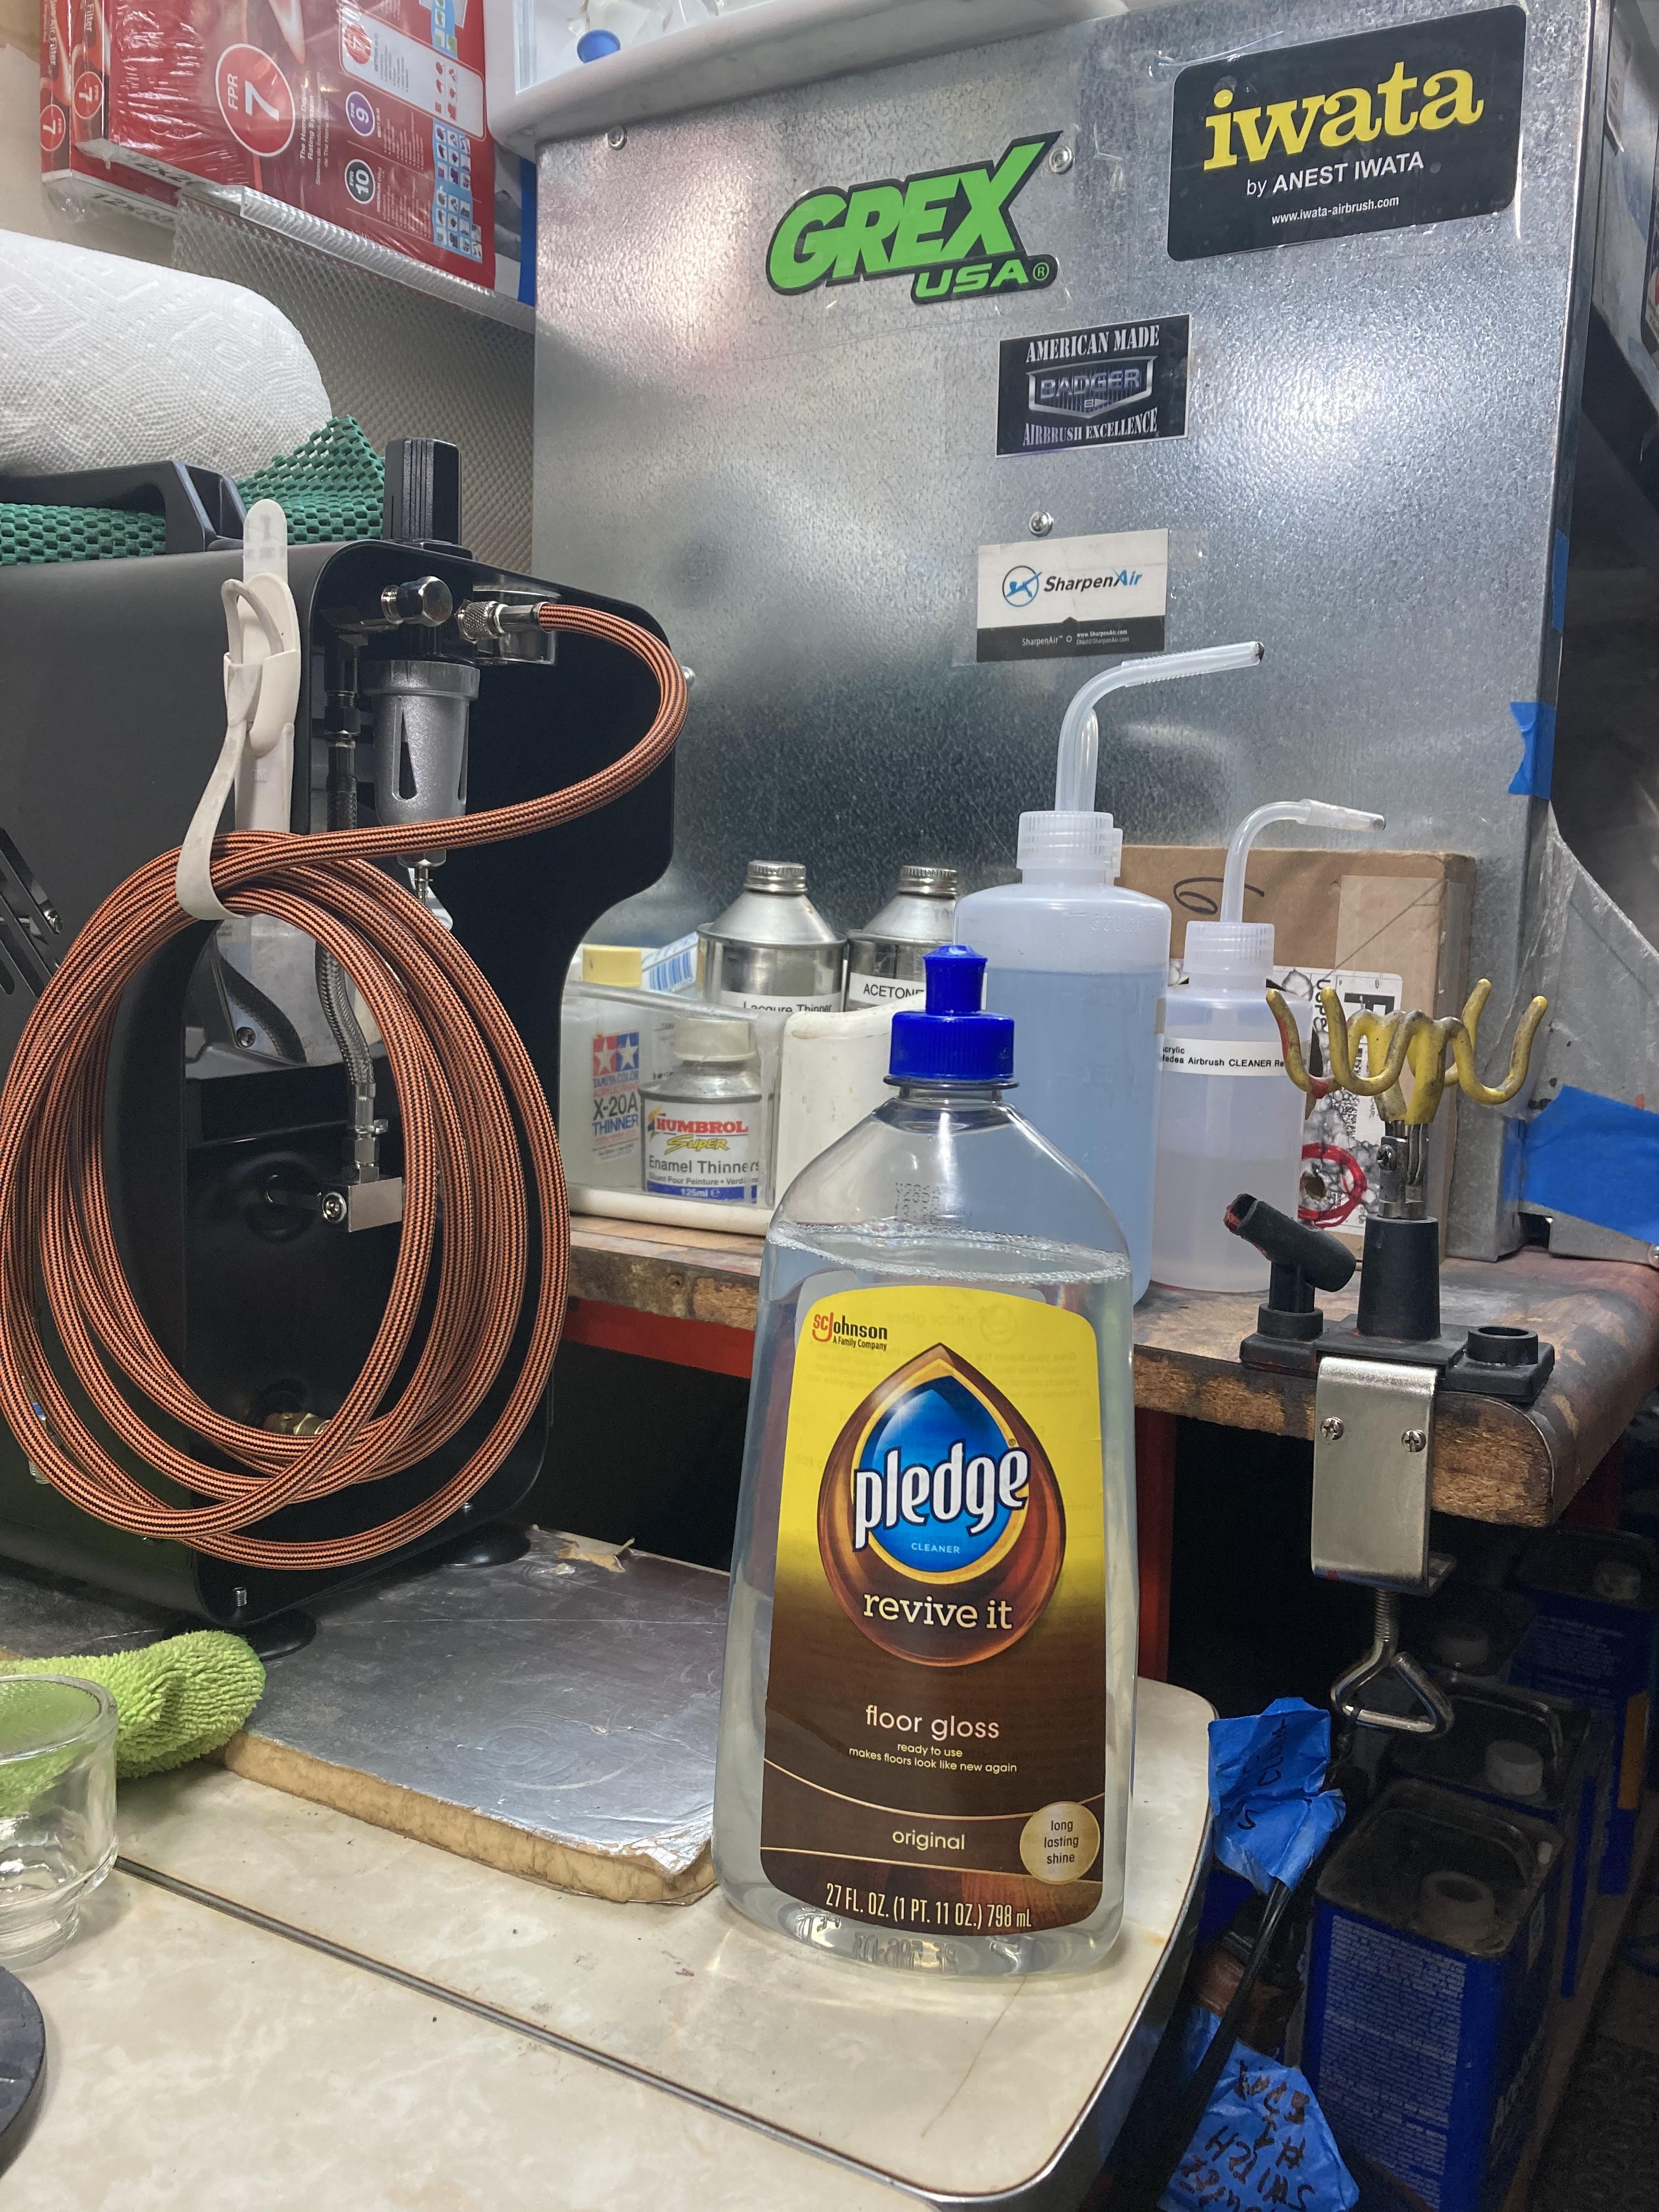
Because its a because non-yellowing and self-leveling, I`ve been airbrushing Johnson & Johnson Future aka Pledge Revive It Floor Gloss as a clear top coat for awhile. Also, its not to hot for ANY kind of base color coat; be it lacquer, acrylic,enamel etc PLUS it will not harm decals. However, I`m interested in venturing out of my comfort zone and trying other clear coats that are airbrush-able. I prefer airbrushing because you have far more control of the spray output and it`s more cost effective than rattle can. So I`m interested in what you good folks are using as a clear top coat. All suggestions and input are welcomed. Thanks for replying in advance.
-
Has anyone had a chance to use Ak Interactive Paint Stripper. If so what was your experience using it.
-
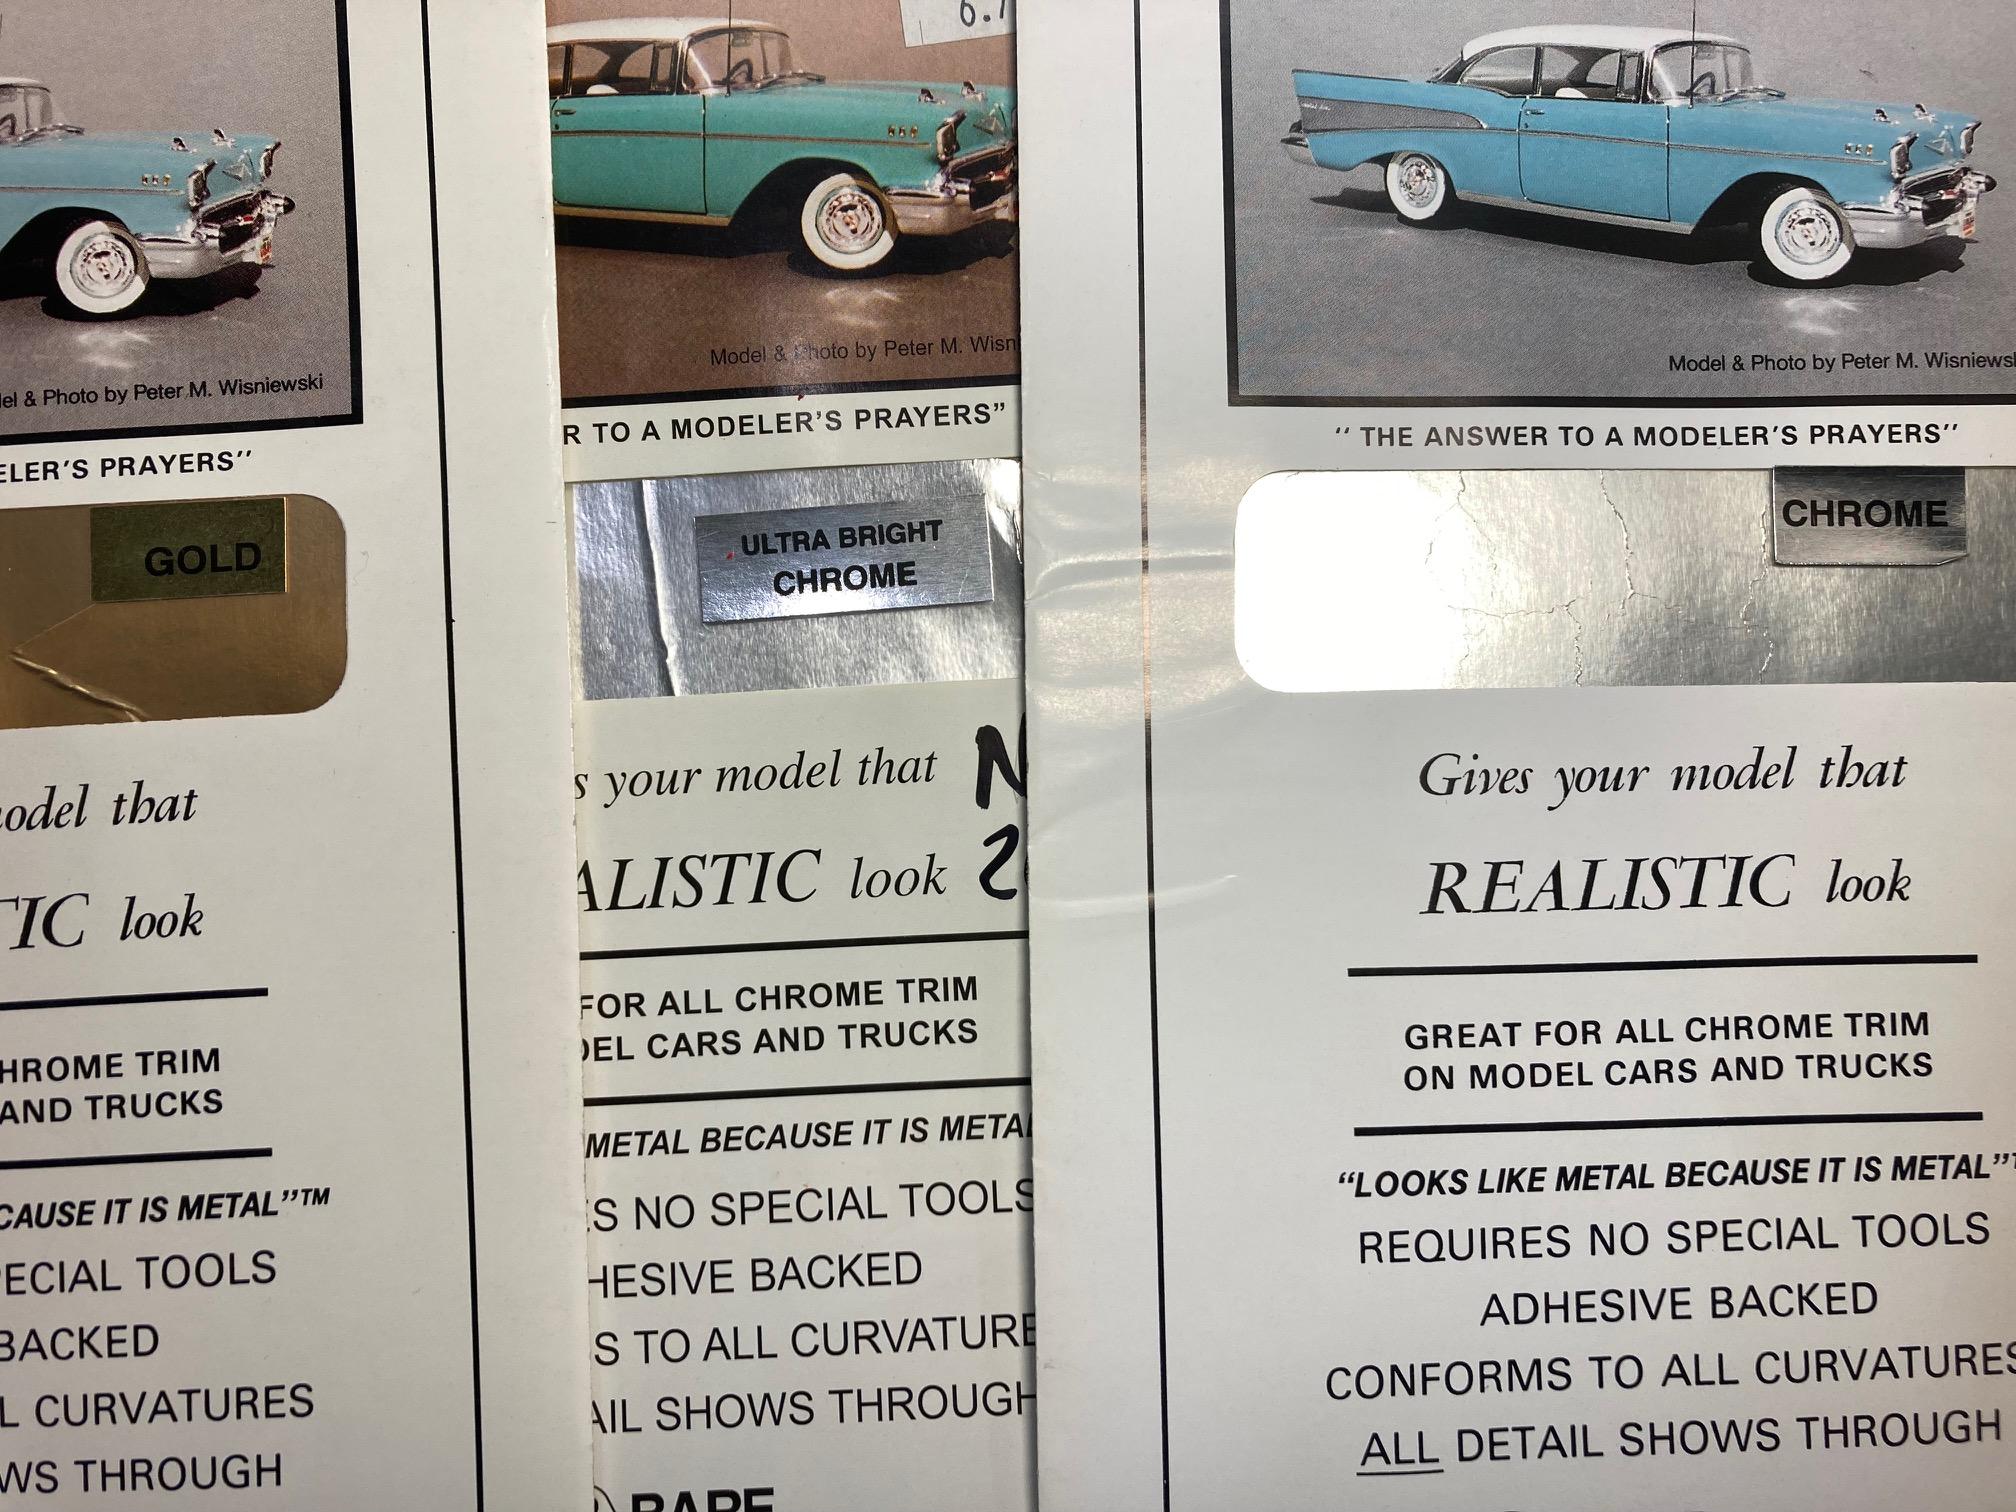
What Do You Use To Replicate Chrome Trim
69NovaYenko replied to 69NovaYenko's topic in Model Building Questions and Answers
Thanks for the tip. I will have to try it. The chrome on your completed projects look very good. Leica007 I`m not familiar with HVAC tape. However, I really like the results & look of the tape. With a little searching I was able to find it on Amazon. I will be ordering a roll to try it out. Once it gets here I may reach out to you again for additional how to use it tips & tricks. I`m VERY impressed with how the HVAC tape conformed to the Gremlin logo. Your projects also have awesome looking chrome as well!!!! Jon Cole Thanks for the helpful advise and how to apply Bare Metal Foil technique tips. -
What Do You Use To Replicate Chrome Trim
69NovaYenko replied to 69NovaYenko's topic in Model Building Questions and Answers
Sandboarder I have already placed an ordered for some however it appears to be on it way to me via a VERY SLOW boat from overseas, but once it arrives I planning on giving it a spin. Thanks for the suggestion. -
What Do You Use To Replicate Chrome Trim
69NovaYenko replied to 69NovaYenko's topic in Model Building Questions and Answers
First thank you one & all for responding to my post. My completed projects are NOT fingered by myself or viewers. Even contest judges rarely pick up or finger completed projects. Finished projects spend 99.99% of their life in a display case. Once completed the the chrome trim (aka Bare Metal Foil) along with any supporting decals & photo-etched parts are lightly overstayed & hermetically sealed to body with a non-yellowing clear acrylic. This is to protect the paint, decals, photo etched parts, foil (or alcohol-based metallic paints) from fingerprints, dust and the ravishes of time. I`m aware number of you leave you chrome trim, decals & photo-etched parts naked to the world..which is fine but, that`s not how I wish to roll. I`ve wrestled with Bare Metal Foil Chrome, Ultra Bright Chrome as well Gold, off and on since 2014. True, it looks good when finished. However; that doesn't change the fact that it's finicky & a royal pain to work with. Not to mention I`m still uneasy with running a fresh sharp X-acto blade over my 99 % finished project. Because ,I do not wish to re-strip body, hood etc and start over with sanding, priming, color coating due to an accidental slip of a sharp blade. I have tinkered with some of the alcohol-based metallic paints on junk bodies and found several of them to be clear acrylic friendly. Testing on junk bodies has also revealed low percentage alcohol or non-ammonia window cleaner will clean up Ooops as long as you don't allow it to dry and the color coat is not a flat or matte finish. So, I was surveying the group to see what other chrome trim options were out there beyond Bare Metal Foil. StevenGuthmiller gets were I`m coming from. Again thanks for the replies and unbiased input.
-
I have used Bare Metal Foil on several projects and have found it to be a ROYAL pain to apply properly. Additionally, I`m neither comfortable nor thrilled with the prospect of putting a fresh X-Atco blade (which is required to trim excess foil off) on body panels after spending hours sanding, priming and shooting multiple coats of color. Oh.. let me not forget to mention Bare Metal not wanting to stick to body (I know..I know.. it means the foil is old & is losings it tackiness). I`m looking for a BETTER alternative to Bare Metal!!! So I ask what have you good folks been using on your chrome trim around the windshields, roof line rain gutters, rocker panels fender well openings and body-side moldings.
-
That's one sweet looking ride. LOVE the color. What did you use on the chrome trim, around the windshield, rain gutters, rocker panels and body-side moldings.
-
The one I have was cast by Scale Coachwork out of Milwaukee off Ebay several years ago. It took me a bit of time to get my hands on all the necessary donor kits (at a reasonable cost) to build this subject. Your post made me dig it out of my stash ...I think this will be the next one up at bat...once I finish the one that`s currently on the work bench....
-
Ok then after cleaning airbrush with Lacquer do you run a finale pass through the gun with water to rinse the cleaning solvent out..
-
I was wondering what you good folks have been using successfully to clear the above mentioned products from you airbrush. I have read several online articles & view a number of YouTube clips on the matter. It summation it appears Lacquer Thinner, Acetone, Ammonia (used to clear gun of Future sprayed as a clear coat) are ALL bad for the longevity of your airbrush seals and packing. Some of these even attack the brass wall of gun or outer chrome plating. One online article stated quote:"...acetone should not be considered a fix, for removing enamel, lacquers from your airbrush, in the long term it will have a detrimental effect on your airbrushes internal rubber and plastic components." Note: Acetone is what is recommend for clearing Alclad II from you airbrush. Then I read a 2007 FSM post that stated..." I use Windex almost exclusively for cleaning "Acrylic paint" and "Future" out of my airbrush. Windex or any other ammonia-based window cleaner will work fine. It's the ammonia that does the trick, the water just washes the ammonia away. It`s the Ammonia that really works to clean Future from your airbrush. Windex without ammonia will not work.." Note: I viewed this YouTube clip featuring Grex Airbrush Representative stating Ammonia does not play nicely with airbrushes electroplated brass interior. But he does recommend Lacqure Thinner as a good go to for cleaning up after a paint session. Another 2019 post In FSM stated quote: "...best product/substance for cleaning Future (Klear) out of your airbrush after clear coating session is Alcohol with a final flush of water...." Another 2019 ARC post stated quote "...never used Acetone...I doesn't play nicely with inner brass bodies of airbrush so proceed with caution. First there is paint thinner, then lacquer thinner which is stronger than paint thinner and then Acetone; as you move toward acetone, the type of thinner gets stronger and more destructive. Every air brush is different so just use your best judgment. I use Tamiya X-22 clear gloss. I tried & love the stuff, I'll never go back to Future...." I could go on & on & on but you get the idea...there a mixed options out here. So, I`m hoping to get a bit more clarification from you seasoned air gunners on the matter.
-
Airbrush Cleaning-Ultrasonic Cleaner
69NovaYenko replied to 69NovaYenko's topic in Model Building Questions and Answers
Putting the internal parts that come in direct contact with paint (not the entire airbrush body..because of the internal seal) in a mason jar and the jar in the ultra sonic cleaning machine sounds like an interesting approach. I wonder if the does that with the lid on or off the jar. And, I wonder would an empty baby food jars work . -
By all means please give us your 2 cents . I like the way you masked off the body.
-
Airbrush Cleaning-Ultrasonic Cleaner
69NovaYenko replied to 69NovaYenko's topic in Model Building Questions and Answers
Off the cuff if you're shooting lacquers or enamels I`m not sure if Dawn & plain tap water will remove any residue. I did have someone (who exclusively shoots acrylics) tell me they use Windex "WITHOUT" ammonia in their sonic cleaner. Supposedly, the ammonia will start to eat away at the guns chrome plating with prolonged baths. As for using Super Clean I I first want to inquire if it will remove lacquer & enamel paints. Then secondly if it does what's the best dilution ratio. Because I have concerns about damaging thee guns seal. -
I was wondering if anyone was using an Ultrasonic Cleaner to DEEP clean their airbrush. If so what has been your experience. What is the best non-combustible cleaning solution that will clear lacquer/acrylic/enamel paints out of your gun. Any tips or insights are welcome. Thanks in advance for looking at this post. Ps: I was think about using Super Clean because its non-combustible but I`m not sure if it is safe to used on airbrushes chrome plating and internal metals etc. And, if its safe to use on gun should it be used at full strength or diluted.