Bren
-
Posts
126 -
Joined
-
Last visited
Content Type
Profiles
Forums
Events
Gallery
Everything posted by Bren
-
AMT Exterior Post Doubles Vans
Bren replied to Bren's topic in WIP: Model Trucks: Big Rigs and Heavy Equipment
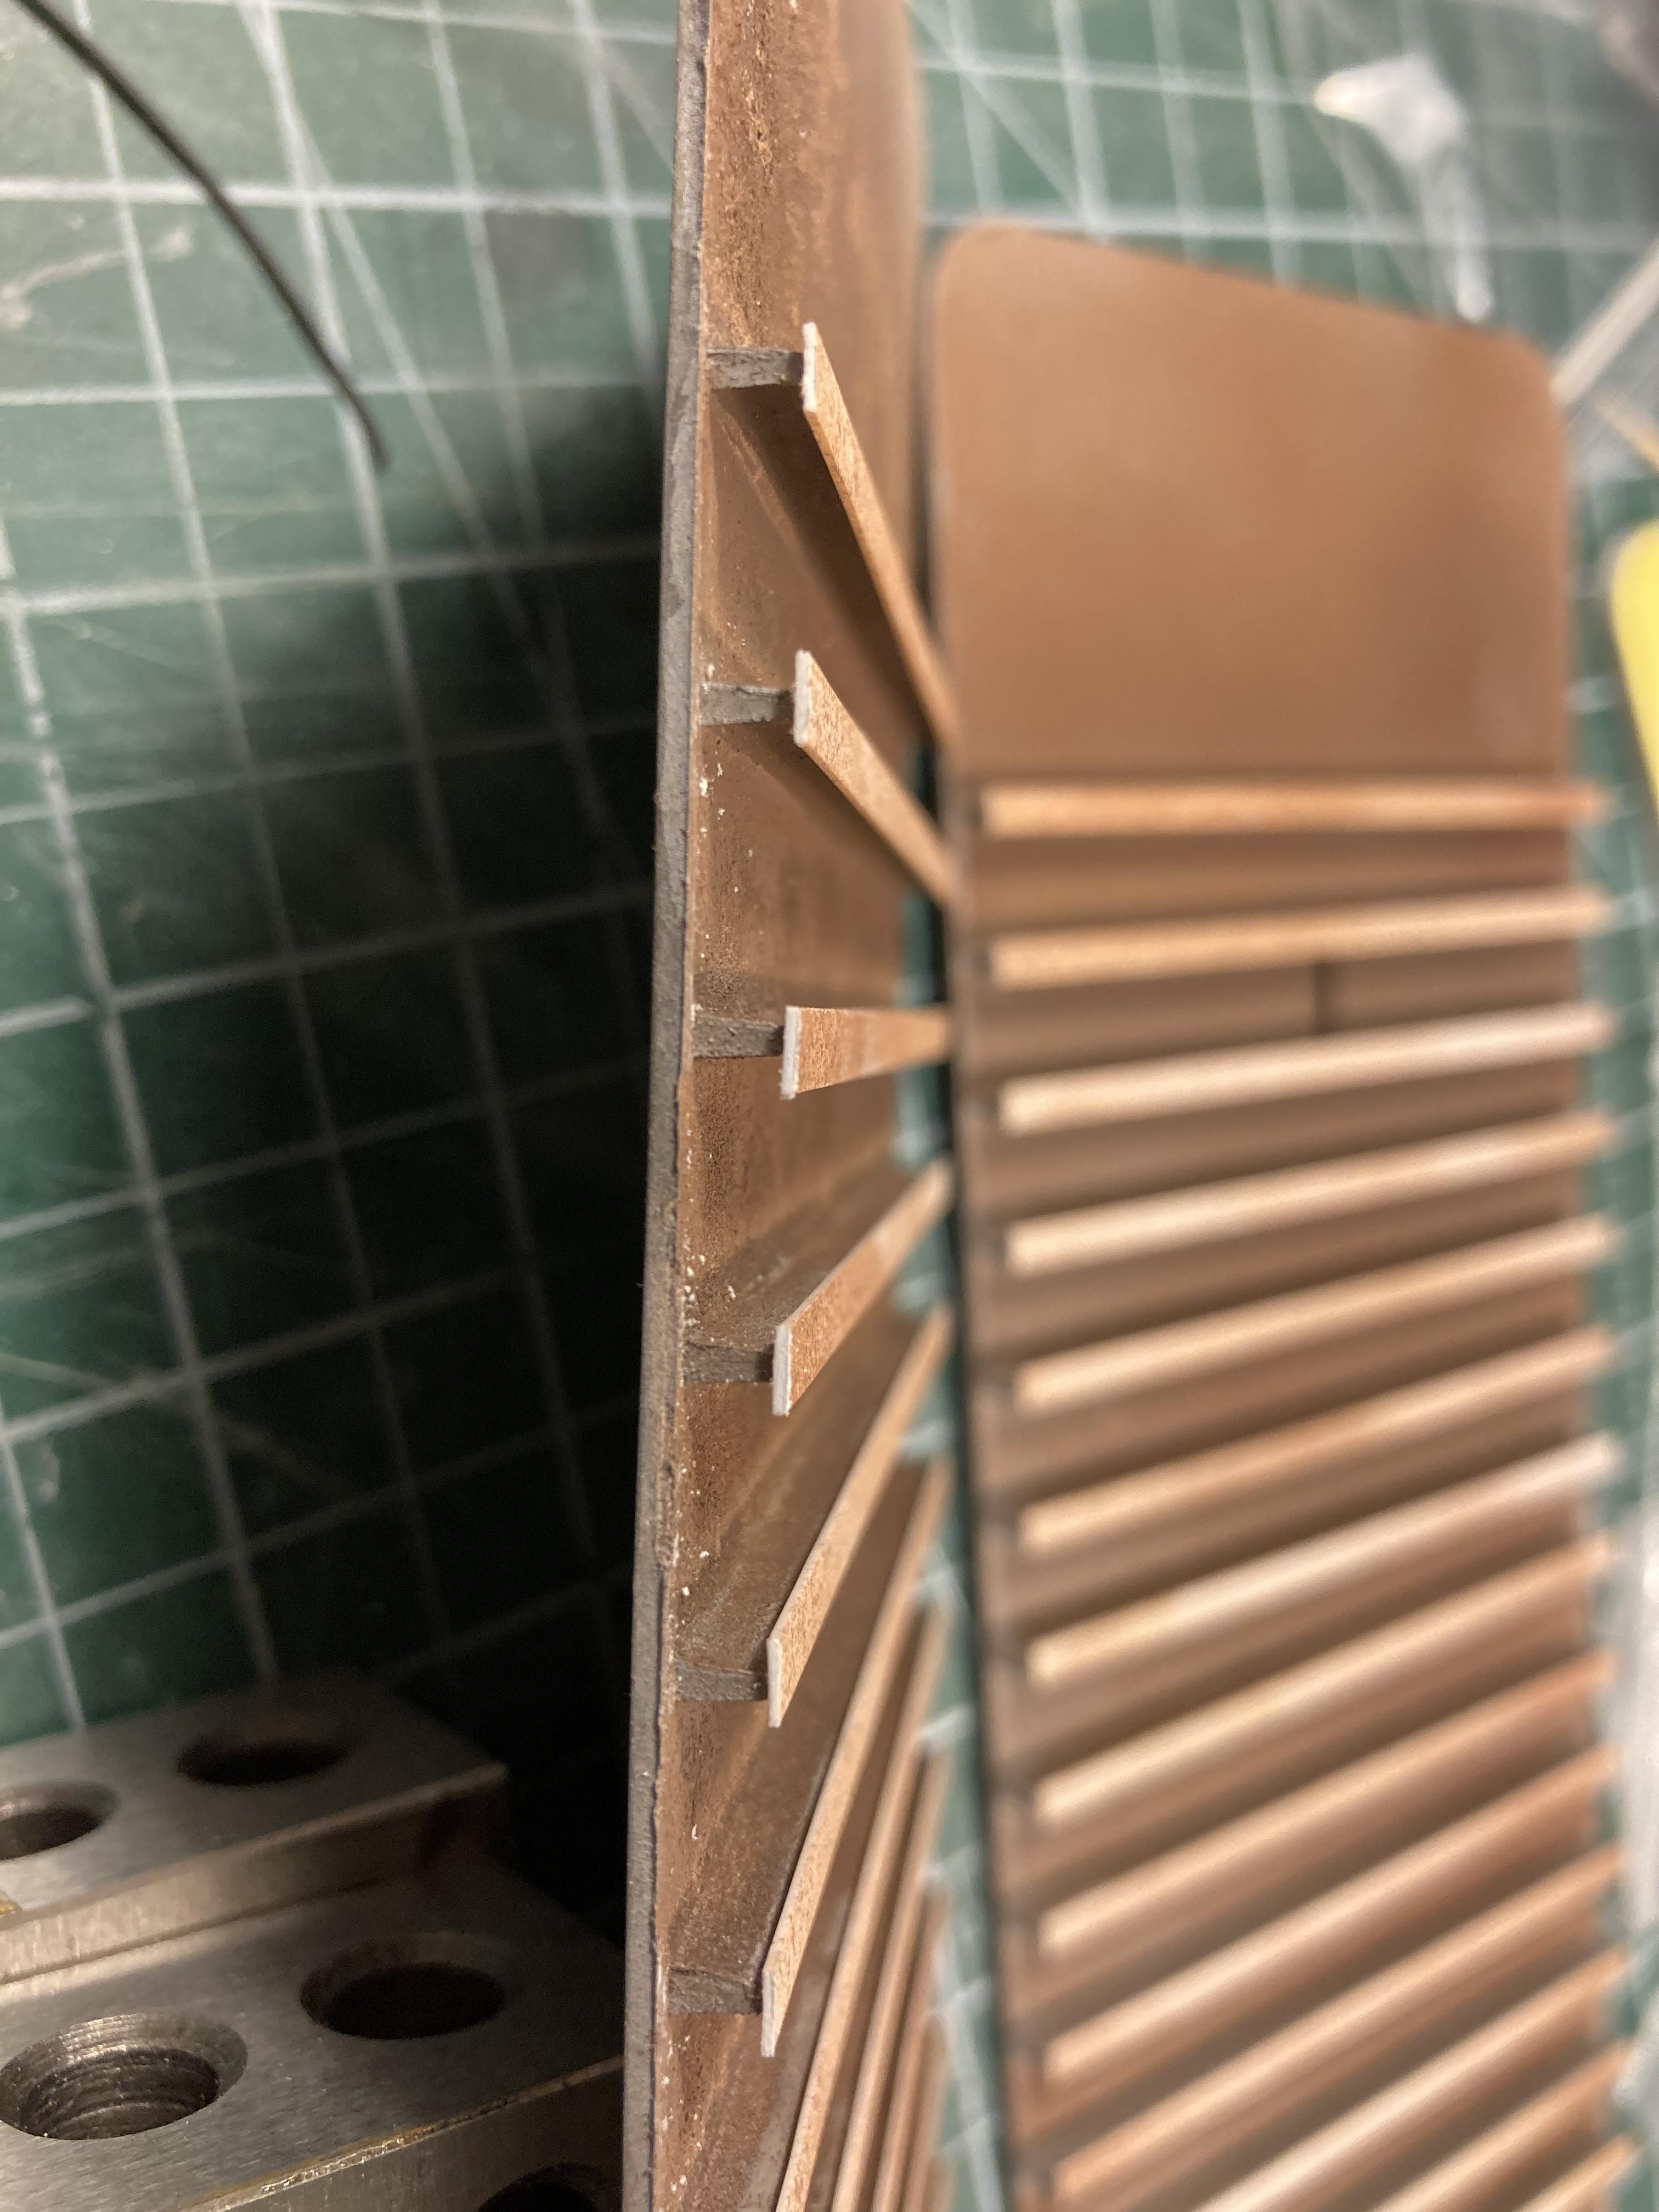
Finishing up the trailer sub-frames and the dolly. Just need to plumb and wire them now.
-
AMT Exterior Post Doubles Vans
Bren replied to Bren's topic in WIP: Model Trucks: Big Rigs and Heavy Equipment
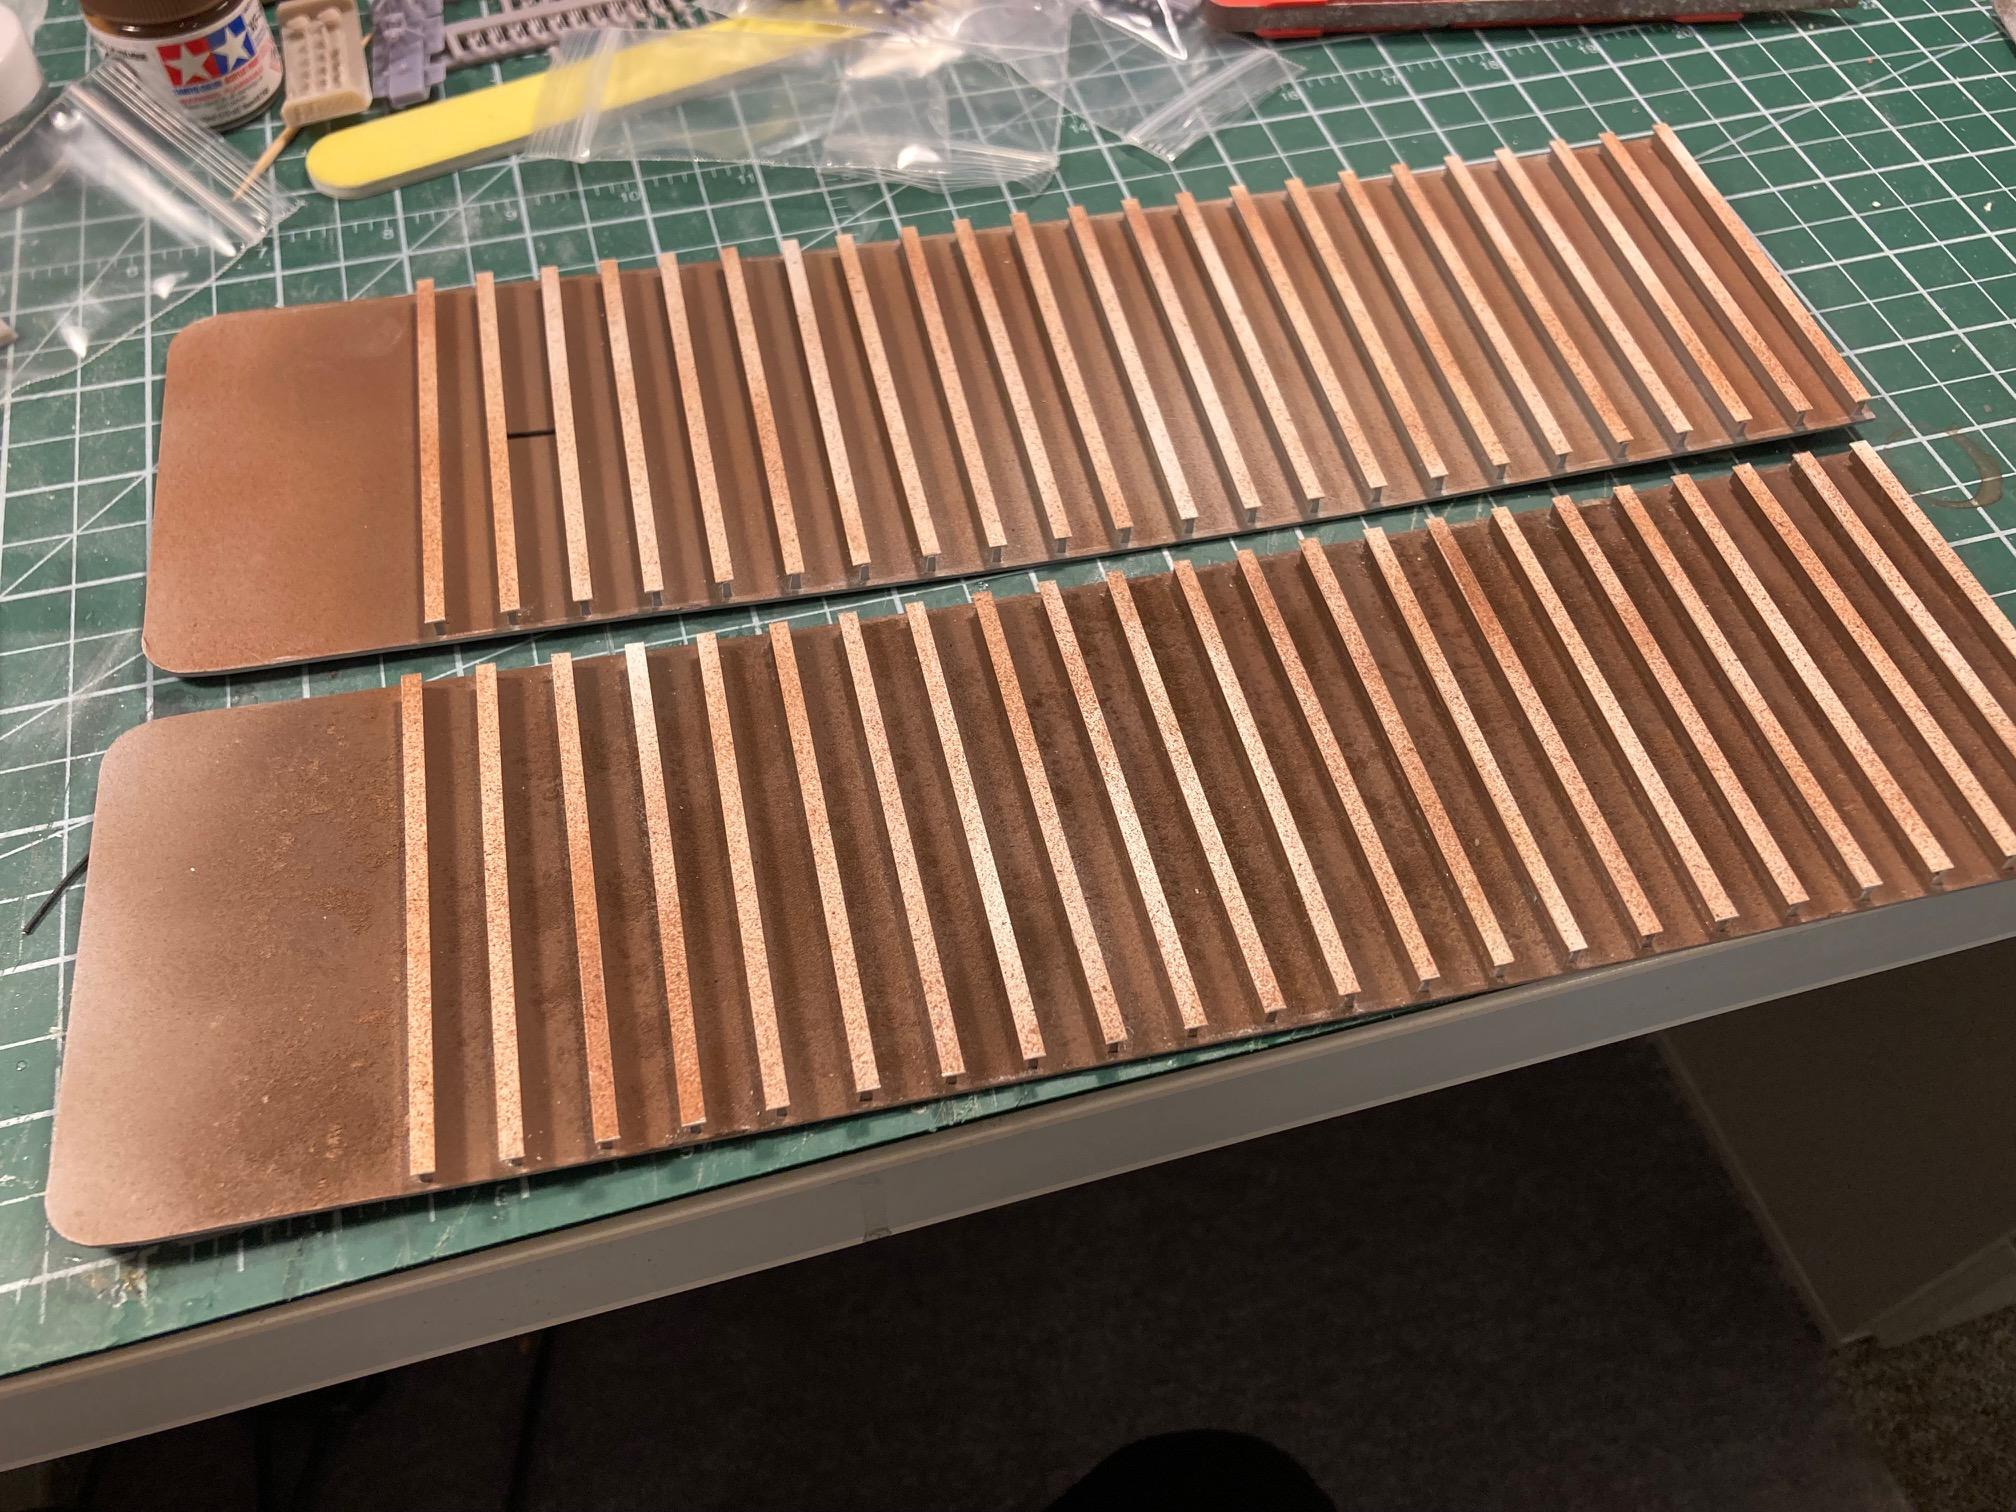
I'm back at the bench this week so I thought I'd post some more pictures of the AMT doubles build. I never liked the simplified representation of the beams across the bottom - for simplicity AMT left the edge off them (see real trailer below) - so I cut a series of .015 x .125 Evergreen strip to correct it. Just finishing the weathering.
-
Western Star 4900 FA plow truck
Bren replied to BK9300's topic in WIP: Model Trucks: Big Rigs and Heavy Equipment
At risk of waxing too philosophical Brian, my submission would be that you are highlighting the difference between an artist and a draftsman. I have always contended that what we do when we build models is create “constrained art”. We decide to accentuate certain things, and omit or modify others. How each of us choose to interpret the raw materials of a kit or scratch built replica is what marks us an artist - and why we love looking at someone else’s work. How did they represent this or that - not whether they succeeded in slavishly reducing the size of a 1:1 object. Your entire project is art, in my view- you have interpreted the real object in a very creative way - I LOVE looking at your updates. Yup - the bumper isn’t dead square - gives the subject character and, as Biggu points out, it can distort that way if stressed in the real beast. My Diamond Reo hood wasn’t quite square to the bumper - which drove me crazy, until I noticed a lot of 1:1 Diamond had exactly that happen over time. So - don’t let it drive you crazy - I think if we could perfectionistically eliminate the least little variation in our work it would render it paradoxically very boring! Keep trucking brother! -
Kenworth 925 - Strato Models
Bren replied to carsntrucks4you's topic in WIP: Model Trucks: Big Rigs and Heavy Equipment
This is brilliant work Michael. This is exactly where I’m stuck with my Peterbilt 353 project - I tried a modified styrene hood but it didn’t look any good. I’m trying to work up the courage to make one in brass - but I don’t have any metal-working skills. Did you use a buck to shape it? What gauge brass did you use? -
Everyone seems to be talking about something different on this thread🫣. Sorry if I caused the confusion. I thought you were looking for wrecker parts in 1/32. However as Jurgen points out - you can print in any scale - these are actually 1/25 as published - and could be printed 100% for 1/25. I was just enquiring if these were the sorts of parts you were looking for. If they are - they are available on Cults. If not - no worries - just ignore. And yes - this is a great build! Nicely done.
-
International 9670 KFS
Bren replied to Hessel Hemstra's topic in Model Trucks: Big Rigs and Heavy Equipment
I love this build Hessel. Which Italeri kit did you use as a donor? -
Hey Scott - sorry I’m not up on my wrecker types. Would either of these function for your needs? Holmes 550 I believe. They could be printed in 1/32.
-
Hakan, I just have to say your knowledge base is amazing. Every time you post I learn something new. Thank you!
-
And speaking of trucks that look like motels - did you see Alfa Centauri has a new hi-rise Kenworth out on Cults?
-
Nicely restored. I, too, love the trailer, and would like more details on the ‘how’. Congrats!
-
Great to see your 3D skills growing by leaps and bounds Ron. This is a great example of a subject that will never be kitted being made possible through this new technology - and you’ve done a fantastic job of it. Keep inspiring all of us Ron!
-
Restoration project
Bren replied to cdntrucking's topic in WIP: Model Trucks: Big Rigs and Heavy Equipment
I’ll take you at your word when you said advice or suggestions welcome😜. As a guy fond of weathering, my own golden rule is “less is more”. These trucks can cost a better part of a million dollars, so owners don’t like to see them looking like mud-boggers. To say nothing of getting a ticket for pelting motorists with rocks and mud! The Tamiya line of weathering chalks are reasonably cheap and produce subtle effects. You apply them with a make-up foam wedge available at any grocery store, and fix in place with matte clear coat. Dry brushing is another simple technique to bring out the tire lettering and edges - experiment on some spares. I like Tamiya buff on an old brush almost dry. Pin washes with dilute flat black can make panel lines pop and there are specific panel line washes for sale if you don’t want to mix your own. A TINY bit of gloss black carefully applied is great for oil stains around the engine or greased joints. Another technique is to experiment with “streaking” - there are YouTube videos on that - but it involves oil paint like burnt umber, applied very sparingly, thinned with appropriate solvent, and drawn downward across body parts where rain would naturally streak dirt. Or fuel filler necks - but again - less is more. I’ve seen some model fuel tanks looking like the trucker got more on the ground than in the tank! I see you’ve done a nice job on your fuel tanks there and even have the rubber gasket under the strap. Your trailer main beam also looks nicely detailed with some chipping where the air hose supports rub. You might want to try some powder on the air hoses to damp down the dark black. A standard trick which can look great is to mask the windshield wiper pathway and lightly fog a dusty colour with your airbrush. Peel off the mask and you’ve got shiny ‘glass’ where it would realistically be. This may be too late for you as your wiper blades are already in place. Chipping and rust are advanced techniques which need practice - but both can be used to great effect when done right. AK makes an extensive line of rust products - and it goes without saying but I’ll say it anyways - consult 1:1 pictures to see where rust realistically develops - usually high wear points on steel parts. Careful - fibreglass and aluminum don’t rust - I’ve seen attempts to ‘rust’ fibreglass hoods and aluminum fuel tanks and the like. Oops! I hope these little suggestions help Lewis. This is a great build - clean, visually interesting and great colour selection. A tiny bit of weathering would be the finishing touch. Thanks for entertaining my suggestions. -
Ron is correct - depends on what material is used. Most typical for small parts is resin - and water soluble resin tends to be brittle but sands well and takes putty or paint. The dust is an irritant so use a mask/gloves. However - they are bringing out new resins all the time - and the most popular now are the more flexible/tough ones - which I have no experience printing. I suspect water-soluble resin will improve rapidly over the next short while. Not to hijack Jeff’s thread here, but if you want to see what 3D printed small parts can do for your model look at some of the aftermarket threads in this forum. I posted a bunch of examples of 3D truck parts there.
-
You are very welcome Jeff, I had fun printing them. I have spoken to Brian, the wizard of CAD who designed the .stl file and he agreed I should put them up on Cults - the 3D website - so that anyone that wants them can download them. I think that’s the tremendous value of this forum- guys working together to provide something we all want/need for our builds. I’m also going to post his hydraulic pump design and dump-truck tailgate latch - I think lots of us could use those for our builds too!
-
Alaskan Hauler refurbishing project
Bren replied to Jürgen M.'s topic in WIP: Model Trucks: Big Rigs and Heavy Equipment
Gutsy move Jurgen! I get it though- if one of my models isn’t right, it just sits there bugging me to fix it! The larger wheels/tires should really improve the look of your KW. I’ll be watching with interest. -
AMT Exterior Post Doubles Vans
Bren replied to Bren's topic in WIP: Model Trucks: Big Rigs and Heavy Equipment
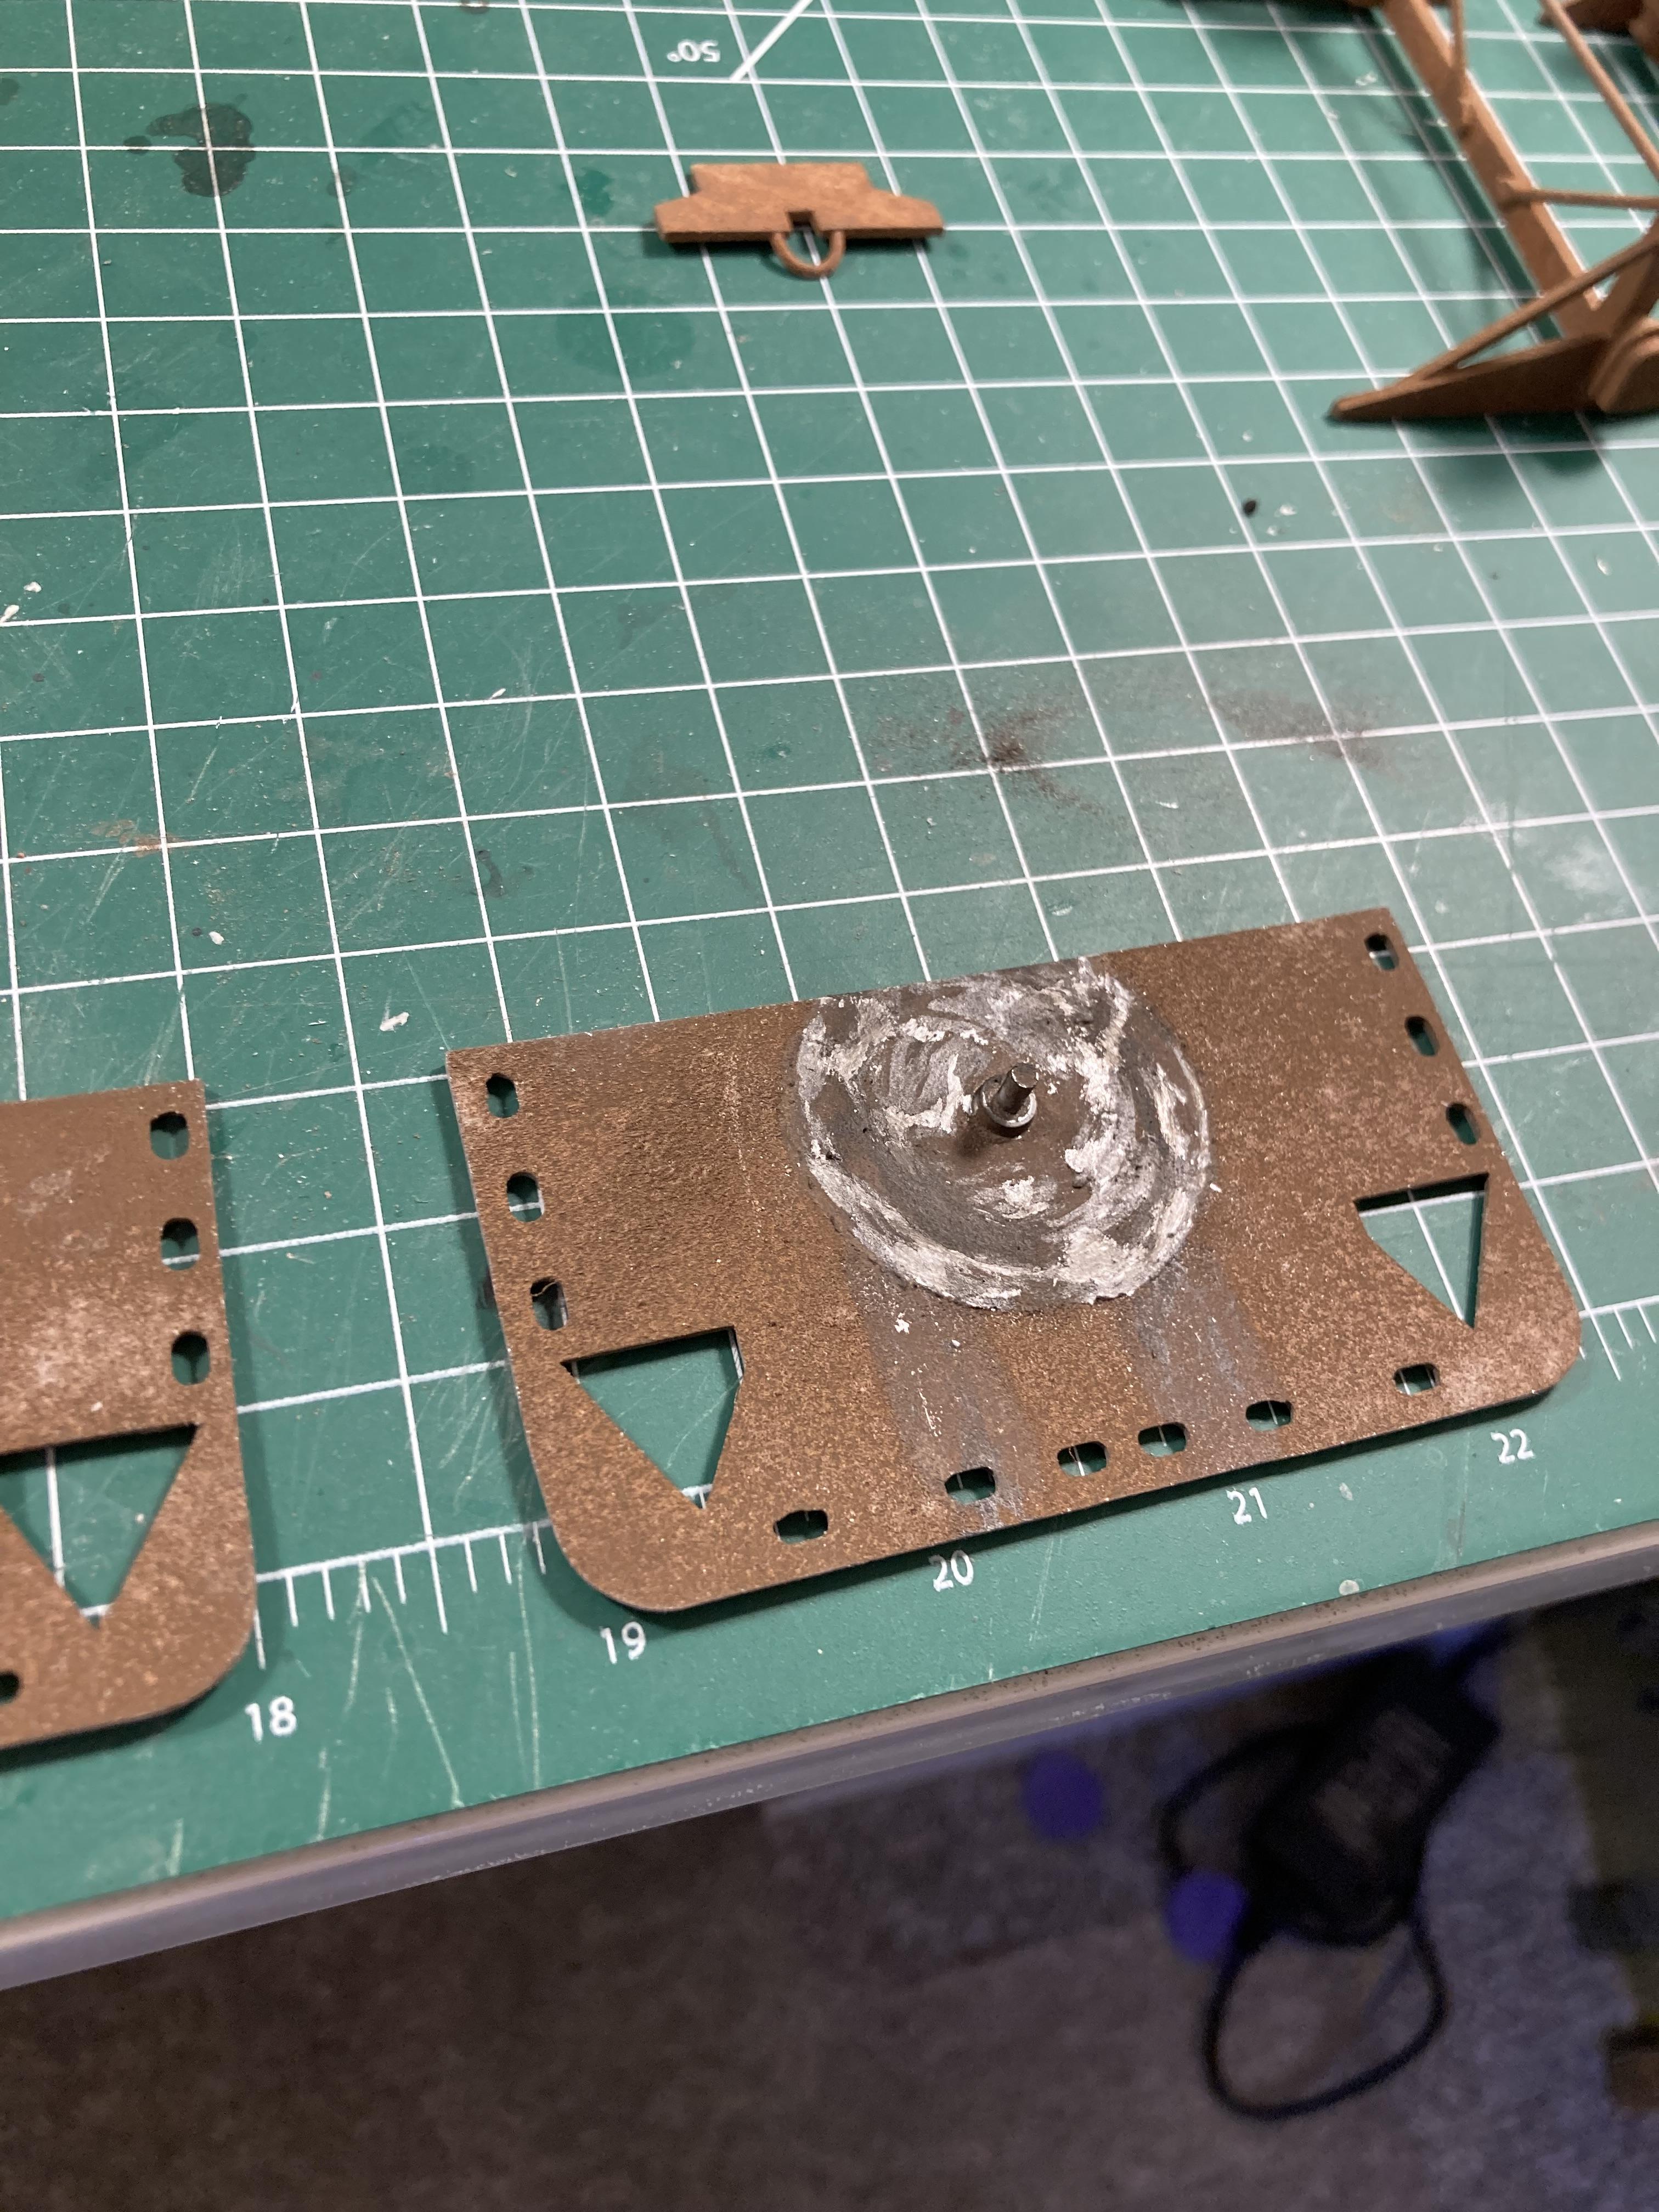
Started on the trailer side panels too.
-
AMT Exterior Post Doubles Vans
Bren replied to Bren's topic in WIP: Model Trucks: Big Rigs and Heavy Equipment
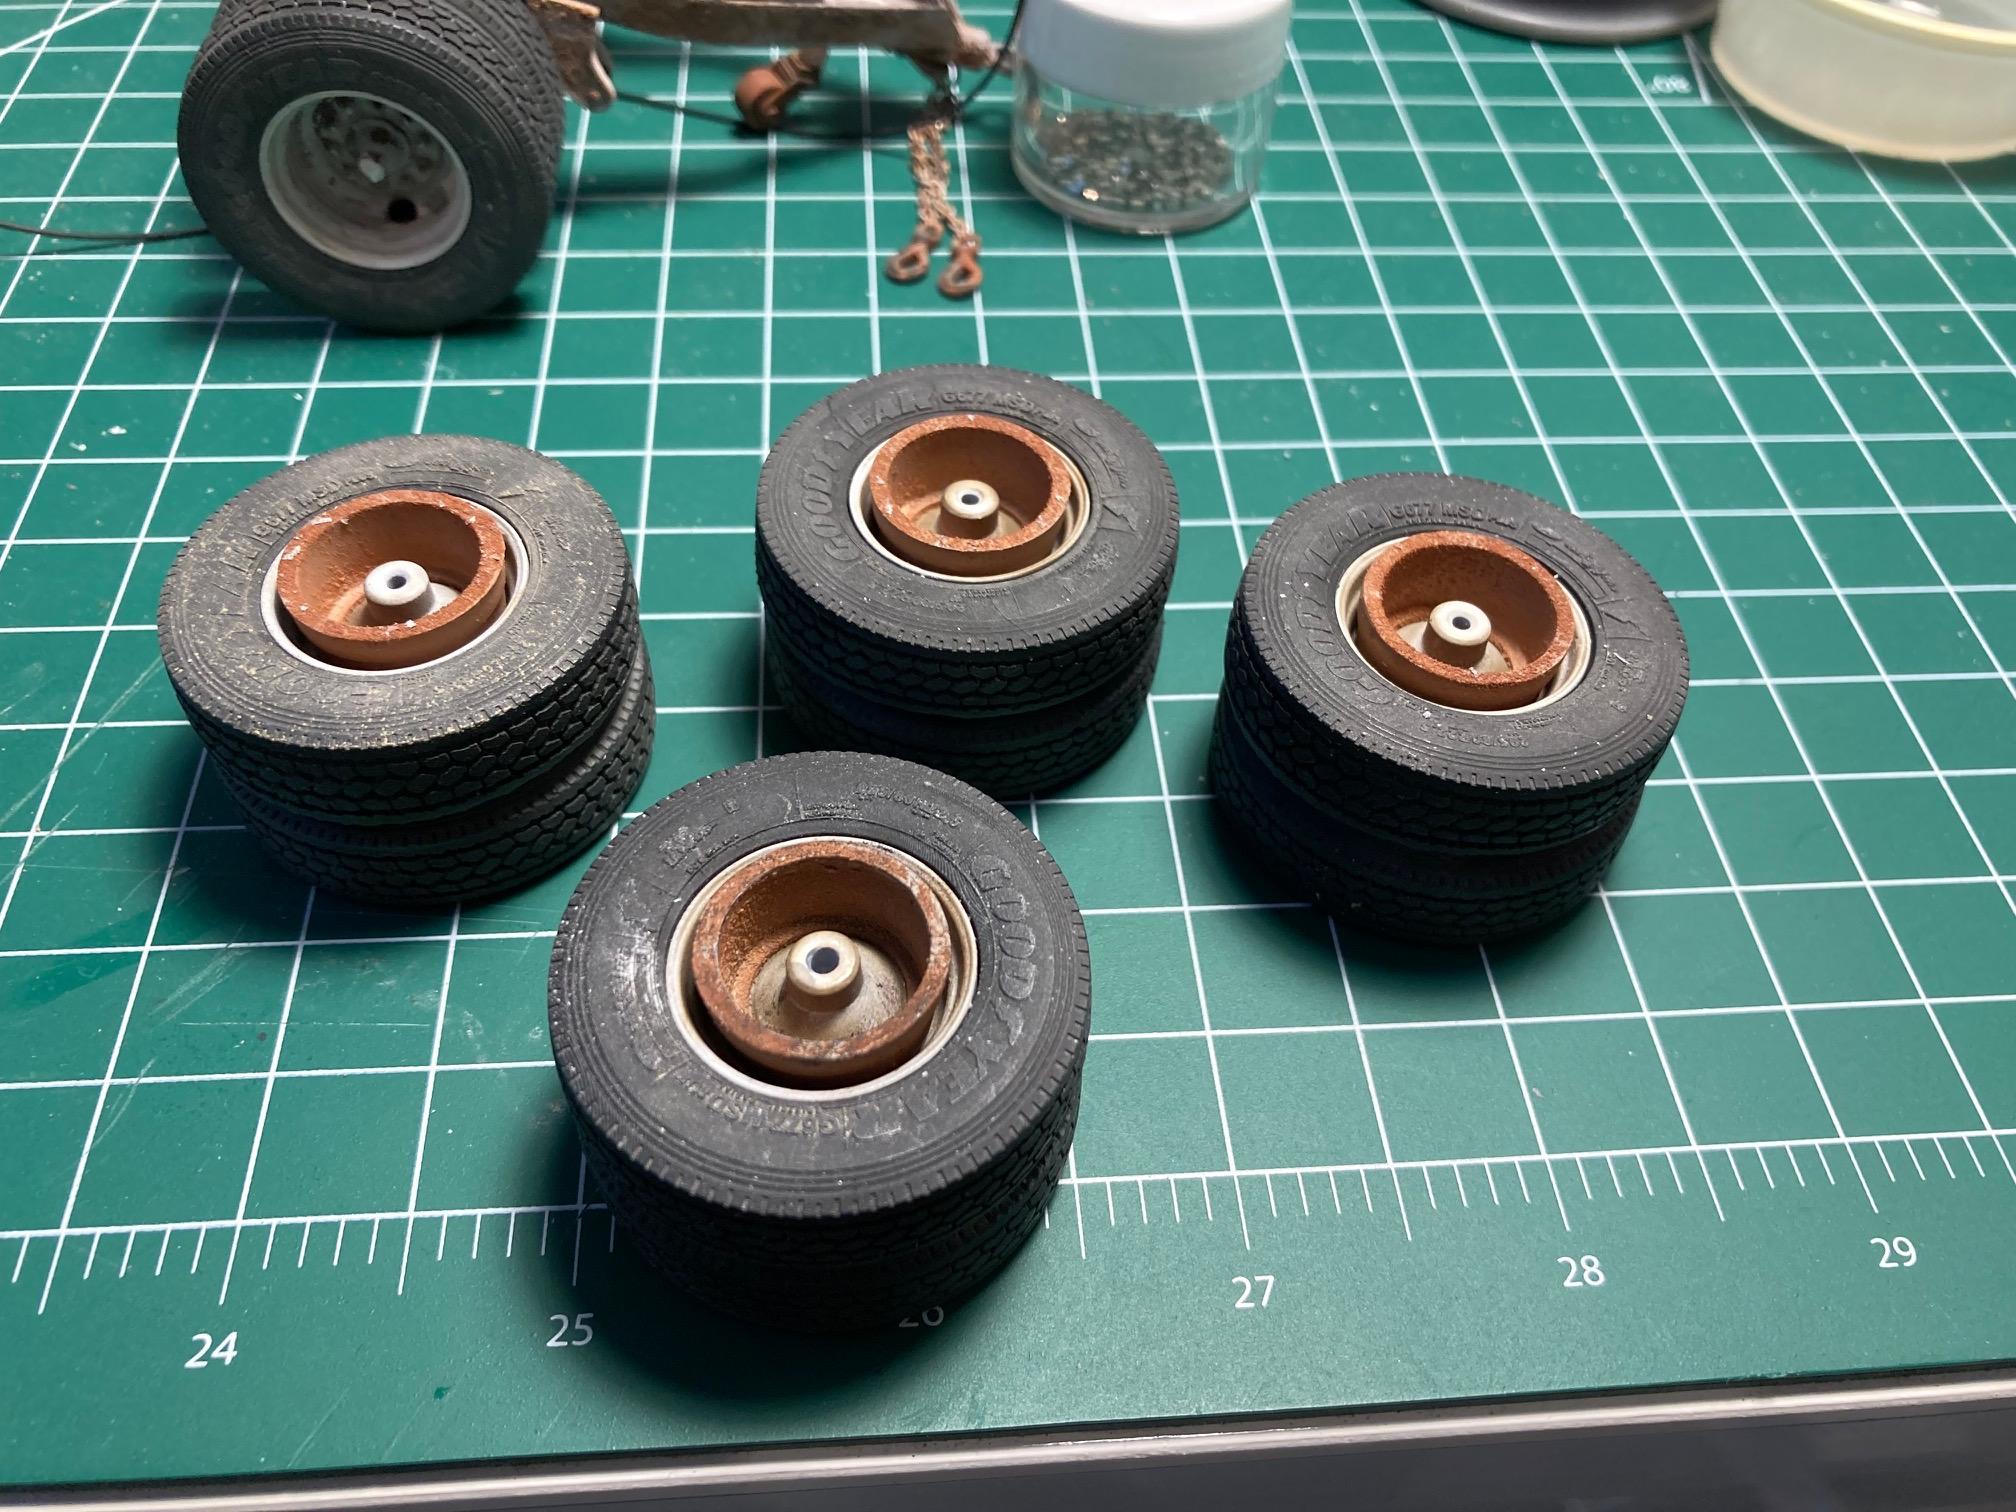
Here are some updates on my slow build🙄. Dolly is almost done - have to add the air tank and plumbing, decal numbers and a few bits. I added the new dolly castor wheel on the front. The crank is scratched. Wheels and tires 3D printed. The break-away hooks were 3D printed with model chain added.
-
Mack and heavy equipment project
Bren replied to TrucksMT's topic in WIP: Model Trucks: Big Rigs and Heavy Equipment
Thanks for sharing your work with us Dan. It is much appreciated. I have found the bunch here to be most supportive and helpful. There are 2 other Payhauler builds going on at the moment - so I’m sure you will have lots of ‘back-and-forth’ with them. I’m printing some 3D parts for one of them - if there’s something you need don’t hesitate to ask and we’ll see what we can do to help out. -
Wow! Immaculate build Randy. I always look at several things (Sorry - can’t help myself) as indicators of a superb build - paint finish/borders between colours. Crisp window gasket edges. Everything lines up and is square. Detailing seamlessly fits into the overall model. You hit each one 10/10 - a pleasure to look at. Thanks for sharing it with us.
-
Yes - they went bankrupt. Interestingly I just read a post by their new CEO promising they are back... so we'll have to wait and see I guess.
-
Wow! That must have been some printer Ron! I use a Elegoo Saturn 3 Ultra - about 500 bucks all up. There are also services who will print stuff for you - bit pricey tho.
-
Likely Revell - but that's the cool thing about slicers - you can rescale any of the X, Y or Z dimensions - or edit the file in a 3D Editor to conform to what you want. As I said - looks like you've got it well in hand scratch building - but searching a site like Cults can sometimes uncover a usable print file....
-
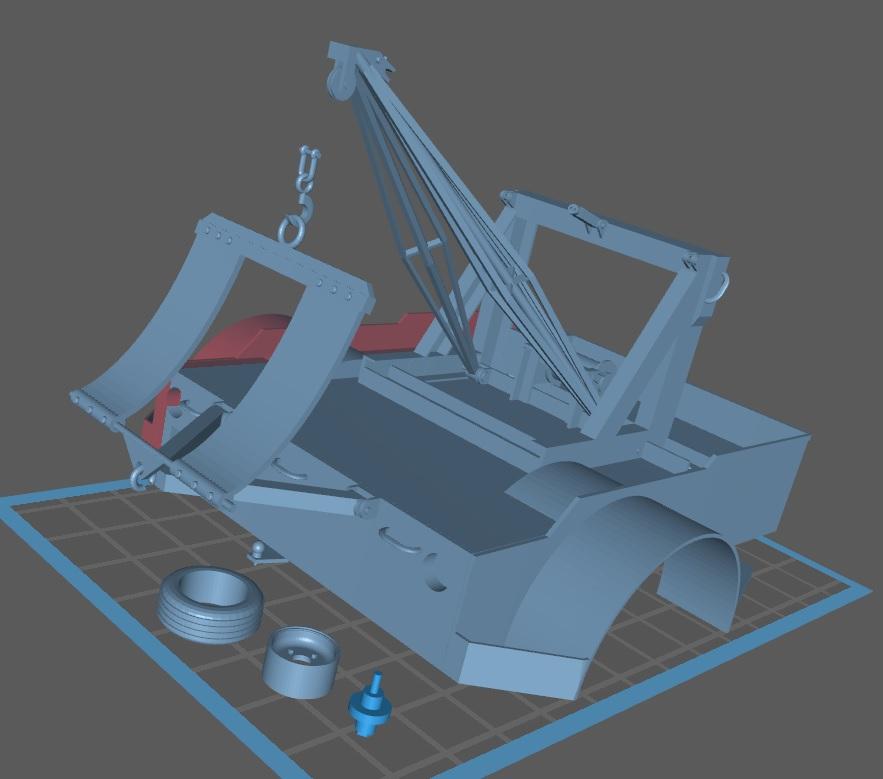
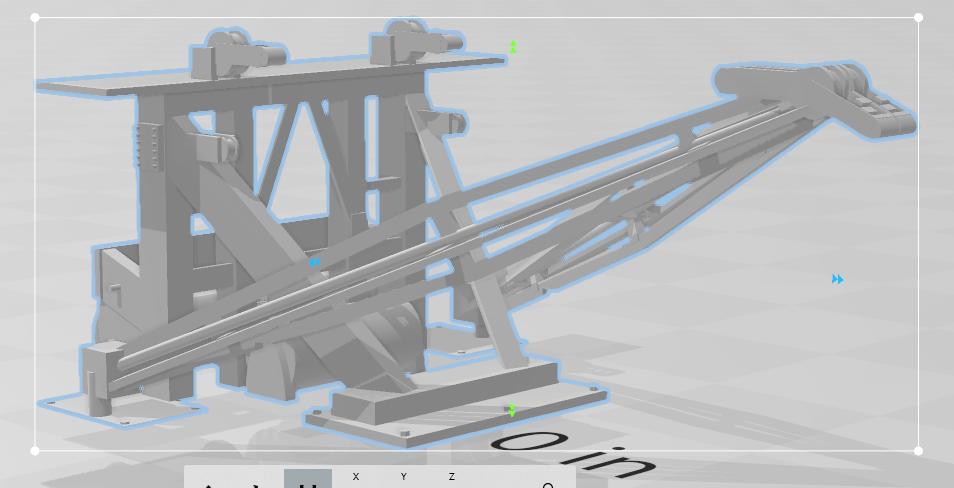
Looks like you have things well in hand with your scratch building Ron. Just FYI - this is something that 3D printing can help with as well. This is a file off Cults by a guy called Dud99- he does a lot of truck stuff. I took a screenshot for you from my slicer program. Here's his description: "Here's a request from someone on the site who wanted the extended hood available as an option from Peterbilt. The standard hood measures 119¨ and the extended hood is 127¨. You have 2 files for the conversion: the extension for the frame and the hood. On the pictures you don't have the version with rivets. If you're interested, I've put together a kit for the front extension that includes hood, frame extension, modified front fenders and the 2 round headlight grille. It's a bit cheaper." Photo from his print: Source: https://cults3d.com/en/3d-model/various/1-25-peterbilt-359-big-rig-extended
-
I love this build. One of the few examples of “wintering” I’ve seen that is utterly convincing - and as a Canadian with 11 1/2 months of winter I should know😜! Care to share some of your secrets with us? What did you use for the ice/snow?
-
Very creative ideas on display here. Crisp, clean build with great use of scratch building materials. My congratulations on an excellent model!