Bren
-
Posts
126 -
Joined
-
Last visited
Content Type
Profiles
Forums
Events
Gallery
Everything posted by Bren
-
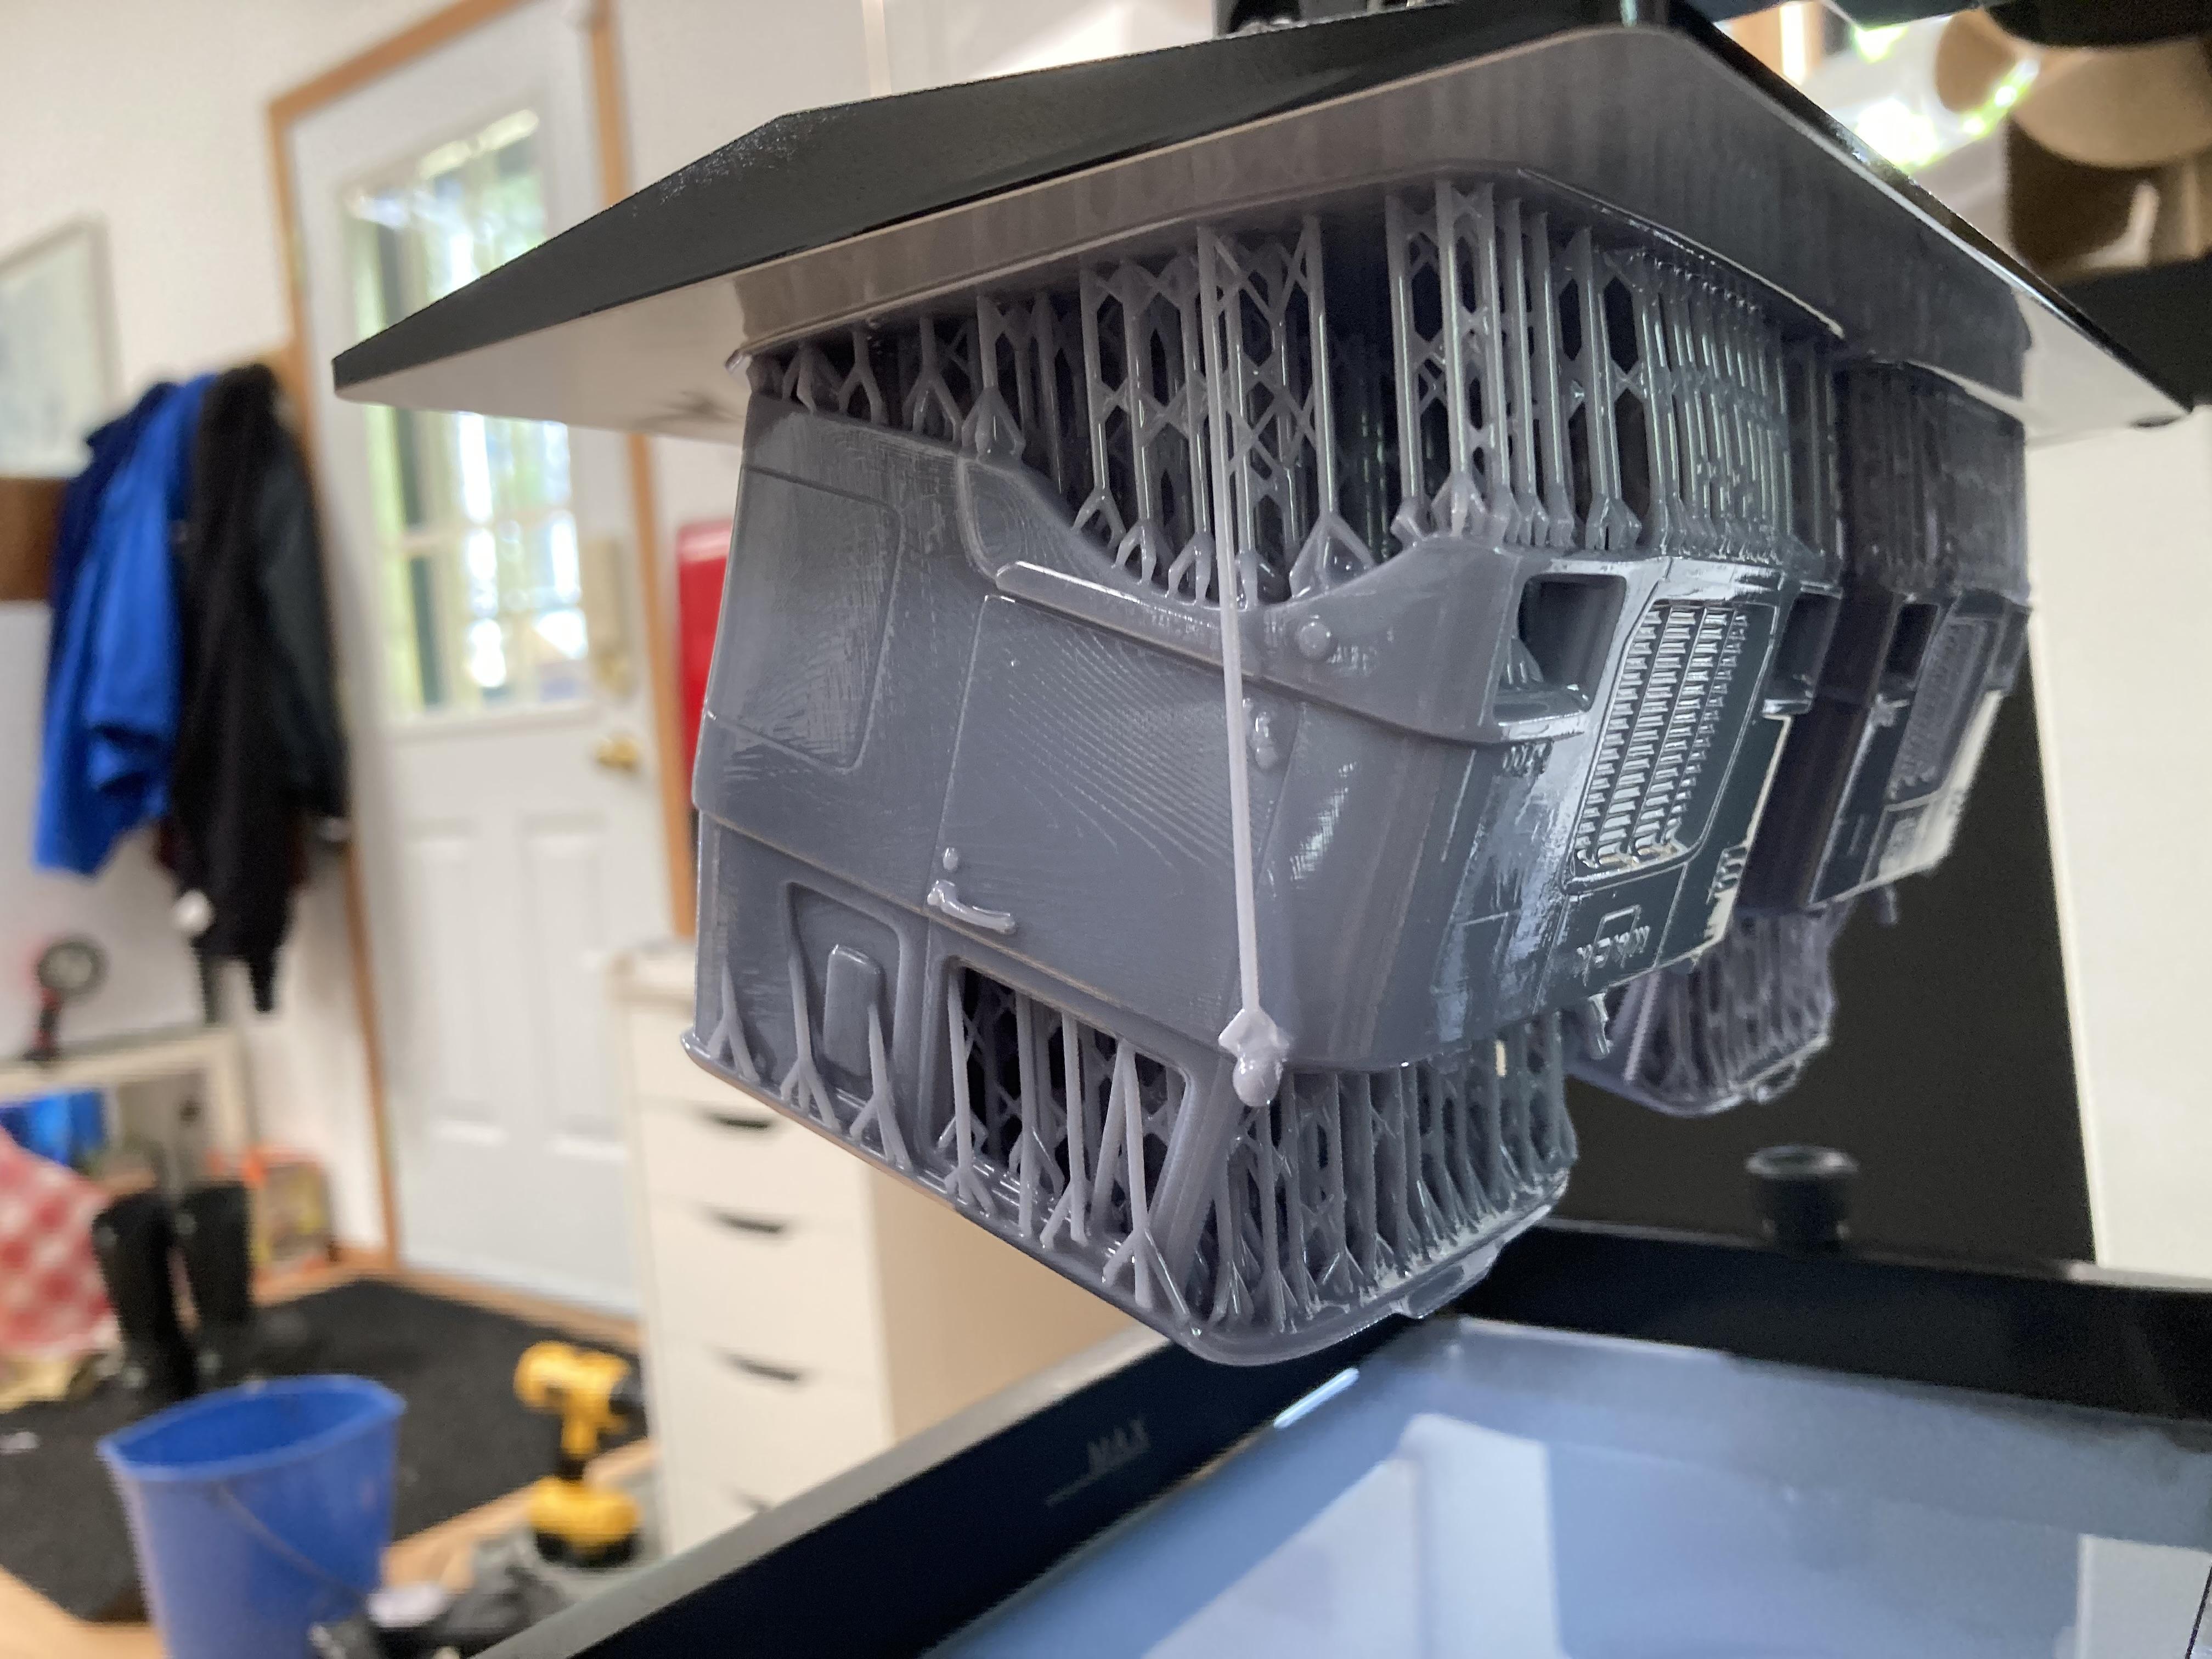
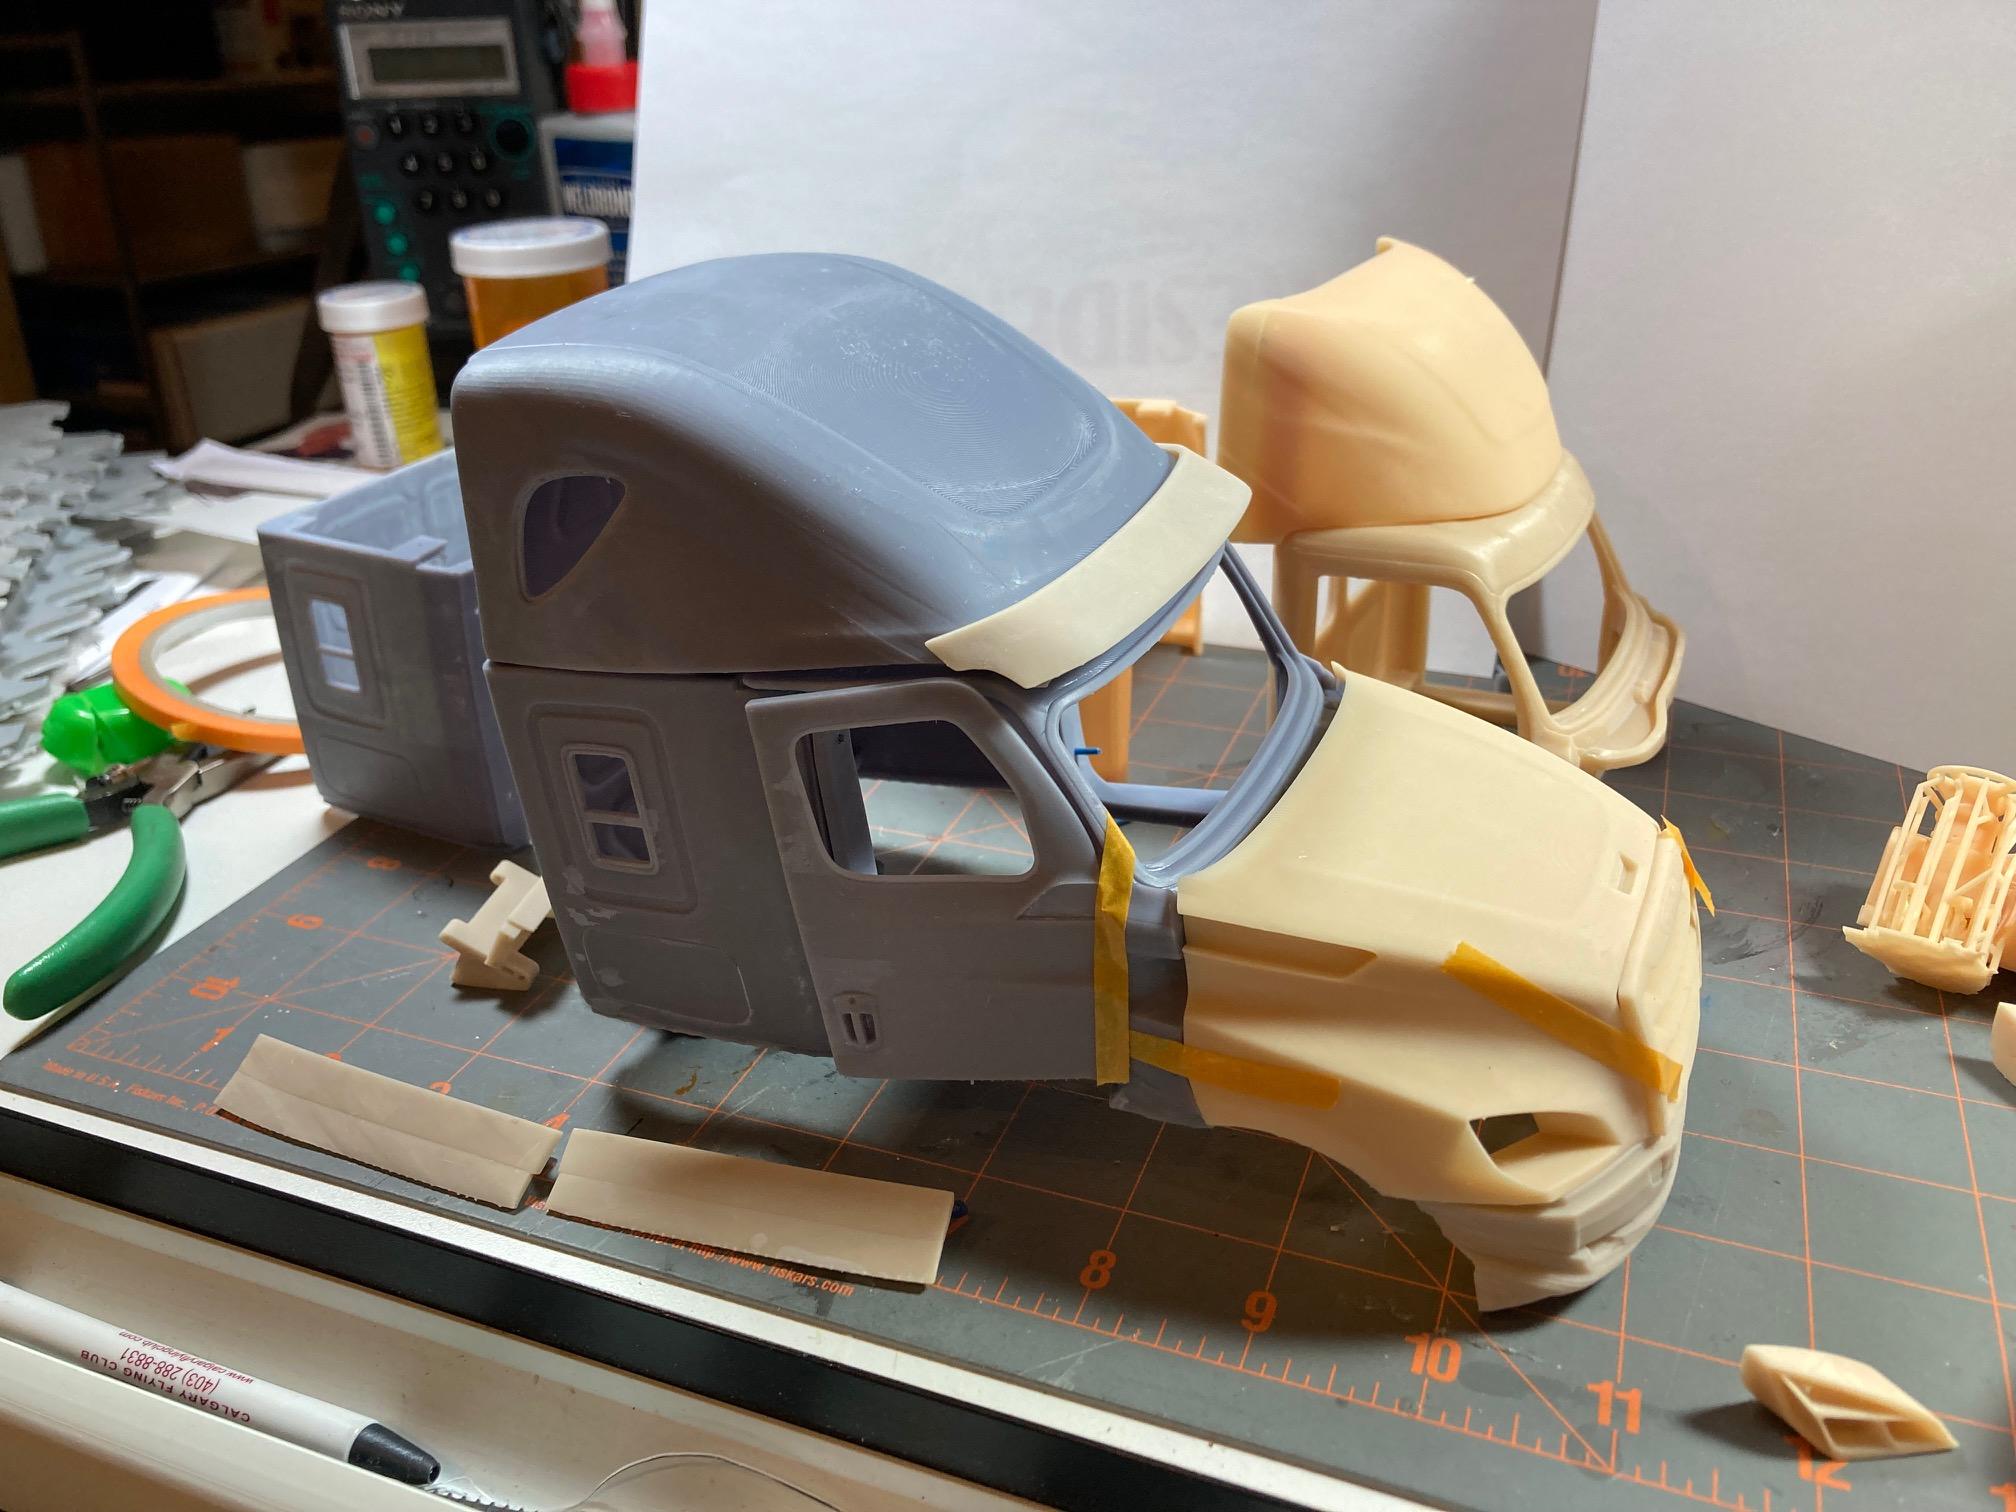
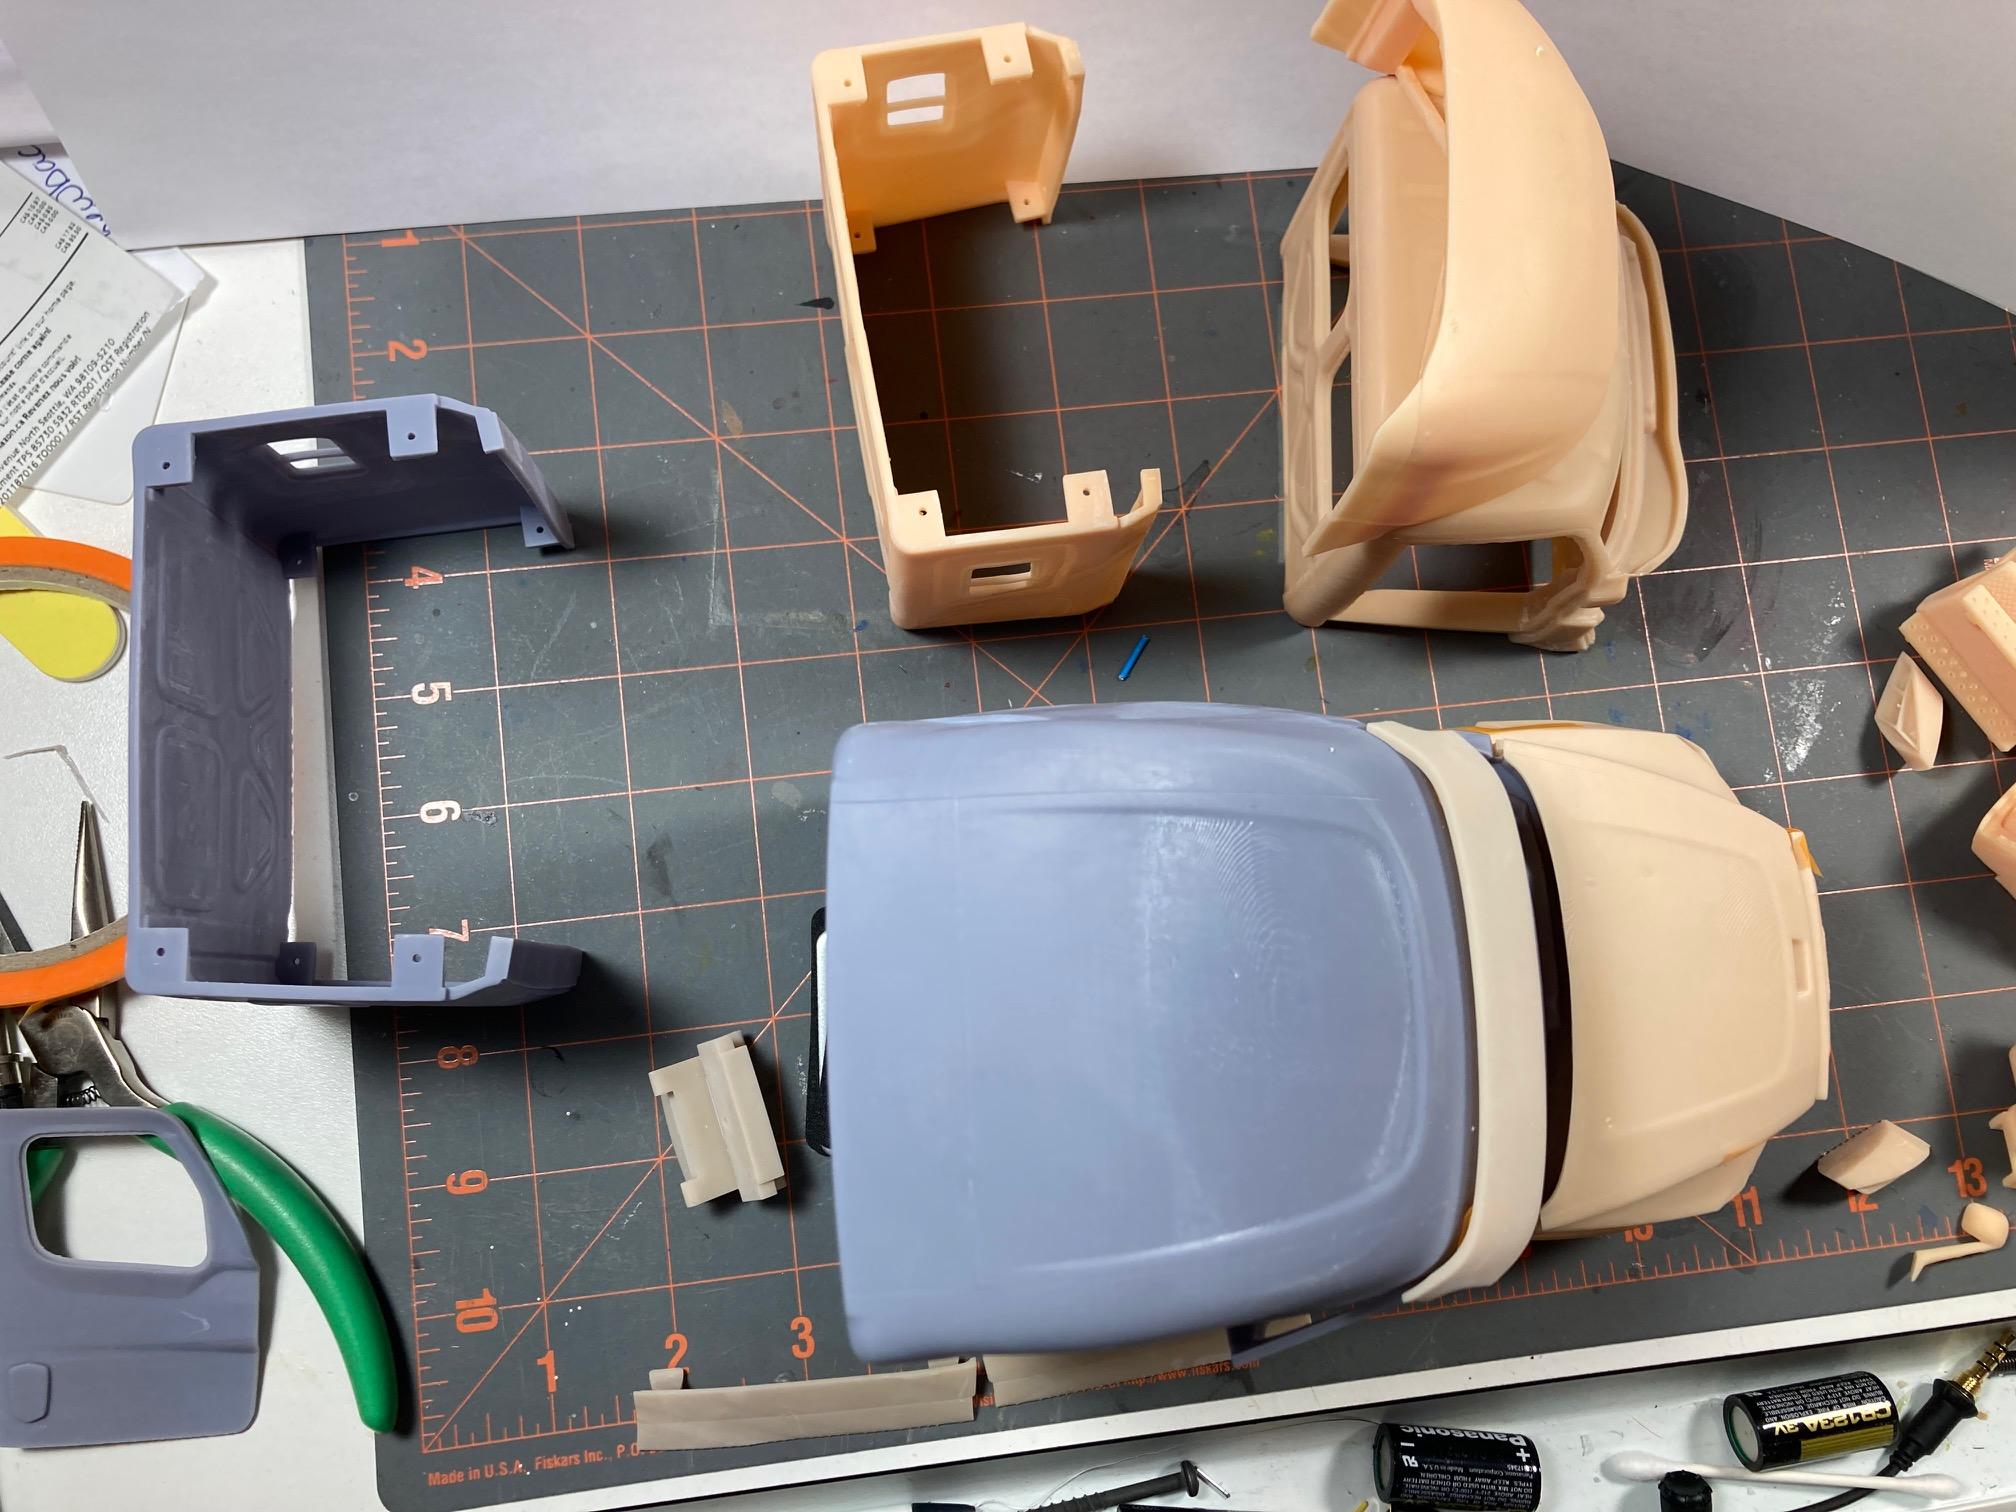
I like to post makes of new 3D file offerings so the forum users who don't haunt the 3D sites (and therefore have a life - unlike me!?) know what's out there. This is my latest print of a file from a new (to me) designer on Cults - VLAD-2. He usually does European stuff - but this truck is also sold in North America - hence of interest to us here. It is 1/14 - scaled down in my slicer to 1/25 - which are the photos here. Please forgive the crooked alignment - I just taped the parts together for the photo shoot. There is also no sanding or post production work - so you can see exactly what will come out of your printer. Excellent detail, and, although a bit pricey at $85.00 US, it's fairly priced given there are 114 files to print. So ...if you like your trucks looking like moving hotels (looking at you Roninutah!) this one might be for you. For those who are interested in the technical details, it was printed on an Elegoo Saturn3 Ultra with water washable grey Elegoo resin, sliced at .05mm.

-
Pete 352 day cab
Bren replied to Jürgen M.'s topic in WIP: Model Trucks: Big Rigs and Heavy Equipment
I totally agree Gary. I’m aware, as the YouTuber Dr. Cranky noted, we didn’t get into scale modelling to manufacture parts - but to build. However those of us unfortunate enough to be infected with the model truck builder virus (no known cure), and are tired of 1970s kits showing their age, are forced to make our own. I, too, think the after-market is great and needs to be supported - but sourcing all the parts for a build can run to hundreds of dollars. Stl files are a few bucks, and resin is cheap by comparison. Building up a comprehensive library of ‘must-haves’ is not hard. I agree that a 3D printer should be standard for our model benches. -
Exactly!3D printing excels at small parts - even things like wheels and tires. I use a Saturn ultra and find it excellent for bodies - with the provisos I gave above. I’m not skilled enough to design my own yet - but that’s coming.
-
10 Problems with 3D Printing I have really been enjoying this forum, and the excellent conversations with many of the folks here. There is so much talent and knowledge here – awesome (and a little intimidating!) As you may know if you have been reading my posts, I have been talking about 3D printing - and some of you have been saying that you are considering it. The interests of fair play, (and to show you that I am not completely fanatical!), I thought I would make a posting giving voice to “the other side”. I am sorry if this evolved into more of an article than posting, but I wanted to capture some of the discussions I have been having with various members. 1. Most 3D designers are not scale modelers- the ‘lump’ problem. It is terribly important to remember that 3D files had their origins in the world of video games and CGI. Actual objects only came later, and even then, these were usually manufactured products designed to be used as printed. The idea that one would print accurately fitting model parts that assemble into a fine scale replica is only a most recent development. As such, you will find a lot of 3-D designers publish files designed to print an entire model as a ‘lump’. Or not scalable to 1/25. Or look like a crude toy. These are, unfortunately, of little value to us. It also needs to be clearly understood that, although your slicer program can shrink or magnify any file infinitely, it will not create greater detail as you enlarge. Scaling from 1/32 up to 1/25 is about the practical limit as the walls of things like cab start to get very thick. Going the other way scaling down from 1/14 to 1/25 is also the practical limit, caused by small parts getting excessively thin, and being too fragile to survive the print process. 2. Most designers lack accurate source data – the “THAT’S not a Freightliner” problem. We know how often large model companies, with their huge budgets and a team of engineers get some rather surprising details wrong. Imagine how much more difficult that is for a designer, who may never have seen the actual item he is modelling, to create a faithful replica. It is very much “buyer beware” out there, and what a designer may represent as being a replica of a particular truck, actually is not. I have found that moderate to radical scratch building is required to correct these deficiencies, and that is something that one should take into account before jumping into 3D printing with both feet. 3. Straight lines sometimes aren’t. Now we come to the limitations of the medium itself. For various technical reasons, 3D printers will sometimes struggle to produce straight lines. There are various settings that can be tweaked, and some tricks played with print angles, but the problem remains. The bottom edge of a cab may be slightly curved. Even if the object prints completely straight, resin is prone to warping, particularly in humidity shifts. This means sometimes reinforcing with brass shim or rod. 4. Other technical problems – layer separation, unwanted lines, failed prints. Just as with any modelling skill, 3D printing has some art associated with it. You can expect a fair number of failed prints and you will be surprised by some of the things that can happen along the way to maturing your skills. Layers printed flat to the print surface will sometime separate, and the fix for that is to print at about a twenty degrees angle. Large solid objects sometimes create so much suction that they stick to the print film (that cellophane-like stuff where all the action happens), and pull the entire print off build plate. I find this happens in our hobby a lot with fuel tanks. Hence, I always print fuel tanks hollow. There is a lot to learn. 5. Just because you can doesn’t mean you should. 3D printing is well suited to producing complex shaped small parts, typical of what we work with an engine or suspension assembly, and large compound curves such as fenders or cabs. They are not very good at producing thin lines such as bolts or large flat surfaces which tend to warp or distort. Nothing will ever beat fabrication in sheet styrene, or brass rod/sheet. There are some truly awesome fabricators on this forum, and 3D printing will never produce anything better than what they are doing. Scratch building, IMHO, is still the gold standard. 6. Cost. Many of us on this forum are older and retired. We do not have limitless funds. A good 3D printer will cost in the vicinity of $350-$500, which is better than a lathe or milling machine, but it is still a lot of money. A bottle of resin which will print about 10 average truck bodies runs about twenty dollars. We need a few other sundry items such as an ultraviolet curing light and ultrasonic cleaner, so the whole setup is going to run you the better part of a thousand dollars. Not chump change. 7. It’s messy and it smells Well, yeah. But so do a lot of other things we do, like painting with lacquers or using acetone -based solvent. I think this part may have been a bit exaggerated. Water-soluble resins do not smell that bad and most modern printers now come with fans or attachment ports for venting them to the outside via a window. Resin needs to be handled with gloves, but clears up well with isopropyl alcohol or water as the case may be. It is no worse than many of the other materials we work with in scale modelling. 8. Resin isn’t styrene – and clear isn’t clear Happily, those of us that are seriously into scale modelling understand about aftermarket resin parts. You cannot treat them the same way you treat styrene. The same thing is true of 3D prints. They tend to be more brittle and prone to breaking if mishandled. They tend to warp, so construction has to take that into account. While many companies advertise that their brand of clear resin prints transparently, I have not found anything that actually does nearly as well as clear styrene or acetate. This is likely coming, and as the medium matures we will get better results. In the meantime, I would count on printing the “glass” in any model as a buck and using it with a vacuform machine to vacuform acetate windows. 9. You need to learn a new skill – and have some basic computer chops. While many writers, including myself, have stressed that anyone with very basic computer skills can do this, it still demands that you have a reasonably modern computer at your disposal, know how to download things off the Internet, can work your way around learning the slicer program, which is very user-friendly and simple, however still requires some knowledge, and is not intimidated by transferring print files onto a thumb drive to get them into your printer. It is not hard, but you may need a ten-year-old kid to help you! 10. Did you get into modelling to build? Or make parts? This is a profoundly philosophical issue which was vastly better discussed by Dr. Cranky in a YouTube video (https://www.youtube.com/@DoctorCrankysLabRATory/videos). I get that many of us, with very limited hobby time, want to spend it getting glue and putty under our fingernails, not 3D resin. Even if you decide not to print, you can still download files that intrigue you, and fairly economically have them printed by aftermarket printing companies that are set up to do small orders. Alternatively, there are some small companies on this forum that print 3D files and sell them as complete end products. The more you patronize them, the more files will become available for us. So – I think the sum total is – 3D printing is just another modelling tool. Some will love it, some will hate it – and most will learn where it fits in their own approach to our wonderful hobby. Thanks for indulging me – as always – comments/brickbats are welcome.
- 4 replies
-
- 10
-

-

-
I'm going to hazard a guess and say no Brian. That is very beautiful detail fabrication you've done there - and nothing beats brass and nut/bolt hardware. I print at .05mm resolution - very standard - and some of the latest printers go down to .02mm - but many .stl files are coarser than that - so the point has been made that greater resolution for these files accomplishes nothing. The other challenge is that, as 3D surfaces get thinner (the brass braces above) or narrower (the long bolts on your hydraulic cylinder), they tend to warp or simply fall apart. Things like rear view mirror braces are best done in brass rod. Use 3D printing to pop the mirrors, but use brass for the thin/strong stuff like mirror mounts. As with all tech (and being enthusiastic as I am about 3D print possibilities) one has to recognize that "just because you can doesn't mean you should". There is much that other techniques are better suited for in modelling. I like 3D for small parts (rubber hood latches, air horns, air relays, hoses etc.) or truck bodies/trailers - curved parts that are difficult to fabricate. Detailed sub assemblies like you've got above would be very difficult to make look any good in 3D. Hope this helps. Can you post a photo if a 1:1 Western Star that represents what you're looking for?
-
Very nicely done. I’m always impressed by your design chops Jurgen. I have yet to tackle the arcane world of file design but it is on my do-do list. The first thing I’d like to try to get my toes wet is to modify the wall thickness on some of the files out there to produce a more realistic print.
-
Sure thing Brian. Check out these: https://cults3d.com/en/search?q=Western+star there are some 4900s in there. Now…a word of warning. Not all 3D files are equal in terms of detail - some are churned out by mass-content creators and the quality is iffy - but if that’s all you have to work with as a base - and are willing to scratch build detail to get to where you want - these could work. My printed truck bodies you like (above) are designed by a guy named Alfa Centauri. He’s on Cults too - and most of his stuff is available printed by Global Scale Models - they are here on the forum. The issue of wall thickness is tricky. Most of Alfa’s files are 1 /14- which I print at 56% scaled down in my slicer program (Chitubox). That makes the walls acceptably thin. Some of his files are 1/32 - and when I scale them up to 1/24 the walls get pretty thick. Still acceptable - but thick. For individual parts - think tread plate or mesh - the X, Y and Z thickness can all be individually selected in the slicer - and thin parts are easy to produce. For complex shapes like a truck body, this trick won’t work. There are some guys on here with a lot of CAD experience that might be able to edit the file to thin out the body or various parts - but that’s way out of my league. Designers tend to frown on guys editing their files - but my view is you bought it - you can do what you want with it as long as it is for your own use only. If you are interested in a particular file of the ones I pointed you towards, let me know, and I can print it and see how it actually comes out. Bren
-
It sure is Brian! Firstly - welcome back - we need every truck modeller we can muster! As a relative newcomer to 3D printing, I fully acknowledge it isn’t for everyone - but the rewards are worth it - I feel like a kid in a candy shop - able to print how ever many of something I want, to any size, and access unavailable subjects - like new (or classic) trucks. I feel parts are the most useful for this technology. Absolutely- filament printing is not that great for us - heavy print lines, not enough detail, persnickety to master - however, good for big stuff like trailers. As far as smell - the water based resins are not too bad - and there are filter fans which drop the smell still further. The problem is similar to paint fumes - an outside exhaust fan like in paint booths could easily be rigged. Printers are about the size of a blender - so they can be enclosed in a fume hood structure and vented to the outside. You might want to check out Karl at Global Scale Models - he sells 1/25 prints of a popular 3D designer. He is on this forum. Check out his website. And do go to Cults3D.com. That’s where most of the scale modellers live. My profile is ‘Heavyhaul’ and I have several thousand files I’ve downloaded that are truck-relevant - and made them public access so you are free to scroll through them at your leisure. Have fun - and if I can help in any way just drop me a line.
-
Hi Ron, I'm a PC guy - but the actual downloading of 3D files takes almost no computing power (i.e. RAM, fast processor) - just hard drive space. Which is cheap these days. It is the designing of 3D files in various CAD programs that chews up processing. Since you just want to print 'em - not make 'em - you should be fine. Note - if you're not in a hurry the Saturn 3 Ultra is just about to be replaced by the Saturn 4 - with some nice features - like a tilting FEP tank to ease the print in not sticking to the FEP film - a problem you'll find with (solid) fuel tanks. You might want to wait. Meanwhile check out my profile on Cults3D - I'm 'Heavyhaul' there - and click on downloads. I've been combing that site for the last 2 years+ and found most of the files a model truck builder would be interested in. Can't say they are all keepers - but lots of good stuff there. The rest of the advice I already gave to Dys in my comment above. I hope you do it - you'll have lots of fun!
-
You are very welcome Ron. Great to see you charging ahead with this project! Well done!
-
Oh I subscribed as soon as I found out about you. I see 3D printing and offering finished product to those who have no interest in printing their own, as the future of our hobby. The styrene based big companies are not interested. What we need now is a full array of modern diesel engines - I’ve asked some of the most active automotive engine publishers to consider truck engines - but no joy so far. This would be a big seller for you - I notice the aftermarket guys are almost always sold out of their engines. The other possibility is to package useful parts in “parts packs” like AMT did back in the day. For instance Alfa’s Kenworth 2000 has a great sleeper interior - and his Cascadia doesn’t. Selling the Kenworth sleeper parts separately seems like an idea. I don’t know if he would let you market groupings like this - or not. A collection of fuel tanks is another thought. Anyways, best of luck to you and your company Karl!
-
M-20 Prime Mover is Finished
Bren replied to Chariots of Fire's topic in Model Trucks: Big Rigs and Heavy Equipment
Not to be redundant - but just…wow! This is the type of build one sees as “best in show” or on a magazine cover. Kudos sir. I’m blown away. -
That is great to hear Karl. It helps explain why Alfa’s designs are accurate and look like they were made with scale modellers in mind. Not like some of the many shapeless lumps out there purporting to be scale accurate. I think you have a great niche there - 3D printing requires the equipment and motivation to learn - many customers would just like to buy the finished result. I hope you succeed. Now try to convince him to do a Western Star 57X!
-
AMT Exterior Post Doubles Vans
Bren replied to Bren's topic in WIP: Model Trucks: Big Rigs and Heavy Equipment
Thanks so much for your help - this is great! Bren -
AMT Exterior Post Doubles Vans
Bren replied to Bren's topic in WIP: Model Trucks: Big Rigs and Heavy Equipment
That’s exactly what I was looking for - thanks Hakan! -
AMT Exterior Post Doubles Vans
Bren replied to Bren's topic in WIP: Model Trucks: Big Rigs and Heavy Equipment
Thanks Hakan - I have that schematic too. I actually need to know where the airline physically runs - is it visible below the trailer floor and if so - where is it? Off to the side, down the middle etc….. thanks, Bren -
I'm doing this build right now - basically box stock with different wheels/tires. Could any of you gentlemen enlighten me on the routing of the air brake lines under the floor of the trailers? I've searched the interwebs but can't find any reference photos to help. Thanks! Bren
-
Hey Dys, Brian has the right idea - JUST DO IT! You won't be sorry and there's TONS of cool stuff out there - stuff you can't even buy in the aftermarket. I'm sad that guys are complaining about there being no new truck kits out there, when you can 3D print just about anything you might want to build! Here's what I think you need to know. Any brand of resin printer will work (not filament (FDM) - that's for bigger stuff and generally gives unsatisfactory results for our type of 1/24 or 1/25 scale models, except in expert hands) . I use Elegoo brand and have found them pretty reliable - for model trucks you will want the Saturn if you can afford it (about 500 dollars Canadian) - I use the Saturn 3 Ultra. Mars Pro would be okay - just a bit small - I use that one too. Definitely go for water washable resin - it's a tad brittle, but the not needing to use isopropyl alcohol is a huge plus - and it doesn't smell as much. I use Elegoo brand resin and have been happy. I haven't been impressed with Anycubic brand printers - I have a Mono 5S too - and they originally sent it out with a non-functional auto-leveling system that had to be corrected later with a modified build plate - at my expense. Zero customer service. Not impressed. Brian mentioned two other things you definitely want - one is a cleaning station, the other is a UV curing station - neither is too expensive. I use the Anycubic Wash and Cure station ($179 Canadian), but don't use the wash function - for that I have found an ultrasonic cleaner works best. This is the one I use: https://phrozen3d.com/products/ultra-sonic-cleaner. ($101 US). You asked if I use a particular type of slicer (the program that translates 3D file, with the .stl suffix to the correct language for your particular printer). Brian uses Lychee - which has a good reputation. I've never used it. I use Chitubox - which comes with all Elegoo printers. I love Chitubox - very intuitive, easy to use. It generates supports very well, and they come away post-printing easily. I tried the Anycubic Photon Workshop slicer which came with my Mono5S - horrible slicer. The supports wrecked most of my prints. Not recommended. So yeah - most printers come with free slicer programs bundled in - and I haven't seen the need to purchase the pro versions. Where to find the files? That was my main purpose in starting the thread - to show you there are a ton of awesome files out there for truck modelers. All the ones above came from Cults - https://cults3d.com/en . Joining is free. I have found literally thousands of files - you can go to my profile - my screen name is 'Heavyhaul' , and I've made all my downloads public for viewing (https://cults3d.com/en/users/Heavyhaul/downloads ) - so you can peruse the hundreds I've downloaded and click on them if they interest you - many are free. Brian mentioned a designer he likes - you are free to 'follow' any designer you like, and will get email updates when they publish new stuff. I recommend a guy named Alfa Centauri - he does high quality truck files - often 30 or 40 files to a truck. Warning - there's a lot of poor quality files out there. Most designers are NOT scale model builders - and it shows. They publish their model as one lump of a truck - not separate parts - and the details are sketchy at best. Beware of 'content factory' publishers who have thousands of files on display - one for every vehicle ever made. They are usually toy-like at best. You'll learn which designers you can trust. You'll learn what you can get away with in terms of resizing - many truck files are published in 1/14 scale for the RC crowd - these generally scale to 1/25 no problem (set your slicer scale to 56%). Be aware that as you scale down, thin parts get thinner. Some of the 1/14 scale steering wheels are pretty skinny in 1/25! Likewise, scaling up from 1/32 (set your slicer scale to 128%) is doable - but walls start getting pretty thick. Those are the practical limits I've found for detailed parts. Simple shapes scale up or down easier. Brian mentioned Blender to customize a file - that's a step up in complexity - you can use editing programs to slice parts or or change things you want changed. I'm not an expert at that - I've just done simple moves like cutting prints in half that were too big - nothing complex. You don't need to know anything about that to start. How do I learn? Youtube has some great beginner videos. This site has literally thousands of 'how-to' articles - and trouble shooting guides - https://all3dp.com/ , check it out. The main thing is DON'T GET DISCOURAGED! You will have failed prints to start - typical problems are prints not sticking to the build plate, partly formed or distorted prints, failing to print at all. There are tricks to learn, just like model building. How you angle your print in the slicer (I like tilting about 20-30 degrees from the horizontal), how you select your supports (the autosupport function works really well in Chitubox), how you set up your print - (I like to space it about 2-5mm above the build plate) etc. all have an effect on the final product. Start with something simple like a tire file. And don't hesitate to ask. If you're running into a problem - post it or DM me - if I can't help somebody else on here surely can. Happy printing! Bren
-
I appreciate them, and they show this build is on another level! I don’t think I’d have the guts to show that level of detail on one of my builds! ?.You hit this one out of the park Robert! The details and workmanship are amazing.
-
Thanks so much Juergen - the build is looking great. I want to know how difficult it is to edit 3D files. As an example - there are many good tire files but they usually have no sidewall detail - and I want to add that. Could I edit them to add manufacturer logos and the usual information on 1:1 sidewalls?
-
I believe - though I may stand corrected - that a lot of their stuff is 3D printed from cults3D website - a designer named Alfa centauri. I printed a bunch of his files and they are generally excellent. The only reason for noting this is you may want to invest in printing them yourself - more flexibility that way - although I totally get that not everyone is into that. If you want to follow the thread between myself and Roninutah- I just printed the Cascadia for him in 1/25. I posted some pictures of the print. He’ll be posting as he does the build.
-
Mack F700, and the woes from 3D printing.
Bren replied to Repstock's topic in WIP: Model Trucks: Big Rigs and Heavy Equipment
? -
Mack F700, and the woes from 3D printing.
Bren replied to Repstock's topic in WIP: Model Trucks: Big Rigs and Heavy Equipment
I've been following the build - you have some great scratch-building chops - and it looks like you licked the roof issue. Just for your interest here's the F700 I printed last week - angled the body - no roof sag issues. If you want one just let me know....
-
Oh you're one of those guys eh?? Q. What kind of truck to you drive Mister? A. A Motel 6! Okey doke - check out the 60 inch hi-rise sleeper parts I printed today below. I'll keep the daycab for my build and send ya the sleeper. I'm leaving the supports in place for the dash so the steering wheel survives the postal service. This thing sure is a beast - thank heavens for the Elegoo Saturn printer - the larger prints wouldn't fit on my Mars.
-
White 7000 Thurston Truck Lines
Bren replied to Repstock's topic in Model Trucks: Big Rigs and Heavy Equipment
Wow! That is a tour-de-force. Beautiful craftsmanship Tom. I always look at the mirror supports and window gaskets - they are the trickiest to make look right - as well as understated weathering - and you nailed them all. I echo the earlier observation - that interior is just amazing. Full marks on this one!
.jpg.9bc1730ae3718f482c198a8fd92201cf.jpg)
.jpg.c81c460c2de6bbcf3933a15024d3f7ec.jpg)
.jpg.c8d6583f5de2795799421c50719c6b5d.jpg)
.jpg.e8061854cfe4260f98ee15c74d51c27d.jpg)
.jpg.6b77da308616526ea3345dc550fe4c51.jpg)