

SpreadAxle
-
Posts
2,198 -
Joined
-
Last visited
Content Type
Profiles
Forums
Events
Gallery
Everything posted by SpreadAxle
-
New Steven's International Release
SpreadAxle replied to crispy's topic in WIP: Model Trucks: Big Rigs and Heavy Equipment
Yes it has both turbo and nonturbo parts. -
New Steven's International Release
SpreadAxle replied to crispy's topic in WIP: Model Trucks: Big Rigs and Heavy Equipment
Good. Now we can stop paying over $100 on ebay for it. It's about time this one came back. -
That is a cool method of doing it. 8)
-
An easy way to make rust..real, genuine..rust.
SpreadAxle replied to SpreadAxle's topic in Tips, Tricks, and Tutorials
I'm not sure how to do it with the steel wool. Ryan Silva suggested that one, but I would assume you would soak it. Either way, I figure it's a simple enough trick that should save a few dollars on weathering powders, and Rustall kits. The rustall does work nicely though. -
Due to warranty issues, this truck has officially been down for 3 weeks again. The wrong turbo was installed last time, a new valve cam has been installed now, and the cylinder head has suffered some damage. That is what happens when the warranty allows the job to be done only half right. It's being resolved, but feet are being dragged. A new replacement head is on its way, then I can get back to work. It's been a dillemma, but things are going better. I should be back to work any day now. I know some have followed along with me as I waited. Thanks to all who wished me well. 8)
-
A quick note or two about the cab. The floor is flat with no doghouse. Also, the cab's left rear corner must be notched to accomidate the exaust stack. I recommend using the rear wall from the Freightliner SD kit for the sleeper's front wall as it has the windows, which appear to be the right size and spacing for this project. Good luck to those of you who try it. I would love to see how many modelers have a go at this one.
-
The Cummins engine found in most AMT kits is the starting point for this engine. The oil pan is rounded and follows the arc of the crankshaft. The turbocharger sits on the driver's side frame rail on this truck. The air cleaner is mounted just behind the turbo. The air compressor and fuel pump which is molded together, must be separated. They are then moved to the front of the engine. The engine front cover piece must be trimmed down a little also.
-
Here is the sleeper that will eventually sit above the cab. You can see what I mean as to how thick the paint was. I cut just above the side compartment doors on the sleeeper.
-
Dave, here is a pic of Peterbilt's experimental version of this truck. Tim would know more, but it's my understanding that this truck wasn't placed into production. I'm not sure if a prototype was built or not.
-
This truck during various phases of construction will be subject to builder interpretation due to limited info on these Freightliners. The engine is one of them. I only have one view of this engine in the 3 pictures I have. Always from what would be the left side of the truck as it sits in(sort of below) the frame. (see my post in 1:1 reference and all 3 pix are there). I am building the turbocharged version. The oil pan was made using a piece of sprue glued in the center of where the kit oil pan normally would go as a guide. Squadron green putty was then poured over it and shaped. It's what seemed to be right to me, although I may need to round it off some more. Also, the edges were cut off of the kit's pan, to preserve the bolt detail, and placed on the edges of my homemade oil pan. The air compressor and fuel pump are moved to the front of the engine. The aftercooler is also moved forward ever so slightly, to being just past the heads. The water manifold was modified to accomidate the thermostat housing. The way the engine is laying is how it will look installed. I still have to install the oil pump, and also figure out if the frame mounted turbo sits on a plate, or if it's directly mounted to the frame. That will tell me where to go with the pipe that leads from the exhaust manifold to the turbo. Meaning through the frame, or is the pipe routed down, and then under the frame. The pipe from turbo to intake is clearly visible in my reference pix. The only other things to figure out is where the oil filter and the alternator are located. The Willamette Valley Freight lines truck in the 1:1 reference section shows the naturally aspirated version. Thanks to Matt Burnett for all of his help with this project. He has been a big help. Thanks to him I discovered the oil pan is rounded, following the arc of the crankshaft. Hence the putty oil pan. Thanks for looking.
-
Finished....for now.
SpreadAxle replied to SpreadAxle's topic in WIP: Model Trucks: Big Rigs and Heavy Equipment
Thanks Kurt -
I like the progress on this one. Looking good.
-
Nothing wrong with history. It was my favorite. I always preferred the Chevys anyway. Again, nice job.
-
Finished....for now.
SpreadAxle replied to SpreadAxle's topic in WIP: Model Trucks: Big Rigs and Heavy Equipment
Thanks Dave. I definately enjoyed doing this one. -
Thank you Dave. I've been sort experimenting and test fitting, mocking things up. I'm really looking forward to doing some assembly.
-
Well I definately learned from this one. The truck is now finished. Thanks to all for your help.
-
Progress is going slow but steady on this one. Stripping a gluebomb with several THICK coats of paint is a challenge. The frame is in the process of being stretched. The engine has been started. I will post pix later of it.
-
Finished....for now.
SpreadAxle replied to SpreadAxle's topic in WIP: Model Trucks: Big Rigs and Heavy Equipment
Thanks everybody. When built 10 years ago, this truck represented a few firsts. It still does now. I totally enjoyed this. I can't wait to do some more restorations. All of your encouragement was great also. It feels good to be back in the hobby. 8) -
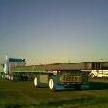
Here it is with the first trailer. Plans are to make a Michigan Train out of this rig, but here's the first 1/2. This has been a fun build. . This is the first restoration I've ever done, and my first build of the dump trailer. I hope you enjoy the pix. Thanks to all who had a kind word as this project progressed.
-
Sunday, a bad day for ebay auctions??
SpreadAxle replied to Modellpularn's topic in General Automotive Talk (Trucks and Cars)
Oh ok. I just wanted you to know I meant that in fun. If I lived overseas, I would too. As I say, I don't blame you. I understand there may be a little extra cost involved with overseas shipping, but it usually is the buyer paying so I never saw the issue with overseas shipping. that's just me, though. -
About 85% complete. Almost there.
SpreadAxle replied to SpreadAxle's topic in WIP: Model Trucks: Big Rigs and Heavy Equipment
I didn't get a great deal done, but I did manage to add some details. Mostly under the hood, or at least related to it. Here is the NTC 350 from the right... ...and the left. Thanks for the compliments given earlier. Trailer hookups, and one or two final touches, then I can finish the trailers for this beast. Probably at 95% complete now. Thanks for looking. -
My new website
SpreadAxle replied to chevymaniac's topic in WIP: Model Trucks: Big Rigs and Heavy Equipment
I wish you well on this venture. I certainly like what I see and have favorited the site. I see you came up with some firsts as well. I hope to see this go forward. -
About 85% complete. Almost there.
SpreadAxle replied to SpreadAxle's topic in WIP: Model Trucks: Big Rigs and Heavy Equipment
I'm very close to completion now. Just a minor detail or two to work out. I thought I would share today's progress with you. With a few interruptons, I got the chrome installed, and mounted the cab, as well as some other very minor things. . Enjoy the shots. I may finish this old girl up tomorrow. And, again, as always, thank you all for looking, and for the encouragement. -
This is turning out pretty nice.
-
Roof Wing
SpreadAxle replied to wild_chld81's topic in WIP: Model Trucks: Big Rigs and Heavy Equipment
Wild Child, Dan's wing in the pic is a good example of the size I tend to see on larger, say 60", flattop sleepers. Raised roof sleeper wings tend not to be as tall. You could use it on a cabover, just not the Kenworth K100 aerodyne as it might be too tall.