
ScrappyJ
-
Posts
495 -
Joined
-
Last visited
Content Type
Profiles
Forums
Events
Gallery
Everything posted by ScrappyJ
-
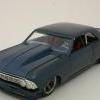
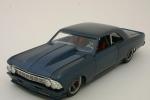
Completed Larry "Spiderman" McBride Top Fuel Bike
ScrappyJ replied to ScrappyJ's topic in Model Cars
Thanks all! It was a labor of love (or hate sometimes). -
Some pics of the completed TF bike:
-
1/12 Top Fuel Motorcycle (Larry "Spiderman" McBride)
ScrappyJ replied to ScrappyJ's topic in WIP: Drag Racing Models
Thanks guys! Rick- I believe I used 30 thousands sheets styrene for the tire. I bought some 20 thou and 30 thou sheets from a local plastic supplier in either 6'x4' or 8'x4' sizes and then I cut them down to smaller sheets, by measuring, scoring and bending and braking. It's a little more work, but a lot more cost efficient. They should have different sizes and types too. Here is a pic of the tool: and the link: http://www.micromark.com/SearchResult.aspx?deptIdFilter=0&searchPhrase=rolling+bender It's a really cool tool and I've gottend some really good use out of it. -
1/12 Top Fuel Motorcycle (Larry "Spiderman" McBride)
ScrappyJ replied to ScrappyJ's topic in WIP: Drag Racing Models
As always, thanks for the kind words, Gents! On another forum, I was asked about the tires, so I thought I would provide some insight: The front tire was from the Tamiya kit and I went ahead and cast them since the original intention was/is to build multiple bikes. The master for the rear tire was scratch-built out of flat styrene. I first cut styrene the width of the contact patch part of the tire and rolled it in a roller that I got from Micro Mark (don't know the part number, but should be easy to find on their website); then I used my olfa radius cutting compass and cut the side walls (making sure to cut the outside first, that way you still have the center point to come in to cut the ID); then I rolled some round styrene rod to radius between the OD and ID of the side walls. Once these pieces were cut and rolled, I attached the side walls to the main conact part, the rolled rods to the side walls, then I applied lots of putty and begun the sanding part. Oh...one part that I forgot to mention: once your roll the flat piece for the main contact part, it tends to roll concave, so I rolled a small styrene strip and glued it to the center of the contact patch and then also applied putty so that I could work it from center to the edge of the side wall on both sides. Once all this was done, lost of primer and sanding. Once the master was completed, I cast a mold and made the tire(s). Unfortunately, I didn't get a chance to take pictures of the process and hopefully my descripton makes sense. Here is a pic of the first version of the tire once it was done (had to redo it beacuse it wasn't wide and tall enough): The easier way to have done it, would have been to buy some type of machinable plastic, chuck it up in the lathe and machined it. Unfortunately, I didn't think of it sooner and went with the first thing I thought of. Next pics will be the finished product in the "under glass" section. -
1/12 Top Fuel Motorcycle (Larry "Spiderman" McBride)
ScrappyJ replied to ScrappyJ's topic in WIP: Drag Racing Models
Painted graphics on the bike. This was all using HOK and taping off the graphics. Unfortunately, because there were so many layers and I also used inter-coat clear, I had too much build-up in certain areas and had to try correcting. Lots of consulting with David Morton, I was able to get it presentable Here are the graphics for the decals. Clay Kemp did a great job on these and I am indebted to him. -
Nice work, Steve!
-
Coming along very nicely, Joe! Can't wait to see more.
-
1/12 Top Fuel Motorcycle (Larry "Spiderman" McBride)
ScrappyJ replied to ScrappyJ's topic in WIP: Drag Racing Models
Thanks, Gents! I couldn't have done it without the help from Mike Lawrence, Bob Dudek and Jim Littiken (not to mention Clay Kemp, Charlie at Pro Tech and Bob at RB Motion). Here is the motor and the exhaust. One of the only parts, other than the front wheel and tire, from any kit was the head and valve cover for the engine, which all of those were cast. The engine block/case and the cylinder jug (for lack of a better term) were machined on my mill. At first, the block/case was more (no pun) block like. Then I decided to taper the sides once I realized that is more how the real case looks). All the braided lines were from Pro Tech (Charlie has the best) and most of the fittings were from Bob at RB Motion. I thought the exhaust was going to be one of the most challenging parts of this build. The part of the exhaust coming out of the motor is made from aluminum and the four pipes coming out to the top are made from stainless steel. It turned out to not be too bad and I think the final results were okay. -
1/12 Top Fuel Motorcycle (Larry "Spiderman" McBride)
ScrappyJ replied to ScrappyJ's topic in WIP: Drag Racing Models
And then the parts from Jim Littiken (MicroNitro). these include the rotor and rotor hats, the calipers and triple-trees. Great stuff here! Thanks, Jim! -
1/12 Top Fuel Motorcycle (Larry "Spiderman" McBride)
ScrappyJ replied to ScrappyJ's topic in WIP: Drag Racing Models
Here are all the parts that Mike Lawrence made for me. To say this guy has talent is an understatement. The work he’s doing on his Evo’s motor is beyond real. Thanks, Mike! The primary covers in the process of being CNCed. MSD box being CNCed The fuel pump Brake and Clutch levers -
1/12 Top Fuel Motorcycle (Larry "Spiderman" McBride)
ScrappyJ replied to ScrappyJ's topic in WIP: Drag Racing Models
Thanks for all the kind words, Gents! I'll post some more between tonight and the AM. -
1/12 Top Fuel Motorcycle (Larry "Spiderman" McBride)
ScrappyJ replied to ScrappyJ's topic in WIP: Drag Racing Models
I used the Tamiya detail kit for one of their bikes for the project; however, I didn’t like the part where the front axle attaches to the fork tubes since it is plastic and not quite the design I wanted. I decided to try my hand at machining pieces for it. The thing with these pieces, is that I made them with a ledge so that once I got my machined pieces (rotors and calipers) from Jim at Micro Nitro, I could machine some brackets to attach the calipers to them: This is a picture of the original parts as they came out of the kit: Here are the machine pieces: -
Stunning, Bill!
-
1/12 Top Fuel Motorcycle (Larry "Spiderman" McBride)
ScrappyJ replied to ScrappyJ's topic in WIP: Drag Racing Models
Let's try it this way: Here are some pics of the dampers for the front end. If you’ve ever ridden a bike and wheelied, you know that when you come down, the front end can sometimes have a tendency to wobble a little. The dampers help to stabilize the front end a little better and when you’re going about 200 mph (these TF bikes can carry the front end for most of the 1320 before the front end final hits the pavement), you definitely don’t want any wobbles. -
1/12 Top Fuel Motorcycle (Larry "Spiderman" McBride)
ScrappyJ replied to ScrappyJ's topic in WIP: Drag Racing Models
For some reason, my edit buttons aren't working and I can't add images. Oh well... -
1/12 Top Fuel Motorcycle (Larry "Spiderman" McBride)
ScrappyJ replied to ScrappyJ's topic in WIP: Drag Racing Models
Here's a pick of the blower hat. It was made from styrene and the master actually is hollow all the way through. I wound up casting these to make enough for the other bikes. Then I machined a flat side to the butterfly shaft. The pulley for the cable has two brass pieces inserted that has holes to receive the cables from the throttle cables: Here is the blower hat on the blower and carbon-fibered. It als has some of the do-dads and do-hickies: Plumbed and ready to go: -
1/12 Top Fuel Motorcycle (Larry "Spiderman" McBride)
ScrappyJ replied to ScrappyJ's topic in WIP: Drag Racing Models
I also enlisted Bob's help for the clutch set up. Again, I made the master out of styrene: Billet items from Bob: Finished product: And then the transmission: -
1/12 Top Fuel Motorcycle (Larry "Spiderman" McBride)
ScrappyJ replied to ScrappyJ's topic in WIP: Drag Racing Models
Thanks, Guys! @ Darryl- We missed you guys too! It's always cool hanging with you and Wayne. I had to make the side plate for the primary belt pulleys. I enlisted the help of machinist extraordinaire, Bob Dudek to make the side plate as well as the brace plate for the drive sprocket. In order to get the side plates done, I made master copies for him to do his CNC wizardry (the sprocket master was actually machined out of aluminum and the primary was scratched out of styrene): -
1-8 scale 69 camaro pro mod (mike hill's car)
ScrappyJ replied to comp1839's topic in WIP: Drag Racing Models
That's a REALLY cool project, Dave! If its anything like your models, it will be stunning!!! -
63 Pro Mod Vette.......Updated 09/28/14
ScrappyJ replied to 1320wayne's topic in WIP: Drag Racing Models
Ditto!!! Nice work, Wayne! I always enjoy watching your builds. I got to see this one in Orlando at the IPMS Naionals (not finished, of course). -
1/12 Top Fuel Motorcycle (Larry "Spiderman" McBride)
ScrappyJ replied to ScrappyJ's topic in WIP: Drag Racing Models
Drilled, tapped and on the frame: -
1/12 Top Fuel Motorcycle (Larry "Spiderman" McBride)
ScrappyJ replied to ScrappyJ's topic in WIP: Drag Racing Models
Thanks for the kind words, Fellas! It is ALWAYS appreciated! I originally didn’t do the rear part of the frame that attaches the axle to the frame correctly (originally, I had it solder to the frame and after some more research, I realized that there were two billet pieces that attached to the frame and that the axle slid through. Since the original version had this piece soldered to it, I had to find some channel stock for the piece to bolt into and then I had to machine the billet pieces. During this process, I had to try making them symmetrical so I had to use my tilting table with my vise. The funny thing with machining (and cool thing actually), is that in many cases there are two or more ways to approach things. My way is only my way and not necessarily the correct way, but I use the best way that I know. The first version on in brass soldered to the frame: For the billet version, I started by milling down blocks to then machine each set. Then I proceeded to machine: The final product sans the tapped holes for the bolts: -
1/12 Top Fuel Motorcycle (Larry "Spiderman" McBride)
ScrappyJ replied to ScrappyJ's topic in WIP: Drag Racing Models
Thanks, gents! @Rick: It was good meeting and talking with you too, Rick. Reggie and I were talking the other day and he said he was going to reach out to you. @Wayne: Yeah...we missed you guys too! After I built the original version on the frame and the body parts, I started on the parts for the engine. The engine block is a two-piece unit and the fins on the cylinder jug was machined using a slitting saw. The only part from a kit is the head and the valve cover, which came out of Tamiya’s Suzuki Katana kit and then modified to receive the blower plenum and the bigger exhaust pipes. The magneto, oil pump and original version of the fuel pump (ended up using a unit that Mike Lawrence CNC’d for me) were machined and then the three cogged pulleys for them were machined. All three units have been died and the engine side plate was tapped so that they screw onto the plate. Once those were done, I had to machine the stabilizer plates for the two cogs for the magneto and oil pump and then the solo bracket for the fuel pump pulley. I also machined the pulleys for the blower, the blower, blower pulley arm (don't know what it is really called) and the plenum/manifold. I don’t really have good pics of the engine and individuals of the magneto, fuel pump and oil pump, but here they are on the engine plate. -
Very nice work, Joe! Nice fabrication and your execution is on point. Look foward to seeing more.
-
1/12 Top Fuel Motorcycle (Larry "Spiderman" McBride)
ScrappyJ replied to ScrappyJ's topic in WIP: Drag Racing Models
Here are the wood bucks I carved in order to vacuum-form the body sections. The “master” of the main body section would wind up being tweaked as there was not enough rake/slope to it. I probably should have redone the buck, but instead, I adjusted the master since I knew I would end up casting the body pieces for the other bikes.