
ScrappyJ
-
Posts
495 -
Joined
-
Last visited
Content Type
Profiles
Forums
Events
Gallery
Everything posted by ScrappyJ
-
Very nice! Clean detail too!
-
Very cool!
-
'62 Corvette "C1RS Custom" UPDATE: Finished in Under Glass
ScrappyJ replied to Kennyboy's topic in WIP: Model Cars
I appreciate the kind words on the Ghia! I love the pro-touring/G-machine genre and have seen the Vette before in several publications. This is a difficult one to capture because of the various styling ques, but you are nailing it and doing good justice to a worth-while project. While my project has porsche power in a Ghia, in the real world, your project would still smoke mine, LOL. -
'62 Corvette "C1RS Custom" UPDATE: Finished in Under Glass
ScrappyJ replied to Kennyboy's topic in WIP: Model Cars
Very cool project, Ken! I love the front end treatment too! -
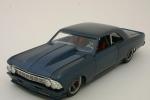
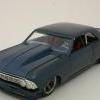
Thanks for the continued kind and encouraging words, Gents! I did get the front spindles and the rear axle housing done. Unfortunately, I think I have to redo the driver's side front spindle as it is a little off and the car is like a trike right now (but hey, at least I don't have zooming muffles jacking my car up). I thought I would have some good time to work this weekend (it being a 3-day weekend and all), but there is a mustang show in town and one of my friends from STT wants to go. For most that know me, I am more of a bow-tie guy and not a huge fan of the blue oval. [ Sitting on all fours: This will likely be it in term of the quantity of updates for a while.
-
LOL! Not really, Bill. A lot of this has been done in the last month or so, just haven't been able to get to posting pics.
-
Thanks, George! MCM did a feature, but not Scale Auto.
-
Definitely glad that you're back on this one, Sherm! Every time I see that motor, I forget that it isn't 1:1. Can't wait to see more.
-
Getting ready for the spindles a and axle housings for the rear:
-
That is a really cool idea and you're off to a great start, Pat! I think you're nailing it right on. Love the bumpers, exhaust and the way it sits.
-
Very nice and meticulous work you've got going there, Brizio!
-
Nice work so far, Derrick!
-
Here are pictures of e upper and lower control/A-arms mounted: The aluminum tube in the last picture is to set the proper distance between the arm attachment points. Then a pin is slid through the two brass pieces, as well as the aluminum piece and should be pretty straight and makes soldering a little easier. The way it was supposed to sit:
-
Nice! Looks like something I wouldn't mind driving down the boulevard.
-
Very, very nice work, Mitchell!
-
Very nice, Tom!
-
Very nice, Ira!
-
Thanks, Gents!!! I really appreciate the kind words! I can't find one of the resin plugs I used to make e tires, but I do have one of another tire I did. In the pictures, you will see what seems to be a plug and that is pretty much what it is. I basically machined a plug so that I could slide the tire onto, then once I pulled the resin out, it gave me material to clamp in the three-jaw chuck, in the lathe. Despite my best efforts to have the tire on the plug and trued, it still wobbled once I took it out of the mold. What I didn't realize until later, is that I could chuck in with the tire in the chuck, true the plug part and then reverse it back to machine it. The other thing I realized is that the tires aren't perfectly round either, so once you have the pieces to glue and piece the tire back together for the master, I couldn't get it exactly now I wanted it (good enough for gov't work, though):
-
USA-1 CORVETTE LSR TEAM! WIP Photos! Finished Now!
ScrappyJ replied to Ira's topic in WIP: Model Cars
I've been following this one and have to say that I really like the whole thing (from concept to execution). Great job, Ira! -
Cool build, Bill! I might need to get me one of these too. I bought the notchback from them, but my work room is so cluttered, I can't even find it. You always have a way with these VW builds, but then the "empinut" name would suggest you would .
-
Very cool!
-
Yeah...that looks good too. I agree that this style fits your project better.
-
Very nice project, Shane! I like the color (my favorite) and the stance is right on point too. Everything about this project is cool.
-
The tires came from a Maitso diecast notchback, but they were a little skinny, so I widened them. I had to cast the tires in resin so that I could widen them and then had to recast then back into rubber (I use a product from Reynolds called Task 14 and it comes out more "rubbery" than most kit tires). In order to get them done, i had to cast two separate molds (the first to make it in resin and then the second for the master). The original mold had he tires set in a plug that I can use to chuck-up in the lathe and machine the tire and separate each half. It wasn't until i was too deep into it that i realized I should have cast three molds (two for the resin tire since it is directional). Here are pics of the masters once I widened (the center is just some type of butyrate plastic I had bought from Small Parts, Inc. and machined to the proper ID and OD: Here are masters for the censors of the Fuchs wheels that I also got from the Maitso diecast: And then the wheels (machined outer and inner sleeves, with cast centers) and cast tires: I'll try taking some pics later of the resin plug I used for one of the tires and also put the originals next to the new ones for comparative purpose.
-
Thanks for the kind words, Mr. Bob!