
ScrappyJ
-
Posts
495 -
Joined
-
Last visited
Content Type
Profiles
Forums
Events
Gallery
Everything posted by ScrappyJ
-
Looking good, Sil!
-
Reminds me a little of the one Chip Foose did on Overhaulin. Among many other slight modifications, he added two more of the small windows on the roof(so it ended up being 5 on each side). I can't remember if it had the corner window at the rear or not, so don't know if it made it a 23 window from a 21 window, or a 25 window from a 23 window. Eitherway, nice job.
-
Really cool concept. Nice job!
-
I followed this one on another forum, Rick and you have done a phenomial job! Simply exquisite!
-
Thanks again for the kind words, fellas!
-
Yeah...payback is a bi&*^, LMAO!
-
Unfortunately, Lee, I don't have an extra eight. I got those from R B Motion in one of his Ebay auctions. There were twelve of them and they are made for a 1/20 car (ferrari I believe). He now has a website, but that is not one of his shelf products, so don't know if he even has anymore. Thanks for the kind words!
-
Thanks, Bob! I'm still working the f-stop and shutter speed to get the proper exposure. I tried taking it with natural light, but you can see the window from my bedroom in the reflection. I will try taking some pics with the flash (at night) and bounce the light off of a reflective board (I use a big piece of styrofoam). Not sure I will make B'ham/Anniston (yet again). Morton just got a new pilot gig and will be heading to training on Friday, so I don't have my road-trip buddy. I do hope to go and hope to see you guys there (can't wait to see your Maro...that thing is looking bad a$$). Later!
-
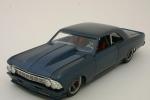
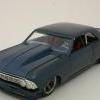
Thanks for the kind words, Gents! I have a problem with the hood not wanting to sit right. I thought I compensated well enough for the paint, but apparently not and the front corner (particularly on the driver's side), sticks up a little. I can't say enough, how much I like the Jada kit. I have both the AMT and the Jada and it's not that I don't like the AMT, but the Jada does look more "sinister" as you guys have said. Again, thanks for the kind words and I'm glad you guys like it. Later!
-
Yet more pics:
-
Some more pics:
-
This is my Concept Camaro I finished in November. Some of you guys might have seen it from Gregg's pics. of the NNL South, so pardon the redundancy. After wishing for a new camera for the last 4 years, I finally go the Canon 50D under the Christmas tree. So, I was able to get some pictures taken on Sunday. Hope you guys enjoy:
-
That is some really nice work there, Cliff! And your paint is crazy nice!
-
Man that looks good. Nice job, Dale! We have a show here in Florida called "Billet Proof" I think they have then elsewhere in the country too. We saw one similar to his, except it was a tow truck and it had dulies. Again, looking good!
-
Looking good. I like the stance and overall concept. I have found myself into the pro touring bit for the last few years. I was strictly Pro Street, but seeing all the neat and innovative desgin and engineering on some of these rides is cool.
-
Just a couple more things- Here you can see where the mirror has been modified. I don't know exactly what the styling is called, but I didn't like the mirror attached to the body (with the original mirror, they stuck out too far from the car): Here, you can barely see the centers for the wheels as they are cast in task 9 resin, which is a little transulcent, but IMHO, is more stable and easier to work with than some of the other resins. Again, my good friend, Dave Morton, cast the centers that my other good friend, Bob Dudek, machined for me: I forgot to mention, the strut support bar was originally not going to have the cross support, which would obviously give it a lot more support while handling the corner duties. My good friend Jay Ruis, gave me the idea to add the cross support and drill the four holes for added looks (in the real world, it would be to take as much weight off of the part): I think that pretty much covers the build-up of the Maro (my other friend Tim K called it that, so I think I'm going to stick with that). Next, I'll try getting the finished car posted "under glass". I finally got some pics taken this Sunday with my new Canon 50D. Still need to work on some aperature (f-stop) and shutter-speed settings. I never added the in-progress on my '66 Chevelle either, so I think I will add some of those pictures too. I hope everyone enjoyed the build-up pics and I apologize I don't get to post pics while building as I don't have a permanent camera set-up, separate from my buildin area.
-
No worries, Cliff! I come from a place similar to yours where you respect each other and life is sort of laid back (St. Thomas, USVI). As Jeff Sauber said, I should have used emoticons to soften the reaction from others and I didn't. BTW, if you do invest in a mill and lathe set-up, any advice I can provide based on my experience, feel free to reach out to me. Thanks for the kind words too!
-
Thanks, Gents! As soon as I get a chance, I will be posting some pics. of the finished model in the "under glass" section of the forum. @ Mike. I like yours too, Mike! Looks like we both had similar visions.
-
Takin' it on the chin..."Leno" - esque twin-turbo V6 Camaro
ScrappyJ replied to Zoom Zoom's topic in WIP: Model Cars
That is looking awesome, Bob. I like that styling more than the one I did. What wheels/tire combination you gonna use? -
On to the interior: And the chassis and interior all coming together:
-
Front suspencion: As you can see, the design of the control arms wouldn't allow the spindles to turn. Fortunately, most of this part can't be seen beyond the wheel: With the motor and the crhome-plated, brass radiator (you can see it through the grill): Rear suspension set up. In this picture, you can see the mostly brass suspension. The trailing arms can actually adjust as they were drilled and tapped. The sway bar was also soldered brass and then chrome-plated:
-
This was the first diffuser design. Unfortunately, GTMike explained to me that the bottom part of the diffuser would have neutralized the whole purpose of diffusers and thus I took that part off. You can also see where I added material for the holes for the exhaust tips: This is the injector set up on the motor. I used RB Motion 1/20 ferrari velocity stacks, then I re did the base for the plenum to accept the velocity stacks and the carbon fibered it along with the valve cover, covers. You can also see the turned pulleys and the machined oil filler, etc:
-
In this shot, you can see where the grill was opened, the air induction in the bumper was opened, and the air vents for the brakes right above the front chin spoiler were opened: The gills in front of the rear wheels were opened in this shot:
-
Adjustable struts I machined: He is set up on a CNC, Ben.
-
Some soldered brass stuff ready for electro, chrome plating: Rear trailing arems Spindles Upper control arms Lower control arms, although they really wouln't work, but I was getting lazy