
kennb
-
Posts
1,056 -
Joined
-
Last visited
Content Type
Profiles
Forums
Events
Gallery
Everything posted by kennb
-
Yes,,,,another MG..............this time it is one of 8 made in 1939....................it has the TA chasis and a 4 cylinder motor but ws set up for racing...............it is a sharp car...This time I have the wheels done, almost and started the engine. It is a little more detailed than what I have been doing but I am trying to improve the models that I am making and feel this is a step towards that end. Each build you explore need territory with the skills you gained on the last one...I can go ahead and make more jsut the way I have been but then What is the point,that game is over ,now onto new explorations. As you can tell I do have a lot of finishsnading to do but for now this is getting close to having a decent and correct motor, was able to get a lot of additional information to make this possible. Kenn
-

Motorcycle
kennb replied to kennb's topic in WIP: All The Rest: Motorcycles, Aviation, Military, Sci-Fi, Figures
main body painted with first clear.... Kenn -
Tony...yes that is the procedure...this picture should clearify it better.....thank you for the comments and questions. Also,,there is no time limit on this challenge. If it takes 6 months it is fine. I would like others to post pictures of their progress tho. Kenn
-
Thanks for the comments... Bebuilt the front brakes and steering and finished the body. kenn
-
The wire wheels are being shown in the community build,,,,,,it shows each step and all the parts needed to make them. This is about 1/20th scale the same as the 1936 MG SA Saloon that is under glass last week. Thank you for the questions and comments. Kenn
-
This is my K3, entirely scratch built. You can follow along and build one like this with me on the community forum. I am going through each step week by week for you to build this car with me. Like all my builds there are no commercial parts of any kind. Kenn
-
Still rough but am starting to get the feel and mass I am looking for on this.................lot of finishing to do on the motor yet but getting there Thanks for looking and comments and suggestions are always welcome,,,, Kenn
-
engine set to frame,,,dry fit only at this time Kenn
-
Motorcycle
kennb replied to kennb's topic in WIP: All The Rest: Motorcycles, Aviation, Military, Sci-Fi, Figures
Got the first color coat on this..It will be wet sanded and spot putteid at least two more time before the final color coat is on and cleared. I also have to make up the handle bars and other details, I will let the base coat set for a few more days before I start sanding. Kenn -
Section 3 three Now lets get to lacing. You will need to make the center hub and 2 rings,one round rod and one flat. the center hub can be made in a few parts. This is the part that will slide onto the axels. The rings are cut to length to go inside the tires we made and superglued and let sit over night. I use some wax paper as a barrier between the tire and ring we are glueing. This keeps them from adhearing to the tires permently. use strands of speaker wire...wire from electrical cords is too heavy. Notice the center of the lacing board is built up. I have since added centering pegs so each wire is the same and the outer(flat) ring will center over the rod ring easier. Start to lace by tying off a wire and going to the center , around the center counter clockwise and to peg 3 ( skipping ever other peg) and continue around. You may want to tape every few laces as you go. Plull the wire snugg but not tight. Again i used wax paper in the center wher we are glueing to reduce the chances of glueing everything to the lacing board. the second row of lacing goes to the pegs you skipped on the first round, again ever other peg is used so that when you have all the laces done each peg is used. The whole thing is taped down so all the wires have contact with the rod, sparingly super glue around the wires and set the outer ring in place and hold down tight for about 1 minute, then put a weight over the top untill the super glue sets, about 1 hour, This should take about an hour for the first wire...you may want to do a few to get the hang of things before you do the finals. Have fun Kenn
-
progress on the engine today.............................worked on some others also.. Kenn
-
Toyota Landcruiser VX 80
kennb replied to Volvoman's topic in Model Trucks: Pickups, Vans, SUVs, Light Commercial
With your photography outside like that you forget this is just a model and not the real thing,,,,,,,,,,,,,great build all the way around Kenn -
Did the final valve covers,,,,,,,,I think they are okey now,,,,,,oile pan don and getting the setting in the engine bay. I have been working on the blower but having a hard time getting it to look right,,,,eventually it will come out. Thanks for commenting and looking............. Kenn
-
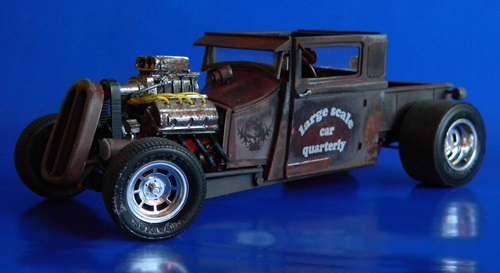
The motor has been botthering me since I put it together,,,,time to find some drawings and get it close to right..I am sure the hemi guys are rolling thier eyes Time for major surgery...... A little cut and paste,,,,,,and taking hammering out a simple vavle cover it is strating to have the right design ques,,,, I am basing this on the 1956 engine,,,,,It is something one would have used in the 32 coupe...................... hope the hemi guys can nowstop rolling the eyes a bit Kenn
-
This mornings mess....I do all my work except painting in this space. I have a small space downstairs I use for painting. Kenn
-
Hemi block and headers Kenn
-
The body is straightened around ,,,now I will tackle the chassis and engine, The need to be done at the same time so everything fits right, Kenn
-
This a request that I try to finish this up...I have a few that I am resurrecting and some winding down to the last few days so I will post this. Kenn
-
few details taht are int he paint shop dash supercharger Thanks for all the nice comments and lookers..............................winding this one down Kenn
-
Thank you for all the nice comments.....The laced wheels construction can be seen in community builds under the 1933 MG challenge, I will be posting the actual lacing this afternoon. Getting closer to finish...need to send the last bits to the paint shop then it goes under glass. Kenn
-
-
hey Guys , my first scratch built piece of linkage
kennb replied to CrazyGirl's topic in WIP: Model Cars
Welcome to the joys of scratch building......now you can make what you can't find Looks good,,,,,,,you have a great microscope,,,better than mine. Kenn -
Bill showed me all the origional paper work for the Brewster. I was surprised that he still had everything but he said his dad kept everything. much like Bill, save evrything,period. It was all handwritten on the Brewster letter head with notes on the Buick chassis. Puffing on the stub of a cigar. smoke filled the air. His cheap cigars did nothing to improve the quality of the aroma other than covering up the old paper smell that comes from keeping them in boxes and the humity filling them with the musty smell. Bill was not much of a neat freak but almost to a clutter nic, much like the personality. All the time we were going through things he was muttering with an occasional tid bit of imformation about the car. If was origionally 2 tone brown dark on the fenders and top and medium on the sides. This brings up a curious dilema, do I go origional or do I go as it is today with the blue. Maybe with the interior the way it is I should just stick with the blue. There was also the orgional bill of sale that should the price on delivery. Bills dad paid cash for the car when it came so I guess tuna sandwiches were really hot then. When the average Ford was going for $895.00 this seemed to be out of sight for most people. $7,893.56 for all the upgrades and special features, including the $895 for the 2 tone paint. Found enough plastic in a box to keep pushing on. Rough yet. Kenn
-
Thank you Derick........................much appreciated.....this is a rather simple car so it does not take much time Final coat on the body today,,,,just need to chrome plate the grill and headlights........... Kenn
-
The firewall has bothered me since i built this one and I think that is why I set it aside,,,,,,so,thanks to the post above on the 31 I am redoing the firewall and cowel. Kenn