
Rdkingjay
-
Posts
270 -
Joined
-
Last visited
Content Type
Profiles
Forums
Events
Gallery
Everything posted by Rdkingjay
-
Fantastic work Tom, I love it!!
-

Georges '59 Impala * 12/22/13 FINISHED "under glass" soon*
Rdkingjay replied to Rdkingjay's topic in WIP: Model Cars
So, since the door debacle has been corrected, forward progess continues. I am aiming to have this car done by 12/30, so that I can deliver it after new years. Although the body is only mocked on in these shots, as are the hood and windshield, it is ready to be finally mounted. Since George and Jean used this car to go to the beach on sundays a lot, I went to a doll house store and grabbed some goodies to acknowledge that. More on those later. Tomorrow the body will get mounted and I will finish the BMF. Going together fairly well and aside from the door, hasn't really fought me too much. Take care and thanks for looking. -
Georges '59 Impala * 12/22/13 FINISHED "under glass" soon*
Rdkingjay replied to Rdkingjay's topic in WIP: Model Cars
All fixed. Paint matched perfectly and layed down beautifully. No wet sanding/buffing needed. Whew!! -
1/16th Dukes Charger * 3/28/15* Update, **DAISY DUKE AUTOGRAPH**
Rdkingjay replied to Rdkingjay's topic in WIP: Model Cars
Polishing continues. I keep back burner-ing this car to finish other projects, but as they fly out the door, this baby is getting closer. Nothing new to report. Wax on-wax off.... -
Georges '59 Impala * 12/22/13 FINISHED "under glass" soon*
Rdkingjay replied to Rdkingjay's topic in WIP: Model Cars
Yep, sanded the whole section and already primed. Luckily I wrote down the exact measure of paint,catalyst and reducer. -
Georges '59 Impala * 12/22/13 FINISHED "under glass" soon*
Rdkingjay replied to Rdkingjay's topic in WIP: Model Cars
If I ever catch Mr Murphy (murphy's law) in a dark alley, he ain't walkin' out!! So thinking I was being extra smart, I sanded out the paint from the channels where the chrome trim goes along the side of the car. It went very well, except for the passenger door. I guess if there was a weak spot in my paint job, better to find it here then when I present it to George. If it had to be anywhere this is where I'd pick. Easy fix. Easy to tape. Pretty sure I can blend it. Body shop experience may pay off here. -
Georges '59 Impala * 12/22/13 FINISHED "under glass" soon*
Rdkingjay replied to Rdkingjay's topic in WIP: Model Cars
Got Georges car painted this past weekend. Sprayed it with Chevrolet Oxford white. I am very pleased with the spray and it only required a few spots of wet sanding to take down a few nibs and get it nice and smooth. Three step polishing system netted a great shine that doesnt show to well in the photos, but I'm happy. So tomorrow we start the trim pieces and BMF. Moving along... -
Foxer thats real french and electric blue.
-
Hello gents, This is a Galaxy Limited 46-48 Chevy Aerosedan, that has been built to replicate the '46 version. Aside from hollowing out the tailpipe and adding real front springs, the chassis is right from the box. For the interior, I flocked the floor and rear parcel shelf. The dash and door edges were sprayed dark brown then lightly airbrushed with flat black, then cleared, to simulate the simulated wood grain found in cars of this era. The colors were chosen based on colors I saw in our own 1:1 '40 Ford. Painting was a snap, with the only taping being between the main body shell and rear fenders. The inner rear fender liners are light blue, because they are originally part of the main body shell. The front fenders are a separate piece. Although it is hard to see because the frame rails hide the fade, I over-sprayed the floor pan with light blue. The side trim running the length of the car, as well as the smaller piece under the windows is actually strip styrene. The engine got many details with a scratch built dip stick, fuel and vacuum line, spark and ignition wires and heater hoses.
-
1/16 MPC cars. Have gotten my hands on original issue/still in plastic General Lee, Street Charger and Super Charger. Still looking for clear bodied Petty Charger and Buddy Baker Charger, preferably still in plastic. When I get the originals, I buy the re-popped versions as well Anyone have the orginal Petty and Baker kits, I'm buying, $$$.
-
Thats a hell of a nice looking car Bob. Both the real one and your model. The paint looks killer. Does he still own the real car?
-
Georges '59 Impala * 12/22/13 FINISHED "under glass" soon*
Rdkingjay replied to Rdkingjay's topic in WIP: Model Cars
Finished interior. The floor has been flocked and I added photo-etched keys/key ring, rear seat ash trays and door handles. -
Georges '59 Impala * 12/22/13 FINISHED "under glass" soon*
Rdkingjay replied to Rdkingjay's topic in WIP: Model Cars
Rear seats. Thanks for looking. -
Georges '59 Impala * 12/22/13 FINISHED "under glass" soon*
Rdkingjay replied to Rdkingjay's topic in WIP: Model Cars
Thank you for your comments so far gents. As you may have gathered, there is a lot to this story about my friend George. As I eluded too earlier and as you keen eyed types may have noticed in the 1:1 shot of the interior, Georges seats are not stock, nor are the door panels. They both have tuck and roll covers that George and his wife Jean made in their upholstery shop. Unfortunately, I had to live with the door panels stock pattern, but the seats I would not compromise on and the supplied tuck and roll decals are ok, but...NO! The following posts/photos tell the story. Basically, I cut the backs/bottoms out of the seats. Added new ones, then inserted custom made inserts that I made from sheet plastic and # 241 .060 half round strips for the tuck and roll pattern. Not perfect or exactly symetrical, but, VIOLA!! Tuck and roll. I also had to sand away the molded pattern along the top of the seats and the side chrome molding that is usually along the sides of the front seat uprights. -
THIS...is the car that started it all for me. I've been building model cars for 38 years, but this car got me interetsed in the real thing, the 1:1's. Probably a natural progession anyway, but thats the story I'm going with. Anyway, the story is, George was the neighborhood wrench and car guy in Ormond Beach Fla. in the early 80's. I was the curious kid whom he always had time for. If he was working on a car in the back yard shop, I was there! He acquired this car from a customer for whom he had re-uphostered a chair and received a bad check as payment. In lieu of payment, he accepted this '59 impala. It was in the back yard with weeds growing thru the floors. It was originally black with a black and white interior. To say it was a mess is an understatement. He was able to get it running enough to drive it home and was surprised when the gas tank fell off and passed by him as he turned. These pics are 30+ years old. His wife snuck them to me and I update her regularly on the process of the model. I am building this car as if it were an original white car, as evidenced by the white over spray on the floor pan. My first time doing this. I also used tires and white line decals from a '64 Chevy kit, as well as the 327, which I badged as a 283, which Georges car had. The seats have been heavily modified to look like Georges interior. More on that later. I am adding several photo-etched parts like asytrays, door handles, keys and key ring and radiator cap, so far. Thanks for looking. BTW, If you know George, don't tell him!!!!
-
1/16th Dukes Charger * 3/28/15* Update, **DAISY DUKE AUTOGRAPH**
Rdkingjay replied to Rdkingjay's topic in WIP: Model Cars
Bone, I'm away on a working trip this week then vaca middle of next. If I get time in between I'll happily tell you all the products I use and how. Ins nutshell: Wet sand with 1500 grit. Polish with 3m rubbing compound and foam applicator. Polish with 3m finishing compound/swirl remover and cotton cloth. Final glaze with cotton cloth. -
1/16th Dukes Charger * 3/28/15* Update, **DAISY DUKE AUTOGRAPH**
Rdkingjay replied to Rdkingjay's topic in WIP: Model Cars
Well, the polishing has started. I use a three step process that I basicaly learned in the body shops years ago. Wet sanding, followed by a no. 1 rubbing compound from 3m, followed by a finishing compound, also from 3m and then a final glaze. Its times like these when I wish I had a little garden knome with a minature buffer. Its labor intensive, but worth it in the end. Here's the completed hood. I still want to add a hood latch mechanism and paint the sound proofing underneath. -
1/16th Dukes Charger * 3/28/15* Update, **DAISY DUKE AUTOGRAPH**
Rdkingjay replied to Rdkingjay's topic in WIP: Model Cars
Yeah, you know I've been back and fourth with clear over bmf or not. Pros and cons too both because I've done both, but in the end, clearing over the bmf protects it and pretty much makes it maintenance free. Wet sanding and three stage polishing to start in a day or two. -
1/16th Dukes Charger * 3/28/15* Update, **DAISY DUKE AUTOGRAPH**
Rdkingjay replied to Rdkingjay's topic in WIP: Model Cars
In the spray booth for the clear coats, finally!! Bmf and decals all came out nicely. Is that a light I see flickering at the end of the tunnell?? -
1/16th Dukes Charger * 3/28/15* Update, **DAISY DUKE AUTOGRAPH**
Rdkingjay replied to Rdkingjay's topic in WIP: Model Cars
I actually bought two of his sheets and he made me a third with some other things I was looking for. I may finally get to clear the body this weekend! -
1/16th Dukes Charger * 3/28/15* Update, **DAISY DUKE AUTOGRAPH**
Rdkingjay replied to Rdkingjay's topic in WIP: Model Cars
Added BMF and hemi logos to the doors today. Would kill or pay for chrome Charger logos for the sail panels. Anyone?? -
Bob, I cannot give you an accurate answer because I don't know. I used what the kit provided. This car is about 15 years older then the oldest types of cars I usually go for. My car model tastes hover from the early sixties to the seventies. So I would assume it is a stock appearing piece, save for molding/scaling issues. Bill, I was not aware of the discrepency with the front fenders, but thank you. Future ref for the next one. The car is nearly complete now. Those photos are 7 months old.
-
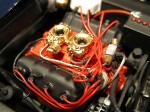
This is a Galaxie Limited 46-48 Aerosedan kit. This is a great kit for an experienced modeler. It is one of the most detailed kits I have ever built, in that the company has taken strides IMHO, to produce a kit, that when finished, does not have any of the gaps or wiggle room characteristics of off-the-shelf kits. I am essentially building out of the box, but I did replace the solid molded front springs with real ones and added hoses/wires/fuel lines to the engine compartment. Oddly, the color I choose for the engine, based on pics of the real thing, is pretty close to the french blue, that is a signature color on our cars, to this day.
-
1/16th Dukes Charger * 3/28/15* Update, **DAISY DUKE AUTOGRAPH**
Rdkingjay replied to Rdkingjay's topic in WIP: Model Cars
Its the Nason SelectClear 2K it is a urethane based clear. -
1/16th Dukes Charger * 3/28/15* Update, **DAISY DUKE AUTOGRAPH**
Rdkingjay replied to Rdkingjay's topic in WIP: Model Cars
Mike, Believe it or not, those are one layer of the kit included decals. I have two and intended on using both sets becase i assumed i would have bleed through, like I did 30 years ago when I built the original. But it seems MPC at least improved their decals, if not the whole kit. I will be using three coats of Nason automotive clear. I use it on all my builds. When thinned down, it lays down beautifully and doesnt attack decals, custom made or box stock.