Rdkingjay
-
Posts
270 -
Joined
-
Last visited
Content Type
Profiles
Forums
Events
Gallery
Everything posted by Rdkingjay
-

Looking for certain Photo etch scripts
Rdkingjay replied to Rdkingjay's topic in General Automotive Talk (Trucks and Cars)
Never tried that method before, but I'd be curious as to its process. But I did find a PE sheet on Model car Garage for a '53 Ford Victoria It has a "Fordomatic" script that has the same font that i'm looking for. Just have to trim off "omatic". I think I can make the rectangle part as a decal. -
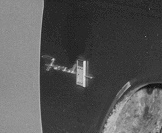
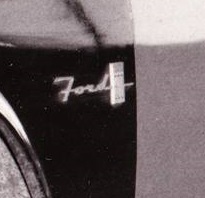
Greetings gents, I am in the process of building a '63 Ford Mass. State Police cruiser for the MSP Museum in Grafton Mass. The car I am using is a '63 Promo model, donated for this project, by fellow forum member, Tom Sheehy. In the interest of accuracy, I would like to replace the existing fender script from "Galaxie" to the lower trim version, which is simply a "FORD" script. Please see the attached pics. Does anyone know of a photo etch sheet that contains something I can use? I have looked on all my usual sources, to no avail. Thanks in advance for any help provided. Jay C.

-
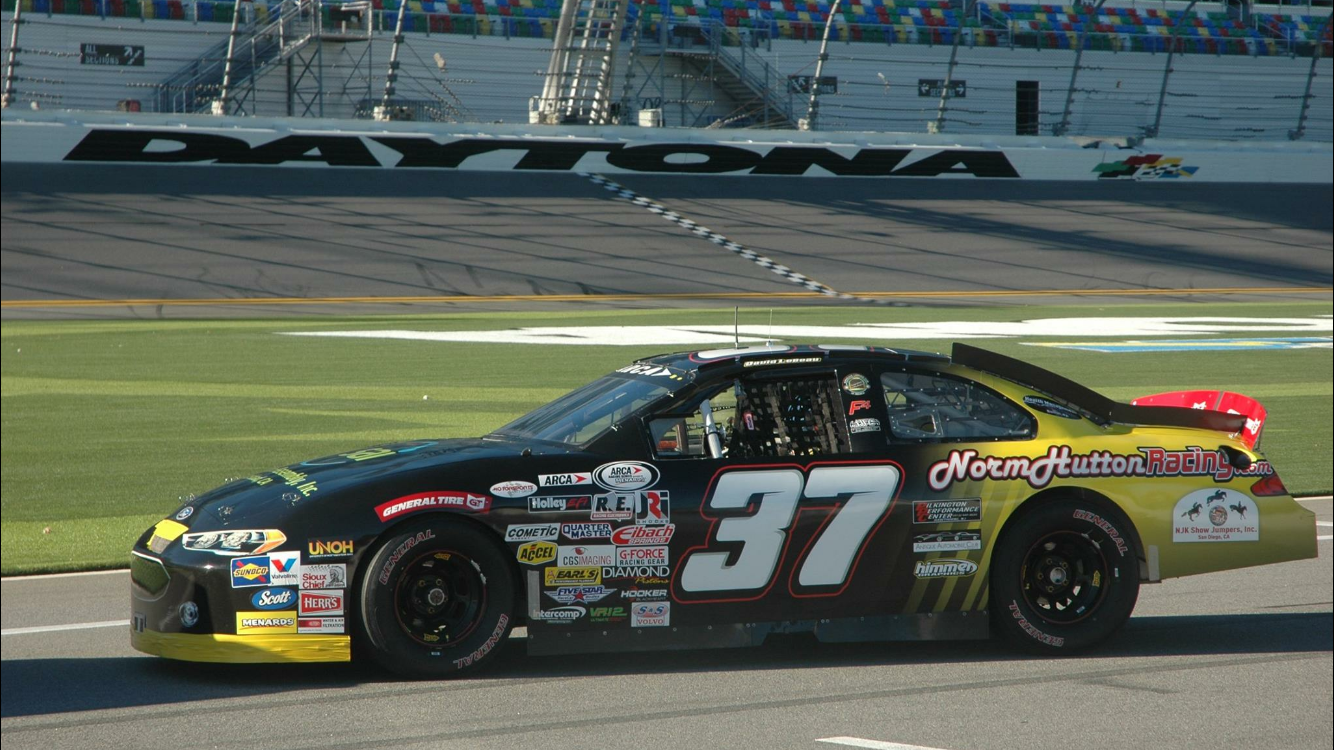
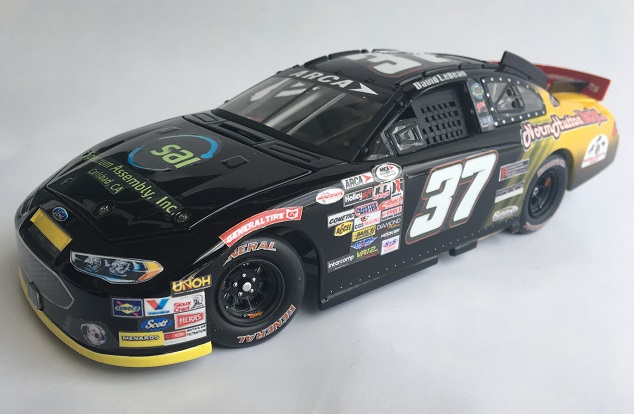
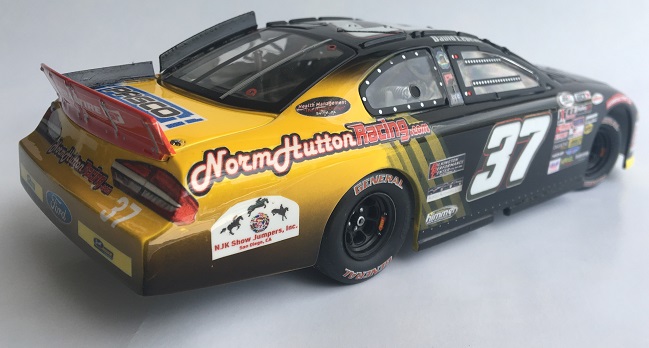
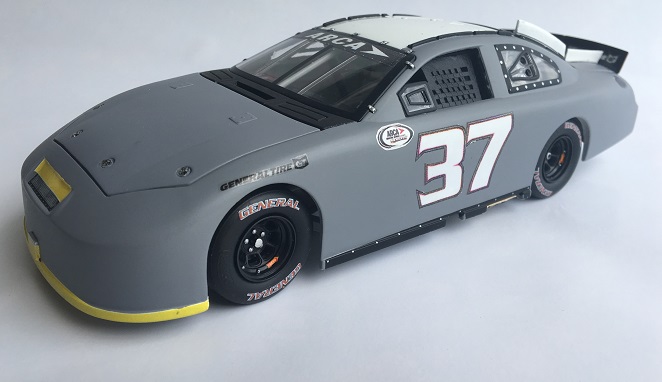
These two were both built from Team Caliber 2006 Fords. They are essentially the same car, just two different versions, test and race day. I built these as a gift for my friend Dave Lebeau, a long time local racer, who got a chance to run a few races in ARCA, for Norm Hutton Racing. The decals are custom made and both cars were painted in automotive grade paint and clear. The most challenging aspect was the race day cars, black to yellow stripe fade. I have also included pics of the real cars. Thanks for looking.
-
63 Ford Photo etch?
Rdkingjay replied to Rdkingjay's topic in General Automotive Talk (Trucks and Cars)
Thanks Paul. Checked it out, with no luck. However, Missing link Models linked me to Scalemates.com. Appears to be based in Belgium. Is this the right site? -
Good morning gents, Have any of you ever seen or know of a photo etch kit for a 63 Ford Galaxie? Soon, I will be converting a very generously donated 1/25th promo into a Mass State Police car, to be displayed in the Mass State Police Museum and Learning Center, in Grafton Mass. One of the glaring issues is that all of the photos of the real car(s), have the stylized Ford scripts on the front fenders, as opposed to the Galaxie scripts. The other issues are modeling prowess things that I can handle. Thanks in advance for your help. Jay C.
-
Ah yes Dan, one of the other MSP's Its all good!
-
Taking this group to a show this weekend. Greatly looking forward to it. I'm fairly certain I have shared all of these on this forum over the last 5 years or so. The GL is the Round 2 MPC 1/16th version that has been modified six ways to Sunday, to help create a more accurate version of the car. The green and white '60 Plymouth is my resto from a couple years ago that combines a Johan Plymouth Police Wagon and a chassis and running gear from the Lindberg 64 A330. The '46 Chevy is a Galaxie Limted kit, that was done to replicate a real in-service MSP Cruiser from that era. The '68 Fury is another Johan kit and it also sports a chassis swap from a '68 Charger, albeit heavily modified. The last is a 1/18th Motor Max diecast Crown Vic. Originally packaged as a white unmarked 2002, I converted it to a 2007 and finished it to replicate my last issued cruiser. It has working lights and sirens and an interior that is absolutely stunning, thanks to assistance from my good friend Hervey Cote.
-
Why Glue Bombs ?
Rdkingjay replied to D. Battista's topic in General Automotive Talk (Trucks and Cars)
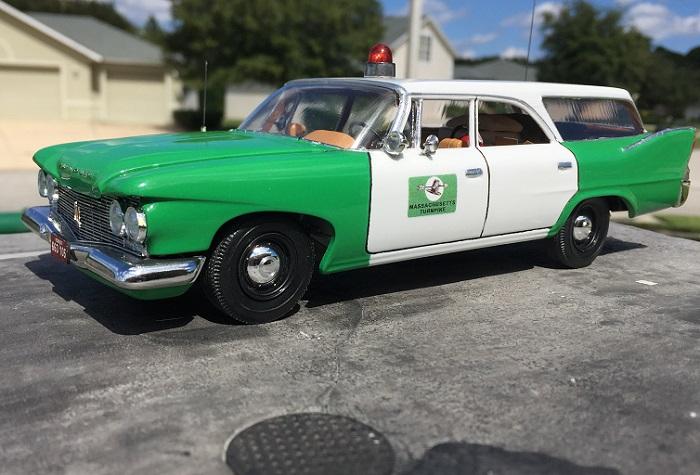
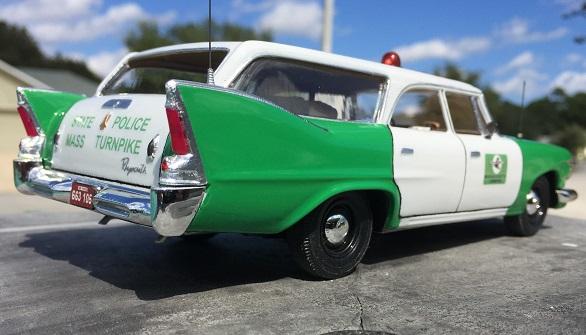
As some one who has always enjoyed a good 1:1 restoration, that enthusiasm has transferred over to certain models. And its a hell of a lot cheaper and easier to find storage for. My last resto was an almost freakishly built Johan Police wagon. I can only imagine that the builder may have been going with a certain theme. Perhaps something along the lines of Halloween or The Munsters. Primarily due to the paint job. But something about it grabbed my attention. I think it took about two years to re-do it, which included a chassis/engine compt. and drive train from a '64 Dodge. It now is representative of the paint scheme that our cruisers used on the Mass Pike from its opening in the mid 50's to 1968.
-
1/24 Model display base
Rdkingjay replied to Rdkingjay's topic in General Automotive Talk (Trucks and Cars)
Those are in fact perfect. Exactly what i was looking for. Thank you sirs. -
Looking for some guidance on locating a particular type of 1/24 model car display base. The base lifts the car up approx. 2-3 inches and has an angled mirror under it to show off the under carriage. I can't seem to locate them or even a manufacturer. Any guidance would be appreciated. Thanks in advance. Jay C.
-
Very well done Matt. I did one of these a few years ago and the challenges to make them look nice are plentiful. I wish the molds could have been updated to be more accurate. I agree with you and others on the silly and foolish policies that SAE enforces with regards to this iconic car and the Rebel flag. They will never see any of my work on their website or on the pages of their rag! Again, great job! Not to hi-jack, but heres mine.
-
Very well done sir.
-
Great back story! I love tribute builds and the stories behind them. Great job on the model and nice save with the wiper/oil filter issue. Interior is gorgeous.
-
Beautiful!! First photo looks like a real car. Amazing build!!
-
Gents, Thanks for your thoughtful comments. This project was a real bear, no pun intended. While I am not anxious to do another, I likely will. I have a vintage 70's Revell Monroe Handler Mustang with a very in-correct ladder frame. I also have an AMT Special Edition '89 Mustang GT. You see where I'm going with this? Thanks again and Happy New Year.
-
Beautiful. Very well done.
-
Wow! Looks like 1:1. Amazing!
-
Amazing! Looks like it just came off of the track.
-
Very well done. Especially the interior!!
-
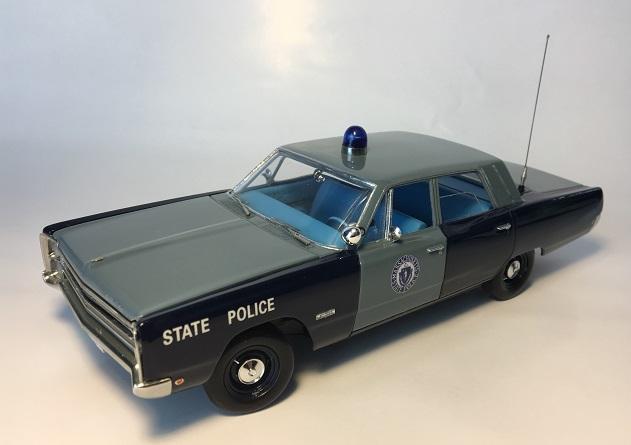
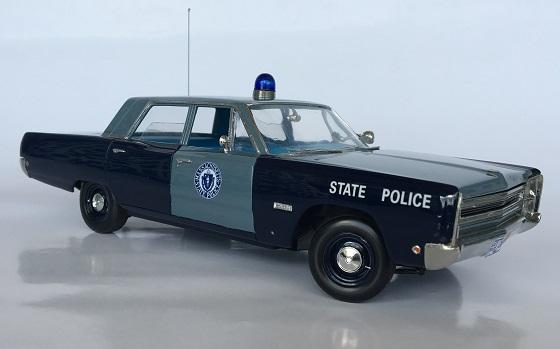
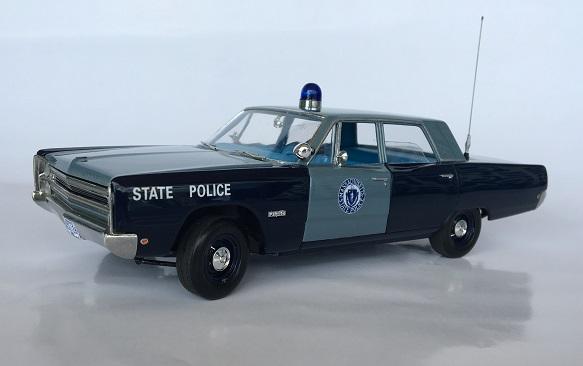
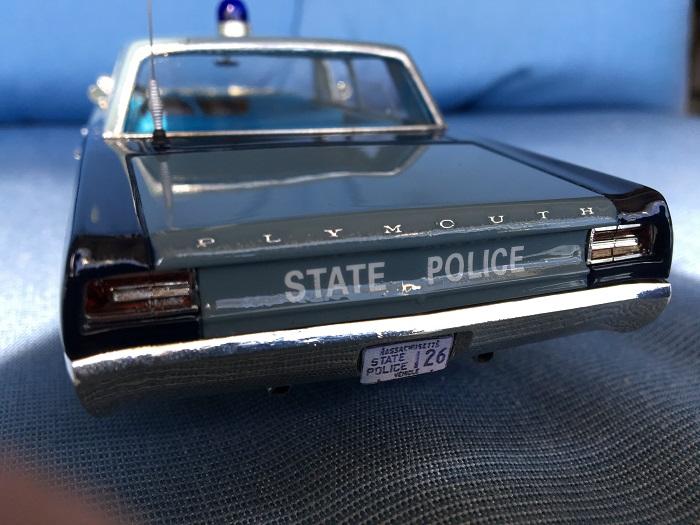
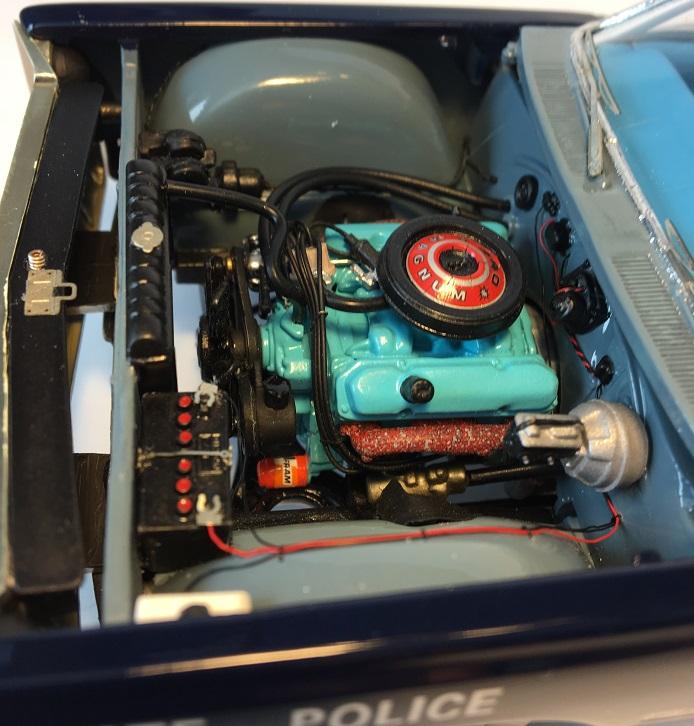
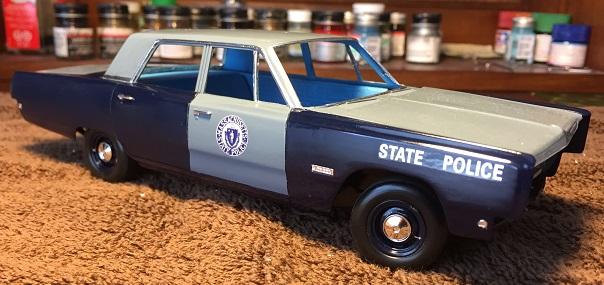
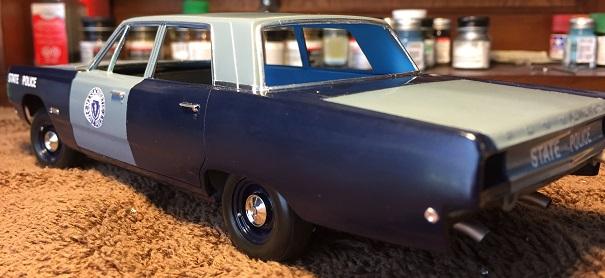
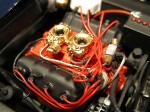
Finally complete after 11 months. Once again, thank you to forum member Tom Sheehy. Tom is a kit bash master for these old kits and he gave me some good advice at the on-set of this project. I picked this kit up, un-assembled but open, along with my recent '60 Plymouth wagon MSP build, about 3 years ago. Like the '60 wagon, I opted to do a chassis swap to get a more detailed look, over the curbside chassis provided in the kit. My '60 wagon used the Lindburg 64 A330 chassis and was an easy drop in. Such was not the case for the Fury. I used the chassis, suspension and engine from the '68 Revell Special Edition Charger. Right from the word go, there were issues. The Fury's interior tub had to be cut behind the back seat to allow it to sit on the Chargers chassis properly. The top of the Chargers chassis floor then had to be ground down as well, for proper fitment of the Fury interior. The Chargers chassis then had to be widened and lengthened behind the rear wheels to meet the inside of the Fury's rear quarters. Then, I had to cut the round front fender wells from the original Fury chassis and adapt them to the Charger chassis to achieve the proper look of the engine compt. Fury's did not have the typical boxy engine compartments that most Mopars of this era had. I opted to use the Chargers firewall, due to the amount of detail it provided and because it was a relatively good fit in the Fury body. Other than the above mentioned items, not much else was modified. Detail was then my goal. The engine is wired, has a fuel line and filter (hard to see), cooling and heating hoses, battery cables and clamps, washer reservoir hose, wired wiper motor and wired siren and horns. I also cut mud flaps for the inner fender wells from very thin cardboard. The header panel for the hood spring and striker is scratch-built and the grille has been hollowed out and filled with very thin metal rods to simulate the grill. The interior uses the kits supplied radio gear, but the mike cord is coiled wire. The seat material is actually 3M Micropore medical tape that when painted, gave the seats a material, rather than vinyl look. I left the front door windows out and "rolled" down the rears. The chassis has a very unfinished look and it drives me crazy. It was sprayed in gray primer. then fogged along the edges with the french blue, as if the car was built as a french blue car. Then the Electric blue was sprayed in with "not the best" tape lines under the rockers, as it might have been, when the Electric blue was applied later at the factory. The rear of the chassis and front sub-frame where then fogged with semi gloss and flat black to simulate the black chassis finish and under coating. The lack of clean tape lines makes me a little crazy. The front lower control arms are done in a color I mixed up, to look like the cosmolene rust inhibitor finish. The finish on the car is standard MSP livery. Authentic French and Electric blue. Three coats of clear then polished out. Fender numbers did not appear until the early 70's. The hood and trunk "Plymouth" scripts were BMF'd prior to painting then, following each coat of paint, I removed the paint from the letters with a Tamiya q-tip, then cleared the car. The result is nice chrome letters. PE'd parts include, hood ornament, valve stems, wheel weights, door locks, hood striker, wipers, radiator cap, battery clamps, battery hold down and tray and window cranks. Scratch built items are the spotlight arm, antenna mast and turned down exhaust tips. Please feel free to ask any questions you may have. I share my tips and tricks. Thanks for looking and take care.
-
'68 Plymouth Fury. Mass. State Police UPDATE 8/25/16
Rdkingjay replied to Rdkingjay's topic in WIP: Model Cars
Charlie, there are a couple of co.s making them, but these are custom made decals that I had in my stash. -
'68 Plymouth Fury. Mass. State Police UPDATE 8/25/16
Rdkingjay replied to Rdkingjay's topic in WIP: Model Cars
Finished the BMF and decals today. Following some minor touch-ups and detail painting, I should be ready to clear it this weekend.
-
Unbelievable work Mike.
-
65 Belvedere Kansas Highway Patrol, updated 12-26
Rdkingjay replied to SteveG's topic in WIP: Model Cars
Progressing very nicely Steve. -


.JPG.10d0a33296d110d4b0b49f20d4ee0ae1.JPG)
.JPG.5baf31ea2a55307238cfa9760d3cd40b.JPG)