
Rdkingjay
-
Posts
270 -
Joined
-
Last visited
Content Type
Profiles
Forums
Events
Gallery
Everything posted by Rdkingjay
-

lets see ur unfinished builds for 2011......
Rdkingjay replied to mopar01lee's topic in WIP: Model Cars
Revell flip-nose 66 Chevelle. Major changes to this thing. Tubbed, narrowed, dropped up front. Its one of "those" models. I can never seem to finish it. I do a few things and back into the box it goes for one reason or another. Missing one of the front wheels is the current reason for the box. I don't know, maybe some day... -
Exceptional looking car and a great paint job!
-
Its interesting that MRM just posted a story about his "polished diecast", which clearly, it is not. But that is pretty much what this is. Another plain white 1/25th Motor Max Dip. I wet sanded and polsihed this thing at nauseum, then applied the custom made decals, which were cleared over first. I also painted the interior and added the police radio, mike and antenna. The lightbar is from Dave Panek and is a beautiful representation of an old S&W piece. The front plate reads 439th SPS and the serial numbers on the doors are 88B 1402. Aside from the radio, this is an exact replica of the very first police car I ever drove, following my assignment to the unit at Westover ARB in Chicopee Ma.
-
Fantastic work!!
-
An amazing amount of work and you deserve the award you got. In my opinion, almost anyone can modify a diecast, however, what seperates the men from the boys is the execution of it. Yours is beautifully done!
-
This started out as a plain white 1/25th Motor Max Diplomat with a blue/red jetsonic light bar. I stripped it to bare metal and primed with etching then sandable primer. The french and electric blue are authentic colors. The paint and the custom made decals are under three coats of Dupont clear. The whole car was then sanded and went through a three stage polishing. The CHP style push bar and siren unit are scratchbuilt, as are all the antenna's. The tires that came with it were way to skinny, so I swapped them out with ones from the parts box. The police gear is from a Roscoe patrol car kit. We never used these back in the 80's. Primarily Ford LTD's and Chevy Caprices. But I have always liked them, so here is my interpretation. Thanks for looking.
-
1/16th Dukes Charger * 3/28/15* Update, **DAISY DUKE AUTOGRAPH**
Rdkingjay replied to Rdkingjay's topic in WIP: Model Cars
Thanks again gents. Overall I am happy with the chassis and interior. I wrote down a "hit" list of things to do to the body in prep for paint and it is long. All the door/fender seams have to be scribed out as does the windshield trim. I will attempt to add a thin chrome strip on the rear valence to seperate the black and orange paint and also have an idea on how to add chrome trim around the rear window. I already drilled out the door/trunk locks and got my hands on some pretty decent door handles. The next big fab job, however, will be the push bar, which I will try and mount securly to the front frame cross member and possibly the front bumper. -
Guy can you explain to me how you made the exhaust stinger? You said plumbers solder and a paint brush ferrule. I have an idea, but I'm not sure. If you have pics of this process, I would love to see them. Thank you and from a former surf rat who loved beetles, your car is amazing.
-
Very informative on the molding process, I will definetely give your techniques a try. Your skills and creativity are amazing.
-
Dirty Mary Crazy Larry...... 68 into a 69 charger again
Rdkingjay replied to mopar01lee's topic in WIP: Model Cars
Loved that car, and the movie. Its a shame that hollywood has chosen this car as its whipping boy. Dirty Mary-Crazy Larry, Dukes of Hazzard, Bullitt, just to name a few. Nice job so far on the resto. Is that the Special editon kit from revell? -
1/16th Dukes Charger * 3/28/15* Update, **DAISY DUKE AUTOGRAPH**
Rdkingjay replied to Rdkingjay's topic in WIP: Model Cars
Thanks gents for the kind and constructive comments, I certainly appreciate them. The interior may seem to have been done quickly, but I have been picking away at it, while I was doing the engine/chassis. Today the CB components came in and that was the final straw for assembly. So, the scratch-built items are, the entire dash, center console, back seat, roll bar, window cranks and package tray. I replaced the solid spokes on the wheel with ones with holes and added a turn signal lever. The gauges are decals and have a thin piece of clear plastic in front of them to simulate lexan. The radio was cut from the dash of a donor 1/20th kit. Although they are hard to see, the levers for the heater and fan are also present, above the radio. I cut the tops from the front seats to give them a more accurate low-back apperance. The seat belts are from Pro-Tech. The Hot Rod magazine on the passenger seat is a shrunk down image, with pages inserted, of the August 2005 issue that did a full feature on the General Lee, following the recently released full length movie. Although it has its flaws, overall, I am happy with it, but next time I will do a few things differently. Any questions, just ask and thanks for looking. -
I vote for the '64 dodge.
-
Cool idea with the mufflers. Any "before" shots?
-
1/16th Dukes Charger * 3/28/15* Update, **DAISY DUKE AUTOGRAPH**
Rdkingjay replied to Rdkingjay's topic in WIP: Model Cars
Anyone who was a dedicated Dukes fan in the early 80's or during the CMT re-runs, knows that for the most part, the general had a single hoop roll bar with a diagonal cross bar. The exception being infrequent shots of a full cage during big jumps, such as the opening sequence jump at Oxford College. So after fabbing up my own roll bar from solid aluminum rod for the hoop and a plastic cross bar, the issue was how to mount it, with it falling over, since it really has no significant lateral support. So I drilled two holes at the mounting location and inserted two pieces of aluminum tubing. The drivers side was shorter due to the mounting location of the cross bar. I then epoxyed the roll bar legs in each tube and then epoxoyed the tubes in the holes, flush with the bottom of the underside floor. I then fabbed up two "mounting plates" from sheet styrene and epoxyed then in place. Believe it or not, the roll bar is incredibly strong and has no forward/rearward movement at all. Thanks for looking. -
Good uck with the airbursh Brandon. I have been using one for many years. The only thing I use rattle cans for now are primers and small pieces like rear view mirrors and such. Airbrushes require patience and practice. With these two things your finishes will greatly improve.
-
1/16th Dukes Charger * 3/28/15* Update, **DAISY DUKE AUTOGRAPH**
Rdkingjay replied to Rdkingjay's topic in WIP: Model Cars
Actually, some opinions mean alot, and your is one of them.I have a complete spare engine and have been kicking around that idea, as I agree with you on the size of the supplied kit wires. It woud mean replacing the distributer and valve covers, ( no big deal) and I read somewhere that 20lb test fishing line makes great fuel line. I don't like the size the fuel line coming from the "T" spilt either. Can anyone recommend a solution for the fuel lines going to the carb from the "T" spilt? -
Awesome looking body!
-
What did you use to scribe the lines? Love the model by the way!
-
1/16th Dukes Charger * 3/28/15* Update, **DAISY DUKE AUTOGRAPH**
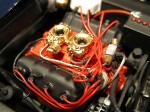
Rdkingjay replied to Rdkingjay's topic in WIP: Model Cars
Its actually sort of a let down. I have been working on this engine and engine bay for several weeks, planning, cutting, test fitting, painting etc. and now its done. I am very happy with it. So just to review, the entire bay/fender wells, radiator support and battery tray are scratchbuilt. You can see the starting point in my first post. The MSD igniton box, spun aluminum ignition coil and plug wire boots are from Charlie at Pro-Tech. The washer bottle and over flow bottle are from a 1/18th UT Caprice and have both been extensively modified. The MSD box, distributor and coil are wired using an actual wiring diagram from MSD that I pulled right from the internet. The coolant over flow, upper and lower radiator hoses and washer bottle hose are all plumbed as well. All the brake lines, hard and rubber, are also present. So its on to the interior, which is just about complete now that the seat belt kit, also from Pro-Tech has arrived. Thanks for looking. -
Nice looking build so far Brandon!
-
Rags to riches. Great job.
-
Amazing detail!!
-
Its scary how real that thing looks. Great job!
-
Don't know how I managed to miss this thread, but awesome work so far!!. I have the Revell "Special Edition" '68 Charger kit and for those who don't have one, get one! They are fantastic kits that are easy enough for a novice, but well suited for detailing by the experienced builder. One of the best I have seen in years. Great job Stu. Looking forward to more progress.
-
1/16th Dukes Charger * 3/28/15* Update, **DAISY DUKE AUTOGRAPH**
Rdkingjay replied to Rdkingjay's topic in WIP: Model Cars
With the ride height set, the fender openings done and the engine bay mocked in, it was time to check the body and see if there were any clearance issues. Thankfully there were not. If you look closely, the scratch built roll bar is also in place, as are the wipers and gas door. As of this post, I am finishing the wiring for the MSD box and ignition coil that came from Pro-Tech, plumbing in the coolant over-flow hose to the over-flow bottle and locking down the whole engine bay to the firewall. The body is all that is really left and aside from prep for paint, all I have left to do on that is add a very fine strip of styrene to the rear valence. It will be the chrome strip that seperates the flat black from the orange, near the tail lights.