
Scottnkat
-
Posts
563 -
Joined
-
Last visited
Content Type
Profiles
Forums
Events
Gallery
Everything posted by Scottnkat
-

1971 Petty Roadrunner
Scottnkat replied to Scottnkat's topic in WIP: Stock Cars (NASCAR, Super Stock, Late Model, etc.)
Thank you, Jason - it's nice to hear -
1971 Petty Roadrunner
Scottnkat replied to Scottnkat's topic in WIP: Stock Cars (NASCAR, Super Stock, Late Model, etc.)
Thanks alot, Kirk! I do appreciate it much! -
Thanks, Mike. The pinstriping decals were something. I thought I had masked just where the template in the instruction showed, but when it came time to put the white stripes on, they just didn't fit. I ended up cutting them up and putting the corners in first, then filling in the space between with the straight pieces. This wouldn't have been so bad, but I forgot to coat the decals first, so the first corner decal that I started with dissolved into little pieces. After coating the decals after that, I proceeded to finish the white pinstripes. When those were done, the car got another clear coat to seal those in before I moved onto the other decals. All in all, it was an experience!
-
oh, and thank you, Paul! Didn't want you to think that I'd forgotten you!
-
Chevrolet 3100 pickup
Scottnkat replied to Scottnkat's topic in WIP: Model Trucks: Pickups, Vans, SUVs, Light Commercial
thanks for the comments, guys - it's appreciated -
Harry, I posted it in the Under Glass section because the car is now literally under glass in its case. I've posted all my builds in the Under Glass section (including other NASCAR cars such as the '69 Petty Torino, the '69 Talladega, the '68 Roadrunner, and the '71 Roadrunner) and nobody complained about it. I thought a finished car could be posted in the Under Glass section regardless of what kind of car it is. If I was wrong to think I could to that here, then I apologize.
-
Bart, I didn't really document this one as it was (mostly) a box-stock build. Also, I was working on it between projects so it was my background job. I used Tamiya tape for masking the edges, then regular blue painters tape to mask the rest of it. It took me hours to do that masking job - of course, others would probably get it done much faster, but this was a four hour job for me. I'm glad it's done and glad to have it on the shelf.
-
I just finished this pickup truck (my first truck model). It is mostly all box stock with only a few changes. First, I weathered the wood in the bed to show more wear near the tailgate (where the wood would get the most wear). Also, I figured what good is a truck without something to haul around? So, I built an engine stand out of sheet styrene and found an old 409 engine in the spares box. I also added a couple of tires and a chain. I added chains to the back of the tailgate as well. Finally, I decided that I liked the bare wheels better than the hubcaps, so I left those off. I hope you enjoy the pics: Finally, since presentation is everything, I put it in a case with an old garage for a background and a mirror on the base so you can see underneath:
-
I just completed this Charger today. It is from the Polar Lights kit and is mostly box-stock (I did have to add hood pins instead of using the decals). This took a while as this was one that I built in the background while I was busy with other stuff. However, once it came time for the paintjob, this one took over. Anyway, I hope you enjoy the pics:
-
nice! I'm planning on building one at some point myself - hope it looks as good as yours
-
1971 Petty Roadrunner
Scottnkat replied to Scottnkat's topic in WIP: Stock Cars (NASCAR, Super Stock, Late Model, etc.)
Thanks for the comments, guys. I really do appreciate it, but I did find a few things that I will change when I make another one (which I am planning on doing later). Mike, the wheels are the correct scale. I had test-fit them and they fit in fine, but when I put the superglue on (both wheels and tires are resin), they stuck out just a touch. However, superglue dries rather quickly so I couldn't quite get them all fixed before they had set. Just one more thing for me to watch out for in the future. -
1971 Petty Roadrunner
Scottnkat replied to Scottnkat's topic in WIP: Stock Cars (NASCAR, Super Stock, Late Model, etc.)
Thank you for the comments, guys - I had four builds going on at once, so it took me a little while to get this one done. I think I'm going to keep it to two builds at a time from now on - it just takes too long with four of them at once. -
Thank you, guys - the completed build is now under the Under Glass section
-
1971 Petty Roadrunner
Scottnkat replied to Scottnkat's topic in WIP: Stock Cars (NASCAR, Super Stock, Late Model, etc.)
Here's a closeup of the front of the car: And here's a pic of the engine compartment: -
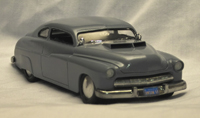
My Roadrunner is done. Just to summarize, I used many of the parts from the Monogram '71 Roadrunner kit. The 426 Hemi engine came from the MPC '70 Coronet Super Bee. The rollcage, seat, window net, dashboard, rear end cooler, fire extinguisher, shock absorbers, and firewall were all handmade. The tires and wheels were resin copies. The hood was a resin copy of the GTX hood, but the large bump in the middle was sanded down to make it level with the rest of the hood. The decals were from Slixx. Here's the pics:
-
seam lines, flash, and detailing
Scottnkat replied to 62rebel's topic in General Automotive Talk (Trucks and Cars)
I'm sorry, but I read this hours ago, came back and read the thread again just a bit ago, and this really sticks in my craw. This kind of comment basically states that if someone doesn't build to your standards and doesn't want to be criticized, then they shouldn't even post it here. This is a terribly elitist attitude and I find it extremely offensive. It takes courage for anyone to post something that they built for everyone to see. It doesn't matter if it's a model, a painting, a wooden chair or anything. I know because a year and a half ago, I was in an accident and could not use my hands to even hold a paintbrush. My wife got me into modeling to build my dexterity and strength. You never know what someone is going through, or whether your perceived wrongs even matter to them. Not everyone has the skills, talent, money, or even desire to build a "perfect" model. When I finally posted my pics, I was scared to death - you want people to get enjoyment from what you are sharing - not criticize you because you shared. I used to be much more active on this forum until I saw people berated for everything from sloppy paint (when they didn't even have the cash to buy a nice thin paintbrush) to misspelling words (when they suffered brain damage in the military). I stopped coming to this site altogether because of this attitude. I finally started coming again at the request of one of the members here, but I don't post on here very much at all anymore - most of my builds are posted on other sites because everytime I start to think that things are getting better, I see posts like this one. I'm sorry for the rant, but this has been bothering me for hours now and I had to get it off my chest. -
The body is on the Plymouth, the front chassis and wheels are mounted again, and we're starting to get to the end of this one - I guess the next pics will be on the Under Glass section. In the meantime, here's the engine compartment:
-
...and I finished up the decaling on the body - here it is: I still need to do a little work to get the hood to lay down perfect, but you can see how it's shaping up so far...
-
Dang! You know how you can stare at something and not see something staring you right in the face? Well, I have that feeling right now. I didn't like the front suspension so I cut it off to start again with it. After I did that, I realized that I had never added the vertical bars to the rollcage. Duh!! I feel like such a numbskull!! Anyway, here's the chassis now - mostly missing front suspension and now with the vertical bars:
-
by the way, I decided that I wasn't happy with the front suspension on the Roadrunner, so that's been clipped off and I am re-working that.
-
Thanks, guys - the chassis in the background is for the Polar Lights Charger - it's just being done completely out of the box and I'm just doing stuff when I am in between things
-
Well, I'm almost done with the chassis for the Petty car. You can also see the newly made window net in this pic. I hope you enjoy:
-
Also, I forgot to mention - the body is all done with decaling - tomorrow it gets a clear coat over everything. Woo hoo!! We're getting there!
-
I decided to use a hammer and pound the mesh flat. Yeah, a hammer should work. I figured that the steel of my table saw would be firm enough, and I figured I would sandwich the mesh between the table saw and a piece of laminated board: After trying it with not only the regular hammer, but the sledge hammer, this was the result: Still no difference. Dang! I looked down and noticed the floor. Hmmm... Concrete is pretty darn hard. So I proceeded to hammer the mesh straight on the concrete. Well, this tore the mesh up pretty quickly. As I was trying to think of what I could use to keep it from tearing, my wife says, "Why not use paper or something?" and handed me some paper. This is what I ended up using: I laid the paper on the concrete, then the mesh on the paper and hammered straight on the mesh. No tears! Yippee. When I lifted it up, it was nice and thin! Much more to the proper scale thickness. Here is the completed mesh on the left: While it may not look different, there is a definite difference in thickness. Now I can paint this, cut it down to size, and I will be set! Woo hoo!!
-
I need a window net for the car. After some thought (and checking with my wife), I got ahold of this stuff: This is 12 Mesh Needlepoint Canvas that we picked up at Hobby Lobby. I started out cutting a swatch of it off the roll: I cut this into three pieces. While it seems like it will work, it is a mesh and it does have some thickness to it. My goal in this was to make it thinner so it would be more in scale to a real mesh window net. It took me three tries (well, four actually) before I figured out how to do this. First, I tried using a J Roller (used for laying on laminate tops) to roll it out. Here's the J Roller: And here's the results (on the left) next to an untouched piece (on the right). Hardly any difference at all, and I was pushing pretty hard. Hmmm... Time to think of something else.