
Scottnkat
-
Posts
563 -
Joined
-
Last visited
Content Type
Profiles
Forums
Events
Gallery
Everything posted by Scottnkat
-

AJ Foyt '65 Galaxie
Scottnkat replied to Scottnkat's topic in WIP: Stock Cars (NASCAR, Super Stock, Late Model, etc.)
Thanks, guys. -
AJ Foyt '65 Galaxie
Scottnkat replied to Scottnkat's topic in WIP: Stock Cars (NASCAR, Super Stock, Late Model, etc.)
Thanks, guys. retroguy, I took pics of the interior before it was mounted inside the car. I hope this is good enough -
Smokey Yunick's Chevelle
Scottnkat replied to MarkJ's topic in WIP: Stock Cars (NASCAR, Super Stock, Late Model, etc.)
Fantastic great build - honestly one of my favorites -
This car started as the stock AMT '65 Galaxie kit. I trimmed the chrome trim off the body and smoothed it out. I had to modify the chassis to remove the molded in exhaust. I used plastic tubing for the exhaust. I modified the interior and scratched up the rollcage. I added seat belts and shoulder belts along with buckles and bolsters. I fabbed up a fuel cell for the trunk and made shocks from plastic tubing and rod. I removed the emblem from the grill and stripped the chrome, replacing it all with Alclad. The wheels and tires were made by me from resin. I fabbed up the hood and trunk pins. I wired the engine and used an air cleaner from the parts box. The decals are a combination of Penngwen decals and some of my own homemade decals. Here's the engine compartment... ...and the trunk Here's the underside and a final picture
-
This is the Lindberg Chrysler Sebring model kit. It's a curbside snap-together kit. I wanted to build this like my old Sebring that I used to own. I also tried my hand at photo-etching for the first time and I learned a few things. The seat belts are from craft store ribbon and the buckles and latches are my first attempt at photo-etching anything. Overall, I'm pleased with how it came out, though I wish it had been a more detailed kit and I wish my p/e parts came out better. a closeup of the interior the underside showing the four screw locations to hold it all together
-
really sharp looking build - I like it
-
Here's the Monogram Mark Martin Thunderbird. It's mostly box-stock with only a few changes. I cut off the stock exhaust pipes and used aluminum tubing instead. Also, the windshield was broken so I scoured until I found a spare that would work. It took some massaging, but I got it to fit. Also, the body was warped pretty well, but I got it back into shape (pretty much). The most difficult part of this build for me was simply mixing the paints to match the decal colors so I didn't have white areas around the windows and white roof rails. It's simple, but it was fun. The engine compartment
-
Thanks, y'all Scott, I built both this and the Cougar II. I found them both relatively easy to build. Some of the parts had alot of flash on them, but everything cleaned up very nicely without too much trouble. I didn't find them to be a pain at all. If the subject matter interests you, I'd say pick 'em up. Between the two, the Mustang II was the easiest to work with.
-
This build started as the reissued Petty Talladega. It's mostly box-stock with just a few changes. I cut off the exhaust and used brass pipe instead. I adjusted a couple of parts just a bit to appeal to me more. I wrapped the steering wheel with thin tape, and added valve stems to the wheels. Finally, the decals were a mix of ones I had in my parts box and some that I made myself. It's not based on any one single race, but is just an interpretation of what his car could have looked like at the time. The interior The engine compartment and one final pic
-
Thanks alot for all the kind comments. I do appreciate it
-
looks really nice!!
-
Thanks, everyone. I didn't have to match the decal color since I couldn't use the decals for the stripes - it's all paint.
-
I was trying to figure out where to post this - it's not drag racing and it's not NASCAR, so I just decided to post it here. This is the Monogram 7-Eleven GTP car. The kit went together very nicely, but the decals were awful. I had to use multiple applications of MicroSol and a warm hairdryer to get them to lay down. Even then, there were some that just wouldn't work. The stripes all curled up on themselves and I gave up and painted the stripes. The blue is a mixture of blue, black and grey that I made up, while the red stripes are Testors fluorescent red orange. The kit itself went together quickly but the bulk of my time was spent on the body. It was build out of the box, so there's really nothing special about it. Here's the engine compartment Here's the chassis before putting the body on As usual for me, here's one last pic
-
Thanks, guys. Yep, there's a block of some sort at the end of the headers. I've no idea what the devil it's for, but decided to keep it on anyway.
-
I picked up this kit at a thrift store. I stripped the gold plating as this was rather unevenly done with one side being shiny and the other almost non-existent. I ended up doing those parts in Alclad Pale Gold. I also decided to wire up the engine, add an ignition module to the dash, and add carburetors. Honestly, I had no idea how that kit-only engine could possibly run without spark and fuel. Finally, I decided to paint it in French Blue instead of the black called for in the instructions. The decals were horrible and required not only a coating of decal film over them before starting, but then lots of work just to get them to lay down. I finally gave up and I'm calling this done. It's not fancy by any means, but it was something different for me - my first show car. The engine Comfy spot for the bad guys and one last pic of the engine - it is the centerpiece of this car, after all
-
Thanks, all, for the comments, and yes - there was liberal use of Micro Sol employed with this. Danno, that's a great story - thank you for sharing
-
After doing a couple of curbside kits, I needed to build something with an engine. Only problem is that my wrist is still not healed, so I didn't wanna mess up anything I liked. I figured I'd just build something that I don't care about so if I screwed it up, it would be okay. This was built mostly box-stock with only a few small changes. The paint is Wet & Wild Eggplant nailpolish picked out by my daughter. These silly decals came with the kit and she liked the decals so they're on the car now. Here's the engine compartment Here's the basic black interior and a final picture before it goes up on my daughter's shelf
-
Thanks, everyone
-
Thanks, everyone. Charlie, it's 1/24 scale
-
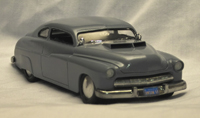
This kit started as the Hawk Mercury kit. I stripped the pre-painted body, then painted it a different color. I used some old Fred Cady Decals. I also used embossing powder to flock the carpet (first time using that instead of flocking - I kinda like it). The kit was build box-stock other than that. I took some liberties with the interior color as I could not find any pics of the interior of the original so I honestly have no idea if it's really two tone or not. I figured that with my hand still messed up, I should stick with something simple for now. Hope you enjoy it Here's the engine compartment Here's the trunk The doors open, too and here's a final pic
-
thanks, guys
-
Here's my most recent. Going along with my penchant for building all my open box kits, and with the troubles with my wrist, I decided to build this. I received two kits from different people. Both kits were missing parts, but between the two, I got a whole kit out of it. The car was built box-stock with the exception of flocking for the interior carpeting. It is curbside, so no engine. Comments good or bad are welcome. the interior the underside and a final pic
-
thanks, fellas.
-
With the problems I'm having with my wrist, I decided that I wanted a simple build. This is the AMT Corvette kit. It went together very well with no fit issues at all. The only thing I did to this was to use flocking on the interior - otherwise, it's box-stock. I found it enjoyable to build and it helped to build a car that I didn't have to make compromises on due to the wrist issue. Here's the underside Here's the interior and a final picture
-
Wendell Scott '62 Galaxie
Scottnkat replied to Scottnkat's topic in WIP: Stock Cars (NASCAR, Super Stock, Late Model, etc.)
Oh, BLAH_BLAH_BLAH_BLAH! I just noticed that I wrote Galaxie instead of Chevy. Yeah, I'm a nunkhead. Alright, for you Ford fans, here's a couple of Wendell's Fords http://www.modelcarsmag.com/forums/index.php?showtopic=80861&hl= http://www.modelcarsmag.com/forums/index.php?showtopic=72591&hl=