
Scottnkat
-
Posts
563 -
Joined
-
Last visited
Content Type
Profiles
Forums
Events
Gallery
Everything posted by Scottnkat
-
Here's the Batmobile from the Batman Forever movie. In my opinion, the only Batmobile that's worse than this is the one from Batman & Robin. Yep, it's ugly but I still had to do it up. The first thing I did was to re-cast the chrome body inserts in clear resin. I then used a grinder on my Dremel to fine-tune the shape so they could fit in where the thinner plastic went, and so it would diffuse the light (yep, I lit this sucker). I also drilled out the gauges on the instrument panel pod and the center console. I used a green LED to light up the interior and blue for the exterior body panels. When testing it out, I realized that the interior tub blocked a large portion of the side panels, so I had to cut out the sides of the interior and re-shape the interior to allow the light to shine through. I also lit up the headlights. It wasn't an easy build, but I wanted to make sure I got it lit up as good as I could. Here's some pics with the car unlit: And here's the car lit up: Due to the wiring and having to include a switch, I mounted it on a base. I figured that it needed a good background, so here's how it looks sitting on the shelf:
-
Thanks, fellas
-

'64 Plymouth Belvedere
Scottnkat replied to Scottnkat's topic in WIP: Stock Cars (NASCAR, Super Stock, Late Model, etc.)
Thank you, all. I thought it would be nice to do something different from the norm with this kit. -
'64 Plymouth Belvedere
Scottnkat replied to Scottnkat's topic in WIP: Stock Cars (NASCAR, Super Stock, Late Model, etc.)
Nope - it is the correct number for Buck Baker - hence, the homemade decals -
With all the work going into the other builds I had going on at the time, I needed something that was pretty much a nothing build. As such, this is a box-stock build of the Lindberg version of Richard Petty's '64 Belvedere, but with home-made decals by me. On to the pics: Under the hood: and a last pic:
-
'67 Mercury Comet
Scottnkat replied to Scottnkat's topic in WIP: Stock Cars (NASCAR, Super Stock, Late Model, etc.)
Thanks, everyone - I appreciate it -
ah hah - so I did. I guess I was so worried about the other stuff, I didn't even think about that.
-
Thank you, everyone. I appreciate the comments.
-
This kit was missing parts, but I ended up cannibalizing a few things, making a few things, and getting through it to get to what I wanted. I don't have the funds for a real '66 Comet Cyclone kit, so I started with the '67 Comet kit. This build was started off by chopping off the top and the front. I then used styrene to get the basic shape of the front end (which I think is much nicer than the '67 front end). I used a reusable coffee filter to make the grill. It was missing the hood, so I had to make a resin copy from another kit. I flocked the interior, but otherwise the interior is all box-stock. I used some parts box wheels and tires, then lowered the ride height just a little. I then made some home-made decals and coated the body in Future. I finished it off by using Sculpey to make a convertible boot. I realize that I did not change the rear to look like the '66, but overall, I am happy with it. I wish I were a better sculptor so I could have done better on the front end and the folded-up top, but this will have to do. Here's the pics: And a few more - here's the interior Here's the engine compartment Here's the underside and finally, here's a good-bye shot
-
Here's my AMT '67 Mercury Comet. The trunk was cut open and I added a hinge so it could lift open. The kit was missing pieces, so I couldn't build it stock. Hence, I decided to make it into a stock car. I stole the engine from my parts box and modified it just a bit to better resemble the Ford engine. I cut out the fuel filler door and removed the windshield wipers, as well as all of the trim from the body. This was missing the firewall, so I made a resin copy. I used athletic tape to simulate the heat shield material on the interior floor. I scratchbuilt the rollcage, the side panels, and made a bolster for the seat. I lowered the ride on all four tires just a little. I then had to scratchbuild the fuel cell, filler pipe, and overflow hose. Finally put on some decals and called it done. Here's the pics: Here's the underside and here's the trunk Finally, one last finishing shot
-
Chex Dodge Intrepid
Scottnkat replied to Scottnkat's topic in WIP: Stock Cars (NASCAR, Super Stock, Late Model, etc.)
Thanks, fellas. -
Here's the Revell pre-painted Cheerios Dodge with a new finish. I stripped the paint off of the body, then treated it like brand new. I primered it, then painted it. Once all the painting was done, I added some aftermarket decals from Just Want To Build A Model. I got these a year ago and I've been sitting on 'em waiting to build this. Finally, I added some hood pins. The rest of the model was built box-stock. Hope you like it Under the hood: one last pic:
-
Here's my Mercury Monterey. This was modeled after my very first car. This started as a '66 Parklane. I removed all the Parklane trim, filled in the two-door seams, sanded off the door handles because they'd be in the wrong place, re-scribed the body to make it a four-door, cut off the top and the area between the trunk and the roof, then filled in the body between the trunk and body and added a new roof. To finish it off, I made new door handles. Hope you like the pics. Here's the underhood area: and a final pic:
-
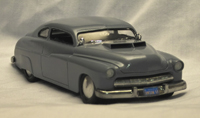
Well, I decided to build an old car in the style of a hot rod. Normally, I prefer the older-style stock look, but thought I would try something different. I used a small block Chevy with a blower, dual carbs and velocity stacks, shortened the driveshaft just a little, deleted the bumpers, changed up a few parts like the mirrors and steering wheel to get the look I was after. The paint is nailpolish for both colors. Hope you like it:
-
Thanks for the comments, everyone. Y'all are right about the wing window posts - they'll be removed and I'll take care of the mirror. Thanks for the input
-
Here's the Monkeemobile. I thought for sure that it was missing parts when I opened the box, but nope. Everything was actually there - this is just a very low parts count kit. I ended up doing it all box-stock except for flocking the interior. I'd seen alot of these done with a white interior and top, but I think the tan looks better. I hope you like it, but comments good or bad are always welcome - on to the pics:
-
Here's the Lotus Esprit that I just finished. This was an open-box kits that was missing a piece of glass, but I was able to cut the window from clear styrene, so it wasn't too bad. Other than that, the only other thing I did was add flocking - one color for the interior, and black for the trunk. The finish is Wet and Wild Burgundy Mist nail polish on top, with a mixture of Testors gray, silver, and steel on the bottom. Oh, let's open the top and use the sunroof for the rest of the pics: When you lift the back hatch, you get to the trunk and the engine cover: Lifting the engine cover, you can view the engine: Here's one last final parting shot:
-
Thanks for all the comments, everyone Phil, yours looks pretty darn nice - I did notice the car had whitewalls, but I was so tired of this kit at the end, I didn't do the whitewalls at all - heck, I didn't even scuff up the tires. My reasoning went something like this: "It's a show car so there's almost no wear on the tires. Yeah, that works. Just get the heck done with it."
-
that's dang sharp!!
-
This was an old kit that I received as a gift. This car fought me from the very beginning when putting together the chassis. It was also missing a couple of pieces, the most obvious one being one of the rear taillights. I had lost my inspiration to complete this one before I was even half way done, but I stuck it out to get it finished. I added brown flocking to the floor for carpeting and made the couple of missing pieces to get this finished. It required alot of filler and sanding as the fit was really rather terrible. I painted it in white, then applied the decals, then finished it with Testors clear pearl. I'm glad to have this one done with. As always, comments good and bad are appreciated.
-
Thanks for the comments, everyone. Paul, yours looks really nice in red - great job on it.
-
Tim Richmond Monte Carlo
Scottnkat replied to Scottnkat's topic in WIP: Stock Cars (NASCAR, Super Stock, Late Model, etc.)
Thank you very much. I enjoyed this build and am happy it's on my shelf now -
Thanks for all the nice comments - I appreciate it
-
In my continuing efforts to complete all of my open-box builds so I have no more open-box kits, here's the Ford Mustang II concept car by Lindberg. The kit was not too bad and it wasn't missing any parts, so that was a bonus after some of the kits I've been doing lately. It was build box-stock with the exception of the flocking for carpeting. Here's the pics:
-
Tim Richmond Monte Carlo
Scottnkat replied to Scottnkat's topic in WIP: Stock Cars (NASCAR, Super Stock, Late Model, etc.)
Thanks alot, Bruce. This was my favorite car of his.