styromaniac Posted December 12, 2020 Posted December 12, 2020 I concur...great scratch building on an unusual subject matter.
SpeedShift Posted December 14, 2020 Posted December 14, 2020 Worked on aluminum tubing inside seats for mounting seat cushions on brass frames.
Alan Barton Posted December 15, 2020 Posted December 15, 2020 I went digging, Jim, and found these. The Thames is the one with my tin hunt Bakelite dash inside it ( and the Cosworth) and the Anglia coupe utility, or Ute, was at the same event, just in case you needed a distraction! I reckon you could build one from a van! Cheers Alan
SpeedShift Posted December 15, 2020 Posted December 15, 2020 (edited) Alan, very cool ! I love the look of the Anglia and Thames, in any form. That Tazmanian devil on the Cosworth is really great. Edited December 15, 2020 by SpeedShift
SpeedShift Posted December 15, 2020 Posted December 15, 2020 (edited) Primed the seat frames and cushions, made the rear axle radius rods....may need to wait to start airbrushing or spray can some paint. Approach to doing the wood grain is pending. The pencil mark on the left ide is apparently where a gas filler cap and gas tank filler pipe need to be drilled. Edited December 16, 2020 by SpeedShift
Alan Barton Posted December 15, 2020 Posted December 15, 2020 Maybe I can help with a suggestion for the woof? I found this in the scrap booking section of a local craft shop only last Saturday. It is self adhesive, ultra thin but more importantly, it has a a very fine grain. Best I can tell it is real wood, comes three A5 sheets to a pack and even with the South Pacific peso ( Aussie Dollar) being valued so low at the moment, it cost be only $5 on clearance. Cutting it to fit in those small panels could be challenging but seeing what you have achieved so far it shouldn't be a problem! Cheers Alan
Alan Barton Posted December 15, 2020 Posted December 15, 2020 By the way, those are not stains, my camera did not like the reflections!
rustybill1960 Posted December 15, 2020 Posted December 15, 2020 Alan I am deeply in awe of Your work on this subject, absolutely fascinating! You have spark an idea for a Thames Panel I have on the shelf. Thank You for sharing with Us here, I am looking forward to more of this project. Cheers Russ
SpeedShift Posted December 16, 2020 Posted December 16, 2020 (edited) Alan, I'm doing a search for that wood veneer....I have something similar that I bought years ago called "Ken's Real - Wood" that is also adhesive backed 3" x 6".....#160 Walnut for $1.98, back when I bought it. I've also got the Ushi product. Uschi van der Rosten: Wood grain decals and fine art scale model accessories. - Uschi van der Rosten Carpet Decals (uschivdr.com) I pulled several articles on simulating wood grain with paint, (Scale Auto Enthusiast and Fine Scale Modeler).... the advantage of that method is it would relieve me from the hassle of cutting each insert accurately to fit each panel area precisely. I also need to do the rear wood deck on the interior but since the plastic has a nice raised wood grain I was thinking of painting it to see if it would look good, and make the final decision after that. From what I have seen in the pictures, this Thames woody had light blonde colored wood on both the frames and panels, so making a much darker interior panel may not be necessary. Edited December 16, 2020 by SpeedShift
SpeedShift Posted December 16, 2020 Posted December 16, 2020 2 hours ago, rustybill1960 said: Alan I am deeply in awe of Your work on this subject, absolutely fascinating! You have spark an idea for a Thames Panel I have on the shelf. Thank You for sharing with Us here, I am looking forward to more of this project. Cheers Russ Thanks Russ.....let's see what you do when you get started.
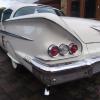
SpeedShift Posted December 16, 2020 Posted December 16, 2020 (edited) On a "side " note...pun intended. I was wondering where a spare tire was kept on this vehicle...thought maybe it goes in the back. Research turned up these pictures from various year models. Not sure i want to cover up the work on the wood paneling with a spare. What do you all think? Edited December 16, 2020 by SpeedShift
styromaniac Posted December 16, 2020 Posted December 16, 2020 Thats pretty wild...never seen something like that. ( Don't know how you are managing to dig up all these great resource photos ! ) You are right about it covering up potentially nice looking wood work....but if you are going for a strictly stock look...but then again...was there ever really a stock Thames Woody? And if so...maybe spares were an option....not standard. Who knows...and maybe there were variations. If some Aussie kids were taking it to the beach...maybe they improvised some things. Which brings to mind....you thought about a roof rack for the boards yet?
SpeedShift Posted December 16, 2020 Posted December 16, 2020 28 minutes ago, styromaniac said: That's pretty wild...never seen something like that. ( Don't know how you are managing to dig up all these great resource photos ! ) You are right about it covering up potentially nice looking wood work....but if you are going for a strictly stock look...but then again...was there ever really a stock Thames Woody? And if so...maybe spares were an option....not standard. Who knows...and maybe there were variations. If some Aussie kids were taking it to the beach...maybe they improvised some things. Which brings to mind....you thought about a roof rack for the boards yet? Roof rack...thought I'd see what Norm has. Maybe a spare can get thrown up there. Where can I get bongos and a ukelele ?
OldNYJim Posted December 16, 2020 Posted December 16, 2020 A lot of the old AMT kits had bongos - I've never seen a uke but the recently-reissued L'il Gypsy Wagon has a little fiddle, which would be about the right size and loosely the right shape to modify into a ukelele
SpeedShift Posted December 16, 2020 Posted December 16, 2020 I'll need to survey those AMT kits......stuff for the cargo bay....any kit have a pop bottle cooler ?
SpeedShift Posted December 16, 2020 Posted December 16, 2020 Drilled out the chrome head light lenses for replacement with clear lenses.
Tom Geiger Posted December 16, 2020 Posted December 16, 2020 3 minutes ago, SpeedShift said: I'll need to survey those AMT kits......stuff for the cargo bay....any kit have a pop bottle cooler ? Johan 59 Rambler Wagon (the Okey release) has a great cooler. Used mine in a camper
styromaniac Posted December 17, 2020 Posted December 17, 2020 Found this one in Jerry Frazier's massive parts bins ( you know the guy ). Not sure about the origin...maybe S.E. Ltd ( Scale Equipment diorama supplies ). Bet there are better ones...pretty sure some of those Revell " Goin Fishin" truck / bass boat combos had coolers...I have one I bought at a swap meet...guy kept the truck but ditched the boat!
SpeedShift Posted December 17, 2020 Posted December 17, 2020 (edited) 40 minutes ago, styromaniac said: Found this one in Jerry Frazier's massive parts bins ( you know the guy ). Not sure about the origin...maybe S.E. Ltd ( Scale Equipment diorama supplies ). Bet there are better ones...pretty sure some of those Revell " Goin Fishin" truck / bass boat combos had coolers...I have one I bought at a swap meet...guy kept the truck but ditched the boat! Pretty sure that is from the Johan 59 Rambler Wagon kit Tom mentioned...inc the decal. Very nice piece. Wouldn't be too hard to scratch build...the prices for that kit on eBay are pretty high. Edited December 17, 2020 by SpeedShift
Belugawrx Posted December 17, 2020 Posted December 17, 2020 Nice work going on here Jim, I like the idea of the spare up top?
SpeedShift Posted December 18, 2020 Posted December 18, 2020 (edited) Worked on seats and frames. Will attempt some weathering on the "leather" seats after paint has time to completely dry. Edited December 18, 2020 by SpeedShift
styromaniac Posted December 19, 2020 Posted December 19, 2020 What did you sculpt those cushions from...and what paint did you use on them?
SpeedShift Posted December 19, 2020 Posted December 19, 2020 (edited) Seat cushions were cut from full bucket seats, ( a Revell sedan street rod kit, IIRC) each seat cut into two pieces to make a seat cushion and a back cushion. I cut the back cushion in the middle, bent them into a slight curve, then filled the empty back with epoxy putty...scribed pleats in the back before it cured. Superglued wire for the upholstery ribbing. Paint is Tamiya XF-68 NATO flat brown. A bit too dark for my liking. Needs highlighting and weathering. Edited December 19, 2020 by SpeedShift
SpeedShift Posted December 19, 2020 Posted December 19, 2020 (edited) Made a floor carpet using art tape with Ken's Kustom Fuzzi-Fur. Made a gear shift from a straight pin. The Ford banjo steering wheel is a Model Car Garage PE/resin piece. Dash has a first coat of paint applied, gauges and parking brake and windshield crank handles next. Edited December 19, 2020 by SpeedShift
SpeedShift Posted December 21, 2020 Posted December 21, 2020 (edited) Working on engine details. The Revell 4 banger distributor is too small to wire for four plugs and coil, so I'm putting a new one together. Made a retention strap for the battery. Need to file it down a little thinner. Edited December 21, 2020 by SpeedShift
Recommended Posts
Create an account or sign in to comment
You need to be a member in order to leave a comment
Create an account
Sign up for a new account in our community. It's easy!
Register a new accountSign in
Already have an account? Sign in here.
Sign In Now