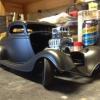
Stray Posted May 8, 2015 Share Posted May 8, 2015 So I am taking my time on the Chevelle re-paint this time. Two screw ups is enough! So while I let it gas out between coats and rubs I decided to start canoodling with this one again. So it is a rebuild/unfinished build that has been waiting patiently nearly 20 years to get finished. I will keep mostly to what I had planned back then, as the top is chopped and the tubs are done already. I think I may have the patience and possibly the skill now to do it credit (maybe). Currently re-doing the chassis so it looks better than the hack job I did back then. Will see where this old girl takes me... Here is some pics of the mock up. The chassis at stock height just doesn't do it with the mods and wheels, so I have figured out how I am going to lower it a bit more respectably. (I will bounce back and forward to this build between finishing off the chevelle. Like everyone else, I need some distraction while waiting for paint to dry! ) Quote Link to comment Share on other sites More sharing options...
cobraman Posted May 8, 2015 Share Posted May 8, 2015 Looking tough ! Quote Link to comment Share on other sites More sharing options...
Ira Posted May 8, 2015 Share Posted May 8, 2015 Great Start! Quote Link to comment Share on other sites More sharing options...
rsxse240 Posted May 8, 2015 Share Posted May 8, 2015 That's a heck of a chop! Looks great. This is currently one of my favorite kits. Can't wait to see this progress Quote Link to comment Share on other sites More sharing options...
Stray Posted May 9, 2015 Author Share Posted May 9, 2015 Thanks for looking in peeps. Currently checking and re-bogging the chop. All that time in a box had loosened a couple of joins. I am going to like seeing how this one comes out myself lol. Quote Link to comment Share on other sites More sharing options...
misterNNL Posted May 10, 2015 Share Posted May 10, 2015 Looking like a baaad boy truck! Quote Link to comment Share on other sites More sharing options...
DumpyDan Posted May 10, 2015 Share Posted May 10, 2015 That's a really good looking truck Quote Link to comment Share on other sites More sharing options...
Tukkerdax Posted May 15, 2015 Share Posted May 15, 2015 Good looking so far ! Quote Link to comment Share on other sites More sharing options...
Custom Mike Posted May 16, 2015 Share Posted May 16, 2015 This should be a good one Greg, I love this kit and can't wait to see what you do with it! Quote Link to comment Share on other sites More sharing options...
RAMBENNA Posted May 16, 2015 Share Posted May 16, 2015 great looking build Quote Link to comment Share on other sites More sharing options...
mustang1989 Posted May 19, 2015 Share Posted May 19, 2015 Looking good Greg!!!! Keep the pics coming man!!! Quote Link to comment Share on other sites More sharing options...
Stray Posted May 25, 2015 Author Share Posted May 25, 2015 Thanks for peeking in peeps. Not a great deal of progress. I have had to rework the putty and fix a rew areas that were pretty thin. Have the highs and lows almost sorted. A little more bog and some primer is on it now. I redid the chassis rear. C'd the frame for the lower rear. Added styrene where needed and squared up everything then primed. This is how she is sitting at the moment in mockup. Quote Link to comment Share on other sites More sharing options...
Stray Posted May 25, 2015 Author Share Posted May 25, 2015 Bummer! I am out of room for uploading pics! OOPS!!!!!!!!! Will have to use an external uploader it seems Quote Link to comment Share on other sites More sharing options...
crazyrichard Posted May 25, 2015 Share Posted May 25, 2015 whow .. those lines rock !! i like !!! Quote Link to comment Share on other sites More sharing options...
426-Hemi Posted May 26, 2015 Share Posted May 26, 2015 P'd off and ready to roll........ I HOPE thats what ya were aimin' fer as thats just what this looks like! NICE job, stance, the whole balla wax, looks GREAT! Quote Link to comment Share on other sites More sharing options...
Stray Posted May 31, 2015 Author Share Posted May 31, 2015 Thanks guys The last couple days I have been very gingerly cutting out the doors. The 20 year old chop is in good nick, but the joins were a bit testy. I ended up bracing the inner windscreen A pillars with some wire and superglue to secure them, and even as gentle as I was in scribing and slicing out the doors the top left corner of the right hand door came apart on me. Then when I was superglueing that back on the errant piece plinked out of my tweezers and I heard the general direction that it landed in. So the next two hours was spent searching for it! Finally found it and reattached it to the door, then used some strip styrene to secure all the chop points before continuing the cut out. I have made the hinges. Will have to sort out the panels and jams. Slow moving on this one. Anyhow, here is a pic. (I had to start a photobucket account as I have used up all my storage room here with the chevelle thread lol!) Quote Link to comment Share on other sites More sharing options...
Stray Posted June 2, 2015 Author Share Posted June 2, 2015 So. Since nobody has tried talking me out of doing these mods, I may just go a little further. Currently sussing out the front and rear suspensions. Cutting up the interior to create the door jams etc. And kind of considering this here roll bar... Planning is fun! Quote Link to comment Share on other sites More sharing options...
Ira Posted June 2, 2015 Share Posted June 2, 2015 Great Progress! Quote Link to comment Share on other sites More sharing options...
mustang1989 Posted June 2, 2015 Share Posted June 2, 2015 What youre doing so far looks great Greg!!! Quote Link to comment Share on other sites More sharing options...
Stray Posted June 2, 2015 Author Share Posted June 2, 2015 Thanks dudes. I will send my therapist bills to you guys. Quote Link to comment Share on other sites More sharing options...
mustang1989 Posted June 3, 2015 Share Posted June 3, 2015 LOL! Quote Link to comment Share on other sites More sharing options...
Stray Posted June 9, 2015 Author Share Posted June 9, 2015 Not much of an update. Mostly just been toying with the suspension and figuring out lowering blocks etc. I have decided to cut the rear panel of the interior off and secure it to the cab. This is because the tub is a pain to get in since I have the filler panels all molded to the cab for a cleaner look. It will be a lot easier to mount the rollbar and interior this way. I hope! I have used sheet styrene to do the door jambs, and some bar for the thicker areas on the sides. Undecided if I will try to concoct some kind of door latch. Didn't REALLY want to go to that kind of detail. Will see where this goes. Also got me a tamiya paint stand! I was the only bidder on ebay, so got the stand, a head magnifier, a desk magnifier and some paint droppers all for the incredibly rich price of 99 cents! WIN. The door frames look rough but thate because i used a skim of putty in them to smooth out. Pics are before sanding. Man my desk is a mess. But it always is. Especially when I am sanding and shaving plastic and making what I need lol. Quote Link to comment Share on other sites More sharing options...
Stray Posted June 15, 2015 Author Share Posted June 15, 2015 Little bit of progress. Still working the door jambs and I have added some styrene to the dash sides to work it into the jambs. Also added a strip to the rear of the dash so the gap is not visible when the windscreen is added, plus giving it something to sit on. Pics: Quote Link to comment Share on other sites More sharing options...
mustang1989 Posted June 25, 2015 Share Posted June 25, 2015 (edited) Great work so far Greg!!! Edited June 25, 2015 by mustang1989 Quote Link to comment Share on other sites More sharing options...
Stray Posted June 25, 2015 Author Share Posted June 25, 2015 Thanks Joe trying to add an update but the forum is going wonky on me! Not much of an update yet again, still chipping away at different aspects of the build. This is where it's at at the moment: Front end lowered and in place, can't really get any lower! And the pic looks like the front wheel is not centred in the wheel arch but it actually is, just the lens angle makes it look out of whack because it is slightly inset. The rear is lowered with the frame tubbed and c'd. Lowering blocks are used so the springs can maintain their original mounts and position in the relocated frame rails. Door jambs are about done, have still got to mount the hinges inside the body and slot the jambs for them, but it is incredibly tight which is why I have had to split the interior, which is to aid the addition of the roll cage also. Quote Link to comment Share on other sites More sharing options...
Recommended Posts
Join the conversation
You can post now and register later. If you have an account, sign in now to post with your account.
Note: Your post will require moderator approval before it will be visible.