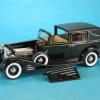
Luis Ayala Posted May 11, 2015 Share Posted May 11, 2015 (edited) Hello Everyone!!! I have been visiting the forum every now and then to keep track on the hobby & friends and now after more than 4 years off the bench, the dust has settle and its time to get back to building... Just started this project about a month ago and wanted to share it with you. This will be a simple build with a few custom details. haven't decided the color yet so suggestions are welcome. This the AMT 1936 Ford kit that I got as a gift from one of my best friends "Mad Slammer". So far now I "shaved" the chassis, opened the rag top, block sanded the body and fixed some minor details on the body. I am working on the under body since some of this old AMT kits need a ton of work to look decent under the fenders... I will use the custom version engine with the "six pack". Hope you like it and thanks for looking!!! Edited February 16, 2017 by Luis Ayala Quote Link to comment Share on other sites More sharing options...
10thumbs Posted May 11, 2015 Share Posted May 11, 2015 Hello Luis, it's good that you're back to building. I like 36 Fords so I'm real interested in what you're doing. Have fun. Michael Quote Link to comment Share on other sites More sharing options...
Luis Ayala Posted May 11, 2015 Author Share Posted May 11, 2015 Hi Michael !!! It is great to sit back again on the bench, I will post more progress next week. Thanks for looking !!! Quote Link to comment Share on other sites More sharing options...
slusher Posted May 11, 2015 Share Posted May 11, 2015 Great build subject Luis. Good to hear your back at the bench... Quote Link to comment Share on other sites More sharing options...
Stray Posted May 11, 2015 Share Posted May 11, 2015 Fenders? We don't need no stinkin' fenders! Ace start buddy. Gonna be a nice build. Quote Link to comment Share on other sites More sharing options...
DumpyDan Posted May 11, 2015 Share Posted May 11, 2015 Can't wait to see where you go with this. Quote Link to comment Share on other sites More sharing options...
Mad Slammer Posted May 11, 2015 Share Posted May 11, 2015 Oh... So that's where that model is... hehehee Good start Bro... Quote Link to comment Share on other sites More sharing options...
Luis Ayala Posted May 12, 2015 Author Share Posted May 12, 2015 Thank you all for your comments !!!! I did some progress on the engine so I will post more progress in a few days. Glad you like it and thanks for looking!!! Quote Link to comment Share on other sites More sharing options...
10thumbs Posted May 13, 2015 Share Posted May 13, 2015 Luis, are you building the engine from the kit? 3 deuces seem right, does the kit have this engine? Michael Quote Link to comment Share on other sites More sharing options...
crazyrichard Posted May 14, 2015 Share Posted May 14, 2015 hmm sweeet !! Quote Link to comment Share on other sites More sharing options...
Jmaracing Posted May 14, 2015 Share Posted May 14, 2015 Looking good! Quote Link to comment Share on other sites More sharing options...
Luis Ayala Posted May 14, 2015 Author Share Posted May 14, 2015 Hi Michael, The kit has two engine options, the flathead with stock carb and a second V8 for the custom version with a tree or six carb intake option. I like the six Carb option but I agree with you, three seems right. I plan to make some custom work to the engine bay so I will test fit to see how much room I have left for the plumbing and then start from there. Quote Link to comment Share on other sites More sharing options...
10thumbs Posted May 15, 2015 Share Posted May 15, 2015 OK Luis, thanks for the info. I'll check in when you post progress. Michael Quote Link to comment Share on other sites More sharing options...
Ace-Garageguy Posted May 17, 2015 Share Posted May 17, 2015 (edited) Looks good. Removing the floors and blobular exhaust on these really improves them a lot. Another way to achieve a better frame is to use the Revell '40 ford unit. All Ford passenger cars from '35 through '40 were built on the same basic frame, and the Revell '40 unit actually fits under the AMT '36 kits quite well. You may already know, but the "ragtop" was not openable on the factory cars. It was built up over a wood frame, padded and skinned with a waterproof rubberized textured material. A popular custom treatment on these cars was to weld in a steel panel that closed the original opening entirely. Another sometimes-seen mod back in the '50s- '60s was to substitute a tinted clear acrylic plastic panel for the built-up top insert. I've seen both red and green. A fold-back fabric sunroof like you see on old VW Bugs has also been done on real '36 Ford customs. If I recall correctly, the optional engines in the AMT '36 kits were Pontiacs. A very well-detailed and accurate Pontiac V8 with 3 two-barrels is available in the old Revell engine PartsPak #85-7253. AMT also made a beautiful version of the same engine, but with 2 four-barrels, in the old Blueprinter 8158 kit (which has been repackaged and reissued a couple of times...and the engine is available again, now). Because both Revell and AMT did a good job of scaling these models, the engines built up from the parts pack kits fit well in the AMT '36 engine bay, and really enhance the detail. Edited May 17, 2015 by Ace-Garageguy Quote Link to comment Share on other sites More sharing options...
Luis Ayala Posted May 25, 2015 Author Share Posted May 25, 2015 (edited) Thank you all for your comments!!! Bill, thanks for the advice I really appreciate it!!! Time for a small update This old AMT kit needs a ton of work under the running boards and fenders, specially because I want to make a custom car with a nice paint job underneath. I am not adding too many PE parts so I will work out all those details and wrap it up with a two tone paint job. First I removed the rumble seat to detail it later and sealed the floor to make it look more realistic. Then I started to remove all the excess plastic, pin marks, etc., to get a smooth surface. Below you will see the results on one side and on the other I just highlighted the spots that needed to be fixed. I will finish up all the body work and hopefully get it ready for primer next week. This is just a small update but didnt wanted to let it sit for long without making some progress. Hope you like it and thanks for looking!!! Edited May 26, 2015 by Luis Ayala Quote Link to comment Share on other sites More sharing options...
10thumbs Posted May 26, 2015 Share Posted May 26, 2015 Luis, good that you're cleaning up everywhere, I like the idea that underneath gets a good coat of paint, body color? Cool. This cars can look real sweet, I'm nuts about them. Man, the plastic looks pretty stout on this model. Good info too about the motor possibilities. Just so happens I have 2 of those Revell Pontiac tripower motors. The kit has a bellhousing, just no trans. Nice headers too. Not a big problem though. Now I have an idea where one could go. Michael Quote Link to comment Share on other sites More sharing options...
Luis Ayala Posted May 31, 2015 Author Share Posted May 31, 2015 (edited) Another small update… I am almost done with the body work, so hopefully it will get a coat of primer tomorrow to highlight the areas that still need some sanding and filing. Since I am looking for a custom look, I decided to modify the optional flat hood curtains that came with kit. I didn’t wanted to cut off a straight line so I drilled a couple of offset holes to make some curved lines and used the curtains as a guide. After drilling the holes I carefully cut off the curved strips using the back of the Exacto blade on both sides. I will probably add some mesh later but so far I am very happy with the results. Hope you like it and thanks for looking!! Edited May 31, 2015 by Luis Ayala Quote Link to comment Share on other sites More sharing options...
squirrel886 Posted May 31, 2015 Share Posted May 31, 2015 Whoa, that's cool! Quote Link to comment Share on other sites More sharing options...
10thumbs Posted May 31, 2015 Share Posted May 31, 2015 Luis, that's nice work! Excellent idea to get the proper curve, I really like the look. Good too, I'll bet we'll see some shiny motor parts from under the hood peeking through those clean cutouts. Michael Quote Link to comment Share on other sites More sharing options...
slusher Posted May 31, 2015 Share Posted May 31, 2015 Nice touch on the side panel cutouts... Quote Link to comment Share on other sites More sharing options...
Mad Slammer Posted June 2, 2015 Share Posted June 2, 2015 Looks good... please paint it green... jejeje Quote Link to comment Share on other sites More sharing options...
bob29579 Posted June 7, 2015 Share Posted June 7, 2015 Looking real nice. The hood sides are really cool. Quote Link to comment Share on other sites More sharing options...
Roadrunner Posted June 7, 2015 Share Posted June 7, 2015 I've just got to do a car with a rumble seat one of these days. Nice job so far. Quote Link to comment Share on other sites More sharing options...
artecar24 Posted June 8, 2015 Share Posted June 8, 2015 More!!! Quote Link to comment Share on other sites More sharing options...
Luis Ayala Posted June 9, 2015 Author Share Posted June 9, 2015 Thank you all for your comments !!!! I will post more progress soon !!! Quote Link to comment Share on other sites More sharing options...
Recommended Posts
Join the conversation
You can post now and register later. If you have an account, sign in now to post with your account.
Note: Your post will require moderator approval before it will be visible.