Davewilly Posted January 2, 2017 Posted January 2, 2017 Great looking Stuff there Dave! Thanks for the update!
GoatGuy Posted January 2, 2017 Posted January 2, 2017 Dave, WOW. I'm too busy studying your work to look for new words to describe what I see on your bench.....
John Teresi Posted January 2, 2017 Posted January 2, 2017 Dave..........the work you share with us is just pure eye candy.....thank you so much for sharing your talent with us.......just amazing work man!!!!!!
gasser59 Posted January 2, 2017 Posted January 2, 2017 Ummmm........speechless. I'm beginning to think you're not of this world.
comp1839 Posted January 3, 2017 Author Posted January 3, 2017 henry, thanks! you be certain, if this were a real motor, it would be in my real car!!! hehe. joe, thanks buddy. always a pleasure!!!! bill, thank you. i can only hope that you get the chance to dive into a model this deeply. so you can experience the reward of it all. it's not like building a real car. it is actually more work. you don't go buy a block, you get make it.....know what i mean. there is only as much effort and detail as you command. no one else. it's a liberating experience. tim, i love it.....mayan stepped pyramid!!!!!! you're always welcome...you know that! here's the pic you requested. it's raining so i couldn't take it out for a better shot. dave w., thanks! dave r., thank you also! john, thank you, sir! brad, if watch closely ,.....i'm on "people of earth"..... no,not really!! thanks!!! so i got the scoop tray hogged out. not that it matters but, it's amazing how light it got. roughed in the scoop.
John Teresi Posted January 4, 2017 Posted January 4, 2017 Dave........Man, your ride is the Bomb.......looks mean and fast
blackbeard Posted January 4, 2017 Posted January 4, 2017 Great craftsman ship I truly appreciate you take time and show us your wonderful build you have going on I thank you
Belugawrx Posted January 6, 2017 Posted January 6, 2017 Great stuff going on down here Dave !!Every time I come down to this section to check out these builds I end up spendin my bench time drooling and dreamin instead,...Darn you super detailers !!Cheers
futurattraction Posted January 6, 2017 Posted January 6, 2017 I love it, Dave! Both the work you're doing on your T/G car, but also your '37. Am sending you a PM I hope you can shed a bit of light on for me...
comp1839 Posted January 7, 2017 Author Posted January 7, 2017 thanks john. she is my pride and joy that's fer shure! henry and dave , thanks! bruce, glad to have you follow along! scott, thanks! hope i answered your question. well, i got to puttin' the carbon decals on. something i admit is not my strong point. did the entire seat only to have them lift off the next day. thought maybe it was the material being too flexy. i noticed it did stick in some spots. so i tried a different primer just for giggles. decals stuck like glue. so, i either got a bad sheet of decals or the difference in primers helped. either way, it was an expensive lesson. at 11.00 bucks a sheet (it takes an entire sheet to do the seat by the way) any way here's my seat with all of it's mistakes. the scoop takes a full sheet too, so my carbon decal bill just for these two parts is at $33.00. plus we have the interior floor and side panel to go. the scoop, while it stuck on the first attempt. (yes, i put the other primer on before this try) is very difficult with all of it's compound curves. trust me you're not seeing the bad parts. thank god for camera's and lighting. also made the steering rack mount and the flex coupling.
John Teresi Posted January 7, 2017 Posted January 7, 2017 Dave.......man,that looks AWESOME......great up-date!!!!!
blackbeard Posted January 7, 2017 Posted January 7, 2017 x2 terrific update love how the carbon decals look on the seat and scoop
Codi Posted January 7, 2017 Posted January 7, 2017 You've given me some good ideas Dave on how to go about some of the brackets I've been fabbing etc. and have to say how much I admire the "tidiness" of what you've done. You make me laugh too, carbon decals suck. But you can't deny how nice they look. Always fun to peek in on your thread Dave! cheers, tim
Red rocket 10 Posted January 8, 2017 Posted January 8, 2017 Dave as always, love your stuff brother.............
shucky Posted January 8, 2017 Posted January 8, 2017 Simply amazing work. I have no other words. Just wonderful stuff.
comp1839 Posted January 8, 2017 Author Posted January 8, 2017 (edited) john, thank you, sir! henry, thanks for following. tim, i glad you you "peek in". i get just as many ideas from you! leonard, always good to hear from friends!! mike, tanks, hope you continue to follow along! i was rummaging through my files and i found a pic of the carb bodies before i assembled them. for those of you whom this might help.......here ya go. Edited January 8, 2017 by comp1839
Codi Posted January 9, 2017 Posted January 9, 2017 Love the pic of the carbs Dave. I did ponder and couldn't come up with an answer, how DID you hog out the inside of the scoop? cheers
Davewilly Posted January 9, 2017 Posted January 9, 2017 Nice work on the decals Dave...I hate working with them....or they hat eme one or the other...but they sure bring a model to life in the end.
Foxer Posted January 9, 2017 Posted January 9, 2017 It's so enjoyable watching this build .. I'd say wow, but WoW!
Art Laski Posted January 9, 2017 Posted January 9, 2017 Fantastic stuff, Dave! You're moving right along and it's looking good.
Mooneyzs Posted January 12, 2017 Posted January 12, 2017 Dave... wow my friend... looks like you have been a busy bee cutting chips. Man I sure have missed a lot being gone for a while. It's great to see you making some killer progress. Jeep up the great work.
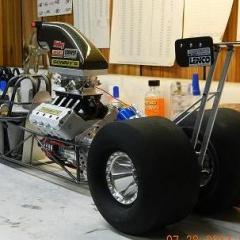
comp1839 Posted January 22, 2017 Author Posted January 22, 2017 many thanks guys!!!! been pretty busy again lately. finally got some time to do some detail stuff. got the chassis painted. mock assembly. made this interior panels and c/f'ed them. made a clutch arm for the cross shaft. also the clutch pivot for the frame. trans blanket. made the rest of the parts and pieces for the rear. this will be the actual with it will sit at.
John Teresi Posted January 22, 2017 Posted January 22, 2017 Dave......what an up-date Brother!!!!!!......very very nice
Recommended Posts
Create an account or sign in to comment
You need to be a member in order to leave a comment
Create an account
Sign up for a new account in our community. It's easy!
Register a new accountSign in
Already have an account? Sign in here.
Sign In Now