Bumblebi Posted October 21, 2015 Share Posted October 21, 2015 Hi guys, thought I'd share some of the progress of a Monogram Ford coupe '30. Started off with changing the front axle to a dropped front axle from Monogram's Stinger dragster, engine from an AMT Ford Victoria '55 and wheels from the parts box. Painted it solid red and was really satisfied with how it turned out.. That is, until the paint literally started falling off the body. So I removed it all, and wet sanded the entire body, but grew tired of it and put in storage for a few months. Fast forward until last week, I put it on the bench again... And started to mock up different things and stiles, and suddenly I had the look I wanted. Still using the engine and front axle like I planned from the start, but the original Monogram wheels and going with the channeled style. This meant I had to build my own frame and floor, haven't made any of those before but I started anyway. Using 0.5 mm styrene I made up the whole floor to fit the V8 and raised it about 12 scale cm. More is coming... Quote Link to comment Share on other sites More sharing options...
Bumblebi Posted October 21, 2015 Author Share Posted October 21, 2015 (edited) After the floor was completed and in the body, I started working on the chassis itself. Here you can see exactly the measurements of the framerails. And in the body.. And then I started adding some pieces to connect the framerails. The front piece is the mounting point for the suicide front end. The rear parts had to follow the bodyline to kick up enough to clear the rear axle. And then I decided to use another engine, because the Ford V8 isn's symmetric and a pain in the a** to fit nicely. It's from a Top Fuel dragster so it should pack quite the punch! Edited October 21, 2015 by Bumblebi Quote Link to comment Share on other sites More sharing options...
Bumblebi Posted October 21, 2015 Author Share Posted October 21, 2015 Here's a few mock up pics of the new engine. And the engine mounts which connects to the mounts on the engine of course, not the prettiest but they'll do the work. And I've also filled the rear axle, which had a big piece missing, since it'll be visible through the trunk... I'm going to add the steering to the front axle, build the interior using some bucket seats from the parts box, modify the radiator and radiator masking, and of course make the rear suspension, going with a four link setup with airbags. I'm hoping to be finished with the build so I can compete with it on one of Sweden's biggest modelshows, BUCK, which is held on the 31st of October, so I've got ten days to finish it. We'll have to see how that goes! Quote Link to comment Share on other sites More sharing options...
Mr. Metallic Posted October 21, 2015 Share Posted October 21, 2015 Definitely has a unique style. Nice fab work on the floor and frame. Quote Link to comment Share on other sites More sharing options...
Bumblebi Posted October 21, 2015 Author Share Posted October 21, 2015 Definitely has a unique style. Nice fab work on the floor and frame.Thanks Craig! Like I said, it's the first time doing frame work, but I'm very satisfied with how it's turned out! Quote Link to comment Share on other sites More sharing options...
misterNNL Posted October 21, 2015 Share Posted October 21, 2015 Now you're talking!Low stance,monster motor,bigs and littles on vintage wire wheels.Looking good so far.Please keep posting progress photos and thanks for sharing.For those the the U.S.who don't know....BUCK stands for Builers of U.S.Cars.Some of those guys traveled to the NNL nationals twice(!)at Toledo.Great guys and great model builders. Quote Link to comment Share on other sites More sharing options...
bobthehobbyguy Posted October 22, 2015 Share Posted October 22, 2015 Nice start. Love the idea. Looking forward to more. Quote Link to comment Share on other sites More sharing options...
Spex84 Posted October 22, 2015 Share Posted October 22, 2015 Love the re-build so far. So much attitude! A massive hemi combined with stock wheels seems ridiculous, but it looks so darn cool...and I know for a fact there's at least one 1:1 rod out there with the same combination (one of them is a gold roadster I think). I dunno, something about installing an engine so violent it could fling most of the body and driveline into a pile of scattered metal shavings the first time the driver tromps on the go-pedal....appeals to me Quote Link to comment Share on other sites More sharing options...
Bumblebi Posted October 22, 2015 Author Share Posted October 22, 2015 Tom- Thanks, I'm very pleased with the look! Today there will be some updates on the suspension and steering, and there might be some work done to the interior too, if I'm being efficient.Bob- Thank you, glad you like it!Chris- That's one of the reasons I decided upon this engine, I too love the look and the insanity of having such an engine in such a car!I'll have to look up some details on the engine to make it more detailed but mostly to make it more streetable, it doesn't even have a starter motor now.. Thinking about going with ignition cables and such too, I've never done that though so I'll go slow with it. Quote Link to comment Share on other sites More sharing options...
Bumblebi Posted October 22, 2015 Author Share Posted October 22, 2015 (edited) Here's a small update on the rod.. There wasn't as much progress done today as I had hoped for. 1. The steering is sorted out. 2. Front axle has been painted 3. Interior has been sorted out and is almost ready to go in, just need some modification to the seats and the dashboard and some paint. 4. Radiator has been shortened in height to suit the style better. Took off about 4 mm in total. Mounts for the radiator has also been made. 5. Body, frame, and floor are now finished and ready to be painted. Here's a few pics from the day.. I think it's starting to look pretty good actually. Thanks for looking, if you have any ideas on how I can improve things, do tell me! It's the first time for me doing a lot of the things I'm doing on this build so all help and ideas are welcome! Edited October 22, 2015 by Bumblebi Quote Link to comment Share on other sites More sharing options...
geemoney Posted October 22, 2015 Share Posted October 22, 2015 i love the frame rails conforming to the trunk lid!!!would you consider tapering the front frame rails from the cowl to the radiator?love the attitudeare you chopping the top? Quote Link to comment Share on other sites More sharing options...
Bumblebi Posted October 22, 2015 Author Share Posted October 22, 2015 Thanks Mike, I'm very satisfied with that myself! It was something that I had to make to be able to fit the frame rails there so it's kind of function and form going hand in hand there.I thought about tapering it, but I decided to not test my luck and keep it slightly more basic since it's the first time doing framework.The top will be kept to the original height, I personally like the look of a car with superlow ground clearence but with a high bodywork so to say! Quote Link to comment Share on other sites More sharing options...
Ace-Garageguy Posted October 23, 2015 Share Posted October 23, 2015 Very nice scratch-building and fabrication, especially considering it's your first time. I like the super-slammed look of builds like this, as long as there's sufficient ground clearance to be somewhat drivable if they were real. Looking good. Quote Link to comment Share on other sites More sharing options...
Bumblebi Posted October 23, 2015 Author Share Posted October 23, 2015 Very nice scratch-building and fabrication, especially considering it's your first time. I like the super-slammed look of builds like this, as long as there's sufficient ground clearance to be somewhat drivable if they were real. Looking good.Thanks Bill! I've managed to get about 36 scale mm (1.4 scale inches) of ground clearance to the frame rails,but I'm going to build a rear end with airbags so that it would be be somewhat more drivable if it was real. Quote Link to comment Share on other sites More sharing options...
exesivefire Posted October 24, 2015 Share Posted October 24, 2015 Looking good! I just found a 30 body to plop on one of my existing projects. Love the low bodies with the full roof. There is something about that look that just gets me going. Quote Link to comment Share on other sites More sharing options...
Ace-Garageguy Posted October 24, 2015 Share Posted October 24, 2015 Looking good! I just found a 30 body to plop on one of my existing projects. Love the low bodies with the full roof. There is something about that look that just gets me going. A nice thing about that look too...you can actually drive one reasonably comfortably. A channeled AND chopped '30 doesn't have much interior room, and it's a pretty good trick to build one you can bear to go very far in. Quote Link to comment Share on other sites More sharing options...
Bumblebi Posted October 24, 2015 Author Share Posted October 24, 2015 (edited) Andy- Thank you! Looking forward to your '30 Bill- Yes indeed, I've almost found it hard to fill the interior nicely now though.. Speaking of the interior, I modified a pair of bucket seats to fit and to get a different look to them... I am pretty satisfied but I'm not sure if I should raise them up a little.. Also shortened and later painted the steering rod from the Stinger dragster from Monogram. At the same time, I turned one end of it 90 degrees so it would fit properly. Also bought a helping hand yesterday and it instantly came into good use. Edited October 24, 2015 by Bumblebi Quote Link to comment Share on other sites More sharing options...
68shortfleet Posted October 24, 2015 Share Posted October 24, 2015 Really like where this build is headed. Just the way I like them, extremely low. Quote Link to comment Share on other sites More sharing options...
Bumblebi Posted October 24, 2015 Author Share Posted October 24, 2015 Glad you're liking it Jason! Quote Link to comment Share on other sites More sharing options...
Bumblebi Posted October 25, 2015 Author Share Posted October 25, 2015 Working on the rear suspension and most likely making something that doesn't work at all in real life.. But I think it looks alrigh at least. I'll be going for an airbagged setup in the rear and I'll be starting on the bags soon. Currently making the inner pair of brackets on the rear axle and the chassis. Got some use of my second hand today too. And the pair of suspension arms. Made out of three layers of 0.5 mm styrene and sanded to look like circular pieces. Mocking up the rear end. Still got the inner pairs of brackets on the rear axle and on the chassis to make. Quote Link to comment Share on other sites More sharing options...
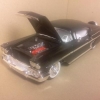
Bumblebi Posted October 28, 2015 Author Share Posted October 28, 2015 Some more done since last time. Today I have three days left to finish the car, but I have school every day... Finished the rear suspension brackets. Added an extra crossbar for the frame too. And got some grey paint on the frame and underside. I've added some weathering too. And painted the rear end and made some airbags out of a pair of airplane wheels. Also rebuilt an electric fan from the parts kit to fit the radiator. And actually got some paint on the body too. Not the best finish but I think it'll do, but I think that with some wetsanding and some weathering it's going to look good enough for a rat rod... Note that the paint is a lot darker than the photos show. I'll try to get a good pic tonight after school. Quote Link to comment Share on other sites More sharing options...
tubbs Posted October 28, 2015 Share Posted October 28, 2015 doing some fine scratchbuilding here. totally different look with those skinny wheels and spokes. Quote Link to comment Share on other sites More sharing options...
DrKerry Posted October 28, 2015 Share Posted October 28, 2015 Unreal, looks awesome. Only thing you may want to do is add another set of the tires to the outside on the rear because thos little skinny's in the back ain't gonna hold that beast!!!! Quote Link to comment Share on other sites More sharing options...
Bumblebi Posted October 28, 2015 Author Share Posted October 28, 2015 Thank you Al, I'm very sastisfied with it considering it's my first time doing scartchbuilding like this. Kerry, thank you very much! I'm thinking about evolving the car later on with some beefier wheels, but since I have a very short amount of time to finish it (It's going on a show on saturday morning and I can only work with it on evenings...), I've decided to settle on these wheels! Quote Link to comment Share on other sites More sharing options...
exesivefire Posted October 28, 2015 Share Posted October 28, 2015 Very cool Quote Link to comment Share on other sites More sharing options...
Recommended Posts
Join the conversation
You can post now and register later. If you have an account, sign in now to post with your account.
Note: Your post will require moderator approval before it will be visible.