Ron Hamilton Posted October 11, 2016 Posted October 11, 2016 I finished this one last night just in time for our club meeting next Saturday. I built it out of the box, pretty much per the directions. The paint I used was Tamiya Chrome Yellow Lacquer out of the spray can, which is a little more intense than the factory color, but I liked it better. Testors has a Daytona Yellow, which is closer to the Chevrolet Yellow color. I painted the wheels with dark aluminum paint which closely matches the gray finished wheels. The engine detail is pretty good, but in photographing it, I have to make an adjustment in the headlamps and vents next to the grille, as they stick out too far.. All in all, I think it is a nice kit, per my review.
cobraman Posted October 11, 2016 Posted October 11, 2016 Not a huge fan of the newer style Camaro's but your model looks very nice .
Snake45 Posted October 11, 2016 Posted October 11, 2016 Ack! I guessed the color wrong! Nice model though. But then, we expect no less of you.
Perspect Scale Modelworks Posted October 11, 2016 Posted October 11, 2016 I'm no fan of the current Camaro body style, sort of like an overweight stormtrooper, but this build looks very cool.
RestoModGuy Posted October 11, 2016 Posted October 11, 2016 Nicely done, very well executed box build
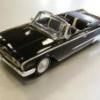
kelson Posted October 11, 2016 Posted October 11, 2016 I like the color choice,can't wait to buy a couple,i saw a coupe in black on the road yesterday and it looked pretty sharp.
bbowser Posted October 11, 2016 Posted October 11, 2016 Nice! That color really pops in the sunlight.
peekay Posted October 11, 2016 Posted October 11, 2016 Nice clean work Ron! Did you polish the paint? I use Tamiya lacquers, specially their clear-coat, but even my final wet coat always has fine orange peel when dry.Any tips?
Ron Hamilton Posted October 11, 2016 Author Posted October 11, 2016 Nice clean work Ron! Did you polish the paint? I use Tamiya lacquers, specially their clear-coat, but even my final wet coat always has fine orange peel when dry.Any tips? I smoothed the body with fine sanding pads after I removed the mould lines and minor sinks that did not belong on the body, and leveled it out at the door and trunk seams with polishing sticks after I deepened the seams. When I painted the model, I used Tamiya Fine White Primer, which dried for a day, then I painted the car with several coats of Tamiya Chrome Yellow Lacquer, which dried for about 24 hours, and I clear coated it with Testors' Clear Lacquer. The finish was pretty smooth after a 24 hour drying time. I then polished the finish very carefully with Novus #2 Polish with a soft rag. I lucked out, as there were no rub through on the edges with this one. All of the paint came from spray cans. I think it came out pretty good.
Ron Hamilton Posted October 11, 2016 Author Posted October 11, 2016 Here is the underhood detail. Looking at this photo, I am going to see if I can do a better job of recessing the headlamps and brake vent detail. The hair you see on the fender is not in the paint. The digital camera picks up everything.
Snake45 Posted October 11, 2016 Posted October 11, 2016 Here is the underhood detail. Looking at this photo, I am going to see if I can do a better job of recessing the headlamps and brake vent detail. The hair you see on the fender is not in the paint. The digital camera picks up everything. While you have it in the garage, see if that left front wheel needs an alignment job. (Surprised Harry didn't pick up on that.) (I mainly noticed that because it often shows up embarrassingly in my own model pictures.)
Ron Hamilton Posted October 11, 2016 Author Posted October 11, 2016 While you have it in the garage, see if that left front wheel needs an alignment job. (Surprised Harry didn't pick up on that.) (I mainly noticed that because it often shows up embarrassingly in my own model pictures.) That is also going to be taken care of when I fix the other things. At least I was able to get it to hunker down better in the front.
peekay Posted October 12, 2016 Posted October 12, 2016 Thanks for your reply Ron. I think I need to try out other clear coats than Tamiya. (Testors isn't available here.)
Ron Hamilton Posted October 25, 2016 Author Posted October 25, 2016 (edited) I took the 2016 Camaro to our club meeting, and it was well received. Also, I brought along some of my earlier model Camaro builds to contrast and compare the new car against some of the classic Camaros I built in the past. 1969 Camaro SS350 Coupe- Converted from a Revell '69 Z28, with the hood, intake, carb and air cleaner from Replicas and Miniatures Co. of MD, MCW Rally Green Lacquer, MCG Photo-etch, Modelhaus COPO Dog Dishes on parts Box Steelies, and MPC Hockey Stick Decals. 1970 Camaro SS350 Coupe- Converted from an AMT '70 1/2 Z28, with the intake, carb and air cleaner from Replicas and Miniatures Co. of MD, MCW Cranberry Red Lacquer, MCG Photo-etch, Detail Master Aluminum Wheels with American 200S Centers mounted on Fujimi Pirelli P7 Tires. 1967 Revell Camaro SS396 RS Coupe- Converted from a Revell '67 Camaro SS, with a scratch built RS Grille, and Deluxe interior, Testors Artesian Turquoise Lacquer, MCG Photo-etch, Parts Box Cragar SS Wheels mounted on AMT Firestone Wide Oval Tires. 1970 Baldwin/Motion Camaro SS Coupe- Holley 780 carb and Lynx air cleaner from Replicas and Miniatures Co. of MD, MCW Daytona Yellow and Black Lacquer, MCG Photo-etch, and Fred Cady Baldwin Motion Decals used for the edge stripes. I have a '78 Camaro Sport Coupe under Construction, being built as a replica of a car I once owned. It will be White, with a Dark Red Interior, T-Tops, 350/Automatic, Aluminum Wheels. I am using a MPC '78 Camaro kit as the basis. Sorry no pics of that one yet. I have a lot of work to do to it yet, but it is pretty well along. As you can see. I like Camaros. I have more on the shelf to be built. And yes, I fixed the headlamps and front wheel alignment that was mentioned before by Snake 45. Edited October 25, 2016 by Ron Hamilton
Recommended Posts
Create an account or sign in to comment
You need to be a member in order to leave a comment
Create an account
Sign up for a new account in our community. It's easy!
Register a new accountSign in
Already have an account? Sign in here.
Sign In Now