comp1839 Posted January 25, 2017 Posted January 25, 2017 the detail, on the printed parts, is amazing paul. great job on drawing them up. the floater is looking very good as well. will the spindle and the hub be machined as well as the rotor or will the spindle and the hub be printed?the brakes look super on the wheel and the frame is really looking sharp. keep up the fantastic job. this is REALLY going to be a nice pro mod when you are done!!
mr68gts Posted January 26, 2017 Author Posted January 26, 2017 the detail, on the printed parts, is amazing paul. great job on drawing them up. the floater is looking very good as well. will the spindle and the hub be machined as well as the rotor or will the spindle and the hub be printed?the brakes look super on the wheel and the frame is really looking sharp. keep up the fantastic job. this is REALLY going to be a nice pro mod when you are done!!Dave, Thank you! If it wasn't for your help some of it wouldn't be possible and I most likely wouldn't have corrected the chassis issues either.The hub itself will be 3d printed along with the drive flange. I did the 5 on 5 b.p. but I have the dimensions for the 5.5 one also. (there's a height difference on the 5.5 pattern one for some reason) The spindle will be machined but the portion that has the brake bracket boss will be printed. Basically a collar that will slip over the machined tube with a stop to locate it. Probably the best of both worlds this way as I can get the strength of the aluminum yet the detail of the printed parts.Funny thing, I've learned to draw up everything in 1:1 scale since starting the 481x. It makes it much easier to scale it within the program over trying to do it on paper and keep it straight. With that said I can scale the parts down to what ever provided it will print.Off to the lathe I go! Time to start machining the tube spacer for the 4 link brackets.Paul
mr68gts Posted January 26, 2017 Author Posted January 26, 2017 (edited) The Penske rear shocks. This is just the upper assembly. I have the lower portion and the adjuster done also but I'm not going to bore ya'll with the details.... lol, you get the gist of it anyway. So I've got the drive flange for the floater done. I ended up doing it in one piece instead. Just made more sense as these parts are small in scale! This is the flange on the floater spindle. This piece will be 3d printed along with the above parts. By doing it this way I can get the profile of the part and retain the strength of the aluminum. This is the floater spindle without the above flange. This part will be machined from aluminum for strength. Edited January 26, 2017 by mr68gts
mr68gts Posted January 26, 2017 Author Posted January 26, 2017 The next order on it's way! The 481x is finally going to be a reality, after over a year working on it!
Davewilly Posted January 26, 2017 Posted January 26, 2017 (edited) Very cool Paul...It will be cool to see the parts when they come in. 3D printing is going to have giant impact on the world as it develops and evolves. Not just in modeling and jewelry making but on anything we use today. Edited January 26, 2017 by Davewilly
Mooneyzs Posted January 26, 2017 Posted January 26, 2017 Paul... Man are things looking great. Love all of the design work.... what only a year on the stuf? Doesn't seem that long. I can't wait to see the 3D printed parts and this thing as a roller at GSL. Keep up the great work.
mr68gts Posted January 28, 2017 Author Posted January 28, 2017 (edited) First parts painted and detailed!!!! What a milestone for me woohoo! The individual part break down as follows, The crank hub which in real life is pressed onto the crank snout, the crank bolt goes in, then the timing/degree wheel goes into notches on the hub (yes the notches are in the 1/16 hub!), the pulley goes over that and then the support hub goes into the pulley and it is all bolted together. The pulley and the bolt are not painted yet. I have some paint mixed up to make the pulley look like hard anodized but am not quite there yet and I cannot do anything about installing the pulley anyway because I need the block and timing cover here to install it all any how. The bolt will be gold in color to look like a gold iradited bolt. (ala ARP) The 6 bolts in the support hub are T2M bolts. I'm going to have to scrounge around for these things since they are no longer in business. There is a company that makes hardware like scale hardware did but they do not have anything like what T2M made. Wish someone would pick up that line because they are a wonderful detail to add! Edited January 28, 2017 by mr68gts
mr68gts Posted January 29, 2017 Author Posted January 29, 2017 (edited) Got the lathe out and got to making chips! This is one of the rear end spindles. The first one was a failure. There was an issue with a dimension in the printed parts. They are close but there wasn't enough of a lip to retain the 4 link bracket without sliding over the spindle so I made a new one with a bigger step in it. I may need to go in an change the dimensions a bit on the pattern for the spindle boss that will be printed so that it fits correctly without interfering with the tube since there are bolts that hold the caliper bracket on. What to do when you need a carriage stop and don't have one? You think outside the box and get ingenious lol! Using the tail stock as a back stop so I can machine the out half. Finished part. I though up another idea on how to do this but I will just make the 2nd one and carry on. The idea would require having new parts printed and there really is nothing wrong with these. Just a different way to do it. Edited January 29, 2017 by mr68gts
Mooneyzs Posted January 29, 2017 Posted January 29, 2017 Paul... Nice work man... This thing is just looking killer with all of the 3D designed parts along with you cutting chips. Love how things look with the pulley and getting some paint on them parts. Keep up the great work my friend!
mr68gts Posted January 31, 2017 Author Posted January 31, 2017 Do you have a color in mind?I thought about the body in carbon fiber with Yenko stripes. (it's a the way a real one is done up) I'm not trying to copy it as a replica but I do like the way it looks! That would be a fortune in carbon fiber decal though!
Mooneyzs Posted January 31, 2017 Posted January 31, 2017 Paul... that wouldn't be too much... maybe 3 sheets or so?? . I like the idea ofan all carbin fiber body. I thinkntt uod be fun to do a funny car body that way.
comp1839 Posted January 31, 2017 Posted January 31, 2017 sweet, sweet stuff there paul. the carbon look on the body would just knock this out of the park.......LOVE IT!!!!!!
mr68gts Posted February 3, 2017 Author Posted February 3, 2017 Thanks guys! I may just do that. We'll the parts were delivered to the house......and I'm in Boise Idaho lol. At least the block will be there when I get home. Boy am I impatient now...
comp1839 Posted February 3, 2017 Posted February 3, 2017 At least the block will be there when I get home. Boy am I impatient now... I'll bet!!!!!!!
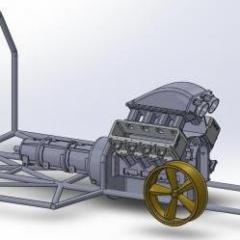
mr68gts Posted February 9, 2017 Author Posted February 9, 2017 (edited) Well, the 481x in1/16 scale is finally a reality! Need to do up the supercharger manifold but it's close at last! Edited February 9, 2017 by mr68gts
Codi Posted February 9, 2017 Posted February 9, 2017 That thing is a BEAST Paul. I can't wait to see pics when it's primered so we can see more of the detail but it sure looks fantastic already. cheers
Davewilly Posted February 9, 2017 Posted February 9, 2017 Thats looks fantastic! I am sure its great to see your work come into something other than a flat piece of paper! Very Nice!
mr68gts Posted February 10, 2017 Author Posted February 10, 2017 Thank you guys! I can't believe it's finally here. I now need to scale it to other scales. Some of it will have to be combined to if I want it available in 1/25 scale. Most of the timing cover and such will probably be all one piece. Nice thing about larger scales is the detail you can add as it goes up in scale. In 25th scale I will probably have to add the hardware into the solid model to make it work and not have to worry about the bolts in that scale. Just have to see. Not too sure if the degree wheel will be printable or not though and that may be something that might have to be photo etched to still be there. So I machined the crankshaft stub this afternoon. Wasn't too hard to do. I really need to look into some tooling for this lathe. Have the tooling will help greatly in machining the parts I require but I make do with what I have. Still looking into mills at the moment though. Probably have to wait on the rotary table for a bit however. Various stages of machining the crank stub. Front half. Now keep in mind I took a print from a Chrysler Hemi crank and used that and modified the back of it obviously to work with my engine. I still need to machine the seal retainer but that's a project for tomorrow. The back half of the crank stub which registers with the hole in the block. In the block it sits! And the stack up of parts to make the assembly within the block.
gasser59 Posted February 10, 2017 Posted February 10, 2017 That's so nice Paul. Loving all of your hard work and detailed explanations with accompanying photos.
Mooneyzs Posted February 10, 2017 Posted February 10, 2017 Paul... This is so awesome!!! It is great to see the engine all printed up. It looks killer. I know you have to be super pumped about it, I would be for sure. I am digging it. I may have to get one for myself . Also I need to talk to ya. Glad to see you getting some bench time in.
Randy D Posted February 11, 2017 Posted February 11, 2017 Hi Paul, You are one talented builder sir. Love all the different skills you are showing on this!!!! Randy
Recommended Posts
Create an account or sign in to comment
You need to be a member in order to leave a comment
Create an account
Sign up for a new account in our community. It's easy!
Register a new accountSign in
Already have an account? Sign in here.
Sign In Now