6bblbird Posted January 13, 2017 Share Posted January 13, 2017 Im gonna follow this one to the end! I love when "real" car guys build models. They certainly know how to detail them correctly!WF Quote Link to comment Share on other sites More sharing options...
Reeves Racing Posted January 13, 2017 Author Share Posted January 13, 2017 Thanks Walter I think I have most of the major scratch building complete. Now its just finishing up sanding and shaping and then I can start building and painting. The roll cage is built and it is snapped into the mounting plates. It will be removed for painting. I still need to make the door panels, modify the dash and make the inside part of the C pillars. Of course more filling, sanding priming on the body. Very close though. Quote Link to comment Share on other sites More sharing options...
MarkJ Posted January 13, 2017 Share Posted January 13, 2017 That cage looks spectacular. Quote Link to comment Share on other sites More sharing options...
DumpyDan Posted January 14, 2017 Share Posted January 14, 2017 Great project, love the body work great look Quote Link to comment Share on other sites More sharing options...
Oldriginal86 Posted January 14, 2017 Share Posted January 14, 2017 Cool build! It's fun to duplicate a car you had in 1:1. Is the next build Dads car? Diorama of the two? That would be awesome. Quote Link to comment Share on other sites More sharing options...
Maindrian Pace Posted January 15, 2017 Share Posted January 15, 2017 Great build, and the roofline looks almost perfect. To make it perfect the rest of the way, the upper windshield trim needs to be slightly raised and revised, especially the corners, to Falcon/Comet shape. Quote Link to comment Share on other sites More sharing options...
espo Posted January 15, 2017 Share Posted January 15, 2017 Great looking roll cage. Outstanding chassis details. Quote Link to comment Share on other sites More sharing options...
Reeves Racing Posted January 17, 2017 Author Share Posted January 17, 2017 Thanks Gents. I am temporarily on a different project but will resume this soon. Quote Link to comment Share on other sites More sharing options...
espo Posted January 19, 2017 Share Posted January 19, 2017 I also did, or should I say my brother in law helped me redo our wood floor. The original contractor set the joints to close together from one run to the next. They tell you to offset the joints at least 6". If you can offset them further do it. The joints will hold much better. Ask me how I know. Quote Link to comment Share on other sites More sharing options...
Reeves Racing Posted January 26, 2017 Author Share Posted January 26, 2017 Thanks for the advise, floors are almost done. I took a break from them last night and worked on the model a little. My Comet's original gas tank didn't go from frame rail to frame rail, it was narrower on one side. Also there is a lip around the opening the at the tank drops into so I scratched up those things and made the opening for the fuel cell. The interior is pretty much ready for some paint. The rear suspension is pretty much mocked up and ready to be painted as well. Quote Link to comment Share on other sites More sharing options...
Reeves Racing Posted February 2, 2017 Author Share Posted February 2, 2017 (edited) I have started the painting and assembling process. I worked on the seat and seat belts the last two nights.I used the Scale Motor Sports PE kit and it come with the belt material.My buckle on the real car was different but I am still happy with the look of the harness in general.I used one of my custom decals to make the RJS label for the left shoulder harness. I'm using some model railroad detail parts for the nuts and washers. Edited February 2, 2017 by Reeves Racing Quote Link to comment Share on other sites More sharing options...
MarkJ Posted February 2, 2017 Share Posted February 2, 2017 That's some fine looking detail you got going on there. Quote Link to comment Share on other sites More sharing options...
Reeves Racing Posted February 7, 2017 Author Share Posted February 7, 2017 Thanks Mark, I am adding quite a bit more detail to this one than I usually do. I made the fuse block and the master cut off relay and got them painted and installed. I also finished up the dash. Made gauge faces and toggle switches and put PE rings around the gauges and PE washers on the toggle switches. Used wire insulation for roll bar padding. Quote Link to comment Share on other sites More sharing options...
espo Posted February 7, 2017 Share Posted February 7, 2017 Outstanding detail on the interior. The suspension is amazing. Quote Link to comment Share on other sites More sharing options...
10thumbs Posted February 7, 2017 Share Posted February 7, 2017 Really great progress Mitch! A wonderful model in the making, love it. Quote Link to comment Share on other sites More sharing options...
bobthehobbyguy Posted February 7, 2017 Share Posted February 7, 2017 very nice work. Quote Link to comment Share on other sites More sharing options...
Reeves Racing Posted February 8, 2017 Author Share Posted February 8, 2017 Thanks guys, I'm really enjoying this build. I worked on the engine and wheels and tires last night. Pictures help me see I have some touch up to do on both sets of assemblies... Quote Link to comment Share on other sites More sharing options...
Reeves Racing Posted February 8, 2017 Author Share Posted February 8, 2017 Cool build! It's fun to duplicate a car you had in 1:1. Is the next build Dads car? Diorama of the two? That would be awesome. I Just saw this, I built his car a couple of years ago. Quote Link to comment Share on other sites More sharing options...
RAT-T Posted February 10, 2017 Share Posted February 10, 2017 VERY COOL BUILD MITCH Quote Link to comment Share on other sites More sharing options...
Reeves Racing Posted February 10, 2017 Author Share Posted February 10, 2017 (edited) Thanks Tom. I tried several sets of headers and much like the real car none would clear the spring towers. So I used some solder and I'm making my own. This solder is the perfect size for the primaries and is super soft. I super glued the ends where the collector goes and drilled a hole in the middle of the four pipes and glued a rod in the middle and then a bigger piece of tube stock. Then I put on some shrink tube, shrank it and then put on another layer of shrink tube to make the collector.I will use some more tube stock to make the turn downs. I took the carb back off because I have ordered a Detail Master carburetor PE linkage and bracket set. I am going try another first for me and use the tungsten filament from an 1157 bulb as the throttle return spring. I also added some nuts to the coil overs and detail painted the rearend. I had two different springs rates on the back of the car hence the silver and dark blue springs. The steering wheel is installed. Edited February 17, 2017 by Reeves Racing Quote Link to comment Share on other sites More sharing options...
Reeves Racing Posted February 13, 2017 Author Share Posted February 13, 2017 (edited) I did some more over the weekend. BMF, windows, tachometer, wiring and starter solenoid, master cylinder and proportioning valve, fuel pressure regulator and gauge, checked length of fuel line to carb. I'm waiting on some PE carb linkage before I mount the carb permanently. I made the support braces and test fitted them to see if there was enough clearance, added fuel pump and filter, 1/2" copper fuel line, and the hardware for the fuel cell mounts. Replaced the steering wheel with one that looked better, mounted body, mounted rear end, mounted radiator, electric fan, radiator supports, made radiator hoses, mounted alternator and charge wire, added tie down chain and hardware. Edited February 13, 2017 by Reeves Racing Quote Link to comment Share on other sites More sharing options...
Davewilly Posted February 13, 2017 Share Posted February 13, 2017 Looking pretty good! Quote Link to comment Share on other sites More sharing options...
Reeves Racing Posted February 13, 2017 Author Share Posted February 13, 2017 Thanks Dave. Here are the reference pictures I used along with fond memories... Quote Link to comment Share on other sites More sharing options...
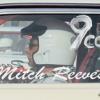
Reeves Racing Posted February 20, 2017 Author Share Posted February 20, 2017 The repaint was successful. I did hit one snag, I broke the windshield so Hi had to find another 64 Thunderbolt on eBay to get another windshield. The BMF (looks lumpy in the pictures but better in person) is done and the window channels and inside trim is painted and the rear and side glasses are installed. I made them from sheet stock. I started on the decals which is my favorite part of a build. I am really happy with the way it's tuning out. I wish some of my detail work was a little cleaner but that's where my vision for the build exceeds my skill set. Quote Link to comment Share on other sites More sharing options...
Reeves Racing Posted February 21, 2017 Author Share Posted February 21, 2017 Finished the decals last night. I need to reapply the BMF to the lower windshield trim and as soon as I get the new windshield I will be able to finish it up. I am also waiting on a PE carb linkage set to finish up the carburetor and permanently mount it. I am hoping the parts show up today or tomorrow. I finished up the disc brakes, the real car had 65 V8 Mustang spindles, 89 Ford Ranger rotors, 90 Chevy S10 calipers and Cadillac brake hoses and an adapter kit from Scarebird Fabrications. The chrome pens are awesome for touching up the BMF. I will finish detailing my trailer and the hitch on the truck and I will have a miniature of my tow rig.I set it on the bench last night. Boy does that bring back memories. I sold the truck when we moved to Louisville and I sold the race car a year and half later, and my trailer was stolen so I no longer have any these in real life any more lol... Here are some pictures. Quote Link to comment Share on other sites More sharing options...
Recommended Posts
Join the conversation
You can post now and register later. If you have an account, sign in now to post with your account.
Note: Your post will require moderator approval before it will be visible.