jeffdeoranut Posted May 16, 2017 Posted May 16, 2017 anybody here ever chop the top on a superbird or roadrunner...looking at building a superbird as a pro stock/pro mod cross...will b lengthening nose a bit and adding wedge shape to body ...thanks
Ace-Garageguy Posted May 16, 2017 Posted May 16, 2017 (edited) It's similar to chopping any car of the period with inward-sloping C-pillars. I did this '70 Chevelle in 2012. If you really want to know how, I'll walk you through the procedure. Edited May 16, 2017 by Ace-Garageguy
TarheelRick Posted May 16, 2017 Posted May 16, 2017 (edited) With all those compound curves in that roof line and the C pillars, it will require a lot of cutting and piecing back together. To maintain the smooth curvature it will also have to be very carefully sanded. I would suggest finding some side, front, rear, and top views, printing them off and study where the cuts can be made with the least work involved in getting it back together. Than carefully cut the pictures to see exactly how it will look. It will take some work, but then it is only plastic and you want know until you try. Good luck.EDIT: Seems like Ace got in about the same time I did, that Chevelle looks pretty good. Edited May 16, 2017 by TarheelRick
Ace-Garageguy Posted May 16, 2017 Posted May 16, 2017 (edited) If you want my guidance, I'll be happy to tell you exactly how to do it the easiest way, so it doesn't end up a dorky poorly-proportioned mess. Like this turd. Or not. Edited May 16, 2017 by Ace-Garageguy
jeffdeoranut Posted May 16, 2017 Author Posted May 16, 2017 If you want my guidance, I'll be happy to tell you exactly how to do it the easiest way, so it doesn't end up a dorky poorly-proportioned mess. Like this turd. Or not. right now im thinking following steps in scale auto mag showing how to chop a 65 riveria...if your method is very different I would appreciate the help...gonna b cutting up a johan s n m bird and dont want to ruin it
Ace-Garageguy Posted May 16, 2017 Posted May 16, 2017 (edited) Tim Boyd's method in SA should work fine, but it's a lot more complicated than the way I'd do it, and it will tend to shift the visual mass of the roof rearward somewhat too...something I usually avoid, depending on the car. I'm not a big fan of using CA and brass reinforcements either, as they tend to crack with rough handling (if not done perfectly), so there's that. The chop method I used on the Chevelle brings the mass of the roof straight down, preserving the proportions of the original design, but it won't work the same way on a Superbird body, because the forward line of the sail panel slopes. To bring the visual mass of the roof straight down on the 'Bird body the easy way (and to preserve the lines) it's necessary to cut the top at the base of the C-pillars. Carefully executed, cutting a section out of the roof, as on Tim's method, should be able to be eliminated. Maybe some day I'll take the time to do tutorials on the various methods and what to look out for, why one works on one body and not another, and visual considerations...maybe not In the meantime, if you follow Tim Boyd's steps carefully, you should be fine. http://www.scaleautomag.com/how-to-models/how-to/2014/06/chop-that-top You mention you'll be lengthening the nose, but after the chop (using Tim's method) you may find the nose will appear slightly longer with no additional surgery. I DO recommend, however, that you print out several copies of this, adjusting them to roughly 1/25 scale, and do your design development with paper first. Edited May 17, 2017 by Ace-Garageguy
jeffdeoranut Posted May 16, 2017 Author Posted May 16, 2017 Tim Boyd's method in SA should work fine, but it's a lot more complicated than the way I'd do it, and it will tend to shift the visual mass of the roof rearward somewhat too...something I usually avoid, depending on the car.I'm not a big fan of using CA and brass reinforcements either, as they tend to crack with rough handling (if not done perfectly), so there's that.The chop method I used on the Chevelle brings the mass of the roof straight down, preserving the proportions of the original design, but it won't work the same way on a Superbird body, because the forward line of the sail panel slopes.To bring the visual mass of the roof straight down on the 'Bird body the easy way (and to preserve the lines) it's necessary to cut the top at the base of the C-pillars. Carefully executed, cutting a section out of the roof, as on Tim's method, should be able to be eliminated. Maybe some day I'll take the time to do tutorials on the various methods and what to look out for, why one works on one body and not another, and visual considerations...maybe notIn the meantime, if you follow Tim Boyd's steps carefully, you should be fine. http://www.scaleautomag.com/how-to-models/how-to/2014/06/chop-that-top You mention you'll be lengthening the nose, but after the chop (using Tim's method) you may find the nose will appear slightly longer with no additional surgery.I DO recommend, however, that you print out several copies of this, adjusting them to roughly 1/25 scale, and do your design development with paper first. how do you handle the a pillars on a superbird? my eyes may b wrong but it looks to me as if on the chevelle you cut a horizontal slice out of the c pillars and cut a slice off the bottom of the a pillars thereby lowering the roof...any chance of the stock windshield still working on the bird?
Ace-Garageguy Posted May 17, 2017 Posted May 17, 2017 (edited) how do you handle the a pillars on a superbird? my eyes may b wrong but it looks to me as if on the chevelle you cut a horizontal slice out of the c pillars and cut a slice off the bottom of the a pillars thereby lowering the roof...any chance of the stock windshield still working on the bird? A couple of answers, not necessarily in order. You're right, I just cut a horizontal slice (about 3 scale inches, which is all you probably want to go, max) and moved the roof straight down. This works fairly easily on the Chevelle because the cut is made through the center of the vertical line at the front of the sail panel...which you maintain as straight. However, because of the tumblehome in the sail panels (the inward slope towards the top), when the top comes down, the sides of the upper and lower portions will not line up, but the plastic is thick enough to just stick the edges together, and then add sheet styrene material to both the insides and outsides (the white streak), which is filed to final contour after being thoroughly dry and hard. Using liquid cement, this makes a very strong joint...which I further reinforced inside with model airplane fiberglass and epoxy. This method is similar, in miniature, to the way we reinforce composite structure splices on aircraft and real-car parts. Obviously, the rear line of the sail panel will not line up either after the cut, but this is easily corrected by again adding a little styrene and filing to a pleasant curve. It's actually a lot easier that it may sound, and avoids the need to rebuild the rear window opening like on Mr. Boyd's method. I made new A pillars from styrene, because splicing them in the middle or ends would have given weak joints. By fabricating new pillars, I was able to splay the ends where they attached to the body, and spread the gluing surface considerably. Again, the joints were further reinforced with very fine fiberglass cloth and epoxy. In all the sanding during and polishing after paint, no cracks developed...which was the goal. Nothing will ruin your day like having a crack come through your beautiful paint job. The windshield is the stock Chevelle piece, carefully fitted to the new opening, and it fits flush. ----------------------------------------------------------------------------------------------------------------- To do the old Mopar, you aren't going to be able to use my exact Chevelle method...because there's no vertical line on the forward edge of the C-pillar (sail panel). I'm not wild about Mr. Boyd's method, as it requires a section to be cut out of the roof at the rear, and a careful rebuilding of the window opening. If you haven't done a lot of heavy mods, any extra cuts and reworks are best avoided. In general, a minimum number of cuts and splices is always better. If I were doing the S-Bird, I'd cut the roof free at the lower edge of the sail panel where it intersects the body, and slip the cut edges between the edges remaining on the main body shell. You can come straight down that way, to preserve the original proportions, and you avoid having to section the rear edge of the roof and completely rebuild the rear window. Look very carefully and critically at your new proportions, and when you like them, cut the lower edge of the sail panels flush with the tops of the quarter panels. You'll then need to make styrene "ledges" projecting inwards from the quarters for the cut sail panels to sit on. Spread the sides of the sails gently as necessary, and glue them to the ledges. If you cut and fit carefully, and use liquid cement, you'll have a strong joint that only requires a little filler to smooth everything out. I'd still recommend reinforcing inside with f'glass, but that's up to you. I'd cut the front pillars loose at the bottom, and likewise slide them down inside the opening. You'll have to gently bend them slightly forward at the bottom, as the windshield will of necessity be raked a little more. Sliding the roof down into the body shell this way allows you to actually look at the results of your chop as you go, and get a feel of how you're changing lines and proportions as you work...without hacking all the way through the middle of the sail-panels, and making a potentially frustrating multi-piece mess that's difficult to correct. Your original "glass" should be fairly easy to fit to the new windshield and backlite openings, as you're not changing the angles at the intersections of the pillars and roof panel very much. I developed the new chopped proportions on this one in a similar manner...sliding the rear of an up-top down into the rear opening of what had been a hardtop body shell, and carefully adjusting it until I had a good look from all angles. Edited May 17, 2017 by Ace-Garageguy
jeffdeoranut Posted May 17, 2017 Author Posted May 17, 2017 A couple of answers, not necessarily in order. You're right, I just cut a horizontal slice (about 3 scale inches, which is all you probably want to go, max) and moved the roof straight down. This works fairly easily on the Chevelle because the cut is made through the center of the vertical line at the front of the sail panel...which you maintain as straight. However, because of the tumblehome in the sail panels (the inward slope towards the top), when the top comes down, the sides of the upper and lower portions will not line up, but the plastic is thick enough to just stick the edges together, and then add sheet styrene material to both the insides and outsides (the white streak), which is filed to final contour after being thoroughly dry and hard. Using liquid cement, this makes a very strong joint...which I further reinforced inside with model airplane fiberglass and epoxy. This method is similar, in miniature, to the way we reinforce composite structure splices on aircraft. Obviously, the rear line of the sail panel will not line up either after the cut, but this is easily corrected by again adding a little styrene and filing to a pleasant curve. It's actually a lot easier that it may sound, and avoids the need to rebuild the rear window opening like on Mr. Boyd's method. I made new A pillars from styrene, because splicing them in the middle or ends would have given weak joints. By fabricating new pillars, I was able to splay the ends where they attached to the body, and spread the gluing surface considerably. Again, the joints were further reinforced with very fine fiberglass cloth and epoxy. In all the sanding and polishing after paint, no cracks developed...which was the goal. Nothing will ruin your day like having a crack come through your beautiful paint. The windshield is the stock Chevelle piece, carefully fitted to the new opening, and it fits flush. ----------------------------------------------------------------------------------------------------------------- To do the old Mopar, you aren't going to be able to use my exact Chevelle method...because there's no vertical line on the forward edge of the C-pillar (sail panel). I'm not wild about Mr. Boyd's method, as it requires a section to be cut out of the roof at the rear, and a careful rebuilding of the window opening. If you haven't done a lot of heavy mods., any extra cuts and reworks are best avoided. If I were doing the S-Bird, I'd cut the roof free at the lower edge of the sail panel where it intersects the body, and slip the cut edges between the edges remaining on the main body shell. You can come straight down that way, to preserve the original proportions, and you avoid having to section the rear edge of the roof, and completely rebuild the rear window. Look very carefully and critically at your new proportions, and when you like them, cut the lower edge of the sail panels flush with the tops of the quarter panels. You'll then need to make styrene "ledges" projecting inwards from the quarters for the cut sail panels to sit on. Spread the sides of the sails gently as necessary, and glue them to the ledges. If you cut and fit carefully, and use liquid cement, You'll have a strong joint that only requires a little filler to smooth everything out. I'd still recommend reinforcing inside with f'glass, but that's up to you. I'd cut the front pillars loose at the bottom, and likewise slide them down inside the opening. You'll have to gently bend them slightly forward at the bottom, as the windshield will of necessity be raked a little more. Sliding the roof down into the body shell this way allows you to actually look at the results of your chop as you go, and get a feel of how you're changing lines and proportions as you work...without hacking all the way through the middle of the sail-panels, and making a potentially frustrating multi-piece mess that's difficult to correct. Your original "glass" should be fairly easy to fit to the new windshield and backlite openings, as you're not changing the angles at the intersections of the pillars and roof panel very much. I developed the new chopped proportions on this one in a similar manner...sliding the rear of an up-top down into the rear opening of what had been a hardtop body shell, and carefully adjusting it until I had a good look from all angles. many thanks...I will post pics as I go along unless I mess it up horribly...lol
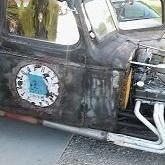
Draggon Posted May 17, 2017 Posted May 17, 2017 (edited) This pic might help you as to getting the proportions on the C pillar correct. I don't like the A pillars on this one. The slight angle chop to the front and the way Bill did the pillars and cowl on his Chevelle make it look much "lighter" than this one. Edited May 17, 2017 by Draggon
Ace-Garageguy Posted May 17, 2017 Posted May 17, 2017 This pic might help you as to getting the proportions on the C pillar correct. I don't like the A pillars on this one. The slight angle chop to the front and the way Bill did the pillars and cowl on his Chevelle make it look much "lighter" than this one.Good looking car, but I agree with you about the A-pillars not quite getting it in profile.I think part of the problem is that the rear of the hood has been raised a tick, and the rear edge of it has had a swoop formed to shroud the wipers. It's just a little too heavy-handed, and makes the car look too thick and heavy right there.I don't understand what the heavy blackness just behind the A-pillar itself is all about. Maybe it's a cage bar, but it really interferes with the first impression, the way the car is photographed.
espo Posted May 18, 2017 Posted May 18, 2017 The blackness behind the A pillar may be the Roll Bar. There looks to be a hoop behind the front seat and this could be the front portion going down toward the dash board.
Recommended Posts
Create an account or sign in to comment
You need to be a member in order to leave a comment
Create an account
Sign up for a new account in our community. It's easy!
Register a new accountSign in
Already have an account? Sign in here.
Sign In Now