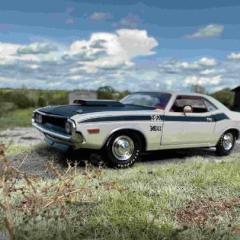
QbanFam Posted February 19, 2019 Author Posted February 19, 2019 (edited) I finally received the static grass applicator. First time using this, so I have to practice to get better results. I figured I would apply some 6mm meadow grass to this diorama. Here are some pictures. I’m not sure the color of the grass I picked goes with the theme. I probably should have used some dead ones, or patchy. Edited February 19, 2019 by QbanFam
Anglia105E Posted February 20, 2019 Posted February 20, 2019 Well Yordan, considering this is your first time using the static grass applicator, I think the result is very good actually. The colour seems okay and the area around the wooden building and the tyres is just right. This diorama of yours is coming together really nicely. The scene has a nice feel about it, and a real background with daylight works in your favour too. David
QbanFam Posted February 20, 2019 Author Posted February 20, 2019 40 minutes ago, Anglia105E said: Well Yordan, considering this is your first time using the static grass applicator, I think the result is very good actually. The colour seems okay and the area around the wooden building and the tyres is just right. This diorama of yours is coming together really nicely. The scene has a nice feel about it, and a real background with daylight works in your favour too. David Thank you. Every time I get a hold of a tool for modeling I’m terrify to use it. Lol.
Anglia105E Posted February 20, 2019 Posted February 20, 2019 Yeah..... I was worried about using an airbrush but soon got the hang of it, although it is a cheap one and I can sometimes get better results with a rattle can. What worries me more than the tools, is the chemicals we use as scale model builders. The moulding and casting resins, the cellulose paints, the glues, the thinners and cleaning fluids...... all this toxic stuff and disposable latex gloves and face masks....... I just worry about it. David
QbanFam Posted February 20, 2019 Author Posted February 20, 2019 1 hour ago, Anglia105E said: Yeah..... I was worried about using an airbrush but soon got the hang of it, although it is a cheap one and I can sometimes get better results with a rattle can. What worries me more than the tools, is the chemicals we use as scale model builders. The moulding and casting resins, the cellulose paints, the glues, the thinners and cleaning fluids...... all this toxic stuff and disposable latex gloves and face masks....... I just worry about it. David I agree. I just started building my little man cave (for modeling) in my spare room. I actually built the airbrushing table by the window. Airbrushing is one thing I haven’t done yet. I just need to get a spray booth to help with the fumes.
Tom Geiger Posted February 20, 2019 Posted February 20, 2019 Nice work Yordan! It was fun watching your truck take shape over the two pages of this thread! Rust is also a regional thing. Northern cars rust from the bottom up due to salt on the roads, while Southern cars rust from the top down due to intense heat and sun wearing the finishes thin. You may find a Northern car with paint in good shape on the roof, and a Southern car with clean fender bottoms! When I'm working on a project, I decide where my vehicle will reside... as in what license plate etc. Then I rust accordingly. As others mentioned, photos of real rusty vehicles are your best friend. Every vehicle has it's own rust patterns... for instance Tri-Five Chevys always rust above the headlight. I cringe when I see a rusty Tri-Five with perfect fender tops over the lights... but a big rust hole in the center of the hood (where no car has ever rusted!) The Internet is a good source for photos. I like eBay Motors since people will post a whole series of photos around the vehicle for sale. I save those photo sets for future projects. You are on the right track using Dullcote over your rust. I do a lot of that. Take a look at the tool chest above. That was scratch built from Evergreen sheet. It is gloss green, then rusted with powdered chalks and Dullcote slurry. Then Dullcoted again. The final step that gives it depth is that I took Testors clear gloss and aimed the can up in the air. I placed the chest at the back of my spray booth and let some gloss paint drops just rain down on it. I like the way it came out!
QbanFam Posted February 21, 2019 Author Posted February 21, 2019 7 hours ago, Tom Geiger said: Nice work Yordan! It was fun watching your truck take shape over the two pages of this thread! Rust is also a regional thing. Northern cars rust from the bottom up due to salt on the roads, while Southern cars rust from the top down due to intense heat and sun wearing the finishes thin. You may find a Northern car with paint in good shape on the roof, and a Southern car with clean fender bottoms! When I'm working on a project, I decide where my vehicle will reside... as in what license plate etc. Then I rust accordingly. As others mentioned, photos of real rusty vehicles are your best friend. Every vehicle has it's own rust patterns... for instance Tri-Five Chevys always rust above the headlight. I cringe when I see a rusty Tri-Five with perfect fender tops over the lights... but a big rust hole in the center of the hood (where no car has ever rusted!) The Internet is a good source for photos. I like eBay Motors since people will post a whole series of photos around the vehicle for sale. I save those photo sets for future projects. You are on the right track using Dullcote over your rust. I do a lot of that. Take a look at the tool chest above. That was scratch built from Evergreen sheet. It is gloss green, then rusted with powdered chalks and Dullcote slurry. Then Dullcoted again. The final step that gives it depth is that I took Testors clear gloss and aimed the can up in the air. I placed the chest at the back of my spray booth and let some gloss paint drops just rain down on it. I like the way it came out! Wow!! Thank you for all that awesome information. I will be applying them in future projects. Also, amazing work and details on that model. It’s looks so real. Thank you, again.
Flat32 Posted February 21, 2019 Posted February 21, 2019 Noticed first pics have reasonable headlight lenses, but later seems to have them painted over. The headlight bezels were stainless steel so wouldn't have rusted at all. Leaves and debris on the hood looks really good, but seems like running boards would have some as well. Grass looks fantastic. Would you consider some weeds in it? Easy to say, but haven't the foggiest notion how weeds could be done. Chevrolet emblem was chrome plated die cast zinc and the chrome usually survived pretty good. If the emblem lost it's original chrome over the years it might look gray, but certainly not rust color.
QbanFam Posted February 21, 2019 Author Posted February 21, 2019 1 hour ago, Flat32 said: Noticed first pics have reasonable headlight lenses, but later seems to have them painted over. The headlight bezels were stainless steel so wouldn't have rusted at all. Leaves and debris on the hood looks really good, but seems like running boards would have some as well. Grass looks fantastic. Would you consider some weeds in it? Easy to say, but haven't the foggiest notion how weeds could be done. Chevrolet emblem was chrome plated die cast zinc and the chrome usually survived pretty good. If the emblem lost it's original chrome over the years it might look gray, but certainly not rust color. Great points. I really messed up painting the headlights. I will try to clean them. I Could try to remove the paint around the bezel and the emblem. Then paint them in chrome and weather them. I found a tutorial online on how to do it. As far as the weed...that’s a tough one but it would be a good challenging project. Thank you for pointing out those details.
Gramps46 Posted February 21, 2019 Posted February 21, 2019 Your grass is amazing. I had never heard of a static grass applicator before so thanks for the reference. Went on line and found out more about them, thanks.
Foxer Posted February 21, 2019 Posted February 21, 2019 I'm really liking this! Very good textures ... grass is amazing.
QbanFam Posted February 21, 2019 Author Posted February 21, 2019 2 hours ago, Foxer said: I'm really liking this! Very good textures ... grass is amazing. Thank you so much.
QbanFam Posted February 21, 2019 Author Posted February 21, 2019 4 hours ago, Gramps46 said: Your grass is amazing. I had never heard of a static grass applicator before so thanks for the reference. Went on line and found out more about them, thanks. Thank you. The grass applicator is a great tool to help with realism.
Scalper Posted February 21, 2019 Posted February 21, 2019 Love it . the details . everything looks great but the headlights. take them out have grass growing out of them or a bird nest
QbanFam Posted February 22, 2019 Author Posted February 22, 2019 7 hours ago, Scalper said: Love it . the details . everything looks great but the headlights. take them out have grass growing out of them or a bird nest That’s a great idea. Thank you.
iamsuperdan Posted February 26, 2019 Posted February 26, 2019 On 2/19/2019 at 4:20 PM, QbanFam said: I finally received the static grass applicator. First time using this, so I have to practice to get better results. I figured I would apply some 6mm meadow grass to this diorama. Here are some pictures. I’m not sure the color of the grass I picked goes with the theme. I probably should have used some dead ones, or patchy. I don't believe it! This is way too good to be just your first diorama! lolz Amazing work. Your detail and realism is just perfect. Your pic above reminds me of a pic I took last summer.
QbanFam Posted February 26, 2019 Author Posted February 26, 2019 (edited) 21 minutes ago, iamsuperdan said: I don't believe it! This is way too good to be just your first diorama! lolz Amazing work. Your detail and realism is just perfect. Your pic above reminds me of a pic I took last summer. It was my first one. Lol. I have gotten that from many of my friends. My mother has always done craft stuff and I used to watch. So, I must have gotten it from her. I’m still working on it as well as another diorama. I posted it under the name “Over the Creek.” Thank you so much for your kind words. Actually...just realized you saw that one. Lol. Edited February 26, 2019 by QbanFam
Recommended Posts
Create an account or sign in to comment
You need to be a member in order to leave a comment
Create an account
Sign up for a new account in our community. It's easy!
Register a new accountSign in
Already have an account? Sign in here.
Sign In Now