IanH Posted February 16, 2021 Author Share Posted February 16, 2021 Just making a mess at this stage.... Quote Link to comment Share on other sites More sharing options...
IanH Posted February 20, 2021 Author Share Posted February 20, 2021 Almost happy with the finish between the shroud and the body, a little bit of a deeper gap on the other side, so will apply a touch more putty. I noticed that the main center section of the wing didn't fit as snuggly as I would like, so I did some work on that, much happier now. Quote Link to comment Share on other sites More sharing options...
IanH Posted April 23, 2021 Author Share Posted April 23, 2021 Been a while without much progress, but have managed to get the roll bar painted red, and it's base black, figured these two parts are going to be a real struggle to paint later, specifically the base of the roll bar... Also been playing around with ideas for the seat belts for a very long time, this kit does not have the pe belts, it just has the rubber belts which are designed to go over the driver figurine. I am not going to use the driver, so the rubber belts won't work (for me at least). Decided to design some belts on Visio, and print on paper, have given it a coat of Matt clear to protect it, not my favorite solution, would have preferred the pe, but I think this will do. I decided also not to worry too much about the clips, as I am going to chop off the drivers head, and have the helmet resting on the seat covering the belt clips. So here's the waist belts installed, they need to be done before the two halves of the body are joined. These two parts are ready to be joined.... Anytime now 😉 Quote Link to comment Share on other sites More sharing options...
Belugawrx Posted April 23, 2021 Share Posted April 23, 2021 Good to see you back at it Ian. I have decided the same thing on my 312T4 build, and have cut off poor Jody's head to paint up his helmet. Keep it going..Cheers Quote Link to comment Share on other sites More sharing options...
IanH Posted April 23, 2021 Author Share Posted April 23, 2021 44 minutes ago, Belugawrx said: Good to see you back at it Ian. I have decided the same thing on my 312T4 build, and have cut off poor Jody's head to paint up his helmet. Keep it going..Cheers "Off with his head!" Quote Link to comment Share on other sites More sharing options...
IanH Posted April 23, 2021 Author Share Posted April 23, 2021 Finishing off the evening with the lower portion of the body glued to the upper portion. Will remove the tape tomorrow, and start to work on the joins, and tape up the interior to protect from dust, and over spray in future steps. Quote Link to comment Share on other sites More sharing options...
JohnnyK Posted April 23, 2021 Share Posted April 23, 2021 I have a suggestion. It might be helpful if you reduced your photos to 600x450. It's difficult to scroll through your posts with really large photos. Quote Link to comment Share on other sites More sharing options...
IanH Posted April 24, 2021 Author Share Posted April 24, 2021 6 hours ago, JohnnyK said: I have a suggestion. It might be helpful if you reduced your photos to 600x450. It's difficult to scroll through your posts with really large photos. Thanks, I didn't realise, as it's fine on my mobile. Will try it. 👍 Quote Link to comment Share on other sites More sharing options...
IanH Posted April 25, 2021 Author Share Posted April 25, 2021 On 4/23/2021 at 10:45 PM, JohnnyK said: I have a suggestion. It might be helpful if you reduced your photos to 600x450. It's difficult to scroll through your posts with really large photos. All taped up and ready to do some more bodywork. Not much to report on, so this is more of a test post....@JohnnyK, how does this picture display now? Quote Link to comment Share on other sites More sharing options...
JohnnyK Posted April 25, 2021 Share Posted April 25, 2021 The size of the photo is much better 🙂 Quote Link to comment Share on other sites More sharing options...
IanH Posted April 27, 2021 Author Share Posted April 27, 2021 Been working on the seam between the upper and lower body parts... It's about as good as I can get it, for a first round... Made a template out of plastic to use to shape the wet putty to try avoid excessive sanding later. Will have to wait for it to dry to see if I need another layer... Quote Link to comment Share on other sites More sharing options...
IanH Posted June 16, 2021 Author Share Posted June 16, 2021 Pulled this back out of the closet, and previous sanding efforts showed a slight indentation along the join on the one side. Spent a couple of minutes applying some more putty, added it quite rough, as it's a soft, easy sanding putty. Will need to let it set, then sand smooth... As much as I have enjoyed this phase, I am really looking forward to getting some primer and colour on. So that's my short update.... Quote Link to comment Share on other sites More sharing options...
IanH Posted September 27, 2022 Author Share Posted September 27, 2022 So after quite a break from this build, I have started making some progress... Wiring up the engine: and finished (hopefully) sanding the main body section in preparation for primer and then the base colour coats... Some careful masking needed, can't wait to see it in colour... 1 Quote Link to comment Share on other sites More sharing options...
Brudda Posted September 28, 2022 Share Posted September 28, 2022 On 8/30/2020 at 12:17 AM, IanH said: Oil Coolers: These are as they are currently, the one on the left has been sanded down after having indentations come up as seen on the right one. I will be stripping these fully and will be starting over again, spent hours on this, but am just not happy with it. These are work. You have them looking great. I remember these. A lot of sanding and filling to get these to look acceptable. Quote Link to comment Share on other sites More sharing options...
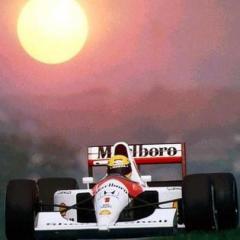
IanH Posted October 9, 2022 Author Share Posted October 9, 2022 A big milestone reached over the weekend, primered, base colour and decals. Happy with the results. 4 Quote Link to comment Share on other sites More sharing options...
IanH Posted December 30, 2022 Author Share Posted December 30, 2022 Going to hopefully be a couple of updates coming up, and hoping to get this one over the line as I try to complete it for a local modeling competition... Big painting session yesterday: Also managed to finally find a solution to these holes where the gauge decals are meant to be, my kit did not come with any inserts, later kits had photo etch disc's to provide a level base for the decals. 3D printed these little disc's as inserts: Quote Link to comment Share on other sites More sharing options...
steveracer Posted December 30, 2022 Share Posted December 30, 2022 Nice work Ian. Keep it up! Quote Link to comment Share on other sites More sharing options...
IanH Posted December 30, 2022 Author Share Posted December 30, 2022 Getting stuck into the fitment of the 3D printed rivets... I quite like the results, but what a lot of work, having to redrill all the holes first and then try slot one of these bad boys in the hole.... 2 Quote Link to comment Share on other sites More sharing options...
absmiami Posted December 30, 2022 Share Posted December 30, 2022 you mite have this finished in time for - maybe - a south african grand prix ?? - first one in how many years ?? 1 Quote Link to comment Share on other sites More sharing options...
Smilesperhour Posted December 30, 2022 Share Posted December 30, 2022 Love the rivet detail. Lots of time and effort to get this detailed up. Such a pretty race car Quote Link to comment Share on other sites More sharing options...
IanH Posted December 31, 2022 Author Share Posted December 31, 2022 3 hours ago, absmiami said: you mite have this finished in time for - maybe - a south african grand prix ?? - first one in how many years ?? Well as it stands right now, my count down to completion is now on 14 days if I am going to make it for the local competition.... Last SA GP was 1992 won by Prost in the Williams. Can't wait to get this one over the line now. Quote Link to comment Share on other sites More sharing options...
IanH Posted January 2, 2023 Author Share Posted January 2, 2023 Riveting stuff! About 250 left to go.... 1 Quote Link to comment Share on other sites More sharing options...
jaymcminn Posted January 2, 2023 Share Posted January 2, 2023 10 hours ago, IanH said: Riveting stuff! About 250 left to go.... Rivets are the absolute worst. Tedious, fiddly and you lose about 10% to the carpet monster. Unfortunately for us modelers, once you've produced something that looks this good you can never go back. Amazing work! 1 Quote Link to comment Share on other sites More sharing options...
IanH Posted January 6, 2023 Author Share Posted January 6, 2023 So with exactly 1 week left until this needs to be done, I am feeling pretty confident, although each step still seems to take so much longer than expected. My own designed and printed vented brake disc's - kit part is unvented which is inaccurate and quite visible. Front suspension on, feels like we're starting to get there. 1 Quote Link to comment Share on other sites More sharing options...
IanH Posted January 10, 2023 Author Share Posted January 10, 2023 4 days left.... And we're hooking up the battery about to fire some life into this baby. My own 3d printed and designed battery terminals, with some rubber hose I had lying around... Was a bit worried that they were too thick, but loving the look now that it's on. Otherwise, rear suspension is on as well, so mostly tying up all the final bits and pieces now. Will take some additional pictures later. Quote Link to comment Share on other sites More sharing options...
Recommended Posts
Join the conversation
You can post now and register later. If you have an account, sign in now to post with your account.
Note: Your post will require moderator approval before it will be visible.