cobraman Posted July 15, 2021 Posted July 15, 2021 Just started this today so not much to show . Body cleaned and primed in white . Chrome wheels were treated to a coat of dullcoat . I’m sure I’m the end some colors may be wrong due to having info that doesn’t match . Will do as best I can but know some parts will be incorrect . 1
gbdolfans Posted July 16, 2021 Posted July 16, 2021 Hi Ray, I am doing the same car. Here is the info that was posted in my thread from Larry. Maybe it will help. The Lime Ice is very hard to find but I found some on Ebay at a high price. Body color..#1835 testors lime ice! Or a mix of Testors/Boyd paint 50/50 mix of #52715 bright green pearl & #52707 lime pearl this is the color mix I used to paint Jim's model! this paint might also be not around, sorry. Rear spoiler.. polished aluminum blade Bumpers..dull aluminum Rear window.. dull aluminum Body tin, all chassis tin, all of the seat, fuel tank and cap, bell housing tin, throttle linkage protection bracket above throttle pedal & pedal, hand brake lever, butterfly wheel...Testors/Boyds #52714 dark green pearl Chassis..gloss black Rear axle.. gloss black (chrome cover) Front suspension..chrome (all of it) Front wheels..aluminum (dull..semi gloss) Rear bearpaws..aluminum and medium bright gold centers and part of the flat areas out from center Steereing linkages..chrome (from steering knuckle to the mount for butterfly wheel (all) Fuel tank top bracket..(chrome) Fuel lines..braided with typical anodized fittings connections..(all) Engine..gloss black Manifold..dull darker aluminum Blower case.. Testors/MM # 1780 steel Injector.. dull aluminum Hat.. dull aluminum Hat - vinyl cover..black (crower on front) Fuel lines on engine upper.. steel (all) Engine pullys.. dull aluminum Valve cover..chrome (black boots) Fire bottles..chrome ( one on top of steering shaft) .....black on two above rear axle with green anodized brackets and green fittings) anodized red push button Ignition block.. black (Mallory) Lines from heads to headers..braided Headers..high heat flat black Wheelie bars..chrome (all) except lower main bar anodized green like tin Wheelie bar casters..chrome with black rubber Brake calipers.. dull aluminum Brake rotors..steel and pale gold anodized hub & studs Rear chassis brackets for mounting the body.. chrome (except hook & locks anodized green) Drivers cage padding..black vinyl semi gloss (only on two center horizontal bars) Parachute covers..bright aluminum (red pins & flags) Parachute lines to chassis..bright aluminum Window frames..dull aluminum (all)
cobraman Posted July 16, 2021 Author Posted July 16, 2021 Thank a lot. It will help. Not sure I will get it done as it should be but i will try and get it as close as I can.
cobraman Posted July 17, 2021 Author Posted July 17, 2021 Yea ! I found a full can and a partial can of the Lime Ice in my paint stash !
Larry Rose Posted July 18, 2021 Posted July 18, 2021 Follow the guy on Youtube who has 3 episodes posted so far at https://www.youtube.com/channel/UCYQxBFOFVGv2ykSzG8520HA.
cobraman Posted July 18, 2021 Author Posted July 18, 2021 Thanks Larry. I saw the first 2 but did not know the third was posted.
cobraman Posted July 18, 2021 Author Posted July 18, 2021 Ya know, the Lome Ice looks too light to me. I am partly color blind so there is that. Working on the engine now but need to locate a 1/16 pre wired aluminum distributor. The tube they give you in the kit is a joke. Anyone who could use that stuff and do a nice neat job of wiring the engine would get my full respect !
cobraman Posted July 19, 2021 Author Posted July 19, 2021 Working on the engine now . Up to my usual low standards . 1
cobraman Posted July 19, 2021 Author Posted July 19, 2021 Thanks Carl. I will admit that there is a little Mickey Mouse stuff going on around here. ?
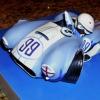
cobraman Posted July 20, 2021 Author Posted July 20, 2021 Made some progress on this kit . Got the body painted in the Lime Ice . Still lots to do . 1
Zen Posted July 21, 2021 Posted July 21, 2021 Looking good! Are you using the kit supplied wires & hoses or something else?
cobraman Posted July 21, 2021 Author Posted July 21, 2021 Not using much of the kit supplied hoses. To me they are too large and not very flexible. I'm using stuff I had on hand. Some may be a little out of scale but I believe better than the kit stuff.
sflam123 Posted July 22, 2021 Posted July 22, 2021 You did a nice job on the engine!! Smart decision NOT to use the kit supplies. There needs to be a special place in hell for the guy (or girl) that came up with the plastic spark plug wires!! I thought the Revell spark plug wires were bad!! I think I will end up buying some from ProTech before this is all done!
cobraman Posted July 23, 2021 Author Posted July 23, 2021 Made some more headway . Body almost ready for clear after some touch ups and then I will detail the bumpers . I did have a problem with some of the decals . They look great but I found them to be very thin and fragile . I messed up on a couple . 1
Tortuga Kustomz Posted July 24, 2021 Posted July 24, 2021 Looking real good man, question, is that the real high for the front suspension?, if so i think you need to lowered down a little bit
cobraman Posted July 24, 2021 Author Posted July 24, 2021 No , the body is just sitting on the chassis and not at its final resting place . It will be lower when the body is actually mounted .
slusher Posted July 24, 2021 Posted July 24, 2021 Looks great Ray, I don’t use decals on the body unless it’s a race car or Muscle car.
Tortuga Kustomz Posted July 24, 2021 Posted July 24, 2021 5 hours ago, cobraman said: No , the body is just sitting on the chassis and not at its final resting place . It will be lower when the body is actually mounted . aaah, sorry that was me steps a head
cobraman Posted July 29, 2021 Author Posted July 29, 2021 This one is almost done , probably tomorrow . I’m sure some colors are not correct . Three sources and they are sometimes at odds of each other . Maybe depends on when the car ran ? Decals did fight me some perhaps due to the size or perhaps I just screwed up ! I will take better pics tomorrow as these are kind of dark .
bob terry Posted July 30, 2021 Posted July 30, 2021 Nice job. Does this kit need the rear axle raised like previous Revell funny cars?
Recommended Posts
Create an account or sign in to comment
You need to be a member in order to leave a comment
Create an account
Sign up for a new account in our community. It's easy!
Register a new accountSign in
Already have an account? Sign in here.
Sign In Now