Mattilacken Posted November 1, 2022 Author Posted November 1, 2022 That tips on the paint repair seems to be working. ? Had to get the filters painted and tested. Seems that I have to extend the piping a little bit so I don’t hit the alternator. 1
Mattilacken Posted November 3, 2022 Author Posted November 3, 2022 (edited) Made a stupid mistake.. I was looking for my Tamiya clear but could not find it.. so I took a generic brand clear and sprayed it. Turned out ok in most places but the hood and roof looks strange.. I hope it buffs out since I am out of the black paint. Ideas? I could not resist starting the detailing of the grill and got started on the lights but had an acident with the grill, except for my painting, can you spot the problem? And just to show the Swedish Norrlänings stuk. We in the North like our extra high beams.. so they are going behind the grill so when it gets dark the High Lighters can be turned on and leave al the other cars to see bad, but these guys keep on going flat out! the paint problem.. Edited November 3, 2022 by Mattilacken
Mattilacken Posted November 4, 2022 Author Posted November 4, 2022 I polished the hood but the damage was severe so it burnt throug in several places. It also looks dull, did I go through the clear? 1
iamsuperdan Posted November 8, 2022 Posted November 8, 2022 I'd say you went right through the clear on the hood. But on a positive note...those headlights and grille! I definitely need to measure up and modify one of my grilles with your 3d files now. No more putting it off! 1
dino246gt Posted November 10, 2022 Posted November 10, 2022 I love this project, looks so cool. You'll fix the paint I'm sure. I always have painting issues, but they get fixed! Cheers, keep on "truckin" 1
Mattilacken Posted November 12, 2022 Author Posted November 12, 2022 I will need to strip the paint since it’s damaged down below the clear. Have not done that the past 10 years… so I…started an other 1500 today.. chassis is glued and primed, clear to morrow.
Mattilacken Posted November 13, 2022 Author Posted November 13, 2022 (edited) Also managed to strip the paint today. So I will sand lightly to morow and then when I get the delivery of the new cans I will spray this body as well as the other one. Edited November 13, 2022 by Mattilacken
Mattilacken Posted November 16, 2022 Author Posted November 16, 2022 (edited) I get to say as AC/DC say.. because I am back! Back in Black! Hood have some swirlmarks that I could not see in primer hope it looks ok after polish. I did put a extra coat after the picture was taken so I have some room for polish. Edited November 16, 2022 by Mattilacken
av405 Posted November 17, 2022 Posted November 17, 2022 51 minutes ago, Mattilacken said: Interior under way. Did you brush paint that? If so, why not spray it?
Mattilacken Posted November 18, 2022 Author Posted November 18, 2022 7 hours ago, av405 said: Did you brush paint that? If so, why not spray it? Had to mix the colors since I didn’t have the right one on bottle and since I have had such bad results with AB and acrylics I felt that I want to get it done, so I went the quick way.
av405 Posted November 18, 2022 Posted November 18, 2022 32 minutes ago, Mattilacken said: Had to mix the colors since I didn’t have the right one on bottle and since I have had such bad results with AB and acrylics I felt that I want to get it done, so I went the quick way. Gotcha. I hear Tamiya TS-33 Dull Red is a good option for this color interior, but you went with what you had. Keep it up! 1
Mattilacken Posted November 18, 2022 Author Posted November 18, 2022 4 hours ago, av405 said: Gotcha. I hear Tamiya TS-33 Dull Red is a good option for this color interior, but you went with what you had. Keep it up! I will get one of those at the next opportunity, thanks for the tip. As you said I went with what I had. I am trying to work on the brush paints skills as well. But I can’t get the Vallejo paints to lai down as nicely as everyone say they will. It Might have to do with patience and getting the right viscosity and coverage on each pass. I did spray the bottom color with Tamiya TS red but the bottle was bad and did not lay down good. Should have decanted it and put a drop of black in it. I should probably re do the parts for the interior ?
iamsuperdan Posted November 18, 2022 Posted November 18, 2022 For future reference Model Master's Crimson Red makes a good dark red interior. A little darker than it "should" be, but it looks good. I used it on the last 454SS I built. Anyway.... I think your interior colour looks bang on.
Mattilacken Posted November 20, 2022 Author Posted November 20, 2022 (edited) Well its back. Need to Work on my painting. Probably need to use decanted paint in the AB to cover the panel lines better since it seems like it’s shining through. Or it might be the clear that I put on to heavy. Edited November 20, 2022 by Mattilacken
Mattilacken Posted November 21, 2022 Author Posted November 21, 2022 (edited) Got my exhaust made with my freshly designed and printed mufflers. Also installed the battery box and cables. Edited November 21, 2022 by Mattilacken
iamsuperdan Posted November 21, 2022 Posted November 21, 2022 I think your paint looks pretty dang good. Love the exhaust too!
Mattilacken Posted November 22, 2022 Author Posted November 22, 2022 (edited) 23 hours ago, iamsuperdan said: I think your paint looks pretty dang good. Love the exhaust too! Thanks man! Btw did you get the new files? I had a export problem a while. My Magnaflow mufflers and 3mm bras tube bent and opened up in the end so it look more to scale. Also relocated the battery in a battery box from my PB where the tank used to sit. Made some progress to night. Decals was keeping it to getter her but had to be “washed” before applied since they where giving gray gue. The bags are thrown in the back to see if they fit ? as well as the snowboards. I guess the Swede will go to the Rockies before going home to Sweden. interior starts to come to getter, did respect the dash, had some over spray on the black. Still thinking if I make seat belts or not.. time will tell. Need to put some cans and stuf in there I guess. Next step.. need to print my license plates and stuff. Edited November 22, 2022 by Mattilacken
iamsuperdan Posted November 22, 2022 Posted November 22, 2022 1 hour ago, Mattilacken said: Thanks man! Btw did you get the new files? I had a export problem a while. Not yet, but I did put one of these on the bench, so will be measuring things up and doing some printing shortly. I checked though, and everything works. Will keep you posted!! 1
Mattilacken Posted November 28, 2022 Author Posted November 28, 2022 I might make it. Even though I have had more issues. Need to get an other polish a final or I have to get an other cloth. The paint got scratches.also the decals wrinkled. Will sort that later.. got glass in after removing the center bar. Also glued the rear wheels and shocks. And a simple detail in the interior, a road atlas from 1987 the year when I was born ?
Mattilacken Posted December 2, 2022 Author Posted December 2, 2022 Thought I would not make it. And these pics are bad. And the paint is not as clear as I would like. Tips on the polishing techniques would be appreciated! I have new decals printed that will go on it. But I would like to get the paint with lesser scratches first. O and how can I make it less static? It’s a real dust magnet at the moment! 1
Mattilacken Posted December 5, 2022 Author Posted December 5, 2022 (edited) Some details have been worked out on the race truck and it’s looking better then what it did in the rush on race night. sad thing though, my decals did not work, I can’t print white so they can’t be seen. So if any one have a set of 454 decals to do or I would appreciate it! Don’t know if it’s possible to get hold of rics models decals due to the tragic events of his wife/girlfriend. btw! How do I get the model to stop being so static and pulling dust to it? Edited December 5, 2022 by Mattilacken
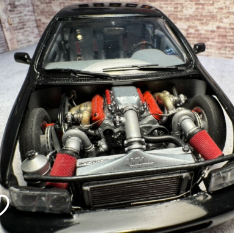
Steve H Posted December 5, 2022 Posted December 5, 2022 Hi Anton! You’ve been busy. This has come together VERY nicely. That engine looks killer stuffed under the hood, and the wheel/tire combo is perfect. I have issues with static too, especially with resin. I don’t have one yet, but I plan on ordering a Tamiya anti static brush, apparently they work well. I’m sure others will have different options… Hope all is well sir, cheers, Steve
dino246gt Posted December 5, 2022 Posted December 5, 2022 Not sure about the static, but the pickup looks fantastic! I love the mods and that engine looks sweet! Well done!
Recommended Posts
Create an account or sign in to comment
You need to be a member in order to leave a comment
Create an account
Sign up for a new account in our community. It's easy!
Register a new accountSign in
Already have an account? Sign in here.
Sign In Now