NOBLNG Posted January 24, 2023 Posted January 24, 2023 Wow Thierry! Amazing attention to detail you demonstrate! Your scratch building skills are impressive too. I just found this thread while searching this car and only skimmed it. Now I’m going back to read every word and study the pics. Thanks for documenting this beautiful build!? 1
CrazyCrank Posted March 30, 2023 Author Posted March 30, 2023 Evening gentlemen Improvement of the water expansion tank The kit part: Mine, after having added a few bits of thin styrene sheet and after priming : - 1 superior strip (0.5 mm wide) to increase the diameter of the lid - 2 strips(0.6 mm) on the middle of the tank, which simulate the routing collars - 1 plate to close the tank at the bottom Obviously, an expansion tank has 2 hoses,for entry and exit, one at the top, and the other at the bottom. I've taken inspiration of these pictures, the left one from Elvis restored car, and the right one from another one: And have machined the superior and inferior hoses and connectors, using: - 0.5/0.3 mm diameter brass tube . - 0.3 mm steel wire - Two micro-bolts: 1.0 mm head, and 0.6 mm thread, that I've re-drilled to 0.6 mm - some 0.8/0.6 mm aluminium tube - 0.5 mm electrical cable of which I only kept the plastic sheath I proceeded as follows: - bended a short section of brass tube, - threaded and glued two bolts on it, - inserted a short section of 0.3 mm steel wire at one end, - threaded the plastic sheath on the steel wire - inserted the free end of this set into the hole of the aluminium tube And hereunder is a close view of water lines After painting: While the paint of the the expansion tank was drying, I've fabricated the file supply line which comes from the rear of the car and is visible in the engine bay Ì used: - 0.4 mm Ni-Cr wire -3 brass bolts 0.6 mm as previously - a short section of 0.6 mm brass tube - A thin strip of Hasegawa Mirror Finish for simulate the collar - And after market silver braided line 0.8 mm (0.6 mm would have been more adequate butI didn't have it, so...) I took inspiration of this picture: My interpretation: Fuel supply and expansion tank installed in the engine bay It is now time to move on to more serious matters, so, stay connected ? 1
CrazyCrank Posted October 30, 2024 Author Posted October 30, 2024 Hi guys My apologies for not posting for a long time. This build is finished and already posted in the "Under Glass" section. However, I'm going to complete the WIP section of this charismatic car and share my tips and tricks with you. Wheels: This BMW 507 was equipped with Rudge wheels, which are not supplied in the kit. I spent some hours on Fusion 360 to draw the Rudge wheels, and the hubcaps. In fact, I drew only the outer part of the rim, the inner part of the kit beeing correct. Below the photos of the drawings As you can see on the drawings, I've separated the rim in two sections, the peripheral, which is chromed, and the central section, which I've colored red for a better rendering (but will be Pearl white on the model, as on the real car) And It's obviously possible to 3D print the two sections separately, and to reassemble them later. This tip will allow to paint easily the 2 sections of each rim. And here's the result after the second print attempt, and a tyre mounted on the rim. The fitting with inner part of the rim and the wheel locker was excellent, so I printed separately 10 peripheral and 10 central parts of the outer rim My workbench turned into a wheel factory : I painted the two parts of the outer half-wheel: - Primer and 3 coats of Pearl White for the central part - Primer, 2 layers of Alclad gloss black base, and 3 thin coats of Alclad Chrome for the peripheral parts. I also painted Alclad Chrome, the same way, my dozen of knock-off nuts. And painted Pearl white 2 copies of the dashboard . Somes pictures of all that stuffs: ` Clear coating stage: I've had to test various varnishes over the Alclad Chrome I sprayed over the inner and outer half-rims and on the nuts, to check whether Alclad Aqua Gloss Clear ALC600 was effectively the one which keeps the best shine . Unsurprisingly, it is the winner The best 4 knock-off nuts have been chosen and the BMW logo decals applied on them before clear coating. For the rims, I've used Mr Super Clear Gloss Clear, decanted from the spray can, and then airbrushed. It's perfect for small parts and dries very quickly ! And then, I had to select among 12 sets of 3 pieces, which ones I will keep to assemble 5 rims (4 wheels on axles and 1 spare), each composed of 3 elements. Not any one is perfect under magnifying glasses, but I manage to find good enough parts for my goal. Hereunder some pictures of sets , before assembly: And I finished then to improve 1 wheel ! I made the inflation valve using: - a short section of black electrical wire sheath of 0.6 mm outer diameter and 0.4 inner one, that I threaded over - A short section of 0.37 mm brass wire - A micro touch-up of the valve's top with Tamiya Rubber Black The whole set glued in a 0.6 mm hole drilled on the outer half-rim's periphery. I was inspired by this picture of Elvis' restored BMW: And my interpretation: The knock-off nut hadn't been glued yet. This would be done at the very end, and a drop of UV clear resin would be added to the BMW emblem to enhance its shine. Wheels now achieved ? I will now continue with the dashboard and the varnishing of the body parts... stay tuned if you like ? 1
Misha Posted October 30, 2024 Posted October 30, 2024 Amazing progress! The thought and focus combined with imagination and artistry with the technical building skills is exceptional! Thank you for your detailed descriptions and photos; there is so much useful information for all of us. Congratulations & cheers, Misha 1
CrazyCrank Posted October 30, 2024 Author Posted October 30, 2024 3 hours ago, Misha said: Amazing progress! The thought and focus combined with imagination and artistry with the technical building skills is exceptional! Thank you for your detailed descriptions and photos; there is so much useful information for all of us. Congratulations & cheers, Misha Wow, what a lot of praise! Thank you very much, but I'm not sure I deserve it. ?
NOBLNG Posted October 30, 2024 Posted October 30, 2024 56 minutes ago, CrazyCrank said: Wow, what a lot of praise! Thank you very much, but I'm not sure I deserve it. ? Believe me, it is well deserved! I also thank you for posting the techniques you’ve used. Outstanding results!?? 1
Justin Porter Posted October 30, 2024 Posted October 30, 2024 Really some seriously good improvements to what is not a bad kit, but one that does show its age in places. 1
CrazyCrank Posted October 30, 2024 Author Posted October 30, 2024 1 hour ago, NOBLNG said: Believe me, it is well deserved! I also thank you for posting the techniques you’ve used. Outstanding results!?? Thanks a lot NOBNLG ? If you are interested in scale modelling videos, you can subscribe to My YouTube channel Most of my videos have English subtitles. 21 minutes ago, Justin Porter said: Really some seriously good improvements to what is not a bad kit, but one that does show its age in places. Thank you very much ? It's not a bad kit, but it's a very difficult one, due to the terrible fittings, the amount of flash, the poor quality of the plastic, which is either too hard, or too brittle, or too soft, and does not accept the paint easily!
CrazyCrank Posted October 31, 2024 Author Posted October 31, 2024 Morning guys Clear coating of the body parts: Some pics under artificial light And under natural light during a cloudy weather Trunk lid and trunk modifications: Trunk lid: I was inspired by this photo: I've scratched, using 0.4 mm thick plastic plate, the panel which covers the inner side of the trunk lid, and drilled on it some 0.3 mm holes to simulate its screws fastening. Later on, I'll thread into the holes some small sections of 0.3 mm steel rod, to simulate the screws. Trunk panels: I've painted semi-gloss black the interior panels of the trunk, using a new method (for me at least) in order to get a grainy aspect which simulate, at this scale, a felt lining. To do that, I used Tamiya Lacquer Semi Gloss Black LP 8, without thinning it, sprayed at 20 psi, with a very low paint flow, in several layers. The rendering, at this scale, is far better than what I would have obtained If I had used flocking powder or thin adhesive velvet. Invisible parts : I've finished to scratch the fuel primary pump, adding two copper lines on my 3D printed part, after having painted it silver. The part has been glued in place. The same way, I've finished to scratch the fuel gauge, painted it silver and adding the electrical cables Spare wheel: At least, I've installed the spare wheel straps in the trunk and placed the wheel in its housing. That's all for now, guys
CrazyCrank Posted November 5, 2024 Author Posted November 5, 2024 Hi guys The dashboard I showed you painted with the new wheels isn't the kit part. In fact the kit represent a BMW 507 Series I when Elvis's one was a Series II, which has a different dashboard, amongst many other features. So, I hadn't any other option than make a new one...and what's more appropriate to do this job than 3D design and printing ? Hereunder the kit dashboard, and a picture of a series II dash: My drawing in Autodesk Fusion 360 All that stuff has been sliced, 3 pieces in 103% and 3 in 104% ( @Spiny ? ) And the 3D printed final part: I presented it on the windscreen, because it's no impossible to follow the assembly instructions which ask to fix the dash on the cabin. The new part will be attached to the windscreen frame:
CrazyCrank Posted November 19, 2024 Author Posted November 19, 2024 Hello everybody Today, I'll show you how I made and assembled all the dashboard components - part 1 - The dash was semi-gloss clear coated - The decals have been placed, not without difficulty because those ones were very fragil. Used a lot of Microscale Microsol to soften them, but damaged a little bit the central one (not visible at the naked eye) - Once dried, I sprayed a finale layer of 1K Gravity clear over the decals .... et voilà ! Next I 3-D drawn and printed a new handle for the handbrake (the lever I thought it was a starter, placed under the dash on the left side) It will be painted with Molotov Chrome I 3-D drawn and printed the different knobs of the dash and radio They will be painted ivory. I 3-D drawn and printed a new passenger handle (placed on the right side of the dash, on the right of the glove box). It will be painted matt black The meter's glasses have been improved using drops of Gauzy agent put on the decals. Once dried, it's fully transparent and shiny I've scratched the gauge's bezels, the elements of the fake glove box hinge, and the chrome frame of the speaker and radio with Nickel-Chrome 0.25 mm wire I've already glued the bezels of the 3 meters and fabricated the fake hinge for the glove box. All those little bits of Nickel-Chrome 0.25 mm rod have been glued using Gauzy agent (from AK), instead of Micro Liquid Tape, because it's much less thick, dries faster and if much more transparent. The thin mesh of the radio speaker, at the top center of the dash, was simulated inserting in the hole a rectangular piece of thin mesh (0.1 mm It has not the right number of rows (30 would be needed to be accurate) but looks good imho. The grill is in place, and the meters's bezels as well: Then, I painted chrome all the dash knobs that I'd resin printed. And next, I brush painted ivory the buttons, under magnifying glasses I had also painted chrome he passenger handle, because on its top end, there is as well a chrome bezel, and I've painted the handle Nato Black (AK 11360), which looks like a black leather. The result is really nice : The dash knobs an radio buttons were placed on the dash. To highlight them, they have been painted light ivory instead of Pearl white, as the body. We can see, on the closest photo, their chromed bezels The handbrake handle was painted chrome and put in place: Stay tuned if you like, and thanks for watching and criticising. ?
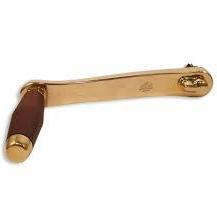
CrazyCrank Posted September 17 Author Posted September 17 (edited) Hello everybody Sorry for not posting anything for almost a year; I've had serious health problems again in the meantime, and have very little time available. So I'm picking up where I left off, and the next few posts will take you through to the completion of the assembly. Improvement of the steering wheel: The kit part has good shapes, but all is too thick, so, I began thinning the part, using a scalpel. On the picture below, you could see the beginning of this job: on the right only, thinning has begun. Unfortunately, I forgot to take pictures of the achieved job. After priming and painting: You could notice on this last picture that I've added some grooves between the 2 "horizontal" struts on the left and on the right side as well. I took inspiration of this photo: Purists will notice that there is 13 grooves each side on the real steering wheel and that I added only 9 ! Why ????....Because I can't count past 10 😂..... more seriously : because I made this mistake ! shame on me ! Clear coating: I had in my stash some spare metal transfers from my Tamiya Mercedes Benz 300SL, and, particularly, a chromed ring, a bit too wide, but would do the job to represent the ring on the BMW 507's wheel centre. I've still to paint semi-gloss black the vertical struts of the steering wheel situated between its horizontal ones, and add at each end of them a fine chromed strip (Hasegawa mirror finish), taking inspiration of the previous picture of the actual. car. The steering column : - I've cut off the indicator control lever, on its right, much too thick ! - And replaced it by a scratched one, using 0.3 mm piano wire and at its end, a droplet of UV curing resin, plus a tiny washer (PE part from Tamiya MB 300 SL detailing kit) - A little touch of ivory paint at the end of the indicator lever, for covering the resin and... that's it ! The ref. photo is the same My interpretation: Assembly and some additional details: And, having received my rivets, I placed six 0.5 mm flat head rivets on the top of the dash: I just placed the wheel near the dash to take the picture : The handbrake handle has been chromed and is now in place: I've added the superior knobs which heads are painted te same color than the bodywork. I cheated and used Hiroboy 1:24 toggle switches. They are metal made. I drilled two 0.4 mm holes at the right places on the dash and inserted the switches into them. Then, a little drop of white on the heads, and ....that's it. Maybe they are a little bit oversized if you look at them from profile view, but at the naked eye, it looks pretty nice. Making of a BMW key ring: It's amazing how little things can take so long to get done 😮 I 3D drawn and printed this: A pretty disk with an eyelet , and on the disk, 4 sections of the same size, 4 "pie slices", that are slightly dug in the disk, and in which I could "pour" some blue and white paint, without overflowing too much. 3D drawings: The 3D printed parts The key ring painted silver plus the slices, 2 blue, 2 white 1 And then, several layers of Gauzy agent, to create a nice shine and give thickness. On this picture, the Gauzy agent hasn't yet dried and look a bit "milky". Once fully dried, it will be totally transparent (Initially, I used transparent nail UV resin to give the best shine and relief, a bit like a curved glass. It worked perfectly but the slightest manipulation of the UV cured part led to dulling the resin, so...) I've also printed some ignition keys. It remained to do the more delicate job: linking ignition key and key holder with a very thin metal wire to simulate the chain, without breaking the eyelets of the key holder nor/or the ignition key (My first key ring made with UV resin has been broken during this process) The keyring is now attached to the ignition key 😎 It took a long time because I had to start over several times. Either I broke the eyelet on the key, or the eyelet on the keyring, during the delicate operation of creating a chain between the two with 0.15 mm wire. As a result, each time I had to either repaint a key, or - and this took longer - repaint and varnish a keyring! The total length is about 7 mm: 2.2 mm for the keyring, 3.5 fr the ignition key and the rain for the chain My eyes won't be able to work on this 1:24 scale for much longer ! And it took its place on the dash: That's all for now, guys. Thanks in advance for your comments and criticism 😎 Edited September 17 by CrazyCrank 1
Mattilacken Posted September 18 Posted September 18 So beautiful details you make for this one!! Great work, it’s tricky printing so small parts and make them look good. 1
CrazyCrank Posted September 18 Author Posted September 18 On 9/17/2025 at 11:50 AM, Pico said: Superb work, my hat is off to you. Thank you so much for this praise, Pico 😎
CrazyCrank Posted September 18 Author Posted September 18 11 hours ago, Mattilacken said: So beautiful details you make for this one!! Great work, it’s tricky printing so small parts and make them look good. Thank you Mattilacken for this great comment. Yes it's tricky, but within everyone's reach with a little determination and patience 1
Recommended Posts
Create an account or sign in to comment
You need to be a member in order to leave a comment
Create an account
Sign up for a new account in our community. It's easy!
Register a new accountSign in
Already have an account? Sign in here.
Sign In Now