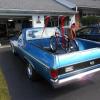
Irvin Arter Jr. Posted March 12, 2009 Posted March 12, 2009 (edited) I actually finished a model car! The Revell 69 Nova just falls together airbrushed HOK white base with brandywine and candy apple red (no clear) I did not rub this out much so it has a small amount of orange peel. I added a few details on the motor. I have a 350 LT1 with aluminum heads. Yenko photoetch logos on the valve covers. Heater hoses,pre wired with plug wires,boots and brake lines. All the emblems are photetch added aluminum exhaust tips Here is a little tip. If you paint your photoetch emblems flat black and sand the tops off you get a nice black shaddow behind your photoetch. It adds depth to your photos and also if you check out the model in person it looks so much better that straight photoetch to see more check out the link 69 Nova enjoy! Edited March 14, 2009 by Irvin Arter Jr.
george 53 Posted March 12, 2009 Posted March 12, 2009 Looks GOOD Irv! That's the way them little street bruisers looked all right. My 1st REAL car was a 69 Nova SS350, and it sat like yours, only I had Mickey Thompson Pro Traks on the rear,and it sat just a little higher. I actually had the cops pull me over to measure the bumper height! How anal was that?
Foxer Posted March 12, 2009 Posted March 12, 2009 That is gorgeous! The paint detailing really makes the whole thing stand out.
Raul_Perez Posted March 12, 2009 Posted March 12, 2009 Very nice Nova!! The whole look is right on the money!! This is the first one I've seen finished that has me thinking that I should build one!! Thanks for sharing,
Lyle Willits Posted March 12, 2009 Posted March 12, 2009 Very cool. It looks strangely familiar,,,,,but very cool.
fordh8r Posted March 12, 2009 Posted March 12, 2009 Beautiful Nova! Makes you wanna take it out for a spin. Well done!
gilsdropshop1 Posted March 12, 2009 Posted March 12, 2009 i like it! great job and well done, wow no clear beutiful job thumbs up!
RodBurNeR Posted March 12, 2009 Posted March 12, 2009 very nice Irv! emblems really set it off in that paint!
cruz Posted March 12, 2009 Posted March 12, 2009 Very cool Irv, I will be trying that P\E emblem trick, details like these make the difference to trained eyes!!!! I have to do mine soon, these Novas look vicious!!!
3men2s Posted March 12, 2009 Posted March 12, 2009 tHAT'S THE LOOK I WANT FOR MINE......THT'S THE RIGHT STANCE THE RIGHT AMOUNT OF DETAIL AND THE ENGINE THE CLASSIC 350. MAN THANK YOU AND LIKE MARCOS SAID, I HAVE TO BUILD MINE SOON. I PROBLABLY INSTEAD OF THE RED, WILL DO A BLACK AND INSTEAD OF THE STOCK SEATS,TWO BUCKET SEATS......MAN... YOU GOT ME GOING
Irvin Arter Jr. Posted March 13, 2009 Author Posted March 13, 2009 thanks guys. I want to take some outdoor shots this weekend.
Manic Mechanic Posted March 13, 2009 Posted March 13, 2009 Nice Job! I think sometimes a little peel is just the right amount as a 1:1 restorer too clean,too smooth,too overdone=not realistic I've won 2 previous best original paint awards on two frame up cars?! The trick was to not over do the restoration or over finish the car. In our hobby though I like them all! AGAIN KUDOS!
Fisher61 Posted March 13, 2009 Posted March 13, 2009 Great looking build! Great tip on the PE, it's all about tricking the eye in 1/25th scale!
Ariel Posted March 13, 2009 Posted March 13, 2009 Hey Irv How was you able to get the front suspension to go so low? The front suspension on this kit doesn't alone for to many options. Ariel
Tommy Kortman Posted March 14, 2009 Posted March 14, 2009 Hey Irv How was you able to get the front suspension to go so low? The front suspension on this kit doesn't alone for to many options. Ariel Dude, You cant ask a magician his secrets! You just gotta appreciate "The Rake"!! pssst.... if you get an answer let me know. That stance is just right.
DR Dubois Posted March 14, 2009 Posted March 14, 2009 Superb build! This looks right from every angle. Any word on the suspension drop????!!....
Irvin Arter Jr. Posted March 14, 2009 Author Posted March 14, 2009 Yes I did..........I cut the front tires on the top to drop it down........I know, I know don't go there.............HaHa
Raul_Perez Posted March 15, 2009 Posted March 15, 2009 I really liked this build the first time through. The outdoor pics really show how well the paint job is done!! Later,
Randy Kern Posted March 15, 2009 Posted March 15, 2009 I cut the front tires on the top to drop it down Now the secret's out! Beautiful, Irv. Out in the sun it really pops.
Ariel Posted March 17, 2009 Posted March 17, 2009 Yes I did..........I cut the front tires on the top to drop it down........I know, I know don't go there.............HaHa I can see where you need to do that to the tire. But as far as mounting point of the wheel to the front suspension. When I mount my tire to the exiciting mount of the the wheel to the chasis it sits to high. Than after lowering the suspension I can see taking some of the top of the tire away. If you can see in this pic that the backing plate is fixed in that position its not like kits in the past that you can just relocate the pin on the spindle. to lower the suspension. I took the pic from len carsner's build
cotto Posted March 18, 2009 Posted March 18, 2009 Fantastic build there, color choice is cool too. I will have to start seeing what I will be doing with mine, just wish I can find some time to build.
Recommended Posts
Create an account or sign in to comment
You need to be a member in order to leave a comment
Create an account
Sign up for a new account in our community. It's easy!
Register a new accountSign in
Already have an account? Sign in here.
Sign In Now