Moparman18064 Posted December 15, 2023 Posted December 15, 2023 Replicating one of the many Mopars I have owned. This one is a Hemi Orange 72 Charger Rallye 340 727 auto, black gut, black halo top, Dana 60 rear( owner prior to me installed from wrecked Hemi Charger). Started with 72 MPC annual body and interior, AMT 71 R/T Charger for the other parts, 340 from AMT Duster kit. The floor and transmission tunnel of AMT kit and the underside of the MPC interior needed a ton of grinding and reshaping to get body to fit. I cut the inner fenders, radiator support and firewall from the 71 kit, shaped and fitted to 72 kit. I will have to use windshield from 71 kit to fit cowl area, even after thinning area. I did usual filing, sanding, filling and scribing to body before priming and painting in MCW lacquer( no color sand or clear yet) I got a set of decals from Keith Marks in black. I am using the 71 grille, as my car did not have hidden headlights. The grille was too wide, pushing fenders out, so filed inside edges of grille and reshaped outside so that it will not hang out over fenders. I have tried many revisions with styrene strips for the grille bars, but I really am not happy.(Hence the post in the questions section) If it was a manual trans, it might not have had much of an issue, but the auto required more filing to fit inside tunnel area. This is the progress so far 5
slusher Posted December 17, 2023 Posted December 17, 2023 Really nice work! I’m looking forward too more..
Moparman18064 Posted January 3, 2024 Author Posted January 3, 2024 Some more progress, vinyl roof treatment done, car is cleared. I foiled all the trim, but the only BMF I had was the garbage ultra bright. I pulled all of it off, ordered more from BMF. The AMT 340 from the Duster kit just didn’t do it for me, so I got a 340 from VCG and one of their Torqueflites. I made custom motor mounts out of .020 styrene, it all fits so much better than the AMT parts! 4
Moparman18064 Posted January 5, 2024 Author Posted January 5, 2024 What an improvement over the AMT engine, this VCG piece is so much nicer. The kit included Thermoquad is really sweet too. I finished and painted motor mounts, set to height and installed. Engine and trans are pretty much done except for the headers. 3
Carmak Posted January 5, 2024 Posted January 5, 2024 This is a great build so far!! What did you use for the door cove decals? 1
Moparman18064 Posted January 5, 2024 Author Posted January 5, 2024 17 minutes ago, Carmak said: This is a great build so far!! What did you use for the door cove decals? 17 minutes ago, Carmak said: This is a great build so far!! What did you use for the door cove decals? They are decals from Keith Marks
Moparman18064 Posted January 6, 2024 Author Posted January 6, 2024 Another test fitting with new engine/ headers, it’s going to be a tight fit. I had to keep filing away at k frame on left side for header to fit( can’t dent header like the real ones). Again, I was not happy with the way the grille looked. I have devised a new plan, opened it up and start over. Wish me luck, as I have not found anyone that will make one. 2
mustang1989 Posted January 6, 2024 Posted January 6, 2024 Lots of work being put into this one and you're right.....that engine is EONS better than the OOB AMT engine. Looking forward to seeing more bud. 1
Moparman18064 Posted January 11, 2024 Author Posted January 11, 2024 A little more progress, finally got new BMF, foiled car. Also, some light toward the end of the tunnel, started building grille inserts from .010 styrene. It is still a long tunnel though, lots more sanding, shaping. 3
mustang1989 Posted January 13, 2024 Posted January 13, 2024 That paint turned out pretty spiffy Rich. Looking forward to seeing more of the whole grille progress. 1
Moparman18064 Posted January 13, 2024 Author Posted January 13, 2024 6 hours ago, mustang1989 said: That paint turned out pretty spiffy Rich. Looking forward to seeing more of the whole grille progress. Thanks Joe, I spent a bunch more time on the grille. I have it about as close as I can get now, filling and sanding any further just isn’t working with my sausage fingers. I airbrushed the grille/ headlight surrounds with gunmetal and Bare Metal Foiled the bumper. I ran into real issues with the resin headers and the torsion bar/ steering areas, still working on that. I also devised a plan for the front wheels being too far forward. I tried to find a Dana 60 that was wide enough, the closest I had was from the 68 Road Runner kit. It was 10mm too short, I cut the ends off of both the Dana and the 8 3/4, drilled the tubes to pin and adjusted to length using the 8 3/4 axle ends. 4
Moparman18064 Posted January 16, 2024 Author Posted January 16, 2024 Got some more progress accomplished. I got the Dana rear completed and the springs attached and painted up. I filled in holes in radiator and red rolled for small block positions. Radiator support painted and properly blacked out in front so orange does not show through grille. Upon test fitting again, wiper motor does not clear distributor. My car had a 3 speed motor anyway, so I made a 3 speed one out of styrene. I started making cardboard forms to make inner fender filler panels out of styrene. I did a wash on panel lines, blacked out tail panel. I think I’ m caught up to now.
drodg Posted January 16, 2024 Posted January 16, 2024 Nice job so far. I really like the 72's. I remember a few years ago I think Missing Link Resin did a 72 non fold over headlight grill for the AMT 71 Charger for a conversion. BTW who is VCG that the 340 is from? 1
Moparman18064 Posted January 16, 2024 Author Posted January 16, 2024 (edited) Thank you. As for the grille, I have searched all over and found nobody doing one. I really wish I could find somebody to print one, as trying to blend in the horizontal bars to the surrounds and the upper and lower surfaces, the details are way too fine for the tooling I presently have. At least it is somewhat presentable while I continue to search, or possibly scratch build one over time( it will be a while, I have too many kits to build in closet). As for the question on resins, it is VCG Resins by Reese, if you go in through Scale Auto Model Works is how I found them. The engine kits are ordered with auto or manual trans, and in stock( 2 barrel 318 design), magnum (340 4 barrel) or six pack ( pictured). I ordered 3 of them- 2 six pack and 1 magnum. Note for admin, I am not trying to sell anything here, just being helpful. Edited January 16, 2024 by Moparman18064 Picture for reference to question
drodg Posted January 16, 2024 Posted January 16, 2024 Nice small blocks. Keep up the good work and thanks for the info on the motors.
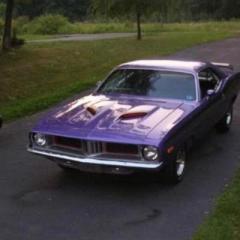
Moparman18064 Posted January 19, 2024 Author Posted January 19, 2024 Got some major progress done. I was working on how to get the front wheels centered in the wheel wells instead of forward. I figured that it was a full 3 mm off. I added plates to the spindles .020 each and stepped back another layer to brace, then added the pins at same height as old ones, drilled and pinned. My car had 15” Cragar SS wheels, so I got some from MCW. I found some L60’s for the rear from a Road Runner kit and the kit fronts. I had to custom make the backing plates from the originals, Lil’ Red Wagon ones and made spacers for the rears to fit properly. The body is now permanently on chassis, I made my own ignition box, shortened driveshaft to fit properly( removed .250 from center). The stance pictured here is the way my real car sat and wheels in front are dead center for the win. I still have to figure out exhaust from the headers back, replicate the factory bazooka tips, permanently attach rear, front lower k frame, shocks, bumpers and rear valence, paint markers, running/ turn lights, touch ups and polish. I finally see an end to this one.
slusher Posted January 20, 2024 Posted January 20, 2024 Real nice progress". Great paint, engine detail and excellent work on the grill.. 1
Keef Posted January 20, 2024 Posted January 20, 2024 Harts Parts offers the bazooka tips under the miscellaneous category on his site 1 1
Moparman18064 Posted January 20, 2024 Author Posted January 20, 2024 59 minutes ago, Keef said: Harts Parts offers the bazooka tips under the miscellaneous category on his site Thank you, I missed that on their site. I need to order a Challenger conversion kit from them anyway. It looks like I have more to order 2
Moparman18064 Posted January 24, 2024 Author Posted January 24, 2024 A little further along, figured out exhaust, made my own decals for the mufflers, painted markers and driving lights, added lenses. I ordered the bazooka tips for exhaust. Once I have them and refinish the driveshaft I shortened, I can permanently mount rear suspension. 3
Recommended Posts
Create an account or sign in to comment
You need to be a member in order to leave a comment
Create an account
Sign up for a new account in our community. It's easy!
Register a new accountSign in
Already have an account? Sign in here.
Sign In Now