meechum68 Posted June 7 Posted June 7 So this is the one kit out there that you like or hate and I had started this for a build off thing, and then left FB. But will finish it. I really like the body color, and going to do black interior to keep it simple and Pontiac Blue engine and murder out the chrome under hood and bumpers and wheels. I can't recall the body paint color, but it is Tamiya ... metallic red maybe? (I need to test spray to verify.) 4
TransAmMike Posted June 7 Posted June 7 Looking forward to seeing this built Michael. Big '66 GTO fan here. 1
meechum68 Posted June 7 Author Posted June 7 Will keep ya posted. (Keep in mind it may take a bit, but hey I build several at a time, and over long periods of time.. aka life finds a way)
johnyrotten Posted June 7 Posted June 7 I spotted that on your bench setup pictures, nice color choice. I've got the old mpc 66 sitting in the stash, so much flash on that,and the pillars are bent as well. Looking forward to checking this out 1
meechum68 Posted June 7 Author Posted June 7 1 hour ago, johnyrotten said: I spotted that on your bench setup pictures, nice color choice. I've got the old mpc 66 sitting in the stash, so much flash on that,and the pillars are bent as well. Looking forward to checking this out Thanks, and I got lucky on the pillars, but flash was ... well a ton I took off the body. I can deal with flash vs unfinished molds. Drag yours out and give it some love
johnyrotten Posted June 7 Posted June 7 5 minutes ago, meechum68 said: Drag yours out and give it some love I kinda broke my own rule and have 3 1/2 semi-stagnant builds now. My chevelle is the reset. Far too active of an imagination and far too little time. 2
meechum68 Posted June 7 Author Posted June 7 2 minutes ago, johnyrotten said: I kinda broke my own rule and have 3 1/2 semi-stagnant builds now. My chevelle is the reset. Far too active of an imagination and far too little time. That's why you see 4 kits on my bench. The trailer I have just get off the bench. (Won't put cars on it until I can attach to the Truck) Once I get the trailer off I will keep puttering on the truck so I can have more space. That boy takes a bunch. 1
meechum68 Posted June 7 Author Posted June 7 So two pics... one of the interior tub and one of the seats I will be using for it. The seats are in the mess of stuff I painted today. 1
meechum68 Posted June 8 Author Posted June 8 Bumpers, wheel and shifter mount dechromed, block put together, a bunch of flashing removed from the parts I am using. The kit so far has some flashing issues, and gonna use box stock stuff, minus making a radiator support as the weird thing they called a support I got rid of. Next is some primer, and then color for the block, bumpers and wheels. 1
meechum68 Posted June 9 Author Posted June 9 3 hours ago, slusher said: Looking really good so far! I am shooting to get the engine in primer, the exhaust/rear end assembly in primer and install the roll bar as well this evening. The more I can do this next couple days the better, as it will be 19 days before i can sit at the bench again.
meechum68 Posted June 10 Author Posted June 10 (edited) More work on the GTO tonight. I will say that it is definitely ... a work of patience. Tried putting in the taillights, no dice the way they should go, so flipped em around. The wheels as well.... such a mess but hey from a distance no will see the flaws. I got the engine primed, so tomorrow I will get it painted blue (I don't have a good blue that is close to Pontiac Blue, so will be a bright blue) Got the roll bars painted too, which I didn't take pics of. Without further ado: Edited June 10 by meechum68 1
meechum68 Posted June 11 Author Posted June 11 More bench time, and a very slim chance I will be able to assemble most of the body tomorrow, and then have some odds and ends to do ... they definitely made this kit to test a mans patience. The pic of the fan/belt set up is actually black, I couldn't get a decent pic of it. 😕
NOBLNG Posted June 11 Posted June 11 I like that color on it too Michael.👍 I am interested in how this goes together, since I have this kit in both the MPC and AMT versions which I gather are from the same molds. 1
meechum68 Posted June 11 Author Posted June 11 5 hours ago, NOBLNG said: I like that color on it too Michael.👍 I am interested in how this goes together, since I have this kit in both the MPC and AMT versions which I gather are from the same molds. Yeah, that color when I saw it was meant to be on that body, I will likely do it on a Chevelle I have as well (John Wick version). And tbh, it is a labor of love, parts not fitting right, some are too big for openings, some are just too big.. I think if I were to build it again I would make some changes like, a different engine, cut the frame at the front and rear and use another kits for a better underside view. Surprisingly, the front seat, console and dash fit nicely. I am using the factory bucket style seats with headrests for it, plus the roll bar that came with the kit. I did notice my tree didn't have the shifter for the console, so I took the shifter out of another kit I am building for my wife. The body itself was great, and same with the hood. The grill, and rear bumpers need some love to fit right on the body, and center of the grill, I miscut trying to make it fit and it looks horrid, but since I will rarely look at the car from the nose, I am ok with it. I will say that the body to frame fit great when I was test fitting.. I have heard the frame part usually is bowed and needs heat to soften and flatten it back out. So assembly I would say overall... 7 Good pieces for details - 5 Pieces that needed to be there to improve assembly and looks: A true radiator support set up, radiator hoses, better suspension and rims that don't cut odd and break. But tbh, considering they are using molds that have had the ever loving snot used out of them, I am just glad we have this kit. Patience, and time and you can take a pigs ear and make a nice purse out of it. I did have a couple times I wanted to pitch it in the trash, but I didn't as I appreciated the challenge this kit gave me. 1
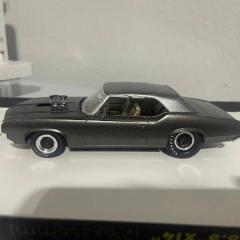
meechum68 Posted June 12 Author Posted June 12 This .. is ... done .. I just didn't have it in me to do a radiator, and add the battery. It's sitting on my car hauler trailer and one day I will pull it off the trailer and do some weathering and add the radiator and battery. This kit needs a ton of love and patience, it's done, and overall turn out.. not shabby but not great, somewhere in between. (Just noticed I slipped the tire on the mustang, gonna have to fix that.) 2
Recommended Posts
Create an account or sign in to comment
You need to be a member in order to leave a comment
Create an account
Sign up for a new account in our community. It's easy!
Register a new accountSign in
Already have an account? Sign in here.
Sign In Now