Alyn Posted August 18, 2009 Posted August 18, 2009 Well, that ought to be good for about 2 MPG on the freeway. I think your hood has a nice clean look that works well without an scoops or bulges. But, while you're on the computer testing, try some louvers and maybe small twin scoops similar to those on a 69 Pontiac GTO; half inset below the hood line, half above. If your set on adding something to the hood, either of these would be less disruptive to the design and flow of what you currently have. While it may be a lot of work, I'd also consider the later one piece curved windshield. Looking at the side profile, a little more slope to the windshield would work well with the dropped nose, but would be difficult to achieve with the short cowl and roof. I owned a gray primered 50 Chevy pickup many years(decades ) ago that was eventually traded straight across for a 55 Chevy Sedan Delivery.
curt raitz Posted August 18, 2009 Posted August 18, 2009 Looks as thou you got a lot done on this truck since i saw it on Friday...are ya still gonna tie the bed into the cab and runnin' boards? I like the pie cutting on the hood, I gotta try that someday "She who must be obeyed" and I had a great time at the Concours d'Elegance in Pebble Beach on Sunday. Saw Jay Leno on a motorcycle, Jerry Seinfeld in a Porsche 908 and "Arnie the Govern-nator" Good Guys this weekend, heh!
Alyn Posted August 18, 2009 Posted August 18, 2009 "She who must be obeyed" and I had a great time at the Concours d'Elegance in Pebble Beach on Sunday. Saw Jay Leno on a motorcycle, Jerry Seinfeld in a Porsche 908 and "Arnie the Govern-nator" Good Guys this weekend, heh! Did Arnold have a Hummer strapped to each foot ???
old-hermit Posted August 18, 2009 Posted August 18, 2009 After all that ya GOTTA chop it !!!!!!!!!!!!!!!!!!!!!!!!!!!!!!!!!! .
curt raitz Posted August 18, 2009 Posted August 18, 2009 Did Arnold have a Hummer strapped to each foot ??? Nope, just came struttin' thru on his big 13's...
Raul_Perez Posted August 18, 2009 Author Posted August 18, 2009 ...I think your hood has a nice clean look that works well without an scoops or bulges. But, while you're on the computer testing, try some louvers and maybe small twin scoops similar to those on a 69 Pontiac GTO; half inset below the hood line, half above. If your set on adding something to the hood, either of these would be less disruptive to the design and flow of what you currently have. While it may be a lot of work, I'd also consider the later one piece curved windshield. Looking at the side profile, a little more slope to the windshield would work well with the dropped nose, but would be difficult to achieve with the short cowl and roof... Thanks, Alyn!! I agree that the hood looks good as it is. With that, I'll probably go with the small intake scoop from the '06 Z06 instead of the more prominent cowl induction scoop from the '94 ZR-1. Yes, the windshield from the '54 and early '55 would look best, but that would only look good if I could also fabricate the molding that goes around the glass, too. That's probably more work than I plan on putting into this one... Yes, I do plan on cutting about 0.03" out of the "A" pillar to slant the front of the roof down just a little bit. Looks as thou you got a lot done on this truck since i saw it on Friday...are ya still gonna tie the bed into the cab and runnin' boards? I like the pie cutting on the hood, I gotta try that someday "She who must be obeyed" and I had a great time at the Concours d'Elegance in Pebble Beach on Sunday. Saw Jay Leno on a motorcycle, Jerry Seinfeld in a Porsche 908 and "Arnie the Govern-nator" Good Guys this weekend, heh! Curt, Yeah, I hit it pretty hard last night. Yeah, the running boards, the cab and the fenders will be joined once all the work on the cab is finished. The pie-cut is pretty easy to do...most of the work is in the measuring...I usually moch it up in the computer to see how it'll look before I actually start cutting. "She who must be worshiped" wants help in the backyard on Saturday AND she informed me that we're having a birthday party for the creator of "She who must be worshiped" on Sunday, so I may not make it to the Good Guys this weekend. Later,
Raul_Perez Posted August 18, 2009 Author Posted August 18, 2009 After all that ya GOTTA chop it !!!!!!!!!!!!!!!!!!!!!!!!!!!!!!!!!! No...I chopped it in the computer and didn't like the look. With the side panels as tall as they are, the only way I would chop this body is if I was also going to section it. However, I am planning on taking about 0.03" out of the "A" pillar to give it a bit more aggressive appearance. Thanks for the suggestion!! Later,
The Red Ranger Posted August 18, 2009 Posted August 18, 2009 Nope, just came struttin' thru on his big 13's... Really? If you go to Graumans Chinese theater you can find Arnolds hand and foot prints, and his feet are small to me and I only wear an 11 and a half. His hands are only slightly larger than mine too. I suppose perhaps his feet have grown since then? But I didn't think hands or feet grew as an adult. I dunno.
curt raitz Posted August 18, 2009 Posted August 18, 2009 Really? If you go to Graumans Chinese theater you can find Arnolds hand and foot prints, and his feet are small to me and I only wear an 11 and a half. His hands are only slightly larger than mine too. I suppose perhaps his feet have grown since then? But I didn't think hands or feet grew as an adult. I dunno. just a figure of speech, i have no idea how big his feet are he was walking thru the crowd with his entourage...
Raul_Perez Posted August 23, 2009 Author Posted August 23, 2009 (edited) One thing that I never really liked about the last '50 Chevy truck I built was how I tear-dropped the back portion of the rear fender, but then left the back portion of the front fender alone. I always felt that it drops off too sharply down towards the running board just after where it meets the cowl and the hood. So for this build I've added a small section of the front fender from the Revell '41 Willys coupe that creates a more natural looking, continuous line from the top of the fender down to the running board. (Very reminiscent of the mid-forties Chevy designs). I think this change makes the front a rear fenders look more alike. I've also doubled the thickness of the running board, bringing it up to the bottom edge of the door. (Sorry for the poor quality pics...my son borrowed my camera for the weekend...). These last two pics also show a bit of the small, recessed hood scoop that initially came from the '06 Z06 Vette. Though it's difficult to see in these pics, the top, leading edge of it has been reshaped to match the contour of the windshield. I also removed the 2 small posts from the Z06 scoop and replaced them with one small brass post in the middle. This helps tie the look of the hood scoop in with the two pane windshield. Well, there's still a lot of cutting, fitting and gluing to be done before this one is ready for paint, so I'd better get back to it... Later, Edited August 23, 2009 by Raul_Perez
Clay Posted August 25, 2009 Posted August 25, 2009 I love the front fender extensions!! The only problem that I would see is if you were to open the doors, thats when I would make them suicide doors. Other than that awesome job so far Raul.
Raul_Perez Posted August 25, 2009 Author Posted August 25, 2009 I love the front fender extensions!! The only problem that I would see is if you were to open the doors, thats when I would make them suicide doors. Other than that awesome job so far Raul. Thanks, Clay!! On this design the door opened into the fender instead of swinging outward. The small piece on the door tucked into the fender opening. Yes, suicide doors would also work very well with this type of design. Later,
Raul_Perez Posted September 2, 2009 Author Posted September 2, 2009 Here's a quick update... I got the bed glued to the cab, the running boards widened to fit snuggly under the doors and the chassis fitted to the body. With the chassis now fitted to the body, this is how the rake and stance will look when it's done. Well, that's all for now... Later,
Ryan S. Posted September 2, 2009 Posted September 2, 2009 Here's a quick update... I got the bed glued to the cab, the running boards widened to fit snuggly under the doors and the chassis fitted to the body. With the chassis now fitted to the body, this is how the rake and stance will look when it's done. Well, that's all for now... Later, This is a very cool build, I can't wait to see it finished! Looking good so far.
Modlbldr Posted September 2, 2009 Posted September 2, 2009 Raul- That is looking very nice. It's starting to really come together and flows nicely. Keep it up. Later-
Janne Herajärvi Posted September 2, 2009 Posted September 2, 2009 Great job in there! Cant wait to see the body after paintjob!
Dr. Cranky Posted September 2, 2009 Posted September 2, 2009 Some great touches on this build so far, buddy. Keep it going.
Bernard Kron Posted September 3, 2009 Posted September 3, 2009 (edited) ront The front fender work and the cool bed and rear fenders are now all tied together by the widened running boards. Love that rear pan and the back of those rear fenders. Excellent rake and stance, too. The Whole Thing Looks Great!!! Edited September 3, 2009 by gbk1
Clay Posted September 3, 2009 Posted September 3, 2009 Great job Raul, I hope I get to see this one finished.
tabsscale1 Posted September 3, 2009 Posted September 3, 2009 I'm liking all the mods you have done so far!!!!!
Raul_Perez Posted September 3, 2009 Author Posted September 3, 2009 Thanks, guys!! No, I'm not going to chop the top, but I will take a bit out of the "A" pillar to give it a slight tilt... Later,
Alyn Posted September 3, 2009 Posted September 3, 2009 That 3/4 rear shot could not look any better. You be stylin' The way it's low and hunkered down, it kinda looks like it could take to a slalom course like peanut butter to a piece of bread. Bring on the paint!
Raul_Perez Posted September 3, 2009 Author Posted September 3, 2009 That 3/4 rear shot could not look any better. You be stylin' The way it's low and hunkered down, it kinda looks like it could take to a slalom course like peanut butter to a piece of bread. Bring on the paint! Thanks, Alyn!! That's too funny!! It'll be a little while before this one is ready for paint. I still need to take a bit out of the "A" pillars, build the engine and get everything fitted into the engine bay before this one sees some seriously RED paint coming its way...but I have thought of painting the hood to see how the scoop looks in color. The pics of it in primer just don't seem to do it any justice. Later,
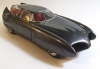
Raul_Perez Posted September 10, 2009 Author Posted September 10, 2009 Here are a few pics with the major portions of the bodywork completed. This is one of the early primer coats that I use to see where I need to add a dab of putty and where any of the body lines need to be corrected. For this, I like using the gray primer instead of the red oxide. At this point the "A" pillars have been cut down 0.02", (about 1/2"). With as short as the roof is, that was just enough to give it a slight tilt downward in the front without looking malformed. The tailgate has also been added. Because of its slant and shape, I chose not to hinge it. I may even glue the bed cover in place. There's really nothing to see in the bed. The tailgate, with a bit of sanding, was made from the lower seat cushion from the '50 Chevy truck kit. Here you get a better view of the small hood scoop that was taken from the '06 Z06 Vette. To make it look right with the split windshield from the '50 Chevy truck, I replaced the two supports from the original scoop with a single, small brass rod in the middle. This view from the back shows the recesses for the custom tail lights and the cutouts for the exhaust from the stock '94 ZR-1 rear bumper. This also shows that I permantly attached the bed to the cab. It made sense to attach it, given the fact that this one rides on a one piece '06 Z06 chassis. Time to add a bit of putty and let the primer dry while I finish building the engine and chassis. Later,
Recommended Posts
Create an account or sign in to comment
You need to be a member in order to leave a comment
Create an account
Sign up for a new account in our community. It's easy!
Register a new accountSign in
Already have an account? Sign in here.
Sign In Now