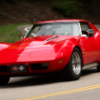
Trae Posted December 22, 2010 Posted December 22, 2010 I started this project several years ago, and this will be my third attempt at finishing it. The body is an old resin, I believe from Freeman Cars. I stole the hood, sidepipes, and several engine components from a Revell BM '69 Vette. The interior, frame, and suspension are AMT. The windshield shown is from an old salvaged build-up, but I'll only be using it as a vacuform master. Hopefully the finished piece won't be a scale 2" thick. I know I'm pretty far along already, but I'll try to post some updates soon. On to the pics ...
Nick Winter Posted December 22, 2010 Posted December 22, 2010 Nice Vette, I think were using the same picture(s) ro detail our vette engines.
Trae Posted December 22, 2010 Author Posted December 22, 2010 Nice Vette, I think were using the same picture(s) ro detail our vette engines. The day-to-day calendars are great for reference pics. I've collected a stack of pages from the past several years - just further proof I'm certifiably nuts.
Mike Kucaba Posted December 22, 2010 Posted December 22, 2010 Neat variation on the use of the astro-vette . I have a couple of those from Flintstone,might give that a try. Nice work by the way.
Joe Handley Posted December 23, 2010 Posted December 23, 2010 I'm digging that Trae, kinda makes me wonder what it would look like with some kind of flared fenders too now
Draggon Posted December 23, 2010 Posted December 23, 2010 Just goes to show what talent can do for a dog of a model!
Modellpularn Posted December 23, 2010 Posted December 23, 2010 Interesting take on that kit..... but those wheels look simply gorgeous, with red lines, and....... droool.....!
Len Woodruff Posted December 23, 2010 Posted December 23, 2010 (edited) Very nice job Trae! The detail is excellant. What kit furnished the chassis, interior, engine? Edited December 23, 2010 by Len Woodruff
Trae Posted December 23, 2010 Author Posted December 23, 2010 Thanks all! I'm digging that Trae, kinda makes me wonder what it would look like with some kind of flared fenders too now I actually thought about removing the skirts and adding flares, but thought it might lose too much of its character. Would still like to see it done though. What kit furnished the chassis, interior, engine? I took the chassis and interior from the AMT '70 Corvette LT-1/ZR-1 kit. The interior is basically stock, but I've made some mods to the suspension to lower the stance a bit. I took the valve covers, intake, carbs, and air cleaner from the Revell Baldwin Motion '69 Corvette. I really don't recall what kit donated the engine block, heads, exhaust manifolds, and tranny. I know it doesn't make any sense that I didn't use the whole engine setup from the BM '69 kit, but by the time I decided to go with the BM theme, I already had that engine ready to go, so I left it.
Trae Posted January 6, 2011 Author Posted January 6, 2011 Got some vacuforming done the past week or so. Now I've just got to make one of them fit. Also done some assembly work, with pictures to follow in the near future.
Trae Posted January 11, 2011 Author Posted January 11, 2011 (edited) Thanks guys! I've gotten a little assembly work done. So far it has gone together smoothly and sits okay, but the engine compartment is gonna be a little tricky - its tight in there. Edited January 11, 2011 by Trae
mcandela Posted January 11, 2011 Posted January 11, 2011 Wow!! Really kool. Those wheels look awesome!!
John Goschke Posted January 11, 2011 Posted January 11, 2011 Great concept and super sanitary workmanship! Love those crisp, slightly shaded panel lines.
george 53 Posted January 11, 2011 Posted January 11, 2011 Yep, I gotta agree, those red lines AND that paint go together like peanut butter n jelly! It looks GREAT! Can't wait ta see a windscreen in it. That thing looks like it's movein, just sittin there! Great job!
Trae Posted January 20, 2011 Author Posted January 20, 2011 Thanks guys! I finally got the engine and radiator installed. Not an overly detailed engine compartment, but I'm satisfied with it.
Trae Posted January 20, 2011 Author Posted January 20, 2011 (edited) very nice! very cool too using Pro Tech's braided line for the sheilded spark plug wires Thanks! I thought it looked convincing, but I didn't branch them off and ground on the valve cover bolts, so I'm slacking in the accuracy department. Edited January 20, 2011 by Trae
Draggon Posted January 20, 2011 Posted January 20, 2011 I love this build. The spark plug wires look very good, and man, is that paint smooth!
Recommended Posts
Create an account or sign in to comment
You need to be a member in order to leave a comment
Create an account
Sign up for a new account in our community. It's easy!
Register a new accountSign in
Already have an account? Sign in here.
Sign In Now