Ryan S. Posted February 8, 2011 Posted February 8, 2011 (edited) So I've wanted to build a 32 for quite some time, and I finally got around to working on one. This is Revell's 32 5 window. Here's where I started with the mock up. I'm using the "Hella" big and littles from Pegasus for wheels/tires and I grabbed one of the 390's out of the 60 Starliner kit for motor-vation. After getting some work done on the motor and the first coat of paint on the grill shell. Going with a Diamond dust and Silver Blue two tone paint scheme. More to come. Thanks for taking a look. Edited May 15, 2011 by Ryan S.
Ryan S. Posted February 8, 2011 Author Posted February 8, 2011 Here's where I started to get creative and do some scratch building. I didn't like the look of the air bag looking things on the rear axle so I decided to fab up some more realistic looking air bags. Here's how I did it. First I went looking around for something that had the general shape of airbags that I was going for. I had a bag of old beads from a necklace that I had that had broken. Looking through them I found some silver metal beads with the right shape. I cut off the unwanted part of the rear axl and sanded down the mounting points. I found 2 wheel retainer pins from another kit and grabbed some heat-shrink tubing. The beads fit perfectly on the pins. Then I cut some of the shrink to a length about twice as long as the pins. I slid the shrink over the beads on the pin and lined up the end of the tube with the top of the pin. After heating carefully with a lighter, the shrink snugged up over the beads and right around the top of the pin. I then cut off the excess shrink tubing, drilled a hole in the rear end to fit the pin down into, counter sunk the top of the mount to fit the contours of the round bead then attached with a drop of superglue and voila, air bag suspension on the cheap! Here's what it looks like under the car, sorry it's not the best picture.
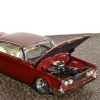
Ryan S. Posted February 8, 2011 Author Posted February 8, 2011 Here's a couple of more shots of where I'm at now. Done some more to the motor, got the two tone done on the grill, but not cleared. Up next, I'm going to scratch up some coil over shocks for the rear end. Thanks for looking and following along!
Dr. Cranky Posted February 8, 2011 Posted February 8, 2011 Love it, the airbags are perfect. This one has all the right attitude so far. Keep it going.
Foxer Posted February 8, 2011 Posted February 8, 2011 Neat trick on the airbags .. what a bummer they are up under .. but WE know they're there! I'm looking forward to this one coming along ...
Ryan S. Posted February 11, 2011 Author Posted February 11, 2011 So here's what I did to make some new coil-over shocks for the rear. I just measured out some different lengths of aluminum tubing and then assembled them as so: I took some blue wire and wrapped it around a length of tube for a while to allow it to retain its shape. Then cut it to length and slipped it between the two ends of the shocks. All I've got to do now is make some attachments for the ends, and install when ready.
Ryan S. Posted February 11, 2011 Author Posted February 11, 2011 Thanks for the kind words guys, here's a little more for ya Got the dash done: Worked with some aluminum tube to make the over-engine bracing. 3 bars, 2 spaces...32 and another side shot, mock up for good measure.
Greg Pugh Posted February 11, 2011 Posted February 11, 2011 Very nice! I dig your trick on the bags!!
Rinseman Posted February 11, 2011 Posted February 11, 2011 You're suspension work is amazing. Definitely watching this build.
Ryan S. Posted February 14, 2011 Author Posted February 14, 2011 Just a little weekend update. Got some more painting done and the chassis assembly has begun. If it wasn't raining and super windy here today I would wrap up the interior and try and get this one close to finished. Looks like I'm going to have to wait a little longer... Thanks everyone for the kind comments. This one has been a lot of fun so far. Thanks for looking
shucky Posted February 14, 2011 Posted February 14, 2011 Ryan, thats looking really nice. I like the color combo. I'm about to begin a '32 Sedan this week so I've been paying more attention to Rods on the forum. Nice job.
LAone Posted February 14, 2011 Posted February 14, 2011 sweet 32. color combo and the wheels make it look tough. oh and i too agree with the air bag idea, pretty trick
Kanedge Posted February 15, 2011 Posted February 15, 2011 Love your idea for the airbags, looking really good.
crazyjim Posted February 15, 2011 Posted February 15, 2011 Some really nice work going on here. Please keep posting progress.
pepperdrumstix Posted February 17, 2011 Posted February 17, 2011 Boy do I like that bead "air bag" trick. Next time my girlfriend takes me to the bead and craft section of a big box store I know what I am going to look for. Those shocks are nice too. That fine little motor is going to look great in this car. I like '32 Fords and this highboy coupe is going to be sweet. Nice color choice, not one seen much but is perfect on this build. Watching WIPs like this is why I love this forum. Thanks, Patrick M
Ryan S. Posted February 17, 2011 Author Posted February 17, 2011 Thanks for all the nice replies everyone. Unfortunately the weather has been pretty cold and wet here and is going to continue as so, so I can't spray the rest of the interior or anything else for that matter. So no update for now, but hopefully I'll get some time in this weekend. Thanks again for following along!
Ryan S. Posted March 21, 2011 Author Posted March 21, 2011 Finally an update on the deuce! It got some attention this weekend and here's where we're at. I added the orange stripe using electrical tape, secured on the ends with super glue, then coated with future to seal it down. So far it's holding nicely. I've also been trying to wrap up the interior. It's two toned with different shades of primers. I added some piping with orange thread (good lord that was tough). I had a problem with the other side panel and had to strip it and am in the process of repainting it. Once that is done I'll be able to assemble the interior and get this baby wrapped up. Right now the motor is not glued down which makes it sit a little funny. Question for you all: Does the firewall look okay all silver or would it look better painted to match the two-tone of the rest of the car. I'm leaning towards the latter but I'm undecided. Thanks for looking, hoping to have more soon. Cheers.
walt francis Posted March 21, 2011 Posted March 21, 2011 (edited) It's really funny I had to write something about this because in the begining I was saying, Oh here we go again with the rubber band tires on a 32 and by the time I got to the end I was really liking them and what sets off the wheels is the paint just sets them off perfect. Your airbags are top notch "love them" along with your struts, so keep it coming I really want to see the end. Edited March 21, 2011 by walt francis
Skydime Posted March 21, 2011 Posted March 21, 2011 (edited) I think it would look good if you two toned and pinstriped the indented part of the firewall and left the outermost surround the way it is. I think it would give it more depth and detail. Beautiful build. Edited March 21, 2011 by Skydime
speedy5963 Posted March 21, 2011 Posted March 21, 2011 Very nice, like what you did with the suspension, some great ideas here!
Adam144 Posted March 21, 2011 Posted March 21, 2011 I think the firewall looks great as is personally. Nice build.
Recommended Posts
Create an account or sign in to comment
You need to be a member in order to leave a comment
Create an account
Sign up for a new account in our community. It's easy!
Register a new accountSign in
Already have an account? Sign in here.
Sign In Now