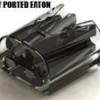
Iron Fist Posted May 6, 2011 Share Posted May 6, 2011 Bought the Round2 68 GT500 kit, its a dog of a kit. First Round2 kit and probably last, but I'm having fun with it. Molded in lime gold, who molds a kit in color. I bought the original AMT kit in 2005, it was molded in grey and I remember the engine and interior detail being poor (like the Round2 kit)but at least there weren't all the flash issues. Well on with the build. Added a stainless steel mesh grill and painted it with decanted Krylon semi gloss black through my AB, I think the mesh scale looks pretty good. Loosely placed in. Detail Engine, added fan from 68 Hemi Now my problem. Testors lacquer clear coat reacted with the Testors black enamel. I did 3 mist coats (waited between each coat and then a wet coat. The finish was like glass then I checked back on it 20 minutes later and this is what I looked like. I'm not too concerned, as I can strip it and repaint but the question is with what? appreciate some input, thanks. Here's the body with 3 mist coats of clear lacquer, I think I will leave it alone and do a final wet coat on Monday as the base coat is not reacting with the lacquer. Thanks for looking. Quote Link to comment Share on other sites More sharing options...
Matt T. Posted May 6, 2011 Share Posted May 6, 2011 I like that grille work! Lacquer over Enamel is usually a no-no, even with Testors. Quote Link to comment Share on other sites More sharing options...
george 53 Posted May 6, 2011 Share Posted May 6, 2011 Justin, NEVER spray a laquer OVER an enamel. it WILL ruin the paint. You CAN spray ENAMEL over laquer but not vise versa. It has to do with chemicals in the paints not being compatable or something like that. One of the guys'll know. Guys? Quote Link to comment Share on other sites More sharing options...
GTMust Posted May 6, 2011 Share Posted May 6, 2011 I have to agree with you on Round2 re-issues as far as quality is concerned. Comparing originals to the re-issues, I find the plastic is not the same guality and there is a lot more flash. But remember, these are mostly 40-50 year old molds. Having said that, they are still very buildable models and, without them, we would be paying exhorbitant prices for the old "Collector" kits of the same thing. Your Mustang is proving that Round2 models are just what the hobby needs to stay alive. I hope they keep re-issuing more of the "Oldies". And I agree with Matt about the grille! Tony Quote Link to comment Share on other sites More sharing options...
Erik Smith Posted May 6, 2011 Share Posted May 6, 2011 Looks great. Engine is very nice. Is the body painted win testors enamel too? Enamel and lacquer don't play well together. Enamel over lacquer is fine, not the other way around though. Quote Link to comment Share on other sites More sharing options...
Iron Fist Posted May 6, 2011 Author Share Posted May 6, 2011 Thanks for the comments guys. I also find the plastic too hard and brittle compared to Revell, but I guess you get what you pay for. The body is also painted with Testors enamel, I'm hoping the 3 clear mist coats will create enough of a barrier to allow a final wet coat. I will try on Sunday or Monday and post my results. Quote Link to comment Share on other sites More sharing options...
Guest Sickfish Posted May 6, 2011 Share Posted May 6, 2011 Justin you've done a great job on the 'Stang The guys are right though, lacquer over enamel is a no no... The Lacquer is "too" hot & re-acts with the cooler enamel. It doesn't matter how many mist coats/full coats of the enamel you lay down, the outcome will be the same So either use enamel for the clear coats or lacquer for the colour too Cheers Cliffo Quote Link to comment Share on other sites More sharing options...
Monty Posted May 6, 2011 Share Posted May 6, 2011 I like where you're going with this so far. The mesh grill is a great touch. Here are a couple other ideas that will make this build stand out. 1) Modelhaus sells the rear tail panel with separate, clear red tail lights. AMT originally made the kit this way, but subsequent issues were changed so that the tail lights were molded in & would need to be painted. 2) Modify or replace the kit's headlights. There are any number of tutorials on how to create more realistic headlights, assuming you don't already know how. I look forward to seeing your progress on this build. Post more pics when you can. Quote Link to comment Share on other sites More sharing options...
Iron Fist Posted May 7, 2011 Author Share Posted May 7, 2011 What do you guys think of using Future as a barrier coat between the enamel and lacquer. I applied it to the body last night, I figure I can always remove it and try an acrylic clear. The hood has been stripped and re-painted. Chassis & Interior are WIP Wheels turned out ok, on the tree they looked pretty bad. Quote Link to comment Share on other sites More sharing options...
rickcaps55 Posted May 7, 2011 Share Posted May 7, 2011 Very nice I am an old Mustang fan I am 58 and have had 8 thrugh the years in fact I am doing a 67 GT convertible I hope to have done by July this year it goes to the body shop in 5 weeks.I did not see any pics of the back.AMT filled in the tail panal and you have to paint the lights in.Missing Link Resin makes the org/tail pannal with the opening for the lights and he gives you the red plastic lights so it looks like the org.I got a couple of sets there nice.Thanks Rick. Quote Link to comment Share on other sites More sharing options...
Nick Notarangelo Posted May 8, 2011 Share Posted May 8, 2011 you know the old amt/mpc/round2 kits yes they can be a challange but if you work them just right you got a nice looking model,besides until we get more intrest in our hobby we take what we can get and stock up on the rest. Quote Link to comment Share on other sites More sharing options...
Iron Fist Posted May 9, 2011 Author Share Posted May 9, 2011 (edited) Thanks for the part recommendations, I was not able to find pictures of the tail lights on the Modelhaus or Missing Ling web site; of someone could post a pic that would be great. Using Future as a barrier coat worked out great, I brushed a thin coat of Future directly on the Testors enamel with the repainted hood, and also applied a thin coat of Future on the body over the 3 mist coats of clear lacquer. I will apply a second wet coat of clear tomorrow night. Pics of first wet coat lacquer over future barrier coat. Edited May 9, 2011 by Iron Fist Quote Link to comment Share on other sites More sharing options...
MADmodelDOCTOR Posted May 11, 2011 Share Posted May 11, 2011 For a crappy kit, you have it looking pretty good. I have the "snakebit" version, funky yellow plastic. I think it was an AMT kit, though. later Quote Link to comment Share on other sites More sharing options...
Iron Fist Posted May 11, 2011 Author Share Posted May 11, 2011 Quick update. Second and final clear wet coat (Did it last night) No wet sanding, polishing or waxing. I think I will post a quick tip in the tutorial section on using Future as a barrier coat for lacquer on enamel, the results are fantastic. Thanks for looking and the compliments. Quote Link to comment Share on other sites More sharing options...
Canuk Posted May 11, 2011 Share Posted May 11, 2011 WOW very nice paint job Quote Link to comment Share on other sites More sharing options...
pharr7226 Posted May 12, 2011 Share Posted May 12, 2011 Using future as a barrier coat was very ingenious and resulted a fantastic result. I would like to see a tutorial and will definitely use your method to apply lacquer over Kustom Kolors (hybrid enamel/lacquer) paints projects. Quote Link to comment Share on other sites More sharing options...
Dr. Cranky Posted May 12, 2011 Share Posted May 12, 2011 That black color looks great! Nice job. Quote Link to comment Share on other sites More sharing options...
Fisher61 Posted May 12, 2011 Share Posted May 12, 2011 Love the smooth black paint! Quote Link to comment Share on other sites More sharing options...
Nate Posted May 12, 2011 Share Posted May 12, 2011 That's so glossy that it still looks wet. Quote Link to comment Share on other sites More sharing options...
Recommended Posts
Join the conversation
You can post now and register later. If you have an account, sign in now to post with your account.
Note: Your post will require moderator approval before it will be visible.