jmpsebring Posted February 13, 2012 Author Share Posted February 13, 2012 Those are acctually Procharger superchargers. Great build, I like it. That's true...These came off a 1/12 renault F1 car. There, with their exhaust side they were turbo's. These will be gear driven superchargers if I can make them look good. Quote Link to comment Share on other sites More sharing options...
jmpsebring Posted February 13, 2012 Author Share Posted February 13, 2012 I know none of this is comp coupe stuff, but I'm having fun trying to see what works and what I want to do next. I figure it's my thread so if I mix things up a little it won't be someone elses thread I'm posting to. I think this Revellution body is 90% promod already. I 'm giving it a little more rake and moving the front wheels back to 112" Quote Link to comment Share on other sites More sharing options...
Romell R Posted February 16, 2012 Share Posted February 16, 2012 Hey Jack Nice job on the build man cant wait to see more progress , one of the builds on your computer screen looks really familure LOL! keep up the good work buddy! Quote Link to comment Share on other sites More sharing options...
jmpsebring Posted February 16, 2012 Author Share Posted February 16, 2012 It's difficult to decide on a subject. I like the idea of a Duster and the plastic body is well molded. I ordered the 41 Willy's and will make that the body or just make it curbside. I don't see myself building a bunch of these with full detail. It's all about space under the Willy's hood and if it will look "bad enough" without a giant PSI and hat sticking out of it. Perhaps I should scratch the gear-drive front superchargers. Plus with some of the bodies, there's very little space between the engine and A-pillars/firewall. I really like the tapered sheet metal depth on some these Pro mods chassis. Your thread has been inspiring for sure!. Quote Link to comment Share on other sites More sharing options...
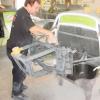
jmpsebring Posted February 17, 2012 Author Share Posted February 17, 2012 (edited) Sorry about the first attempt to post anything from photobucket anywhere. I used a disposible aluminum baking pan to cut panels for the sides and floor of the body. It's a great hi-quality aluminum with a nice grain. Side panels will run from the firewall.. forward past the front of the engine. That's where most of the decals will go. Also have the first primer/ color coat on the plastic part of the frame so it can throughly dry. Next is the new roll bar and little left over things, then another coat of paint over the whole frame. The brass section needs the fuel tank mounting started. The engine has been started, but I'm waiting on parts. Edited February 17, 2012 by jmpsebring Quote Link to comment Share on other sites More sharing options...
eviltwincustoms Posted February 17, 2012 Share Posted February 17, 2012 I know none of this is comp coupe stuff, but I'm having fun trying to see what works and what I want to do next. I figure it's my thread so if I mix things up a little it won't be someone elses thread I'm posting to. I think this Revellution body is 90% promod already. I 'm giving it a little more rake and moving the front wheels back to 112" Jack... Not sure if you are using specific requirements, but most pro mods run the maximum required length as much as possible due to the power they make. Because of this everyone run the 115" center to center. Some will run 112 but not many. I like that duster funny car it almost fits the bill. Just need to adjust the length, nose requirements and you should be good to go. Quote Link to comment Share on other sites More sharing options...
jmpsebring Posted February 17, 2012 Author Share Posted February 17, 2012 Jack... Not sure if you are using specific requirements, but most pro mods run the maximum required length as much as possible due to the power they make. Because of this everyone run the 115" center to center. Some will run 112 but not many. I like that duster funny car it almost fits the bill. Just need to adjust the length, nose requirements and you should be good to go. Thank you !! I kept the front wheel well on the small side so I could adjust them. That also gives me a touch more length between the back of the motor and A-pillar. So if I determine the front wheel center, I can line up the motor with the front of the block/timing gear cover? Quote Link to comment Share on other sites More sharing options...
jmpsebring Posted February 17, 2012 Author Share Posted February 17, 2012 Well...that comes out to 1/16th" . I thought it would be more. I won't have much room in front of the motor either way. Quote Link to comment Share on other sites More sharing options...
jmpsebring Posted February 17, 2012 Author Share Posted February 17, 2012 Why did my writing appear in the middle of my photo ? Quote Link to comment Share on other sites More sharing options...
Pro Tech Posted February 17, 2012 Share Posted February 17, 2012 Hi Jack, build is coming along great. Nice work on the frame and the panels. Charlie Pro Tech Quote Link to comment Share on other sites More sharing options...
jmpsebring Posted February 17, 2012 Author Share Posted February 17, 2012 (edited) Thanks! The frame will look alot tidier I need to FOCUS Would this be a AA/CP? I need someone who knows old school designations. Edited February 17, 2012 by jmpsebring Quote Link to comment Share on other sites More sharing options...
Pro Tech Posted February 17, 2012 Share Posted February 17, 2012 Thanks! The frame will look alot tidier I need to FOCUS Would this be a AA/CP? I need someone who knows old school designations. Jack, I'm not really sure myself. The person you want to ask is John "Old Coyote" he has a thread in "Drag Racing Models" titled Panic AA/FA. I think he ran an altered back in the day and is well versed in classifications. Charlie Pro Tech Quote Link to comment Share on other sites More sharing options...
eviltwincustoms Posted February 17, 2012 Share Posted February 17, 2012 So if I determine the front wheel center, I can line up the motor with the front of the block/timing gear cover? That should roughly put you where you need to be, by doing that. Actually some Pro Mod's do cut into the firewall/windshield for the 16-71 or 18-71 Roots Blower to set back a bit. I would need to check out your reference photo. The other thing is possibly your doors on the FC body are shorter than what they actually would be on a Pro Mod. You can scale these out and check to make sure. Quote Link to comment Share on other sites More sharing options...
jmpsebring Posted February 18, 2012 Author Share Posted February 18, 2012 (edited) I wasn't liking the color. Too bright of a red. It was Zero's Ferrari red. I added a couple drops of purple to darken and shift the color towards a brick red. I think it's an older looking red. Also used a p/e bender to put in a micro edge on the side panels. It's 10x stiffer now. Edited February 18, 2012 by jmpsebring Quote Link to comment Share on other sites More sharing options...
tim boyd Posted February 19, 2012 Share Posted February 19, 2012 (edited) That is a very cool image. It'sototally understandable it would get you back to building drag cars. How could you resist? Love the wheel well work on the body. Some notes on sources for future 1/25 work. Regarding a Bantam body there's are vendors on e-bay I have bought from repeatedly who do fine work and provide an excellent product, thin, clean, etc. Light years ahead of JF and inexpensive. I used one of these Bantam bodies last summer and was quite pleased. Worth keeping an eye out for. My current favorite is gregory23sc. It's all very strange since they seem to offer the same merchandise under different names... Unfortunatekly gregory23sc has nothing on offer at present bit will reappear shortly with a full li neup once again. Bizarre... Here are some pics of mine before it got painted and finished out for my build: (Click on pictures for larger image) Regarding M&H Dragmaster tires the best sources for these are Modelhaus and Replicas & Miniatures Co. of Maryland. Unfortunately delivery time form either of these companies is 6-8 weeks. To make matters worse, Replicas & Miniatures, hands down the finest resin caster on the planet, doesn't even have a web site! And Modelhaus has an excellent site for ordering but it has no images! Replicas & Miniatures can be reached at replmincomd@aol.com . The prorpietor is Norm Veber and he offers a 30+ page catalog that's well worth the $4.00. He offers a large selection of 1/16 scale parts as well. Modelhaus is at http://www.modelhaus.com/ . Look under Parts, Tires, for various offerings. The description for the M&H Racemasters is as follows: T-291 (1959-1962) two Racemaster Drag Slick tires, 8.00-14 size, flexible black resin; Tires; Price : $4.50 But just as nice is the new Parts Pack from AMT under the new owners, Round2, who are creating new tools for all the old AMT tires. There first release is a set of 4 [airs of Racemasters in various sidewall configurations. Generally available at your LHS and online for around $10.00. Here's a pic: I'm looking forward to seeing your build progress and learning more cool techniques... Another excellent source for resin 1960's/ealry 1970's drag slicks is Steve Perry's company, Calnagacastings.com Yes, this is the same Steve Perry who did the FreightTranin on the cover of this month's ModelCars magazine. In his typical fashion, he's modified (accurized) all his resin drag slick masters so they are very accurate. And he keeps a running inventory so he can ship quickly. TIM . I'm really liking all the Comp coupe and roadster model projects shown in this post - keep it up, guys! TIM Edited February 19, 2012 by tim boyd Quote Link to comment Share on other sites More sharing options...
jmpsebring Posted February 19, 2012 Author Share Posted February 19, 2012 Thank You! The jet drives for the ski boats are cool... There were 6 or 7 items that looked like a good value so i ordered them..including the jet drive. Quote Link to comment Share on other sites More sharing options...
Terry Sumner Posted February 20, 2012 Share Posted February 20, 2012 Jack, by any chance was it Dave Mikrut's Comp Coupe that you saw that was your inspiration for this build? Quote Link to comment Share on other sites More sharing options...
jmpsebring Posted February 20, 2012 Author Share Posted February 20, 2012 Jack, by any chance was it Dave Mikrut's Comp Coupe that you saw that was your inspiration for this build? Honestly I don't know who Dave Mikut is..... I saw a photo on Facebook of a comp coupe and it is to blame for my sudden shift back into drag racing models. If I was unable to find good quality aftermarket items, I would not have started anything. The FB photo is earlier in this thread. Quote Link to comment Share on other sites More sharing options...
tim boyd Posted February 21, 2012 Share Posted February 21, 2012 (edited) Thank You! The jet drives for the ski boats are cool... There were 6 or 7 items that looked like a good value so i ordered them..including the jet drive. Jack,,,if you ever build a ski boat with that Jet Drive, please let me know or send pictures! TIM Edited February 21, 2012 by tim boyd Quote Link to comment Share on other sites More sharing options...
jmpsebring Posted March 11, 2012 Author Share Posted March 11, 2012 I need a way to get to the track. The first time I went to a NSRA event, I saw a slammed 39 Ford cab-over ramp truck. Fell in love with them. Started to research and I discovered the White COE truck. I've wanted one ever since. Yesterday It came. This will be a full custom art deco transporter truck of some kind. I only had to raise the fenders 1/8th". I opened up the windscreen and that transformed it. Quote Link to comment Share on other sites More sharing options...
jmpsebring Posted March 11, 2012 Author Share Posted March 11, 2012 (edited) Back to my Sonny's style engine. I glued the heads,flanges,rivets lightly together to set up all the spacing. Used a section of Square tubing to bridge the gap. Also drill some holes for future NOS. Used some rectangular stock spaced by a piece of aluminum stock to ensure they would not stick together'there'. Bridged that gap with a temp piece of tubing to set my width. Used my calipers to ensure the 'top' was level then tacked it in place. Next I cut everything to length then added the front/rear panels, then trimmed everything down. Finally added a top plate making it narrower to create a groove. Soldered my spiral bead wire around to simulate welds. Edited March 11, 2012 by jmpsebring Quote Link to comment Share on other sites More sharing options...
jmpsebring Posted March 11, 2012 Author Share Posted March 11, 2012 The photos for the above.....i'm having trouble ..not sure why http://i1161.photobucket.com/albums/q519/jmpvapb/CIMG6767.jpg Quote Link to comment Share on other sites More sharing options...
Romell R Posted March 11, 2012 Share Posted March 11, 2012 Hey Jack what did you use to make the weld bead around the top if the intake manifold? Looks really good man! Quote Link to comment Share on other sites More sharing options...
jmpsebring Posted March 12, 2012 Author Share Posted March 12, 2012 Romell, it's a product from Beadalon I found in the craft store. It's a copper wire perfectly wrapped with a smaller wire in a spiral configuration. Then it's silver plated. Solders easily. Not cheap @ $11.00 or so. It looks better in person. I'm showing the worse end. If you lightly sand it afterwords, it's even more convincing. It will be used around the intake runners as well. Also found some different gauge wires in different candy colors. Very tough semi-gloss finish. Finally look for the micro bits of tubing in three different sizes. It's so nice to have perfect short lengths of tubing, perfectly square and cheap. Great for standoffs or whatever.... Quote Link to comment Share on other sites More sharing options...
Prostreet Posted March 12, 2012 Share Posted March 12, 2012 Jack, Do you know what size of the beadalon you used by chance? I'm loooking to pick some up. Quote Link to comment Share on other sites More sharing options...
Recommended Posts
Join the conversation
You can post now and register later. If you have an account, sign in now to post with your account.
Note: Your post will require moderator approval before it will be visible.