deadcylinder Posted July 1, 2012 Share Posted July 1, 2012 Great minds work alike....I would first like to thank RacerX very much for the inspiration on my project. I thought, 'What a good idea it would be to build a COPO '69 Camaro! Now where the heck am I going to find Dog Dish center caps, and stock rims?' I searched the web, and stumbled on this site, with RacerX's post on a project under way. There was the answer.'1969 COPO Nova!'... So, to RacerX; Thank you! Your ideas are awesome! My project: 1969 Camaro (COPO 9561, L72 427 pkg.) I have a build sheet in mind for this project, which includes the 9737 option: (140 mph spedometer), U16 option: (Tachometer). This one also has the A01 option, (Sof-Ray tinted glass, all windows). A full build sheet will be added later. I started out with the lynch pin of this project, the Grille. I adopted the idea from RacerX, and dremeled the back of the grille to open it up. It was somewhat labor intensive, and I did have a couple of hiccups doing this, but the repairs were easy. Quote Link to comment Share on other sites More sharing options...
TooOld Posted July 1, 2012 Share Posted July 1, 2012 Great project . Really nice work on the grille . Quote Link to comment Share on other sites More sharing options...
deadcylinder Posted July 1, 2012 Author Share Posted July 1, 2012 The wheels were pulled from the 1969 COPO Nova kit. They're stock rims with Dog Dish center caps, with red wall tires. I distressed the center caps by using a paper towel to knock down the shine. Using a blue sharpie, I filled in the bowtie in the center of each cap, wiping away the excess ink immediately with my fingertip. Using a black sharpie, I blacked out the reliefs on the center caps using the same method. The rims, I scraped the backs right behind the slots on the rims to open them up. They are painted in body color. I scuffed the tire sidewalls, then applied the red wall decals. I detailed the hood underside using the body color. I painted the insulation Flat black. The hood striker is black semi gloss. The body color is spray lacquer. Lacquer dries outside- in, and can be rubbed to remove orange peel and any dust nibs. It was also what was used for paint by GM. Quote Link to comment Share on other sites More sharing options...
mikemodeler Posted July 1, 2012 Share Posted July 1, 2012 Sure, tease us with a couple of pictures...where is the rest of the model?!?!?!?! Looking good so far and should be killer when done. Another way of opening up a grille from behind is to use a sanding stick on the back side- easier to control the speed but harder and slower than using a Dremel. Quote Link to comment Share on other sites More sharing options...
Johan020 Posted July 1, 2012 Share Posted July 1, 2012 The grille is a big tease I will follow this project!! Quote Link to comment Share on other sites More sharing options...
Custom Mike Posted July 2, 2012 Share Posted July 2, 2012 Should be a sweet Camaro Guy, and something you don't see all the time! I'm with Mike on the grille, it's a bit more work, but sanding sticks work great, especially on this grille. I didn't break a single bar when I opened mine up. Now I've got to build the rest of the Camaro to put it in someday.... Quote Link to comment Share on other sites More sharing options...
deadcylinder Posted July 2, 2012 Author Share Posted July 2, 2012 (edited) Thanks guys....Is it me, or are these models getting cheaper? ( I really know the answer to that one).. Finished up the grille work last night. I had to fab my own grille bow tie. It's not too shabby, but I'd love to get a hold of a couple bow ties, so if anyone knows where I could find them, Thanks ahead of time. Chevrolet made the griles in two colors, I believe. Black and chrome. Though, some NOS grilles came with gray sealer only. The chrome grilles came standard on Tuxedo black cars only. They were optional on the rest. The COPO cars came in black, with the bow tie emblem. The headlamp bezels were either black with chrome ring or all chrome. I went with satin black for the grille, and silver for bezel rings. I also swiped the T3 headlamps from the Nova. I built the bow tie emblem from the clear plastic tree's ID tag. It was nice and thin and easy to cut to shape with the exacto knife. I cut a groove, bisecting the piece,then cut the bowtie in two. I then dabbed some glue and reattached the two ends at an angle that matches the pitch on the grille. I shot the piece in blue, then trimmed up the edges in silver, with my stubby 3 hair liner brush. I dry fit the grile on the car....Not too bad. Edited July 2, 2012 by deadcylinder Quote Link to comment Share on other sites More sharing options...
The70judgeman Posted July 2, 2012 Share Posted July 2, 2012 Can't wait to see how this turns out. I've been working on pretty much the same thing myself...only I went the 9560 ZL1 Aluminum block/heads route. Did the steelies from the COPO Nova kit also. Plus I'm going with all the photo-etch too. Quote Link to comment Share on other sites More sharing options...
deadcylinder Posted July 2, 2012 Author Share Posted July 2, 2012 Time for the exterior door handlectomy. I'm addin the nova handles to the Camaro, so out with molded handles....lil' scrapin' lil sandin'...lil' primin'. S'more sandin'...Viola.....gone! Quote Link to comment Share on other sites More sharing options...
deadcylinder Posted July 3, 2012 Author Share Posted July 3, 2012 I have been looking around on this site at 'On the workbench' and 'Under glass'. I am so impressed with the variety, the attention to detail, the craftsmanship and the compliments. This is a great site. I am also intimidated a bit by the quality of work out there. But by saying that, I'm also inspired all the same. So to all watching this project, thank you for your compliments, input and suggestions. They are greatly accepted and appreciated. I spent quite a few years restoring antique cars for a living. I really enjoyed the projects. It didn't matter if I was reconstructing a rotted frame, welding each section piece by piece, standing A-hole high to a girraffe in Black Beauty, blasting an Austin-Healey chasis, painting hundreds of bolts, washers and screws, or sweeping the shop floor. I took it all in! I have been building models since I was 5 years old. My very first model was a 1957 Chevy Nomad. Everyone must know the one I'm talking about. It was the 1/25 Monogram one. Anyways. I found some real pics of the project I have going on. Hopefully the end result is just as good. Let me know what you think, and again, thanks! Quote Link to comment Share on other sites More sharing options...
deadcylinder Posted July 4, 2012 Author Share Posted July 4, 2012 Happy 4th!! Time to put down some Kolschbier, and watch the fireworks in stereo.... Erryone be safe! Quote Link to comment Share on other sites More sharing options...
Casey Posted July 4, 2012 Share Posted July 4, 2012 Nice work on opening up the grille and adding the bowtie emblem. That modification alone makes a huge difference on the Revell 1/25 Camaros. The nice part about replicating a base model COPO is not having to foil (and add) the faux vents on the quarter panels. Nice 1:1, too. Something about the '69 COPO Camaros just clicks. Quote Link to comment Share on other sites More sharing options...
espo Posted July 4, 2012 Share Posted July 4, 2012 NIce build ! On your grill issue, I had a 1:1 '69 Camaro for 18 years, I bought it from the original owner. It was a standard model, nothing fancy about it. The grill was as flat silver color. The '69 Camaros could be had in so many trim leveals that it is hard to tell what was right on it. As I remember the COPO cars were the base model with all the factory hot rod parts they could throw at at. Very good detail work on this. Quote Link to comment Share on other sites More sharing options...
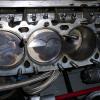
deadcylinder Posted July 5, 2012 Author Share Posted July 5, 2012 Started a lil bit of engine work last night. I'm a little disappointed that I used crappy gloss black and gloss blue from the 'T' brand. Their gloss enamels never cure. But what ever. I did the block, heads and valve covers in Chv. eng. Red. Mixed a touch of tan in with the silver for the intake manifold and carb. The exh manifolds and bell housing were done in silver with a touch of ruddy brown. The gearbox is in black, along with the oil pan. I did the water pump, starter, fuel pump, fan/clutch assy and distributor. In Delco blue. I used some of the tinted silver for the Vac advance on the distributor. The coil and starter solonoid is black. The oil filter is white....This one is getting wires and such later on.Here are some engine pics. Oh, yeah....forgot....I did the firewall too. Quote Link to comment Share on other sites More sharing options...
cobraman Posted July 5, 2012 Share Posted July 5, 2012 Coming along nicely. Quote Link to comment Share on other sites More sharing options...
Albie D Posted July 5, 2012 Share Posted July 5, 2012 Looking good man. Quote Link to comment Share on other sites More sharing options...
catpack68 Posted July 6, 2012 Share Posted July 6, 2012 (edited) very nice work!!! the grill looks great.i'm glad my camaro inspired your project.i am in a bit of a modeling slump,.(work issues and its summer time!!!) but after seeing yours,i might have to finish it up.i messed up the clear coat on my body.keep on going Edited July 7, 2012 by racer X Quote Link to comment Share on other sites More sharing options...
deadcylinder Posted July 6, 2012 Author Share Posted July 6, 2012 Yeah, hopefully you can find the time! That green is awesome. I'm a little apprehensive about painting my body shell. You only get one shot to get it right. I usually shoot a tack coat. Let it flash off, then a nice even slightly wet coat. Flash again, then a good wet coat. While that flashes off I'll hit it with a fog coat to even out the metallics. I use lacquer in a single stage, so afterwards, I rub the finish with a dab of olive oil and baking powder. It seems to make a good rubbing compound, and works good for nibs. It also seems to work well against burn through on edges, sharp angles and corners. After that, a little bee's wax and a small amount of cream of tartar, but I'm sure there's something better. Well, hopefully It all comes out right the next time. You got quite a looker there. Thanks. Quote Link to comment Share on other sites More sharing options...
deadcylinder Posted July 8, 2012 Author Share Posted July 8, 2012 So I figured I would at least add carpeting to this ride. So I looked around for something with the right nap. So after about ten minuites or so I found a shoulder belt pad, you know, one of those velcro things that wrap around the safety belt in a car.... Next was how to adhere the material to the floor pan? It just so happens that when I'm not living it up on the French Riviera, running my TT around Cote D'azure, or chillin' in my mansion in the Hampdens, I fill that time as a commercial roofer. I immediately thought of 3" seam tape. Very thin, and form fitting, adhesive on both sides I figured it would perfect to hold down the carpeting. Especially over the tranny tunnel and foot wells. Just a few snips at certain transitions, to ease the molding process and there it is! A full 1 piece carpet. I dry fitted the interior door panels and dash to check for fit and trim. Not all that awful. Could have been worse. If I did make a mistake, it would have been a nightmare to fix. Quote Link to comment Share on other sites More sharing options...
deadcylinder Posted July 10, 2012 Author Share Posted July 10, 2012 Pluggin away at the interior. Dunno if I should include the center console or not. It's a manual so it's a 4 on the floor for this one. If I omit the center console, gonna need a floor shift trim ring n' stuff...what you guys think? Quote Link to comment Share on other sites More sharing options...
Timeline Posted July 10, 2012 Share Posted July 10, 2012 Looking nice, great progress! Good luck for the rest of it! Quote Link to comment Share on other sites More sharing options...
Gothic Kustomz Posted July 12, 2012 Share Posted July 12, 2012 Not much of a Camaro fan, but I like the detail you have put into this, is this the same package as the Yenko, 427?, nice detail man....... Quote Link to comment Share on other sites More sharing options...
bryan_m Posted July 13, 2012 Share Posted July 13, 2012 the Yenko dealership is(was) right near where i live.........unfortunately they sell hondas or some dang thing now..... heres a wikipedia link: http://en.wikipedia.org/wiki/Yenko_Chevrolet cheers bryan Quote Link to comment Share on other sites More sharing options...
chris_thobe Posted July 13, 2012 Share Posted July 13, 2012 Looks good! Nice touch. Quote Link to comment Share on other sites More sharing options...
The70judgeman Posted July 13, 2012 Share Posted July 13, 2012 Pluggin away at the interior. Dunno if I should include the center console or not. It's a manual so it's a 4 on the floor for this one. If I omit the center console, gonna need a floor shift trim ring n' stuff...what you guys think? It's an option, or in your case, to not put it in...it's your model. A simple trim ring would do. Also...some aftermarket gauges might be in order to hang under the dash. You know, the ones to monitor the engine vitals "old school' style. If I'm not mistaken, there are four gauges in the console ahead of the shifter. After all, what I think you're going for is to lighten up the car, and the console was dead weight. Personally, I like the console, but that's just me, and I'm not telling you how to build your model. Just giving you an idea to use I guess. Either way you go, you're doing a heck of a job on this one. I need to get going on my Camaro again since I have some inspiration now. Quote Link to comment Share on other sites More sharing options...
Recommended Posts
Join the conversation
You can post now and register later. If you have an account, sign in now to post with your account.
Note: Your post will require moderator approval before it will be visible.