Ace-Garageguy Posted August 6, 2012 Posted August 6, 2012 I don't think anyone's mentioned this on this particular thread yet, but the shape of the corners of the front fenders under the headlights is REALLY REALLY WRONG on this kit and the '48 fastback. It's way too square a corner, and if you look at pictures of the 1:1 stock car, you'll see exactly what I mean. If it's not corrected, the vehicle just doesn't look right. It was probably a liberty taken to simplify tooling somewhat, as there is a mold parting-line at the corner. Since you're going to so much trouble opening the doors, etc, it would be a shame to let the front fenders slide.
stulee11 Posted August 6, 2012 Author Posted August 6, 2012 I don't think anyone's mentioned this on this particular thread yet, but the shape of the corners of the front fenders under the headlights is REALLY REALLY WRONG on this kit and the '48 fastback. It's way too square a corner, and if you look at pictures of the 1:1 stock car, you'll see exactly what I mean. If it's not corrected, the vehicle just doesn't look right. It was probably a liberty taken to simplify tooling somewhat, as there is a mold parting-line at the corner. Since you're going to so much trouble opening the doors, etc, it would be a shame to let the front fenders slide. thanks for the heads up... by wrong do you mean that the corners are to sharp and need smoothing ???? or if anyone could upload or discribe what it is that is wrong i would be highly thankful... thanks again stu:)
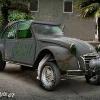
Ace-Garageguy Posted August 7, 2012 Posted August 7, 2012 Yes Stu, the corners are too sharp and need rounding. The front of the model is nearly flat, and goes to square corners. The front fender corners of the real car are more rounded, MUCH more rounded. click this: http://www.google.com/search?q=48+chevrolet&hl=en&safe=off&rlz=1C1NNVC_enUS493US493&prmd=imvns&source=lnms&tbm=isch&sa=X&ei=91ogUJrgJYyg8QSO8IDwDg&ved=0CEAQ_AUoAQ&biw=1600&bih=809
stulee11 Posted August 7, 2012 Author Posted August 7, 2012 hi there back again ... @ Ace-Garageguy. does this look any better ?? i no you cnt really see it but i have reshaped the front fender corners to give her the more 1:1 look. hope you all like her so far thanks for all the advice and comments thus far see yall soon with some more thanks stu
stulee11 Posted August 8, 2012 Author Posted August 8, 2012 hi there all back again with a little update body has had its coat of guide primer and had a little rub down... she has been put in full primer now will take pics tomoz.. did hope to get a bit more done on her but due to having my to little boys today they took up the day lol... aint we a good looking lot love um. well be back tomoz with some more pics. hope you all like her so far. yall come back ya hear. thanks stu
Dr. Cranky Posted August 8, 2012 Posted August 8, 2012 You are making some excellent progress. Keep it going.
stulee11 Posted August 9, 2012 Author Posted August 9, 2012 hi all back again but this time with some colour lol.. it still needs wet sanding and stuff before decals and clear coat but this is the colour... my youngest boy choose this colour. and my eldest boy choose the colour for my next model. hope you all like the colour and overall way this is coming along. see yall soon with some more thanks stu
stulee11 Posted August 10, 2012 Author Posted August 10, 2012 hi all back again but this time i got the clear all buttoned up.. close up of the colour better pic of the overall shine this part is getting me a little worried now. as the shine i have got is far better then i expected and now its come to the polishing part i dont want to wreck her... so any advise, tips, hints or any help with regards to the polishing would be much appreciated... thanks for looking stu
cavemanx Posted August 10, 2012 Posted August 10, 2012 This looks like a great build an yeah, I would glue it to the cowl below the windshield, and maybe put some supports under it.
cavemanx Posted August 10, 2012 Posted August 10, 2012 This looks like a great build an yeah, I would glue it to the cowl below the windshield, and maybe put some supports under it. Didn't notice, but i mayb be a bit off on that timing... failure?
stulee11 Posted August 10, 2012 Author Posted August 10, 2012 Didn't notice, but i mayb be a bit off on that timing... failure? Hey buddy... what do u mean by a bit off on that timing ??? Thanks for the compliment tho
Ace-Garageguy Posted August 11, 2012 Posted August 11, 2012 Looking great. That's some seriously slick paint, and nice job on those fender corners.
W-409 Posted August 12, 2012 Posted August 12, 2012 Great project! This is one kit what I'd like to build too. You're doing great job with it, nice bodywork and excellent paint job too. this part is getting me a little worried now. as the shine i have got is far better then i expected and now its come to the polishing part i dont want to wreck her... That's what I think everytime when I start polishing, but then I just start the polishing and hope that everything goes alright. I haven't failed polishing yet, so it can't be that difficult.
stulee11 Posted August 15, 2012 Author Posted August 15, 2012 hey there folks got a fair bit done on this beauty first off got the engine all done started work on the chassis did a little bit on the dash
stulee11 Posted August 15, 2012 Author Posted August 15, 2012 few more got the body all wet sanded and polished up its only in doors lighting so will take a better pic tomoz if the suns out lol... finally i was going to put some custom wheels on but wen i tried to fit them they was to big for the shell so they will go on another one... but i got the box stock wheels all painted up body colour but i can't decide what ones i like better... so please can yall tell me what ones you think are better lol thanks for looking in... be back soon with some more thanks stu
GerN Posted August 15, 2012 Posted August 15, 2012 Very nice engine. I need to look at this in the raw plastic in my unbuilt kit. Good work.
Olskoolrodder Posted August 16, 2012 Posted August 16, 2012 WOW that shine is a mile deep,nicely sprayed,kool kolor Engine,wheels,all look great!
stulee11 Posted August 16, 2012 Author Posted August 16, 2012 hi all not much done so far today. but i have took some better pics looks alot better outside will be back later with more thanks stu
stulee11 Posted August 17, 2012 Author Posted August 17, 2012 hi all did a fair bit on her today and last night.. had a little problem with the top radiator hose it was to short so i made a new one.. here it is put on... and as you can see she is nearly in a rolling chassis.. i did try to do some "washing" on it not sure if it looks ok or not but i'm sure you guys will let me know lol
Recommended Posts
Create an account or sign in to comment
You need to be a member in order to leave a comment
Create an account
Sign up for a new account in our community. It's easy!
Register a new accountSign in
Already have an account? Sign in here.
Sign In Now