streetmachine11 Posted August 19, 2012 Posted August 19, 2012 (edited) started this project today. got this kit from my club for 2 bucks. it was a paint bomb lol but after the dip in purple power here is what i had started with.... got as far as opening up the doors and trunk and thinned down all the parts. also made the door jambs and trunk ledge. and a quick mock up. note: it just setting together still need to make the jamb on the door side and the hinges for the doors and trunk. also gonna atempt latches and strikers for the hood, doors and trunk. overall made some pretty decent progress today comments and ideas welcome! thanks for looking jason Edited July 17, 2013 by streetmachine11
slusher Posted August 19, 2012 Posted August 19, 2012 Cool project, real nice start. l am a big fan of the 49 ford...
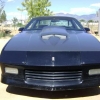
Jantrix Posted August 19, 2012 Posted August 19, 2012 (edited) I'm also building this one. If you want to get the rear down you are going to have to add blocks between the springs and the axle, or else it has a wicked rake. This is the unmodified stance. Edited August 19, 2012 by Jantrix
Dr. Cranky Posted August 19, 2012 Posted August 19, 2012 That's looking fantastic, keep it going, please.
cobraman Posted August 19, 2012 Posted August 19, 2012 Looking very nice. Built some of these when I was a youngster. I think it may be time for another.
jdcar32 Posted August 19, 2012 Posted August 19, 2012 (edited) Heres a shot of a '49 I did with the doors carved open. The kit parts are pretty thin making for easier door opening. Like the stance on yours, and I like the green steelies too. Edited August 19, 2012 by jdcar32
62rebel Posted August 19, 2012 Posted August 19, 2012 kudos for opening the doors but that's only half of the job. the doors are roughly the same thickness almost from the door handle down, not the full width of the space between the tub and body. i've done one with opening doors and trunk and you can separate the sides of the tub from the floor, fill the gap and get more scale appearing doors with not much more effort than you have so far. opening the doors on kits with "tub" interiors usually results in problems with door/quarter thickness due to the draft needed for molding the tub. the AMT '49 is one of the kits i've built many, MANY times... love it. easy to work with and modify.
Deathgoblin Posted August 19, 2012 Posted August 19, 2012 Great job so far! Keep it up. I liked the rake on the test fits.
streetmachine11 Posted August 19, 2012 Author Posted August 19, 2012 kudos for opening the doors but that's only half of the job. the doors are roughly the same thickness almost from the door handle down, not the full width of the space between the tub and body. i've done one with opening doors and trunk and you can separate the sides of the tub from the floor, fill the gap and get more scale appearing doors with not much more effort than you have so far. opening the doors on kits with "tub" interiors usually results in problems with door/quarter thickness due to the draft needed for molding the tub. the AMT '49 is one of the kits i've built many, MANY times... love it. easy to work with and modify. if you widen the interior tub to make the door jambs more realistic, did you have to widen the rear seat to match the interior tub? thanks for the tip! jason
streetmachine11 Posted August 19, 2012 Author Posted August 19, 2012 thanks for all the feedback everyone! i have got a few small things done today. mostly been working on the trunk getting the inner bracing, latch and striker done. rob, thanks for the tip on the rear axle. doing that may get me the look im going for. yours looks killer with the shaved parts man jhon, i really like the looks of your ride. verry clean and well done. also like that door latch
62rebel Posted August 20, 2012 Posted August 20, 2012 you have to add small wedges to the rear seat bottom edge. replace the front seat with a reworked Lindberg '53 Ford unit, or make side panels that widen the base of the seat from the kit. the actual 1:1 seat tapers inward towards the top, instead of widening as the kit seat does. there's virtually no inner structure in the trunk, so closing the top of the fuel tank and adding a trunk mat will do the trick there. making accurate '49-'50 trunk hinges will be difficult, as they're mounted on the surface. i built mine as a '51 so internal hinges work out. sealing the floorpan to the body once you're done will duplicate the way the actual body looks on the frame, oddly enough... i built mine with the floorpan in place and cut the transmission crossmember loose so i could install the engine after the body was painted. i've found that i should add two small pieces under the rear quarters to represent the rear body braces from working on my 1:1 shoebox.... actually, if i wanted to go nuts i could add dozens of little details that AMT left out in '62.....
Brian_B Posted August 20, 2012 Posted August 20, 2012 (edited) Hello, I have one of these kits ordered. I have not touched a model since I was a kid. I will be watching your build with interest. 62rebel..do you have a link to pics of your build? Edited August 20, 2012 by Brian_B
streetmachine11 Posted August 20, 2012 Author Posted August 20, 2012 you have to add small wedges to the rear seat bottom edge. replace the front seat with a reworked Lindberg '53 Ford unit, or make side panels that widen the base of the seat from the kit. the actual 1:1 seat tapers inward towards the top, instead of widening as the kit seat does. there's virtually no inner structure in the trunk, so closing the top of the fuel tank and adding a trunk mat will do the trick there. making accurate '49-'50 trunk hinges will be difficult, as they're mounted on the surface. i built mine as a '51 so internal hinges work out. sealing the floorpan to the body once you're done will duplicate the way the actual body looks on the frame, oddly enough... i built mine with the floorpan in place and cut the transmission crossmember loose so i could install the engine after the body was painted. i've found that i should add two small pieces under the rear quarters to represent the rear body braces from working on my 1:1 shoebox.... actually, if i wanted to go nuts i could add dozens of little details that AMT left out in '62..... 62rebel, thanks for all the information on the 49. i am going to wedge the tub and get the jambs thinned down. i think i might use some bucket seats for this rod and i have plated over the gas tank and spare tire holder as the spare will be moved to a differnt area. the hinges on the trunk are shaved so ill make a more traditional hinge. jason
streetmachine11 Posted August 20, 2012 Author Posted August 20, 2012 hello everyone got a small update... got the inner structure done... the new floor pan the trunk hinges and the latch.. thanks for looking comments and ideas welcome! jason
rmvw guy Posted August 23, 2012 Posted August 23, 2012 You are making this look too easy! I also love this kit, having opened the doors and trunk on one I know it's not an easy task but, fun. The end result on yours will be killer, I can tell by the amount of detail so far. The inner structure on the trunk lid looks spot on. I'll be watching!
59 Impala Posted August 23, 2012 Posted August 23, 2012 I like where you're going with this build Jason. It looks great so far. One question fer ya, are you going to cut open a wheel well for the spare tire or just going to leave the trunk floor flat with no well? Just curious. Dan
Mark R Posted August 23, 2012 Posted August 23, 2012 Don't know what color you're thinkin' but those green steelies with the white walls look sweet !
streetmachine11 Posted August 24, 2012 Author Posted August 24, 2012 thanks everyone for all the kind words! im really enjoying this kit. dan, originally i was going to lay the spare down flat between the wheel tubs. but now i thhink i may have found a tire that fits the original location. if it does, i will open that back up. mark, the green on the steelies is the color the car will be. the color itself is what inspired the build in the first place! lol ive had the kit for a while but never knew what to do with it. when i came across that green for some reason this kit and some wide whites were the first thing to pop in my head thanks again and comments/ideas are always welcome! jason
streetmachine11 Posted August 27, 2012 Author Posted August 27, 2012 been making some good progress on this one. got the interior tub cut and widened to fix the door jambs door jambs finished and primered body sanded and primered firewall and inner fenders sanded smooth and shaved got the stance finalized. and some mock up shots radiator support smoothed as well thanks for looking.... comments welcome jason
streetmachine11 Posted August 27, 2012 Author Posted August 27, 2012 and some more mock up shots... thanks... jason
Recommended Posts
Create an account or sign in to comment
You need to be a member in order to leave a comment
Create an account
Sign up for a new account in our community. It's easy!
Register a new accountSign in
Already have an account? Sign in here.
Sign In Now