Turbo590 Posted September 30, 2007 Posted September 30, 2007 (edited) 9-30-07 Well Guys.... Pictures of the completed cab and chassis as promised. Put the front bumper on at 1:30 this morning. Just a few more little things..like additional plumbing under the hood..Yes the hood does tilt..open fully..CB antenna's for the mirrors..and then to the dump body..which goes back to the work table next week... I estimate another 2-4 weeks for the completed truck..Enjoy !! She's been going together pretty easily now..Check out the rear window (CAT Window Tint) decal.... Any and all comments welcomed. Thank you, Kurt McLucas Edited October 20, 2007 by Turbo590
mackinac359 Posted September 30, 2007 Posted September 30, 2007 STUNNING !!!! Just beautiful. Nothing like raising the bar several notches ! Tim
Albert Moore Posted September 30, 2007 Posted September 30, 2007 Awesome, just awesome! I can't wait to see it with the dump box now. Cheers, Albert
chuckyr Posted September 30, 2007 Posted September 30, 2007 Looks as if you spent a not so small fortune on after market items on this model. Did you strip the kit fuel and hydraulic tanks, sand the seams and spray them with Alclad? Was the rear cab panel the KFS aftermarket part? Looks like the Clint Freeman air breather kit. Excellent paint. Nice choices and execution.
Turbo590 Posted September 30, 2007 Author Posted September 30, 2007 Dear chuckyr, The fuel tanks and the hydraulic tank are all scratch built, taking the orginal tanks, shorten them, filling/sanding the seams..then airbrushing them with Alclad II (polished aluminum) then adding the appropriate decals. The tank steps are from the Pete Can-Do wrecker...and yes, I have a small fortune in it...long story. The air cleaners are solid turned aluminum from Jamie@ Mo'Luminum..along with the tires..the rear cab panel was one of many custom scratch built parts..Dupont ChromaBase paint for the two tone. Hopefully the dump body will be done here shortly..and all will come together nicely. This was my second build in about a year and a half. Thank you to all so far for the positive comments and feedback. Kurt McLucas
jackhammer Posted October 1, 2007 Posted October 1, 2007 Were are the keys ill drive it home just like it is.lol Nice work!!!!!
Casey429 Posted October 1, 2007 Posted October 1, 2007 Nice work Kurt! That's definitley a dead ringer for a Western PA-spec truck. As a matter of fact, theres a truck running arond here painted just like that one, only it's nowhere near as nice or clean as yours (it's pretty well beat).
Old Albion Posted October 2, 2007 Posted October 2, 2007 Kurt, Very Impressive, great details and nice colour scheme. Look forward to seeing the finished beast!! Good Luck with the rest of it.
rottin1 Posted October 3, 2007 Posted October 3, 2007 One word, WOW!!!!!!!! Awesome job. Like Tim said: Definetly raised the bar on this one!! Looks better than most real trucks!!!
ewaskew Posted October 7, 2007 Posted October 7, 2007 That is a very well built truck, Top of the line in my opinion
rottin1 Posted October 8, 2007 Posted October 8, 2007 Kurt: Exactly what all parts did you use the Alclade on? Just the tanks? I really like the way that stuff looks! I was just curious if you had done the front bumper as well. I still can't get over the WOW factor on this one. Unbelievable!!
Turbo590 Posted October 8, 2007 Author Posted October 8, 2007 Johnny, I used Alclad II on everything.... By stripping all of the factory chrome, I can debur everything, fill and sand in all the seams..etc. It is not that hard to use. Just a "little" expensive..the look, if done correctly..is fantastic. It is air-brushed on. Polished Aluminum on the tanks/hydraulic tank/tool box/battery box/wheels (rims) and the soon to be dump body. Chrome on the Grille/headlight assembly/bumper/bumper poles/mirrors/sun-visor/bullet lights/engine fan Solid metal on the airhorns and the air breathers.. I hate to paint..Alclad makes it fun for me..you really see the results up front and fast. Thank you to all once again for the great comments and feedback...Happy modeling to all. Kurt McLucas
rottin1 Posted October 8, 2007 Posted October 8, 2007 Kurt: Thanks for the reply. After seeing your outcome with this stuff, I'm going to have to break out the airbrush and try it. My buddy has some, but he doesn't have an airbrush and we're dying to try it so I guess i'm the guinea pig! Thanks again Kurt!
Turbo590 Posted October 8, 2007 Author Posted October 8, 2007 Guys... I wanted to post a few pictures here of the finished Caterpillar 3406E engine..that was also talked about in another thread here...Just added the oil..and she fired up..first try. I just finished plumbing the the air intake(s) from the engine to the radiator..just need to put some "clamps" on them. It is real aluminum tubing..polished up..real fun to bend..I think they turned out alright... Also are some pictures of the 19 1/2' Ti-Brook Dump bed..in the process of getting the Alclad II polished aluminum finish coat... Thank you, Kurt McLucas Next update...The darn thing will be finished..so the wife wishes.....
Aaronw Posted October 9, 2007 Posted October 9, 2007 Wow, that is spectacular. The colors are great and I've seen Alclad used by the aircraft guys but had no idea it would work so well on a truck, the fuel tanks look like the real aluminium. Great job.
kwtrucker Posted October 9, 2007 Posted October 9, 2007 Kurt, Your Pete 357 looks outstanding. I love those aftermarket floatation tires and wheels. They are light years ahead in detail to the Italeri kit wheels. Looking forward to seeing the Pete completed.
Old Albion Posted October 13, 2007 Posted October 13, 2007 Kurt, This is one of those builds that I keep looking out for the next update. Superb!!! not much more I can say. Really am looking forward to seeing the beast finished. Good Luck with the rest of the build.
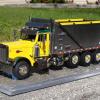
Turbo590 Posted October 20, 2007 Author Posted October 20, 2007 Finally..... The much anticipated moment is here... Other than 1 more bumper antenna to attach...I can call it finished. Thank you to everyone who posted all the great comments and feedback throughout the build. She has had her challenges/major set-backs/ etc...not 100% perfect..but I think it turned out A-OK. The wife and kids love having the bottom half of the dining room table back... Starting to lineup the next project to be started in Feb 08....Happy modeling to all Kurt McLucas
Old Albion Posted October 20, 2007 Posted October 20, 2007 Wow!! Kurt, Superb, great truck, great detail, great ideas, magnificant build. This was worth waiting for.Thanks for sharing it with us. Best Wishes and good luck with the next truck.
Semi Trailer Mechanic Posted October 20, 2007 Posted October 20, 2007 What's goin' on... WELL DONE!!!
Jim B Posted October 20, 2007 Posted October 20, 2007 Think it turned out ok!?! That truck is amazing! I love your attnetion to detail, the frame & engine labels, the Alclad. It's great.
lonewolf Posted October 20, 2007 Posted October 20, 2007 Kurt, That is without a doubt the most incredible truck build I have ever seen! Gentlemen, the bar has definately been raised, probably higher than I'll ever be able to reach. SWEET!!!
mackinac359 Posted October 20, 2007 Posted October 20, 2007 Since we aren't allowed to use cuss words on the board, I'll just say FANTASTIC ! Stunning and well done ! Tim
Recommended Posts
Create an account or sign in to comment
You need to be a member in order to leave a comment
Create an account
Sign up for a new account in our community. It's easy!
Register a new accountSign in
Already have an account? Sign in here.
Sign In Now